1996 Lexus LS400 Stereo Install - Wiring Info + Diagrams
 12-11-08, 06:08 PM
#1
Driver School Candidate
Thread Starter

Hello Community:
Recently I bought a CD/DVD/GPS Radio for my car. I thought it would be a simple task, go grab an install kit, and a harness.... nope. I searched everywhere for solutions and read thread after thread trying to figure out what to do!
After 2 days of research and analysis I have came to what I think is a proper way of installing an aftermarket radio into a 1996 Ls 400. I have a lot of information here so lets start....
First off my original specs:
1996 LS400
Original Lexus Deck (Tape Player) Made by Pioneer Electronics.
Lexus Amplifier (Located under passenger seat)
7 speakers total
-Sub
-All four doors
-2 tweeters in Front doors
The way the speakers run in the 96 are similar to the other generations. The tweeter comes off of the front door speakers. The speakers in the door are Pioneer 2 Ohm speakers, which should sound fine in any aftermarket deck.
In order to remove your old deck:
GOOD GOOD... now you got the stereo out, congrats with the easy part!
Now install your deck into its install kit. I used one from Metra model #99-8153. This is a single din install kit. You will actually install your A/C unit into this kit. It works well and replaces the entire factory bracket and fits snug into place for a secure holding.
Power the new deck:
In order to get power into your new deck you will want to splice into the factory plug near the deck. I supplied from plug R 3C upfront. If you observe the plugs you will see one of the gray plugs that has 14 pin slots but only 10 to 12 wires used ( plugs normally are labeled with factory imprint). This plug has a Lavender wire with a Yellow stripe. It is pin No. 1 and this can be your hot wire. You may use Pin No. 14 which is Brown for your ground(Ground 2) from the same plug.
More Information about this Procedure:
Unfortunately you can not use your SUB anymore after this. I have read ways to, but I feel they are a waste because this procedure by-passes the amp so it is pre-amp, honestly how many watts is your deck.
Your going to use wiring diagrams in order to run wires directly from your deck to the speaker wiring junction where the amp is located and connect hardwire them before they enter the amp. This is easier then running all new wires I feel, and takes advantage of the already installed factory wire.
The wiring diagram is listed at the bottom of this post. It is called If1rap96.pdf (You need a pdf reader to view it. Adobe is free but bloatware I suggest Foxit PDF reader its fast, free, and has less ware on your processor.
In order to access your amp....
If its under the seat go to passenger rear door and look down, you will see a plastic molding at the edge of the seat (Move the seat all the way forward up right) The molding has two squares on it, remove these with a pry tool and remove the two Phillips screws. Now the amp wiring is exposed.
CONGRATS.
1996 Lexus LS400 Amplifire Wiring Information
What you see here is 4 plugs pictured below

These are the four plugs pictured from left to right when you expose the amp plugs.
Connector Plugs Descriptions:
S10 B: White
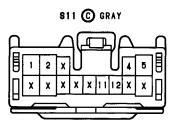
S11 C: Gray
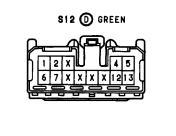
S12 D: Green
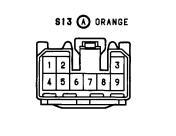
S13 A: Orange
Connector Pin Assignments:
Warning: These pins are my interpretation of the diagram. Please view and double check all information.
Pins:
1- Brown/Black - Ground
2- N/A
3- White - Front Right +
4- Red - Rear Left +
5- Yellow – Rear Right -
6- Pink/Blue – Amp +
7- Black - Beep
8- Red- Front Right -
9- White – front Left -
10- Black – Front Left +
11- Shielded - Signal Ground 1 (goes to CD/Radio Player)
12- Brown/Red Signal Ground 2 (goes to CD/Radio Player)
13- Green – Rear Left -
14- Green – Rear Right –
Pins:
1- Light Green/Black – Woofer + (WOOFER POSITIVE)
2- Light Green / Red – Woofer – (WOOFER NEGATIVE)
3- N/A
4- Brown/Yellow – Signal Ground 4 (to Disc changer)
5- Brown/White – Ground2 (to disc changer)
6- N/A
7- N/A
8- N/A
9- N/A
10- N/A
11- Light Green – CAP+ (to disc changer)
12- Violet – CAP – (to disc changer)
13- N/A
14- N/A
1- Light Green – Front Right + (RIGHT FRONT SPEAKER)
2- Pink – Front Left + (LEFT FRONT SPEAKER)
3- N/A
4- Red – Rear Right + (Rear Door)(RIGHT REAR DOOR SPEAKER)
5- Black – RL+ to Telephone (Rear Door)(LEFT REAR DOOR SPEAKER)
6- Light Blue? – Front Right –(RIGHT FRONT SPEAKER)
7- Violet – Front Left – (LEFT FRONT SPEAKER)
8- N/A
9- N/A
10- N/A
11- N/A
12- White – Rear Right –(Rear Door)(RIGHT REAR DOOR)
13- Yellow – Right Left Negative (Rear Door) (LEFT REAR DOOR)
Pins:
1- Brown – Ground 4 (to CD Player)
2- Lavender/Yellow +B1 (to CD changer) Radio No. 1 fuse 20A
3- Shielded – Signal Ground 3 (to CD Player)
4- Brown – Ground 5 (to CD Player)
5- Lavender/Yellow –B2 (to CD player)
6- Gray – ACC1 – Radio No. 2 fuse (7.5A)
7- Light Blue – Mute (to CD Player)
8- White – HAP - (to CD Player)
9- Black – HAP + (to CD Player)
In order to run the deck preamp your going to splice into sets of wires on this amp. warning this is a long task be prepared. I bought some small suitable gauge wire from the store and went to work measuring the length I need and a little more for room to work with. The main wires you want to focus on are listed in order below.
The main plug you work with is the GREEN plug S12-D.
(You will notice positive and negative are vertically flush)
Left Front
Positive: Pink/Pin 2
Negative: Violet/Pin 7
Right Front
Positive: Light Green/Pin 1
Negative: Light Blue/Pin 6
Left Rear
Positive: Black/Pin 5
Negative: Yellow/Pin 13
Right Rear
Positive: Red/Pin 4
Negative: White/Pin 12
These are your speakers you will need to hardwire directly to your new unit. Remember to work around your seat position rail when installing the wires. I did not go beneath carpet for my install but, I had minimal wire appearance. I went directly from my amp location, underneath my seat rail, to the mid-console, to the din.
Note: The door speakers in this Lexus factory are also 3 holed speakers, inside of a custom speaker din designed by Lexus. Be sure to check measurements before ordering speakers. Max size should be 5.25". Max depth I would guess 3 to 4.5" tops.
Wiring Diagrams (pdf format)-
Wiring Diagrams-
Radio/CD Changer/Amp: http://www.mediafire.com/file/n2ygzzmzf53/lf1rap96.pdf
Antenna: http://www.mediafire.com/file/zn3jmijmujm/antenna.pdf
Telephone (If needed): http://www.mediafire.com/file/21hoo1hlyha/telephone.pdf
Recently I bought a CD/DVD/GPS Radio for my car. I thought it would be a simple task, go grab an install kit, and a harness.... nope. I searched everywhere for solutions and read thread after thread trying to figure out what to do!
After 2 days of research and analysis I have came to what I think is a proper way of installing an aftermarket radio into a 1996 Ls 400. I have a lot of information here so lets start....
First off my original specs:
1996 LS400
Original Lexus Deck (Tape Player) Made by Pioneer Electronics.
Lexus Amplifier (Located under passenger seat)
7 speakers total
-Sub
-All four doors
-2 tweeters in Front doors
The way the speakers run in the 96 are similar to the other generations. The tweeter comes off of the front door speakers. The speakers in the door are Pioneer 2 Ohm speakers, which should sound fine in any aftermarket deck.
In order to remove your old deck:
- Start by prying on the backside of the shifting panel to loosen the two back clips (near the cup holder, spring it secure).
- Lift on the rear of the panel to release the two mid clips near the mid of the panel.
- Place the car in Low gear(1) and apply E-Brake.
- Pull the panel with ashtray towards you (back) in order to free the top clips.
- Disconnect the clips and remove (Hey clean while your in there!
 )
) - Remove the vents/clock/temp gauge by inserting a thin pry tool at the
- lower edge and pulling out one side then the other.
- Disconnect connectors and remove vent and controls.
- Remove two exposed screws from top of AC control bracket.
- Remove two exposed screws from below car stereo. (not the small ones the ones the same mm size)
- Pull car stereo and AC control forward.
- Disconnect all connectors from AC control and car stereo along with antenna.
GOOD GOOD... now you got the stereo out, congrats with the easy part!
Now install your deck into its install kit. I used one from Metra model #99-8153. This is a single din install kit. You will actually install your A/C unit into this kit. It works well and replaces the entire factory bracket and fits snug into place for a secure holding.
Power the new deck:
In order to get power into your new deck you will want to splice into the factory plug near the deck. I supplied from plug R 3C upfront. If you observe the plugs you will see one of the gray plugs that has 14 pin slots but only 10 to 12 wires used ( plugs normally are labeled with factory imprint). This plug has a Lavender wire with a Yellow stripe. It is pin No. 1 and this can be your hot wire. You may use Pin No. 14 which is Brown for your ground(Ground 2) from the same plug.
More Information about this Procedure:
Unfortunately you can not use your SUB anymore after this. I have read ways to, but I feel they are a waste because this procedure by-passes the amp so it is pre-amp, honestly how many watts is your deck.
Your going to use wiring diagrams in order to run wires directly from your deck to the speaker wiring junction where the amp is located and connect hardwire them before they enter the amp. This is easier then running all new wires I feel, and takes advantage of the already installed factory wire.
The wiring diagram is listed at the bottom of this post. It is called If1rap96.pdf (You need a pdf reader to view it. Adobe is free but bloatware I suggest Foxit PDF reader its fast, free, and has less ware on your processor.
In order to access your amp....
If its under the seat go to passenger rear door and look down, you will see a plastic molding at the edge of the seat (Move the seat all the way forward up right) The molding has two squares on it, remove these with a pry tool and remove the two Phillips screws. Now the amp wiring is exposed.
CONGRATS.
1996 Lexus LS400 Amplifire Wiring Information
What you see here is 4 plugs pictured below
These are the four plugs pictured from left to right when you expose the amp plugs.
Connector Plugs Descriptions:
S10 B: White
S11 C: Gray
S12 D: Green
S13 A: Orange
Connector Pin Assignments:
Warning: These pins are my interpretation of the diagram. Please view and double check all information.
Pins:
1- Brown/Black - Ground
2- N/A
3- White - Front Right +
4- Red - Rear Left +
5- Yellow – Rear Right -
6- Pink/Blue – Amp +
7- Black - Beep
8- Red- Front Right -
9- White – front Left -
10- Black – Front Left +
11- Shielded - Signal Ground 1 (goes to CD/Radio Player)
12- Brown/Red Signal Ground 2 (goes to CD/Radio Player)
13- Green – Rear Left -
14- Green – Rear Right –
Pins:
1- Light Green/Black – Woofer + (WOOFER POSITIVE)
2- Light Green / Red – Woofer – (WOOFER NEGATIVE)
3- N/A
4- Brown/Yellow – Signal Ground 4 (to Disc changer)
5- Brown/White – Ground2 (to disc changer)
6- N/A
7- N/A
8- N/A
9- N/A
10- N/A
11- Light Green – CAP+ (to disc changer)
12- Violet – CAP – (to disc changer)
13- N/A
14- N/A
1- Light Green – Front Right + (RIGHT FRONT SPEAKER)
2- Pink – Front Left + (LEFT FRONT SPEAKER)
3- N/A
4- Red – Rear Right + (Rear Door)(RIGHT REAR DOOR SPEAKER)
5- Black – RL+ to Telephone (Rear Door)(LEFT REAR DOOR SPEAKER)
6- Light Blue? – Front Right –(RIGHT FRONT SPEAKER)
7- Violet – Front Left – (LEFT FRONT SPEAKER)
8- N/A
9- N/A
10- N/A
11- N/A
12- White – Rear Right –(Rear Door)(RIGHT REAR DOOR)
13- Yellow – Right Left Negative (Rear Door) (LEFT REAR DOOR)
Pins:
1- Brown – Ground 4 (to CD Player)
2- Lavender/Yellow +B1 (to CD changer) Radio No. 1 fuse 20A
3- Shielded – Signal Ground 3 (to CD Player)
4- Brown – Ground 5 (to CD Player)
5- Lavender/Yellow –B2 (to CD player)
6- Gray – ACC1 – Radio No. 2 fuse (7.5A)
7- Light Blue – Mute (to CD Player)
8- White – HAP - (to CD Player)
9- Black – HAP + (to CD Player)
In order to run the deck preamp your going to splice into sets of wires on this amp. warning this is a long task be prepared. I bought some small suitable gauge wire from the store and went to work measuring the length I need and a little more for room to work with. The main wires you want to focus on are listed in order below.
The main plug you work with is the GREEN plug S12-D.
(You will notice positive and negative are vertically flush)
Left Front
Positive: Pink/Pin 2
Negative: Violet/Pin 7
Right Front
Positive: Light Green/Pin 1
Negative: Light Blue/Pin 6
Left Rear
Positive: Black/Pin 5
Negative: Yellow/Pin 13
Right Rear
Positive: Red/Pin 4
Negative: White/Pin 12
These are your speakers you will need to hardwire directly to your new unit. Remember to work around your seat position rail when installing the wires. I did not go beneath carpet for my install but, I had minimal wire appearance. I went directly from my amp location, underneath my seat rail, to the mid-console, to the din.
Note: The door speakers in this Lexus factory are also 3 holed speakers, inside of a custom speaker din designed by Lexus. Be sure to check measurements before ordering speakers. Max size should be 5.25". Max depth I would guess 3 to 4.5" tops.
Wiring Diagrams (pdf format)-
Wiring Diagrams-
Radio/CD Changer/Amp: http://www.mediafire.com/file/n2ygzzmzf53/lf1rap96.pdf
Antenna: http://www.mediafire.com/file/zn3jmijmujm/antenna.pdf
Telephone (If needed): http://www.mediafire.com/file/21hoo1hlyha/telephone.pdf
Last edited by cnewman402; 12-13-08 at 02:02 PM. Reason: Updated experience, more to come if needed.
 12-11-08, 06:13 PM
#2
Driver School Candidate
Thread Starter
Questions I have:
Can I power the CD player from the wiring in the amp or will I need to run new wires?
Answered above.
Can I power the CD player from the wiring in the amp or will I need to run new wires?
Answered above.
Last edited by cnewman402; 12-13-08 at 02:02 PM.
The following users liked this post:
Mylsrocks (01-24-18)
12-11-08, 11:26 PM
#3
 12-12-08, 07:51 AM
#4
Driver School Candidate
Thread Starter
Note: I was unsuccessful at wiring it from the amp. I have a lack of knowledge in electrical diagrams.
Last edited by cnewman402; 12-13-08 at 02:04 PM.
08-26-09, 05:05 AM
#5
Rookie

Join Date: Aug 2007
Location: ON
Posts: 83
Likes: 0
Received 0 Likes
on
0 Posts
i am picking up my '96 LS400 next week w/Nakamichi stereo
i would really like a hidden installation for my XM radio & an iPod dock
i was looking at the Pioneer AVIC-X710BT
it has 3 sets of RCA outputs
i was thinking of using the Lexus amp & just feed the Fronts/Rears/Sub from the RCA outputs & ignore the builtin amp
mark
i would really like a hidden installation for my XM radio & an iPod dock
i was looking at the Pioneer AVIC-X710BT
it has 3 sets of RCA outputs
i was thinking of using the Lexus amp & just feed the Fronts/Rears/Sub from the RCA outputs & ignore the builtin amp
mark
08-26-09, 08:49 AM
#6

While the stock stereo sounds quite OK for a stock stereo. (Well, it sounds very good for a 13 year old stock stereo, but the head unit is indeed outdated and the speakers cannot take much power. Also, speakers do not age well. The rubber dries out and becomes brittle.)
I'm in a similar process as you and I will replace the speakers with DLS 6.5" in all four doors (components in the front and coaxial in the back doors) and a DLS 10" open air sub in the back. I recon that I could use the Lexus/Pioneer amplifiers, but they output something like maximum 20W RMS per channel. The sub amplifier is also quite weak.
There will be some work to fabricate new MDF baffles for all the speakers, but I recon the sound will go from good to fantastic if I do the job properly.
I'm going with a high-end Alpine HU and the total for the HU, amps, speakers, condensors, cables etc will be around $2K. Kind of "Oh ****, I didn't intend to spend that much...", but now I'm there. I just need to find the time to build/install the whole thing... But it's gonna be fun.
//Bj�rn
08-26-09, 12:19 PM
#7
Lexus Champion

You are making this much to complicated and you need is to locate the 12v power and antenna turn on wires, tap off antenna in trunk for your amp turn-on , tap into speakers under pas seat, run RCA's down the top of trans hump , run amp wire from battery throught large AC boot behind glove box down under side carpet throught a number of holes behind rear seat.
Last edited by Lexkost; 08-26-09 at 12:23 PM.
Trending Topics

 09-01-09, 05:23 PM
#10

Double-Din - http://www.installer.com/item/displa...php?it=95-8153
Single-Din - http://www.installer.com/item/displa...php?it=99-8153
Single-Din - http://www.installer.com/item/displa...php?it=99-8153
09-16-09, 10:27 AM
#11
I'm in the process of replacing all the speakers, as I wrote in an answer above. Now, I've located the amp from which the speakers are powered in the original setup. But where does the wires from the green connector (S 12 D in the original post above) go to. Do they all go back and past the head unit? (Said he in hope for something about the rebuild being somewhat easy.  If so I can splice into the wire harness and pull those wires out, getting a feet or two of speaker wires to "play with".)
Once I've sorted out all these small issues, I'll start another thread with pictures of how I've done it. So far I've already prefabricated some MDF panels for the back speakers and the front panels are in the making. Good fun so far.
//Bj�rn
If so I can splice into the wire harness and pull those wires out, getting a feet or two of speaker wires to "play with".)Once I've sorted out all these small issues, I'll start another thread with pictures of how I've done it. So far I've already prefabricated some MDF panels for the back speakers and the front panels are in the making. Good fun so far.
//Bj�rn
09-16-09, 02:54 PM
#12
Lexus Champion
Here's where I am at so far on my 96LS ( AC relocation and Stereo )
This is just the start of my new project, I am waiting on my other parts to show up so this is where I am at now...............more to come!
This is just the start of my new project, I am waiting on my other parts to show up so this is where I am at now...............more to come!
Last edited by Lexkost; 09-16-09 at 02:59 PM.
 08-15-10, 02:10 PM
#14
So i went to attempt to install my head unit and saw that the wire for the 96 is different from my 98. Im not sure if i have the naki or pioneer factory radio. When I looked under my seat at the amp it looks like i have the same one as Puredrifter's from the ipod hookup thread.
Puredrifter do you have the whole wiring diagram for 1998-2000 LS. Thanks
Puredrifter do you have the whole wiring diagram for 1998-2000 LS. Thanks
