Motor mounts changed
 04-13-08, 11:24 AM
#1
Pole Position
Thread Starter

Ordered OEM from Carson's and changed them in the parking lot. Took me 6 hours including changing front sway bushings. Took only a few pictures because i was too strung up in the middle of it to take many.
Will post them when i finish editing them.
The hardest part of the whole procedure was breaking loose the upper bolts on the mounts.
Cant feel the engine now
Will post them when i finish editing them.
The hardest part of the whole procedure was breaking loose the upper bolts on the mounts.
Cant feel the engine now


 04-13-08, 02:09 PM
#4
Pole Position
Thread Starter
If anyone wants I can post a picture diy of the way I did it when i get back from work. Yes, there's a huge difference now. Have to look at the rpm needle to know if i'm reving the engine...
04-14-08, 04:01 PM
#5
Pole Position
Thread Starter
Engine mount replacement for 1991 LS400. This is how I did it and it may or may not work on your car. Take it as a rough guide only.

Extra tools you need.
Big breaker bar 1/2 inch drive. [K]
17mm deep socket.
2 car jacks.
2 jackstands.
Longest round end 17mm wrench you can find.
WD40
Pressure wash underbody of car use degreaser if greasy.
Put the car on jackstands not ramps.
Remove air cleaner assembly and MAF assembly after unplugging it.
Disconnect battery.
You are supposed to remove PS reservoir hose hold-down but my hold-down was underneth a bunch of abs pipes. I could also remove hose from reservoir but that would have broken the hose anyway as mine was old and crusty. So i took a chance and left it on. It survived.
You don't need to remove a/c or serpentine belt with this method.
Remove driver side wheel.
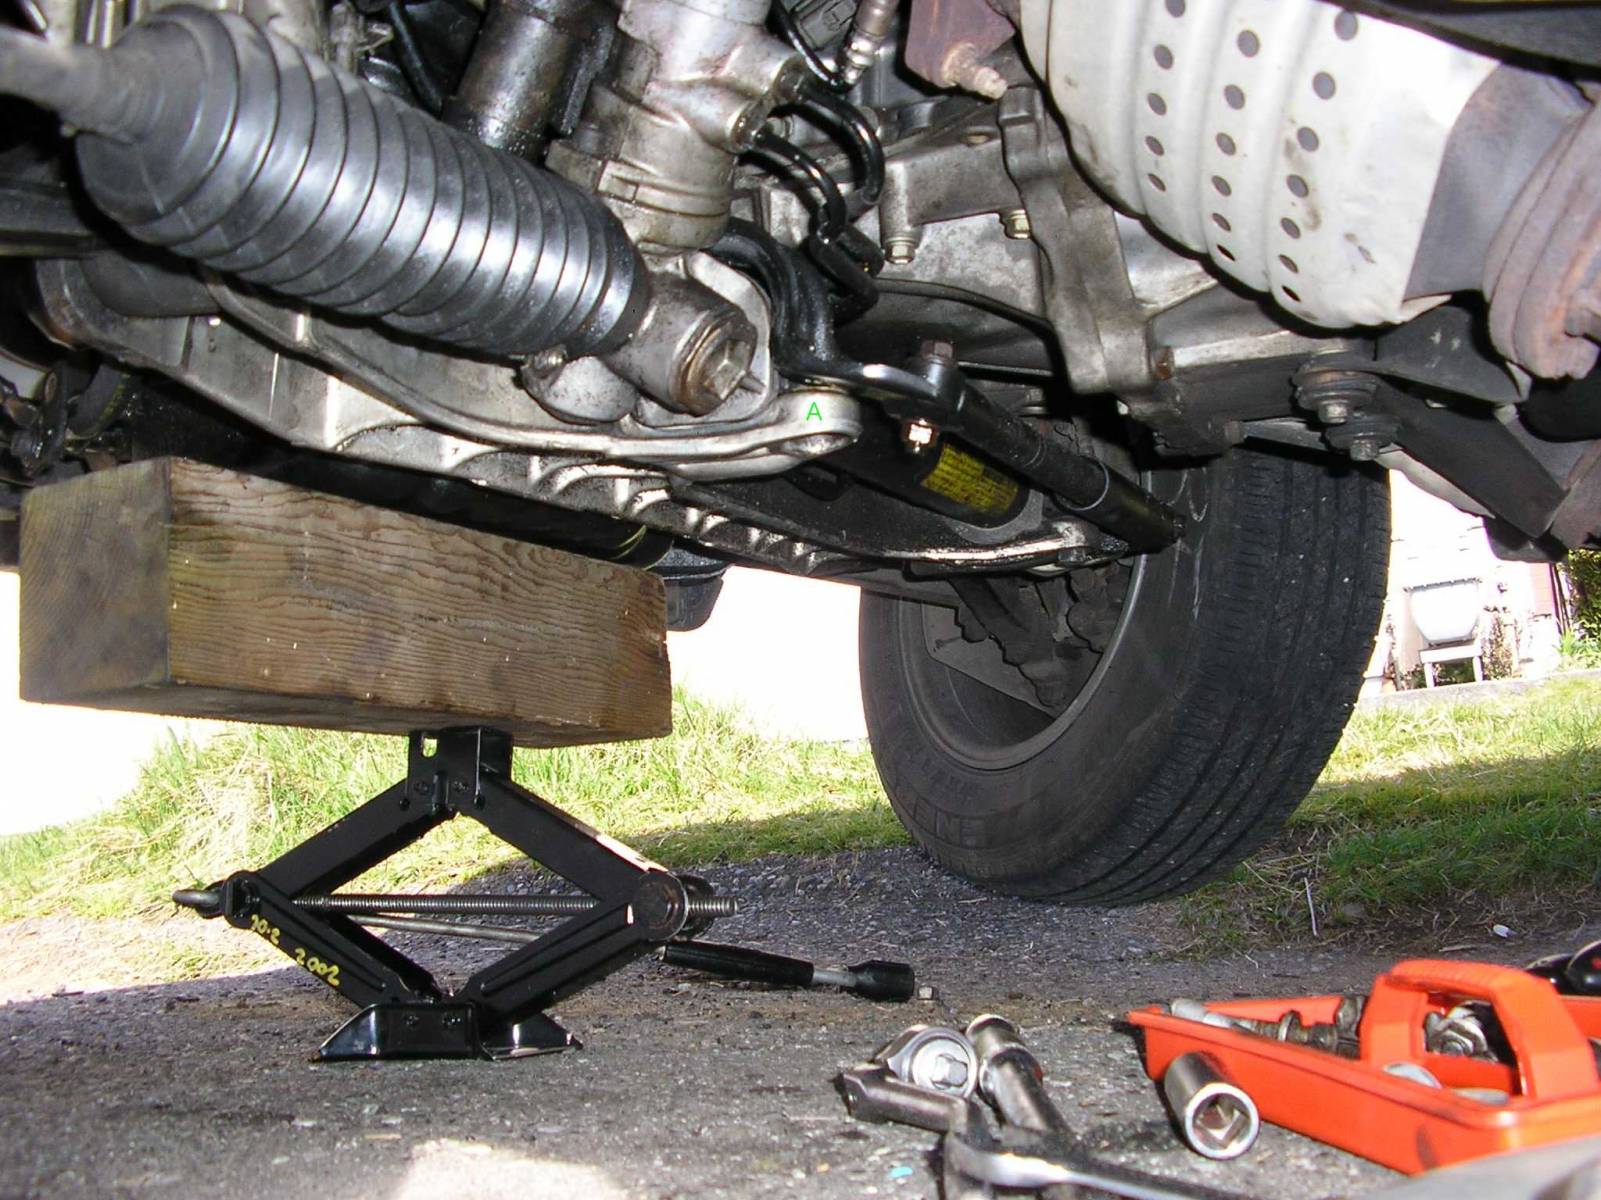
Support engine as shown at the oil pan. Dont let oil drain plug take the load.
Completely remove 2 PS rack bolts on driver's side A and loosen 2 on passenger side.
Remove wiring loom running along front of Crossmember.
Remover lower mount bolts.
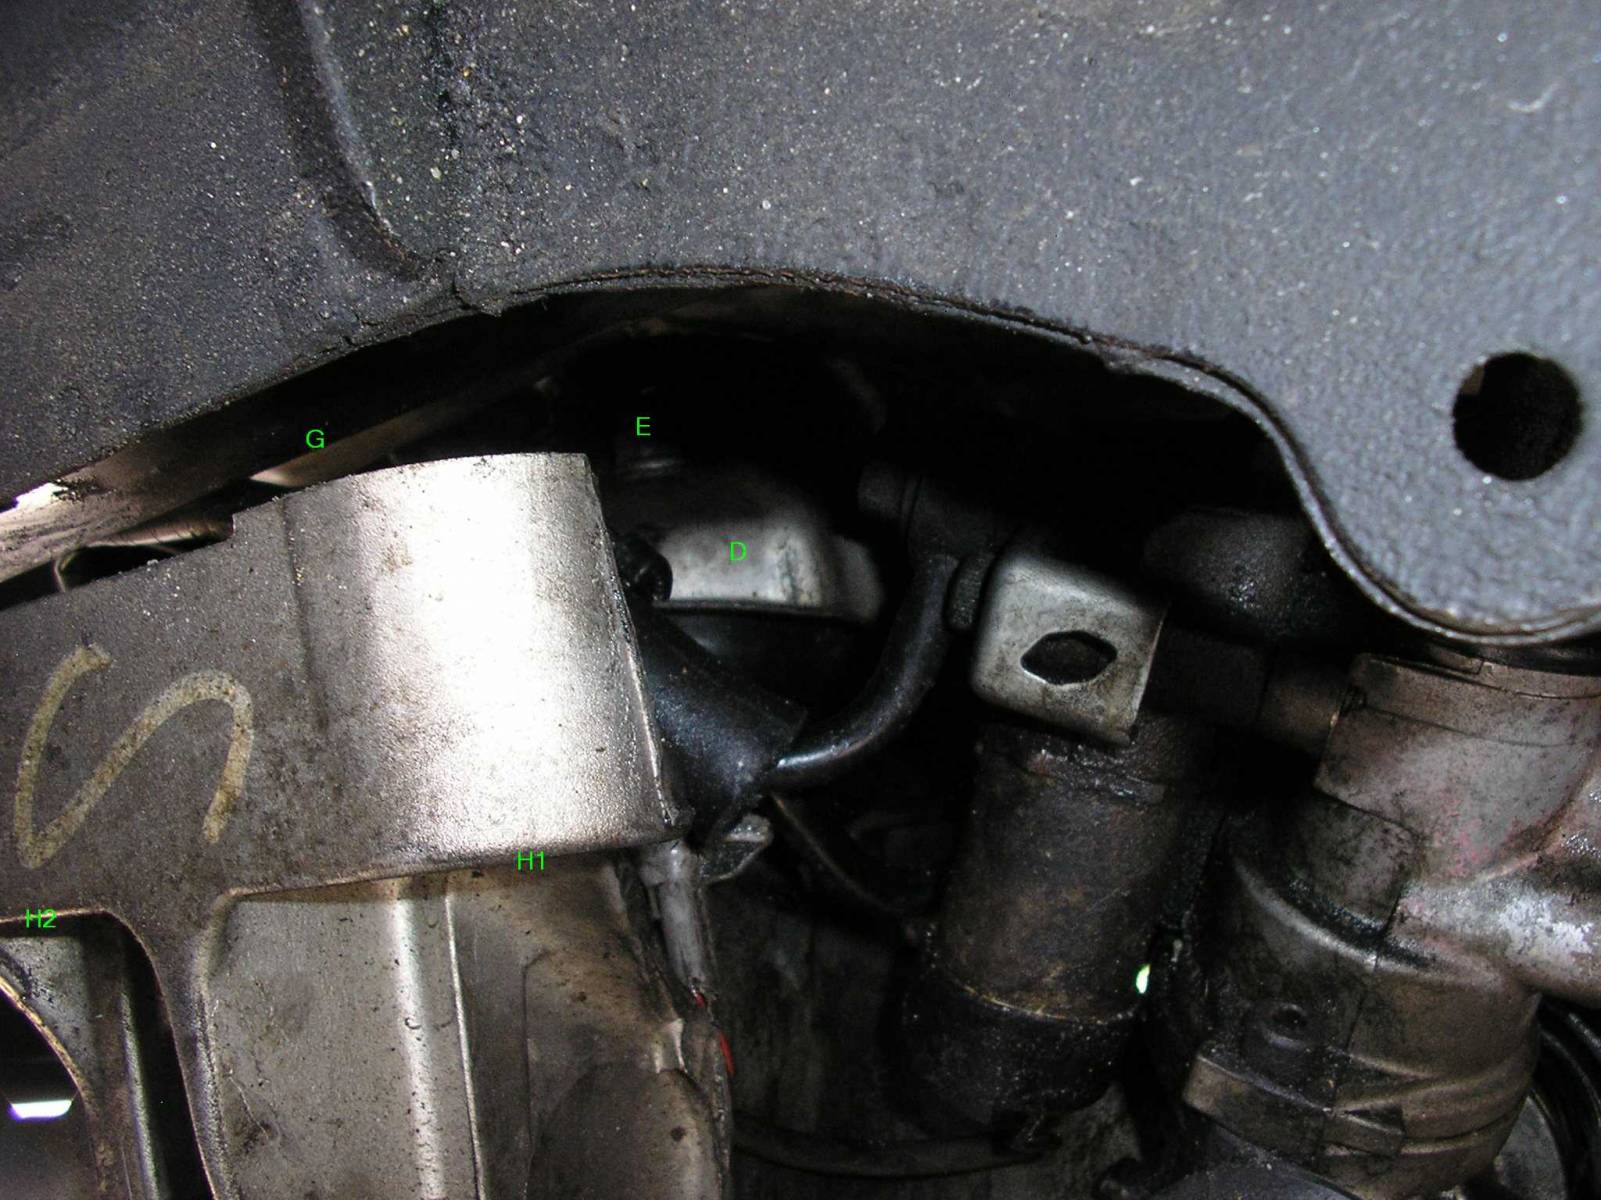
Now use 17mm deep to remove 2 drivers side nuts for crossmember and 2 for passenger side. H1 H2
(Two pics over below)
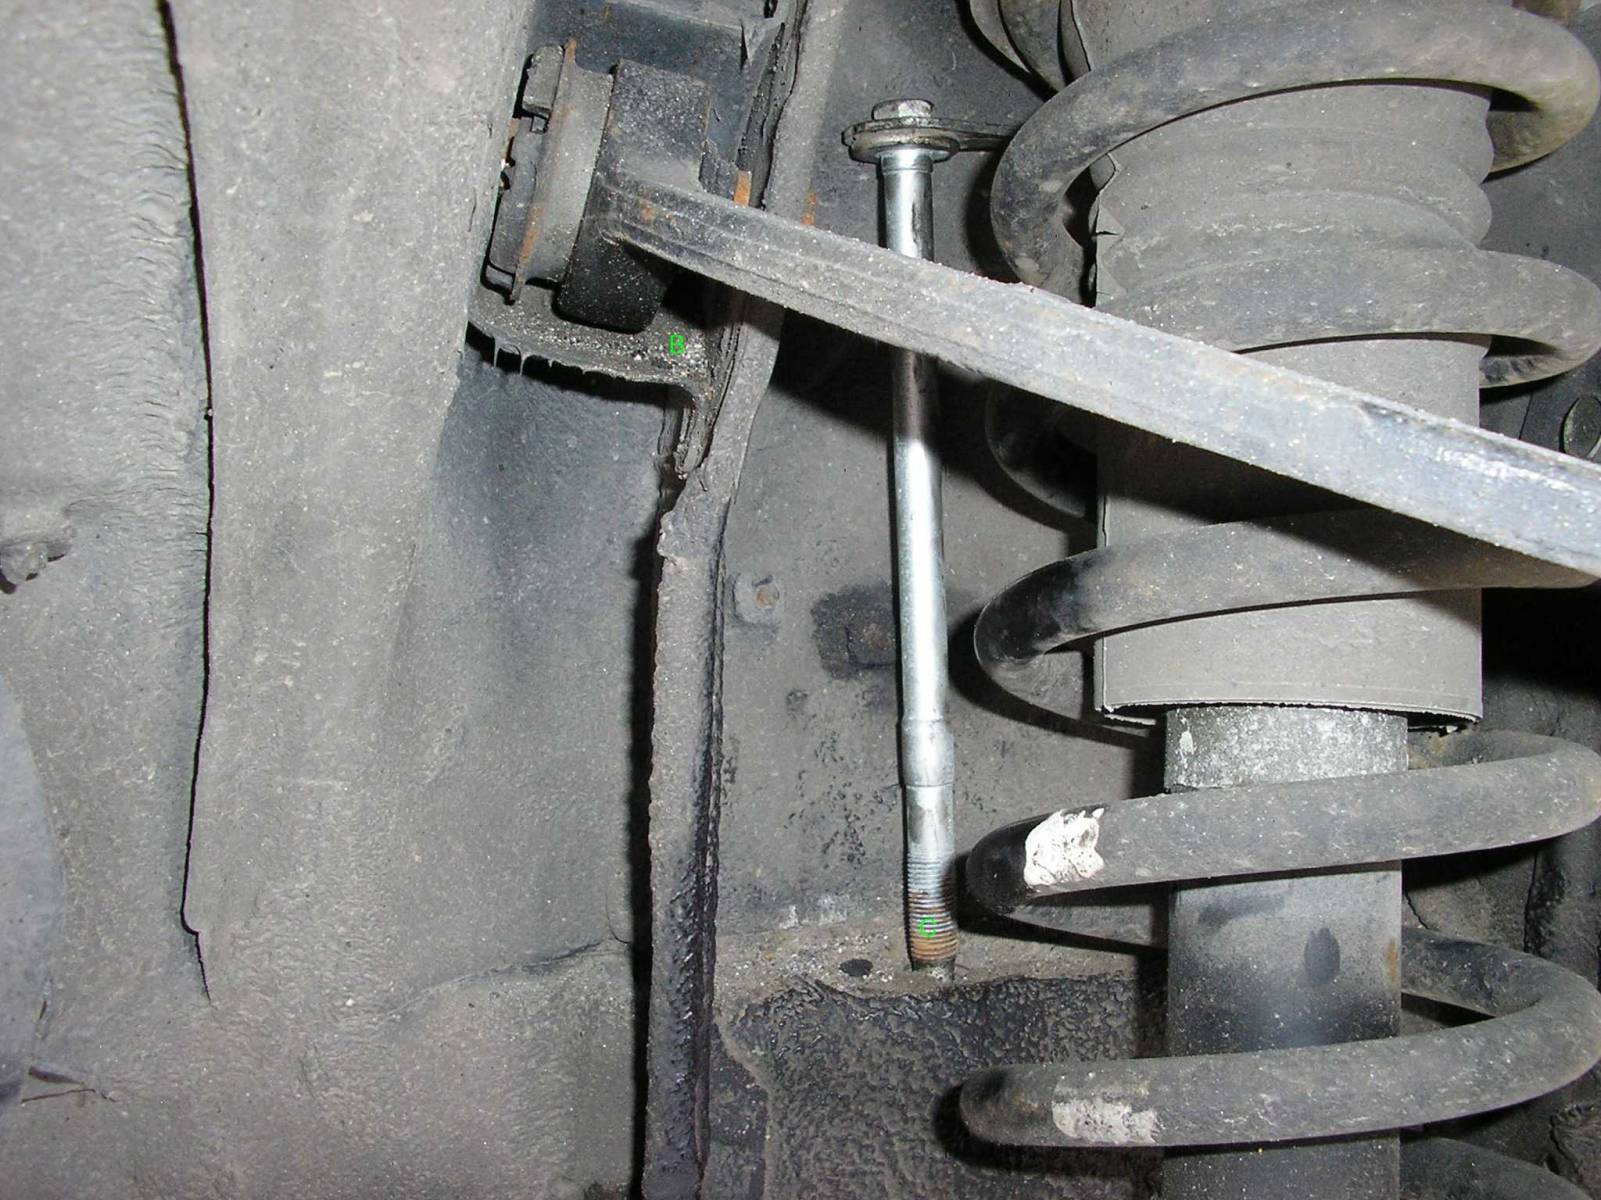
B is the grime that will fall in your eyes if you don't pressure wash all that area first. C is the bolt assembly for crossmember that you can just pull off to give you more room.
Remove the wire pluggin into side of oil filter housing and one to side of a/c
Driver's side mount first.
Crossmember will now sag down if not just pull it down about 2 inches G making sure nothing is pullin on it.
(In all this procedure make sure to keep checking wiring and hoses for pulling. None should ever bear too much weight or get pulled. Remove any holddowns as needed as your car may be different than mine. At this point there are 4 independent units: engine, car, crossmember and PS rack.)
Lower the engine a little so that you can see the upper mount bolt E.
There are 2 oil hoses in the front of a/c compressor that will just touch the sway bar when you are lowering the engine at this point. Don't lower too much.
D is the mount heat shield. This looking in thru wheel well. Spray both the upper mount bolts well with WD40 and go for a coffee break.
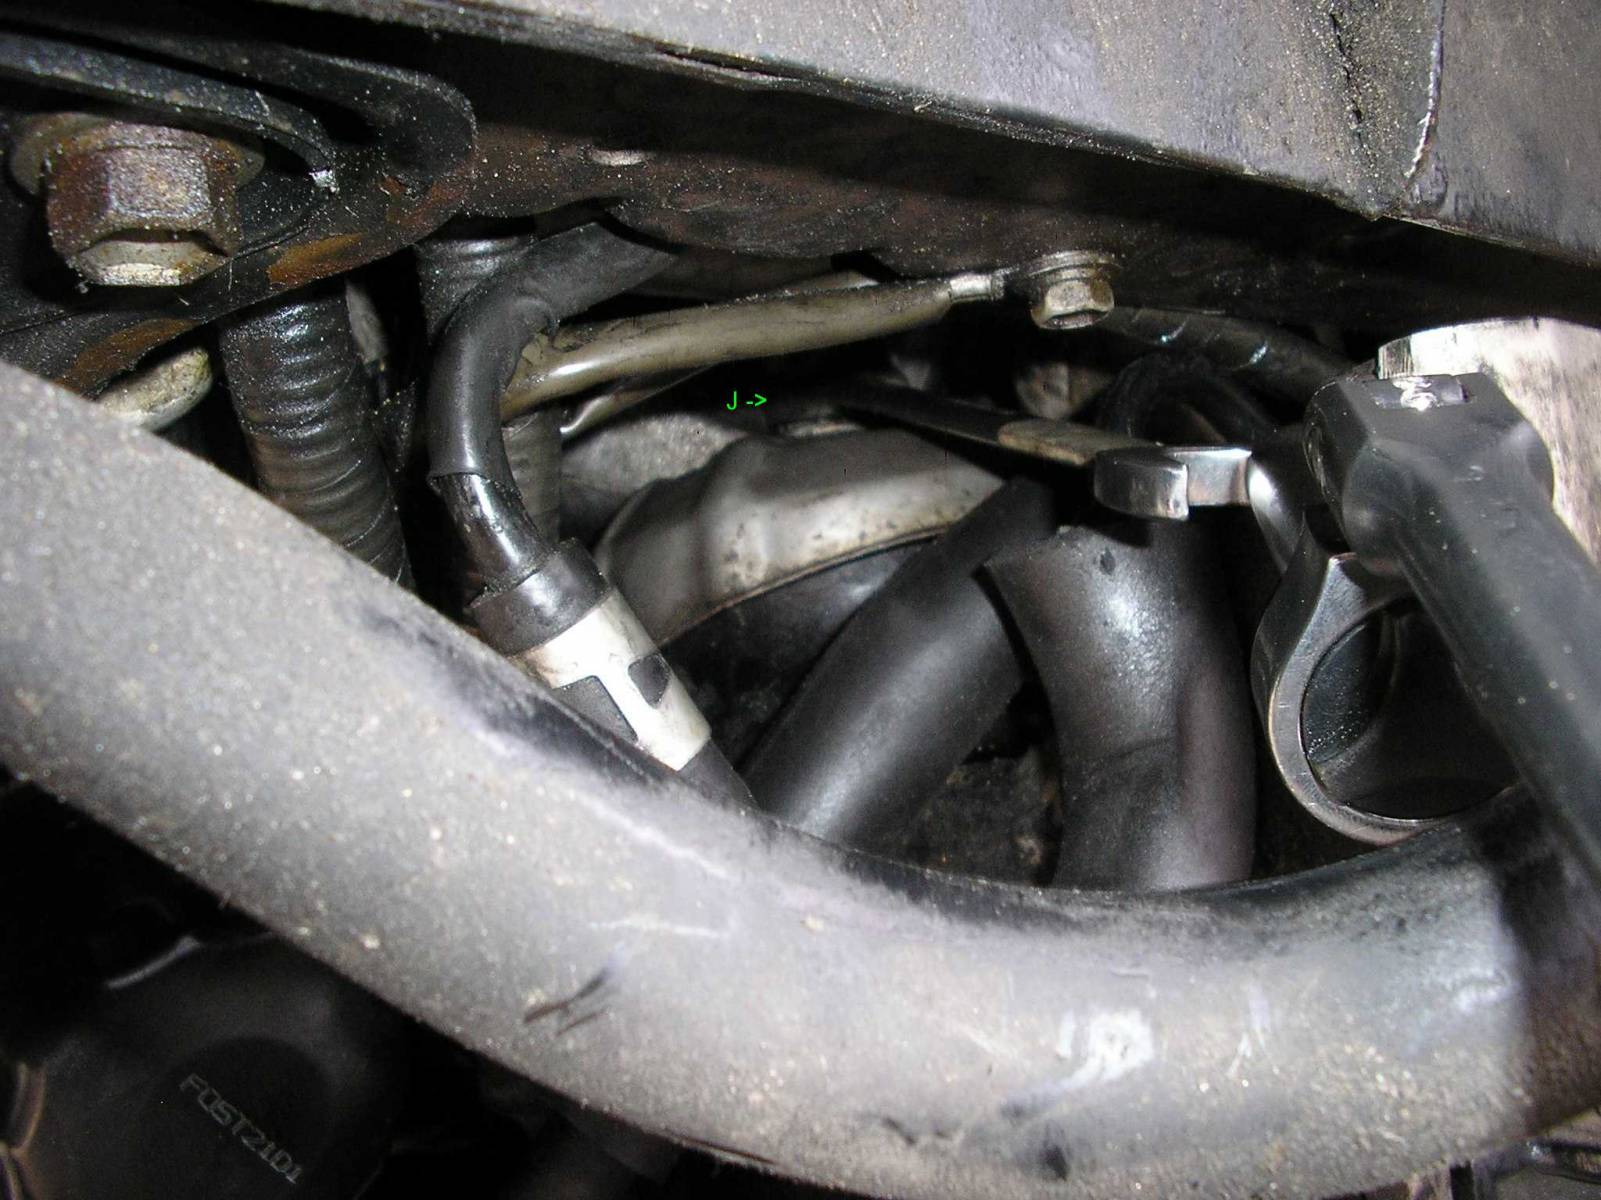
Now take the long 17mm ring wrench and remove upper mount bolt J. This took me 1 hour. DON'T STRIP THE BOLT! Use round end only. In the end i was able to loosen it by using a rachet to leverage the wrench as shown. Worked from the driver's side wheel well.
Do the same for passenger side.
Now raise engine just enough to remove old mounts.
Remove old mounts, remember how they go in. Put in new mounts. Make sure heat sheild and bracket go as they should. Shield out, bracket in. Separate all three when taking out or putting in because of tight space.
Tighten upper nuts as much as you can.
DONT bolt in lower mount nuts you will do this LAST. You dont want to ruin your new mounts by pulling them by weight of crossmember or raising engine too much.
Now use the extra jack to raise crossmember and tighten its bolts.
Put back PS rack bolts and wiring loom and every thing else you took off.
Double and tripple check all connections and nuts and bolts.
NOW tighten up lower mount nuts.
Reconnect maf and aircleaner, battery etc and lower car.
Enjoy and best of luck...

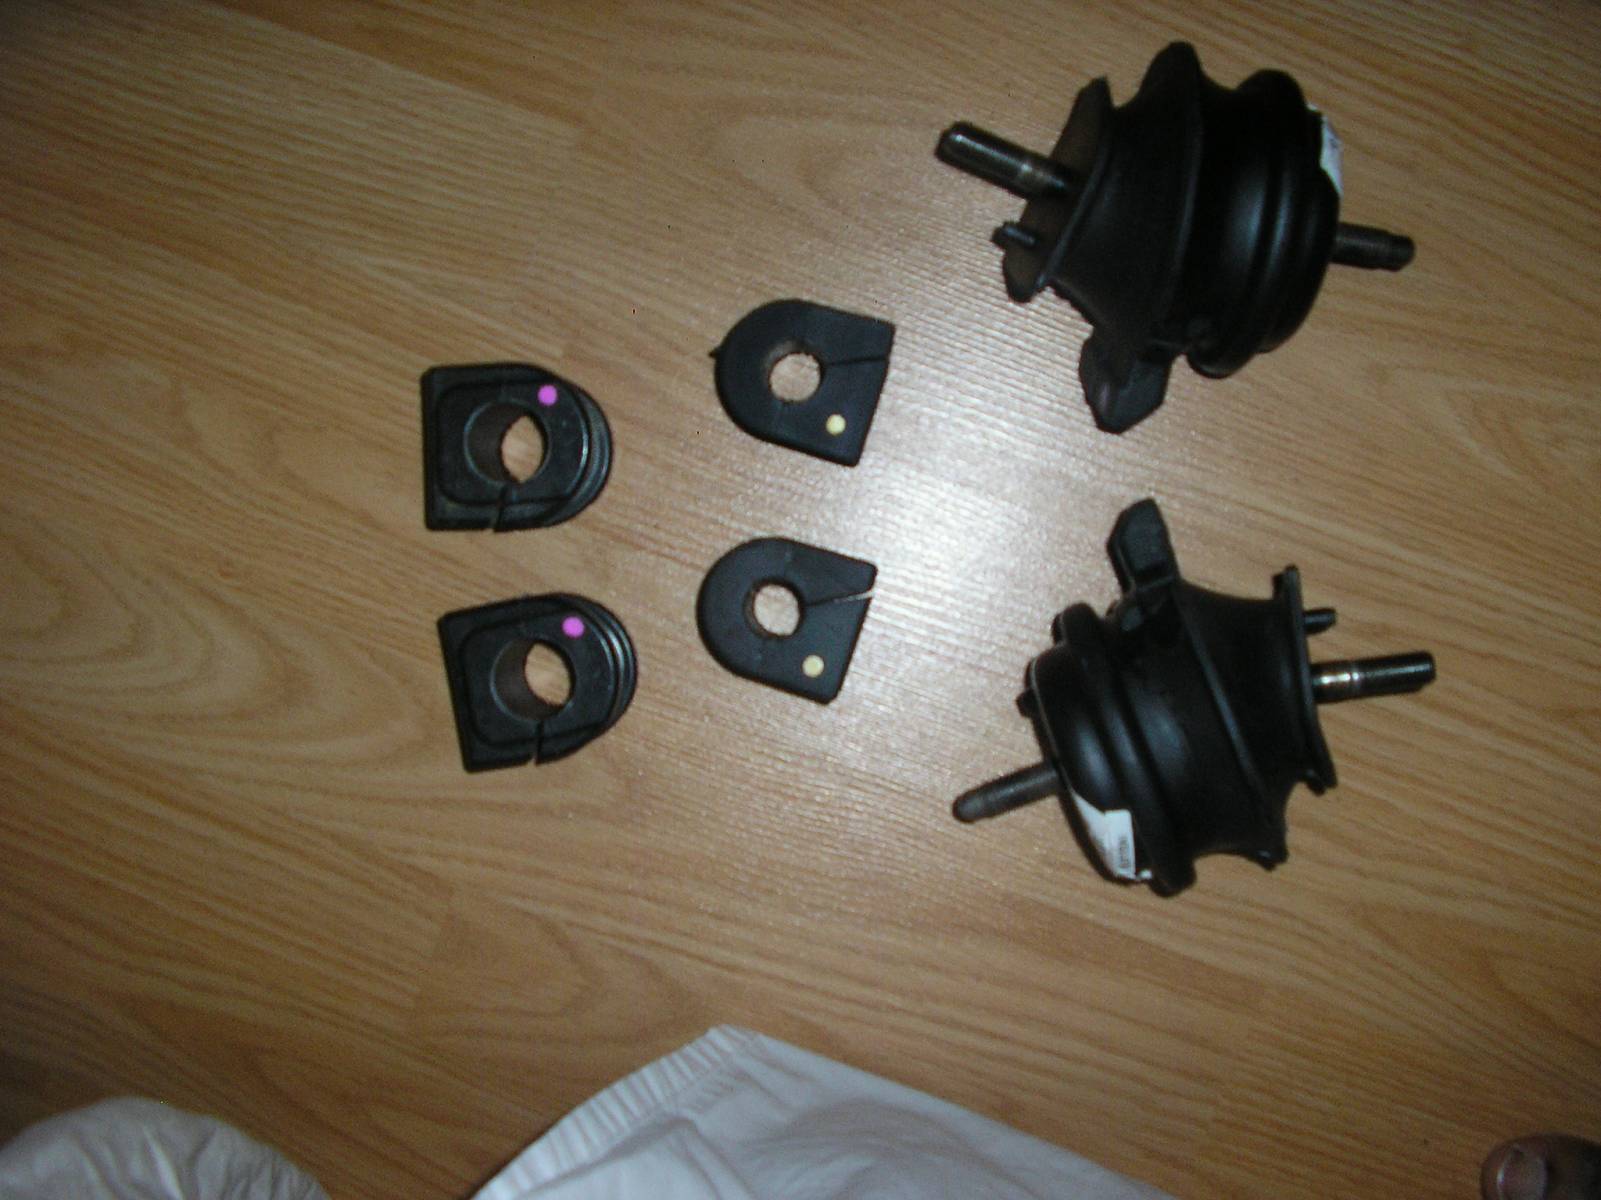
My old mounts.
Extra tools you need.
Big breaker bar 1/2 inch drive. [K]
17mm deep socket.
2 car jacks.
2 jackstands.
Longest round end 17mm wrench you can find.
WD40
Pressure wash underbody of car use degreaser if greasy.
Put the car on jackstands not ramps.
Remove air cleaner assembly and MAF assembly after unplugging it.
Disconnect battery.
You are supposed to remove PS reservoir hose hold-down but my hold-down was underneth a bunch of abs pipes. I could also remove hose from reservoir but that would have broken the hose anyway as mine was old and crusty. So i took a chance and left it on. It survived.
You don't need to remove a/c or serpentine belt with this method.
Remove driver side wheel.
Support engine as shown at the oil pan. Dont let oil drain plug take the load.
Completely remove 2 PS rack bolts on driver's side A and loosen 2 on passenger side.
Remove wiring loom running along front of Crossmember.
Remover lower mount bolts.
Now use 17mm deep to remove 2 drivers side nuts for crossmember and 2 for passenger side. H1 H2
(Two pics over below)
B is the grime that will fall in your eyes if you don't pressure wash all that area first. C is the bolt assembly for crossmember that you can just pull off to give you more room.
Remove the wire pluggin into side of oil filter housing and one to side of a/c
Driver's side mount first.
Crossmember will now sag down if not just pull it down about 2 inches G making sure nothing is pullin on it.
(In all this procedure make sure to keep checking wiring and hoses for pulling. None should ever bear too much weight or get pulled. Remove any holddowns as needed as your car may be different than mine. At this point there are 4 independent units: engine, car, crossmember and PS rack.)
Lower the engine a little so that you can see the upper mount bolt E.
There are 2 oil hoses in the front of a/c compressor that will just touch the sway bar when you are lowering the engine at this point. Don't lower too much.
D is the mount heat shield. This looking in thru wheel well. Spray both the upper mount bolts well with WD40 and go for a coffee break.
Now take the long 17mm ring wrench and remove upper mount bolt J. This took me 1 hour. DON'T STRIP THE BOLT! Use round end only. In the end i was able to loosen it by using a rachet to leverage the wrench as shown. Worked from the driver's side wheel well.
Do the same for passenger side.
Now raise engine just enough to remove old mounts.
Remove old mounts, remember how they go in. Put in new mounts. Make sure heat sheild and bracket go as they should. Shield out, bracket in. Separate all three when taking out or putting in because of tight space.
Tighten upper nuts as much as you can.
DONT bolt in lower mount nuts you will do this LAST. You dont want to ruin your new mounts by pulling them by weight of crossmember or raising engine too much.
Now use the extra jack to raise crossmember and tighten its bolts.
Put back PS rack bolts and wiring loom and every thing else you took off.
Double and tripple check all connections and nuts and bolts.
NOW tighten up lower mount nuts.
Reconnect maf and aircleaner, battery etc and lower car.
Enjoy and best of luck...
My old mounts.
The following users liked this post:
Sherl (03-10-19)
07-23-11, 04:45 PM
#6
Lexus Champion

I just did the motor mounts on my '96.
The old ones looked like the ones on the write-up - not completely torn apart, but tearing. There was maybe 25 to 35 percent actual contact left on the top plate, the rest was all torn up.
Initial impressions are that the motor is a little smoother. It's still not perfectly smooth though, but that's on me and the condition of my motor. I used Beck/Arnley motor mounts. They fit perfect and were made in the USA. I paid ~$125 for the pair, including shipping, from an online retailer.
The installation was a pain in the ***, but straightforward. The passenger side was far easier to do than the driver side. Fortunately for me, the top bolts were not stuck on tightly, thanks to having a California car. They came out with relatively little fuss.
Thanks for the writeup.

Trending Topics
07-24-11, 11:27 AM
#9
Lexus Champion
I had the passenger subframe end hanging off a few threads on the bolts, put a jack under the A/C compressor to keep the engine steady on the driver side, and pulled the driver side subframe down as far as I could get it. I used a wedge to pull it even more than it would naturally give because the damn bolts are so long on the motor mounts. Once I had the clearance I needed, I took the mount out by removing it from the top bolt, bending it forward, and pulling out the bottom end. Then I had to turn it and snake it around the P/S and A/C lines near the A/C compressor to get it out of there. Reinstallation was fairly the reverse of removal except it was a bit of a pain to keep the heat shields aligned and the mount in the little alignment channels as I bolted it back together.
one other note is that there are reinforcement suspension arms that go from the end of the lower control arm to a bracket right near the strut rod chassis mounting point; I pulled those out while I was doing the job to get extra room to work. they're really easy to remove and reinstall, just a couple of 17mm nuts, and you only have to loosen the chassis-end nut.
I will have to get back under the car soon to reposition the motor a little bit via adjustments available on the bottom bolt - i didn't give much thought to aligning the drivetrain when I was reassembling, so my shifter is a little more reluctant to pull out of P due to motor misalignment.
08-03-11, 07:37 PM
#10
Use the longest 17mm wrench to break loose the top nut, then use the shortest 17mm wrench to get the top nut out. It took about 40 minute to get the top nut out.
Will raise the engine, and lower cross member to get the mount out tomorrow.
Will raise the engine, and lower cross member to get the mount out tomorrow.
08-04-11, 08:34 AM
#12

When I did mine, I used a 17mm socket on a socket wrench with a pivoting head - so the handle could be angled down. I remember thinking that it would be almost impossible (or take like 40 minutes) without that tool. Of course it took some time to figure out that I needed to use that tool. Not one of my better or commonly used tools, but it was good to have it.
08-04-11, 09:32 AM
#13
I removed the strut nut and bolt, removed the sway bar linker nut, removed the steering rack bracket, the cross member would refuse to come down. I will raise the engine to see if I can get the mount out.
08-04-11, 11:03 AM
#14
So the driver side of the cross member did not drop at all.
I dropped the passenger side of the cross member as low as it could be, and raised the driver side of the engine.
I was able to get the old mount out. Put the new mount in, and then placed the bracket and the heat shield on to the mount.
I dropped the passenger side of the cross member as low as it could be, and raised the driver side of the engine.
I was able to get the old mount out. Put the new mount in, and then placed the bracket and the heat shield on to the mount.
08-04-11, 11:06 AM
#15
Pole Position

Join Date: Jun 2011
Location: CA
Posts: 222
Likes: 0
Received 0 Likes
on
0 Posts