
My Tanabe NF210 Lowering Spring Install Experience/Info Thread
 10-13-11, 06:46 PM
#1
Lead Lap
Thread Starter
*Warning, lots of opinions and actual data in this thread to HELP anyone interested, so this will be a little long. If you don't like long threads, please use your back button on your browser 
I wanted to share some information about my recent Tanabe NF210 coil spring install to help anyone who may be looking at installing these lowering springs on their LS460.
Costs Involved:
Tanabe NF210 Springs - $250 shipped
Labor for spring install - $250 (yes, that is correct. PM me for the hookup if you live near Orlando)
Lexus +2mm Front Control Arm Brackets (4 pieces) - $140
Install for brackets - $80 (will explain later)
Post install Alignment - $80
Total costs - $800
Install times
Seat Removal - appx 20 minutes
Springs - 4 hours (includes some breaks for rain to pass over (lift was outside)
Control Arm Brackets - appx 1.5 hours (will explain later)
Alignment - 25 minutes
For reference, I have a SWB LS460 non executive with power recline/cooled/heated rear seats.
So, I had these springs installed and for the most part it is pretty straight forward if you have done suspension work before. I didn't really have the time to do this myself, so I received a referral from another CLer to use his mechanic while I was in the Orlando area.
The rear seats have to come out along with the C pillar interior panel piece covering the speaker, the trim piece running down along the seat on top of fender well and the rear door kick plate. The front of the seats lift right up and come right out after disconnecting the power connector. The seat back has two 10mm bolts on each side that need to be removed. Then, you need to lift up and then forward to get the gear off the track. Store in safe place and use gloves to remove seats. Place them on a nice clean blanket inside or something. Search youtube for "LS460 seat" and there are a couple videos showing how its done.
As far as the installation of the coil springs, I will not get into that entire piece of it. Bottom line, although I have done spring installs in the past, I am glad I didn't do this car. There are some bottom plates that need to be removed along with a bunch of small bolts, etc. For $250..I had to take advantage of that price, especially when the dealer quoted me $1600 LMAO! Other shops quoted 6-8 hours with costs near $700 with alignment. My install took appx 4 hours which includes breaks for rain to pass (shop has outside lift). My installer has done suspension work on LS460s before and I felt comfortable knowing he would know exactly what to do.
Once the install was completed, I took it for a test drive and was amazed at how nice the car drove. Tanabe advertises a 5% ride quality difference and I would have to agree with their estimation. You can tell the car is dropped when cornering, braking or hard acceleration, but while just cruising, it rides damn near stock..gotta love that..its the perfect level of sport and comfort I wanted. I pushed the car pretty hard on a long curved on ramp and there was hardly any body roll..I know before the springs, the car was very floaty on that curve..it felt solid with the new springs!!!
Alignment
Next step was the alignment. The shop was across town which was good to allow the springs to settle down. They completed the alignment, but as I anticipated some "red" numbers remained on the alignment sheet involving front camber. The shop pulled up the +2mm control arm brackets that can be replaced and recommended I get those to help get camber numbers closer to stock.
So, I ordered and received the OEM Lexus +2mm control arms and got them installed about 100 miles after initial spring installation. In hindsight, I should of had the control arm brackets in hand ahead of time during the initial spring install because there are a couple of bolts you cannot remove unless you have the strut/spring assembly out. So, I paid an extra $80 to get those added after the fact.
The non adjustable Lexus +2mm control arm part numbers are as follows:
Number 1 brackets -
RH 48614-50030
RH 48617-50030
Number 2 brackets -
LH 48614-50050
LH 48617-50050


Printout from Hunter machine recommending +2mm brackets

+2mm brackets Installed on my car, but had to remove strut to do it..sigh

After springs were installed, I had it aligned. Here are those alignment results along with the 2nd alignment once I installed the control arm brackets.
Factory acceptable ranges are in parenthesis
Green = acceptable range / Red = not within acceptable range
Front Left Camber -1.8 /with +2mm bracket -1.6
Front Right Camber -1.7 / with +2mm bracket -1.3
(0.5 to -1.0)
Front Left Caster 7.6 /with +2mm bracket 7.0
Front Right Caster 7.5 /with +2mm bracket 7.6
(5.9 to 7.4)
Front Left Toe 0.05 /with +2mm bracket 0.04
Front Right Toe 0.03 /with +2mm bracket 0.04
(-0.04 to 0.12)
Total Front Toe 0.08
(-0.08 to 0.24)
Steer Ahead 0.01
(-0.05 to 0.05)
Left Rear Camber -2.3 /with +2mm bracket -2.2
Right Rear Camber -2.2 /with +2mm bracket -2.0
(-0.9 to -2.4)
Left Rear Toe -2.2 /with +2mm bracket 0.13
Right Rear Toe 0.12 /with +2mm bracket 0.13
(0.04 to 0.20)
Total Rear Toe 0.25 /with +2mm bracket 0.26
(0.08 to 0.39)
Thrust Angle 0.00
As you can see, there was only a slight improvement with these +2mm Lexus control arm brackets. Perhaps a true adjustable camber kit for the front will become available but I can live with these specs since this is not my daily driver. Any change that helps get back to specs is a win for me, so I'll take it. I'm all about maxing out tire life if possible.
Closing Thoughts:
* The car rides extremely well on these NF210 springs. I am very pleased at the ride comfort which I feel is appx 5% stiffer than OEM ride quality
* If there is not an adjustable aftermarket option, I highly recommend purchasing the 4 lexus +2mm front control arms and have them installed at the same time you install the springs to avoid paying additional costs. The four parts should run you about $150 or less total. In my case, they didn't quite get me to all green on the hunter alignment machine, but it was better than before I had them.
* I recommend getting an alignment within the first 25 miles after getting the springs installed. This allows the springs to settle down some. Try hitting some roads with dips and hit some turns a little hard. Then go get the alignment. This is just something I like to do, but in the past, this has worked well for me.
* On the fence about Tanabe's? No worries, DO IT!!
* Special shout out goes to fellow CLer Shibumi1 for referring me to his excellent Orlando area mechanic Justin who did my install along with providing a great place to do my alignment, plus coming by during the install to help out with the rear seat removal. Appreciate you man!!
Again, I create long posts like this to try and help answer questions for my fellow LS460 CLers. I know that I dig through tons of posts to find info when I am researching mods, so I am just trying to do my part to help folks out.
Pics after Tanabe NF210 installation


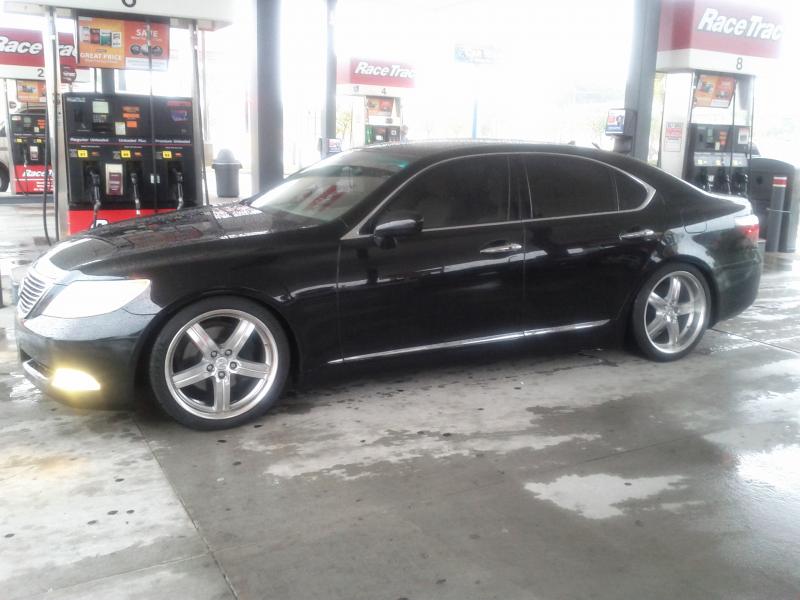
I wanted to share some information about my recent Tanabe NF210 coil spring install to help anyone who may be looking at installing these lowering springs on their LS460.
Costs Involved:
Tanabe NF210 Springs - $250 shipped
Labor for spring install - $250 (yes, that is correct. PM me for the hookup if you live near Orlando)
Lexus +2mm Front Control Arm Brackets (4 pieces) - $140
Install for brackets - $80 (will explain later)
Post install Alignment - $80
Total costs - $800
Install times
Seat Removal - appx 20 minutes
Springs - 4 hours (includes some breaks for rain to pass over (lift was outside)
Control Arm Brackets - appx 1.5 hours (will explain later)
Alignment - 25 minutes
For reference, I have a SWB LS460 non executive with power recline/cooled/heated rear seats.
So, I had these springs installed and for the most part it is pretty straight forward if you have done suspension work before. I didn't really have the time to do this myself, so I received a referral from another CLer to use his mechanic while I was in the Orlando area.
The rear seats have to come out along with the C pillar interior panel piece covering the speaker, the trim piece running down along the seat on top of fender well and the rear door kick plate. The front of the seats lift right up and come right out after disconnecting the power connector. The seat back has two 10mm bolts on each side that need to be removed. Then, you need to lift up and then forward to get the gear off the track. Store in safe place and use gloves to remove seats. Place them on a nice clean blanket inside or something. Search youtube for "LS460 seat" and there are a couple videos showing how its done.
As far as the installation of the coil springs, I will not get into that entire piece of it. Bottom line, although I have done spring installs in the past, I am glad I didn't do this car. There are some bottom plates that need to be removed along with a bunch of small bolts, etc. For $250..I had to take advantage of that price, especially when the dealer quoted me $1600 LMAO! Other shops quoted 6-8 hours with costs near $700 with alignment. My install took appx 4 hours which includes breaks for rain to pass (shop has outside lift). My installer has done suspension work on LS460s before and I felt comfortable knowing he would know exactly what to do.
Once the install was completed, I took it for a test drive and was amazed at how nice the car drove. Tanabe advertises a 5% ride quality difference and I would have to agree with their estimation. You can tell the car is dropped when cornering, braking or hard acceleration, but while just cruising, it rides damn near stock..gotta love that..its the perfect level of sport and comfort I wanted. I pushed the car pretty hard on a long curved on ramp and there was hardly any body roll..I know before the springs, the car was very floaty on that curve..it felt solid with the new springs!!!
Alignment
Next step was the alignment. The shop was across town which was good to allow the springs to settle down. They completed the alignment, but as I anticipated some "red" numbers remained on the alignment sheet involving front camber. The shop pulled up the +2mm control arm brackets that can be replaced and recommended I get those to help get camber numbers closer to stock.
So, I ordered and received the OEM Lexus +2mm control arms and got them installed about 100 miles after initial spring installation. In hindsight, I should of had the control arm brackets in hand ahead of time during the initial spring install because there are a couple of bolts you cannot remove unless you have the strut/spring assembly out. So, I paid an extra $80 to get those added after the fact.
The non adjustable Lexus +2mm control arm part numbers are as follows:
Number 1 brackets -
RH 48614-50030
RH 48617-50030
Number 2 brackets -
LH 48614-50050
LH 48617-50050
Printout from Hunter machine recommending +2mm brackets
+2mm brackets Installed on my car, but had to remove strut to do it..sigh
After springs were installed, I had it aligned. Here are those alignment results along with the 2nd alignment once I installed the control arm brackets.
Factory acceptable ranges are in parenthesis
Green = acceptable range / Red = not within acceptable range
Front Left Camber -1.8 /with +2mm bracket -1.6
Front Right Camber -1.7 / with +2mm bracket -1.3
(0.5 to -1.0)
Front Left Caster 7.6 /with +2mm bracket 7.0
Front Right Caster 7.5 /with +2mm bracket 7.6
(5.9 to 7.4)
Front Left Toe 0.05 /with +2mm bracket 0.04
Front Right Toe 0.03 /with +2mm bracket 0.04
(-0.04 to 0.12)
Total Front Toe 0.08
(-0.08 to 0.24)
Steer Ahead 0.01
(-0.05 to 0.05)
Left Rear Camber -2.3 /with +2mm bracket -2.2
Right Rear Camber -2.2 /with +2mm bracket -2.0
(-0.9 to -2.4)
Left Rear Toe -2.2 /with +2mm bracket 0.13
Right Rear Toe 0.12 /with +2mm bracket 0.13
(0.04 to 0.20)
Total Rear Toe 0.25 /with +2mm bracket 0.26
(0.08 to 0.39)
Thrust Angle 0.00
As you can see, there was only a slight improvement with these +2mm Lexus control arm brackets. Perhaps a true adjustable camber kit for the front will become available but I can live with these specs since this is not my daily driver. Any change that helps get back to specs is a win for me, so I'll take it. I'm all about maxing out tire life if possible.
Closing Thoughts:
* The car rides extremely well on these NF210 springs. I am very pleased at the ride comfort which I feel is appx 5% stiffer than OEM ride quality
* If there is not an adjustable aftermarket option, I highly recommend purchasing the 4 lexus +2mm front control arms and have them installed at the same time you install the springs to avoid paying additional costs. The four parts should run you about $150 or less total. In my case, they didn't quite get me to all green on the hunter alignment machine, but it was better than before I had them.
* I recommend getting an alignment within the first 25 miles after getting the springs installed. This allows the springs to settle down some. Try hitting some roads with dips and hit some turns a little hard. Then go get the alignment. This is just something I like to do, but in the past, this has worked well for me.
* On the fence about Tanabe's? No worries, DO IT!!
* Special shout out goes to fellow CLer Shibumi1 for referring me to his excellent Orlando area mechanic Justin who did my install along with providing a great place to do my alignment, plus coming by during the install to help out with the rear seat removal. Appreciate you man!!
Again, I create long posts like this to try and help answer questions for my fellow LS460 CLers. I know that I dig through tons of posts to find info when I am researching mods, so I am just trying to do my part to help folks out.
Pics after Tanabe NF210 installation
Last edited by CJITTY; 10-16-11 at 08:06 PM.

The following 2 users liked this post by CJITTY:
Kingrb18 (10-30-20),
LexLuv8000 (08-23-22)
10-13-11, 07:20 PM
#2
Lexus Champion
great write up.. i may chk my alignment specs an add the adjustments also.. seeing as it wasn't too much for parts an labor... i'll definitely do it b4 i pick up the new wheels....
10-14-11, 05:09 AM
#5
Lexus Champion
ANYTIME ...Glad I could help...
very nice to meet another member that has the same attn to detail (not too mention passion for modifying cars) i have.. Justin does an incredible job at fair prices and has been working on my cars for years now so i trust him.. if its cost $250 he wont charge $800 because the "book" says so.. i wish more people would follow his lead..
lemme know when the next meet is in atl an i'll do my best to make it....
10-14-11, 05:29 AM
#6
Lead Lap
Thread Starter
10-14-11, 10:37 AM
#7
Lexus Champion
Thanks for the thread bro. Hows the cross camber? Is your car pulling to the left slightly? Good tip on the +2mm arms. Sucks though like in the other thread you can always redrill and reweld the holes lol which I cant see myself doing.
Trending Topics
10-16-11, 08:36 AM
#8
Lead Lap
Thread Starter
Nope, no pulling or anything. Kinda pissed the alignment guy left my steering wheel slightly off center, but car still pulls straight. I may go back and have them touch that up..kind of annoying lol. I won't be drilling or doing any bootlegging my suspension. I suppose when they have a true adjustable front camber option, I will migrate to that, but my camber is not terrible. There are some guys on here with over 3 degrees out, so I am sittin pretty good if I am 1.3 and 1.6. Keep in mind, that although we have the same cars, every car will have a different alignment scenario. I would be willing to bet money that if anyone got the Tanabe NF210s, the 2mm arms would certainly be a plus. 2mm when it comes to camber can make a difference. Since I am running staggered, I will be going through front tires faster anyway. I am so glad the more expensive rear tires will not suffer tire wear as a result of negative camber since those are well within acceptable range. But, the stagger will shave off from the 50K mile life expectancy..just part of the deal. Glad its not my daily driver
 10-16-11, 08:10 PM
#10
Lead Lap
Thread Starter
Gamma, I went back to my sheet to look up the exact number. It shows cross camber at -0.3 and specified range is -0.5 to 0.5, so that is good to go and in the acceptable range. I also have a cross SAI reading, not sure what that is but that shows -0.1 and range is -0.5 to 0.5, so I am good there also.
10-23-11, 06:10 AM
#11
Lead Lap
Thread Starter
How did it go? Can you post up your new alignment specs please? I think it will help to show that every car on Tanabe's won't have same alignment numbers. Yours could be better/worse...who knows. Hopefully you'll be all green with no red. I hope the install went well!
 10-24-11, 08:16 AM
#15
Lead Lap
Thread Starter
My time here in Orlando has run out and I am struggling to find that time window to get back over there. The issue isn't causing an issue other than me thinking I am driving an '82 Ford Granada with a slightly off center steering wheel lol. No issue as it pertains to excessive tire wear or anything. I'll get it redone in a couple months anyway