Changed my spark plugs today........details
 07-04-15, 08:41 PM
#1
Lexus Test Driver
Thread Starter
Well.....thanks to another poster I had the confidence to change my spark plugs today. This is not the same as changing the plugs on the cars we grew up with.....There are a few more obstacles in the way. I posted a few days a go how ridiculous it was for my dealer to charge $500 to change my spark plugs......well after today I can justify say $300 to change the plugs including parts I think would be fair. Anyway I post now to help others that may tackle this job down the road,,,,and I will add this post to the other plug thread once I am done.
I went with OEM Denso plugs......I followed the advice of the previous poster almost to a T but changed a few tools and techniques. This will prob be a long ramble so bear with me.......
Remove plastic engine cover nuts.....( 2 ) 10mm
I started on drivers side.....remove black plastic cover....3 screw clips...just for extra room
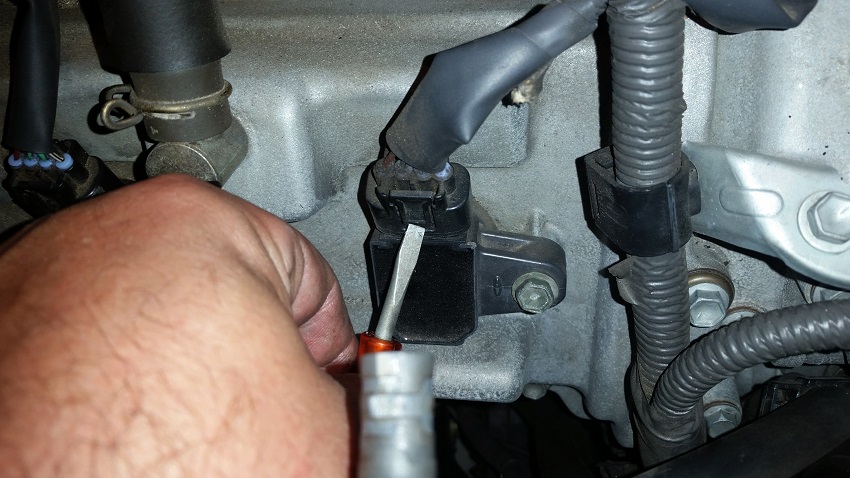
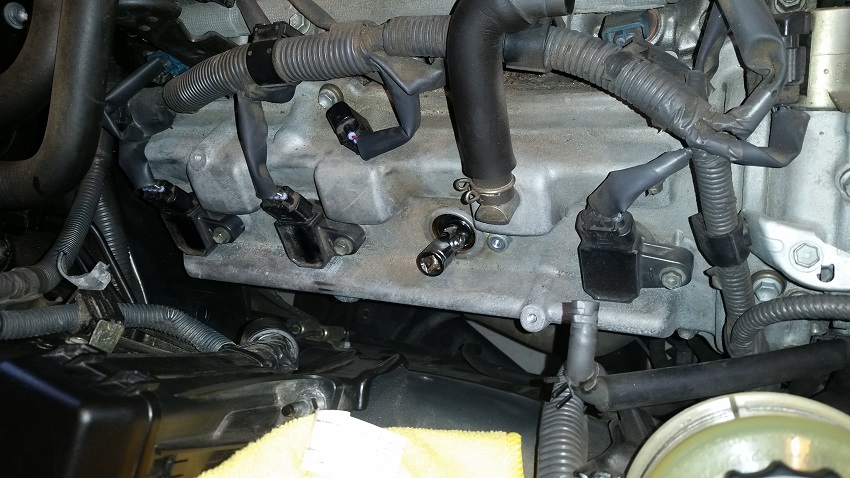
I started at firewall drivers side....First un clip the wires to the boot...some unclip easy with your thumb but most required the bottom part of the clip to be pried outwards with a short flathead screwdriver....careful not to tug on those wires!!!! Once that is un clipped remove bolt that holds boot in place 10mm,,,,,,,,,then remove boot. At this time u can blow compressed air in the chamber while the plug is still in to remove any foreign material......then remove the plug....For this side of the engine I used a 6" extension on my socket wrench......be careful to support the wrench and keep it straight while removing plug....mine were original and did not come out easy. You will have very little space to ratchet.....just keep at it and the plug will finally come out. Get that plug out fast dont spin it around or mess with it...get it out of there so u dont break any foreign debris free.........Sorry this is gunna be soooo long........To install new plug.....I used what I had laying around to solve the issue of the plug sticking to hard in the socket....I put a VERY THIN layer of dielectric grease on the white part of the plug and then popped it in and out of the socket until it would let go fairly easy......I also used a tiny paint brush and used a little synthetic oil or and VERY THIN layer of dielectric grease on the first couple of threads of the plug...I did not use antiseaze........when installing the plug be careful to keep it centered as u slide it down the tube via your socket and extension....then slowly screw the plug in as far as u can by hand.....I thought it was a good idea to count how many turns the plug took to seat...thus they should all take approx the same amount of turns to seat.......Once tight...then give it a good snug up. Then re install boot and boot bolt.....then snap on the electric wires to the boot.........
ok ....that was your basic remove and install.........now here are a couple of tricks...........the plug by the dip stick was tricky....basically u have to gently move the dip stick out of the way and kinda force the boot out of the hole.....be gentle....take your time.
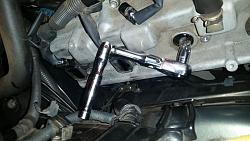
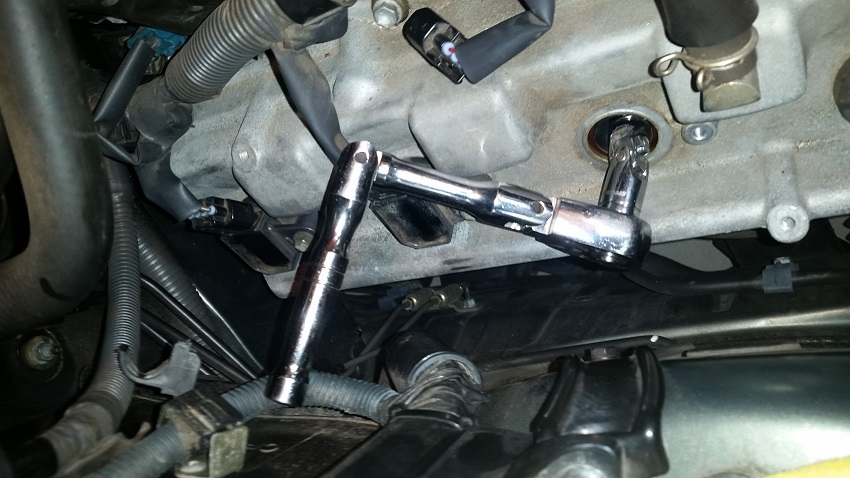
Now on to the other side of the engine...the passenger side. I removed air filter tube to throttle body and the obvious black box that is in your way.......I also removed the additional black plastic engine cover.....Im gunna say that stuff was self explanatory......1 bolt....2 hoses...loosen some clamps.........Now u are ready for passenger side firewall plug.....the fun is over!!!! .....For this side of the engine I had to use the plug socket attached to a 4" extension attached to a swivel joint attached to the wrench......and my socket wrench was multi jointed. Do the same order....remove clip wires.....then bolt....then boot.....Then remove plug.....for me I had to first put plug socket and 4" extension most of the way down the hole...then I snapped the swivel on when I had room....then the wrench...........When the plug was loose I disconnected the wrench then pulled up on the rest of the rig....the swivel would always pop off
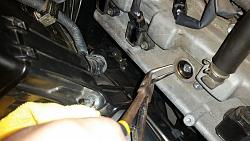
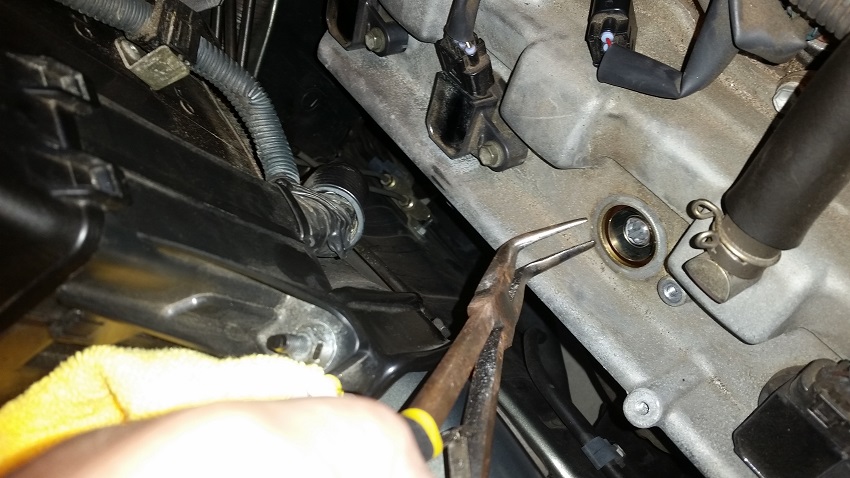
  So I had to retrieve the 4" extension...the plug socket and the plug by grabbing the extension with special needle nose pliers
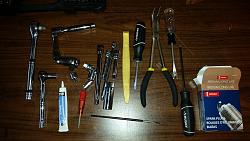

 .......worked perfectly.....see pics
The rest of the plugs are pretty straight forward........once all installed double check that all wires were snapped onto boots firmly.......make sure all tools removed from engine bay.........re install all gizmos...........double check one more time for tools on the engine!!!!
My take on this job..........yes I could now do it in about an hour and a half.....but I did not think this job was easy...mostly due to very little access to use ratchet. I took my time and was extremely methodical ......it took me 3.5 hours......yep....hard to believe huh.......I could have gone much faster but I wasnt going to crack a plug or rip out the small plug wires....so I moved like a turtle.
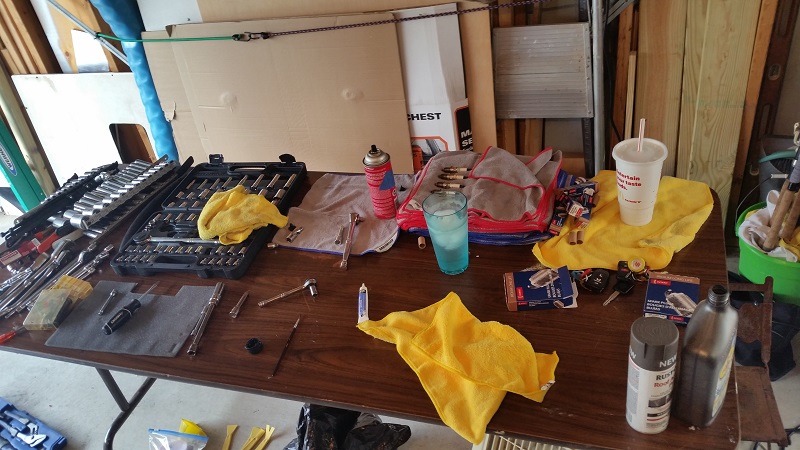
It is very important that u have a good socket set with at least a 6" extension....a 4" extension....a swivel adapter.....and a multi jointed socket wrench was a must for me. A short flat head screw driver....right angle needle nose......some type of lube to release the plug from socket.....your choice for anti seize or not.....see my pics for the tools that I used.
As it turns out my plugs were def the originals w 135K on them....they did not come out easy. When I test drove my car after the repair she seemed to be a bit sportier .....I wouldnt be surprised if I picked up some better fuel economy. I also found out I had a dirty air filter and a leaking temp sensor. Will replace both soon.
Sorry for the long ramble....my intentions are to make this job even easier for the next guy......a big thanks to the other poster for his tutorial....I will include his thread here as well.
I will have to load the pics in a couple of diff posts......u will see the tools and techniques that I used in the pics.
If you are not a fairly confident wrench turner.....leave this job for the pros.....the only reason I say this is......if u screw this job up.....u could do major damage to your engine
Disclaimer........I am not a mechanic.....this info is just how I personally did my repair.....refer to instruction manual for precise info.
I went with OEM Denso plugs......I followed the advice of the previous poster almost to a T but changed a few tools and techniques. This will prob be a long ramble so bear with me.......
Remove plastic engine cover nuts.....( 2 ) 10mm
I started on drivers side.....remove black plastic cover....3 screw clips...just for extra room
I started at firewall drivers side....First un clip the wires to the boot...some unclip easy with your thumb but most required the bottom part of the clip to be pried outwards with a short flathead screwdriver....careful not to tug on those wires!!!! Once that is un clipped remove bolt that holds boot in place 10mm,,,,,,,,,then remove boot. At this time u can blow compressed air in the chamber while the plug is still in to remove any foreign material......then remove the plug....For this side of the engine I used a 6" extension on my socket wrench......be careful to support the wrench and keep it straight while removing plug....mine were original and did not come out easy. You will have very little space to ratchet.....just keep at it and the plug will finally come out. Get that plug out fast dont spin it around or mess with it...get it out of there so u dont break any foreign debris free.........Sorry this is gunna be soooo long........To install new plug.....I used what I had laying around to solve the issue of the plug sticking to hard in the socket....I put a VERY THIN layer of dielectric grease on the white part of the plug and then popped it in and out of the socket until it would let go fairly easy......I also used a tiny paint brush and used a little synthetic oil or and VERY THIN layer of dielectric grease on the first couple of threads of the plug...I did not use antiseaze........when installing the plug be careful to keep it centered as u slide it down the tube via your socket and extension....then slowly screw the plug in as far as u can by hand.....I thought it was a good idea to count how many turns the plug took to seat...thus they should all take approx the same amount of turns to seat.......Once tight...then give it a good snug up. Then re install boot and boot bolt.....then snap on the electric wires to the boot.........
ok ....that was your basic remove and install.........now here are a couple of tricks...........the plug by the dip stick was tricky....basically u have to gently move the dip stick out of the way and kinda force the boot out of the hole.....be gentle....take your time.
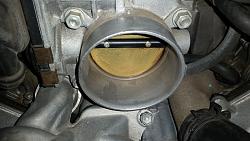
Now on to the other side of the engine...the passenger side. I removed air filter tube to throttle body and the obvious black box that is in your way.......I also removed the additional black plastic engine cover.....Im gunna say that stuff was self explanatory......1 bolt....2 hoses...loosen some clamps.........Now u are ready for passenger side firewall plug.....the fun is over!!!!
.....For this side of the engine I had to use the plug socket attached to a 4" extension attached to a swivel joint attached to the wrench......and my socket wrench was multi jointed. Do the same order....remove clip wires.....then bolt....then boot.....Then remove plug.....for me I had to first put plug socket and 4" extension most of the way down the hole...then I snapped the swivel on when I had room....then the wrench...........When the plug was loose I disconnected the wrench then pulled up on the rest of the rig....the swivel would always pop off So I had to retrieve the 4" extension...the plug socket and the plug by grabbing the extension with special needle nose pliers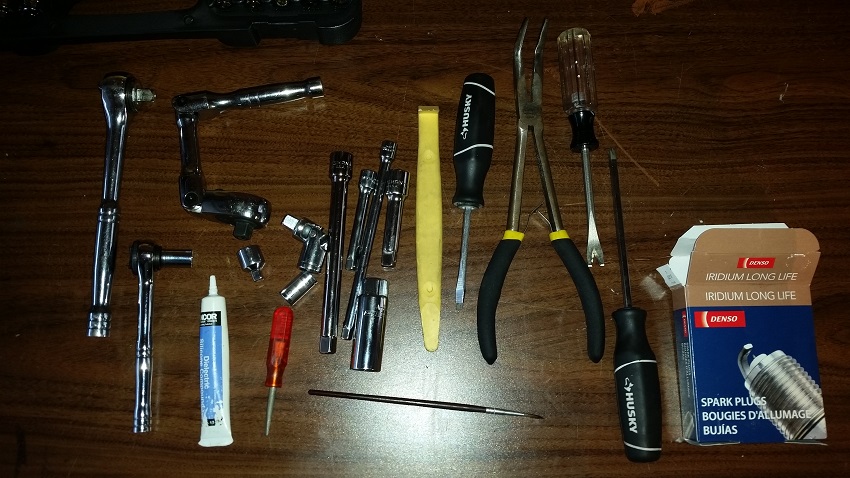
 .......worked perfectly.....see pics
The rest of the plugs are pretty straight forward........once all installed double check that all wires were snapped onto boots firmly.......make sure all tools removed from engine bay.........re install all gizmos...........double check one more time for tools on the engine!!!!
My take on this job..........yes I could now do it in about an hour and a half.....but I did not think this job was easy...mostly due to very little access to use ratchet. I took my time and was extremely methodical ......it took me 3.5 hours......yep....hard to believe huh.......I could have gone much faster but I wasnt going to crack a plug or rip out the small plug wires....so I moved like a turtle.
It is very important that u have a good socket set with at least a 6" extension....a 4" extension....a swivel adapter.....and a multi jointed socket wrench was a must for me. A short flat head screw driver....right angle needle nose......some type of lube to release the plug from socket.....your choice for anti seize or not.....see my pics for the tools that I used.
As it turns out my plugs were def the originals w 135K on them....they did not come out easy. When I test drove my car after the repair she seemed to be a bit sportier .....I wouldnt be surprised if I picked up some better fuel economy. I also found out I had a dirty air filter and a leaking temp sensor. Will replace both soon.
Sorry for the long ramble....my intentions are to make this job even easier for the next guy......a big thanks to the other poster for his tutorial....I will include his thread here as well.
I will have to load the pics in a couple of diff posts......u will see the tools and techniques that I used in the pics.
If you are not a fairly confident wrench turner.....leave this job for the pros.....the only reason I say this is......if u screw this job up.....u could do major damage to your engine
Disclaimer........I am not a mechanic.....this info is just how I personally did my repair.....refer to instruction manual for precise info.

 07-04-15, 09:11 PM
#3
Nice job. Locking extensions are excellent for doing the plugs. The manufacturer (Denso and NGK) and Lexus say not to use anti-seize grease. It will cause the torque to be incorrect potentially damaging the plug or causing it to go too far into the head. Dealers do not use this stuff, they don't come from the factory this way, the plugs are designed not to need this. Don't use anti-seize grease on these cars. It is not the proper way to install plugs. We are not dealing with steel blocks and old outdated plug design.
Something like this is very useful:
http://www.amazon.com/gp/aw/d/B001JG...iAL&ref=plSrch
Edit: Sorry JPV, don't mean to seem like I am lecturing you or anything like that. Thanks for sharing and I am glad you got this done. Fixing those other issues will be great for the car as well.
https://www.clublexus.com/forums/ls4...ml#post8361224
Last edited by Lavrishevo; 07-05-15 at 03:58 PM.
 07-05-15, 09:33 AM
#5
Lexus Test Driver
Thread Starter
No worries Lav...........I read all of the posts about anti seize and thats why I did not use anti seize. It was in the back of my head the whole time.......in my post I mentioned I used a tiny paint brush and applies a VERY THIN.....and I mean.......VERY VERY thin layer of dielectric grease on the first couple of threads only......my plugs were all very difficult to remove.....so I put the smallest amount on simply to assist and have no cross threading.........
I think reading that post about the guy damaging his engine from changing his plugs really made me go slow....and be very careful regarding foreign material getting into the cylinders.
Its funny the more I think about it...and as the labor of the job slowly fades in my mind......the job seems so easy.....like screwing in lightbulbs. ......well......its a little tougher then screwing in lightbulbs.....
Lav......I have a question for you since you are the temp senser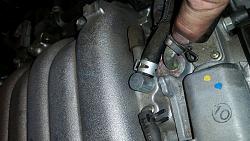

 expert.....well I went back to your posts about the temp sensor and now realize....hey thats what that thing was.....I thought that may have been some kind of 02 sensor or something. Anyway after reading how the other guy resolved his problems by changing the temp sensor...and how his temp needle now stays in the middle....I thought I would order a temp sensor.....my temp needle stays below center and never moves....
The question.....what was the process of removal and install....and did u use any thread sealant? I think u said deep socket to remove....and needle nose to clamp off hose so coolant wont run out.
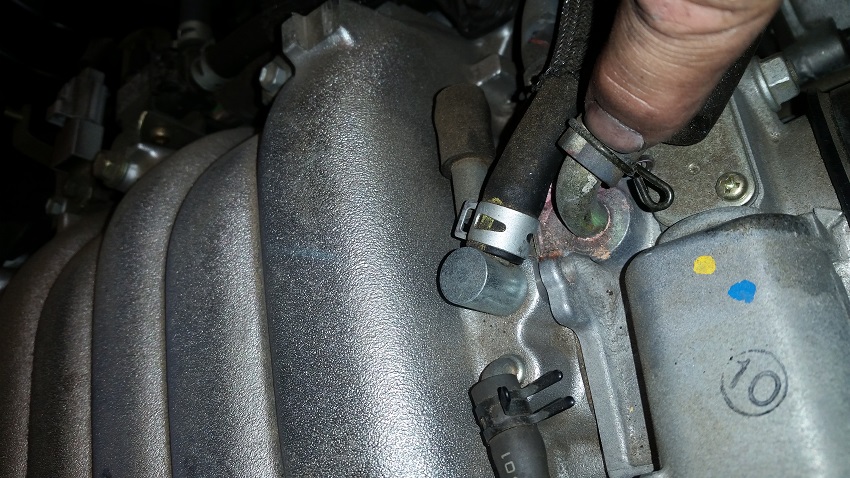
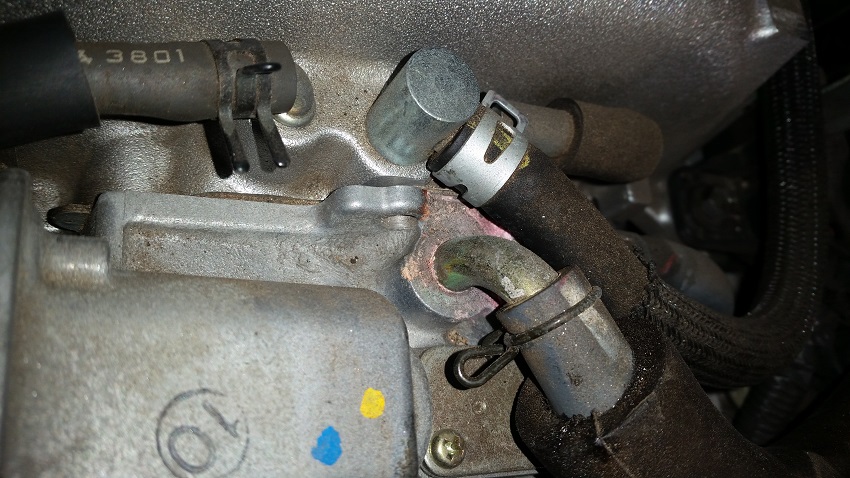
Next question......I noticed a coolant leak near the throttle body....I originally thought this was my temp sensor leaking.......but its not.....its a golden color tube with hose attached....what is this piece?????? Very possible this is left over mess from timing belt service...very likely......will clean it up and keep an eye on it.
And lastly to answer your question about how she is running now..........I noted in my post.....she feels a bit fresher....pulls harder with less pedal push. Now I purposely am doing one fix at a time to see what diff it makes in performance. Next is replace dirty air filter.......then temp sensor......throttle body looked clean.
Sorry for the long post.....Im a rambler
I think reading that post about the guy damaging his engine from changing his plugs really made me go slow....and be very careful regarding foreign material getting into the cylinders.
Its funny the more I think about it...and as the labor of the job slowly fades in my mind......the job seems so easy.....like screwing in lightbulbs. ......well......its a little tougher then screwing in lightbulbs.....
Lav......I have a question for you since you are the temp senser
 expert.....well I went back to your posts about the temp sensor and now realize....hey thats what that thing was.....I thought that may have been some kind of 02 sensor or something. Anyway after reading how the other guy resolved his problems by changing the temp sensor...and how his temp needle now stays in the middle....I thought I would order a temp sensor.....my temp needle stays below center and never moves....
The question.....what was the process of removal and install....and did u use any thread sealant? I think u said deep socket to remove....and needle nose to clamp off hose so coolant wont run out.
Next question......I noticed a coolant leak near the throttle body....I originally thought this was my temp sensor leaking.......but its not.....its a golden color tube with hose attached....what is this piece?????? Very possible this is left over mess from timing belt service...very likely......will clean it up and keep an eye on it.
And lastly to answer your question about how she is running now..........I noted in my post.....she feels a bit fresher....pulls harder with less pedal push. Now I purposely am doing one fix at a time to see what diff it makes in performance. Next is replace dirty air filter.......then temp sensor......throttle body looked clean.
Sorry for the long post.....Im a rambler
07-05-15, 10:19 AM
#6
Lead Lap
iTrader: (1)

Nice to see someone DIY, saving money and enjoying the sense of accomplishment that comes with it.
I have a question/concern about using dielectric grease in any amount on spark plug threads. Since a dielectric impedes the flow of electricity wouldn't it's use bring up the possibility of plugs misfiring as they're not perfectly grounded through the threads now?
In theory, I think I'm right, but in real world use of a very thin layer, it probably won't matter.
07-05-15, 11:12 AM
#7
Lexus Test Driver
Thread Starter
SWFLA........thanks for the heads up......I def am flying by the seat of my pants and knew the mention of my lube would raise some eyebrows......Honestly it was just the only thing in my garage I could think of.....and I also did a few plugs in a VERY THIN coat of synthetic motor oil only on the first couple of threads. I was very concerned that I was making a mistake getting the grease on the white porcelain portion of the plug but given my fresh new spark plug socket I absolutely needed a release agent to retrieve the socket......LAVS point on locking sockets is very true if u have them....use them. Well your heads up made me google the purpose of dielectric grease........wow....lots of info out there.....your point was mentioned several times.........but in the end...looks like I lucked out......use of the grease in the boot is actually recommended....as for the threads....I could not determine an answer....but knowing how little I used...its a non issue. My thought is that all of the sparking was done at the tip of the plug...but your concern about loosing ground via the threads is a good one. I will include 2 links to dielectric grease info.......in the end I would go with your suggestion and just not use it on the threads to be sure...but u guys can draw your own conclusions after reading the links........
thanks again.....
http://www.w8ji.com/dielectric_greas...ive_grease.htm
thanks again.....
http://www.w8ji.com/dielectric_greas...ive_grease.htm
Trending Topics
07-05-15, 12:10 PM
#9
Lead Lap
iTrader: (1)
Good links! It appears that the wrong grease on a boot will cause more problems than on the threads. I'd guess that you're OK with your situation. If you have any ignition problems in the future, you know where to look. At this point it'd be difficult to remove the grease from the plug hole anyhow. "If it ain't broke, don't fix it". 
07-05-15, 03:33 PM
#10

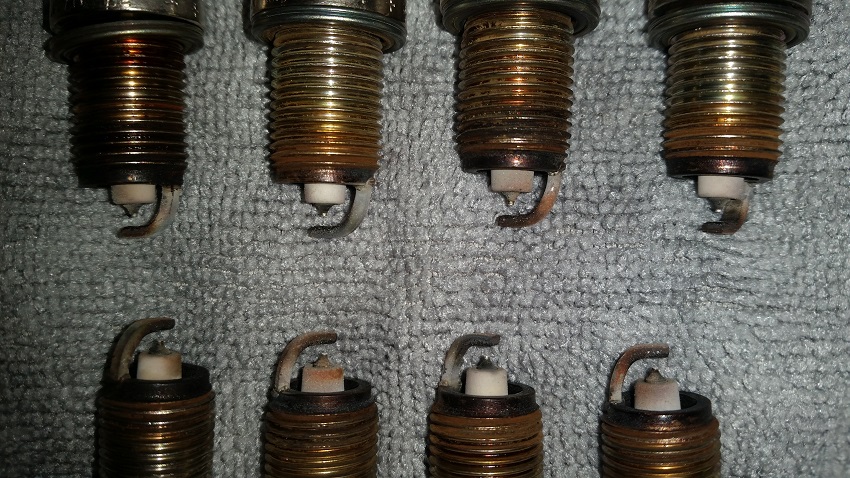
How did your plugs look after removal? Can't really tell from the pictures. Did any of them look really worn? I will be going with the OEM plugs and I'm aware that this job is still relatively labor intensive. For those who don't want to take on the responsibility (especially on the passenger side) give it to Lexus or Toyota and negotiate the price. Make sure you get back all the original plugs....All 8!
07-05-15, 03:56 PM
#11
When I had mine done I did not have the time or tools to do it myself. Lexus of South Atlanta changed me $130.88 in labor. Purchased the plugs myself for $64. I'm talking about plugs only.
The dried coolant was probably there from a throttle body cleaning maybe? Or the TB/WP job. I don't think you are leaking. I think it's just some spillage that dried.
For the temp sensor, oem comes when the threads coated. Just unscrew the old - replace sensor and gasket. I did not remove any hoses. Very little if any coolant came out. Really simple. You know where it is right? On the bottom left of the throttle body if you are facing the engine.
https://www.clublexus.com/forums/ls4...ml#post8842490
Last edited by Lavrishevo; 07-05-15 at 04:28 PM.
07-05-15, 04:24 PM
#12

yer old plugs look pretty good, maybe slightly on the hot side. Might need a top shot to know for sure. Anyone else want to analyze those for fun? I think it all depends on where the throttle was when you shut the thing off. On my bike we'd hit it real hard and kill the motor at the peak, then pull the plugs and inspect, but that aint' happnin here
07-06-15, 05:34 AM
#13
Lexus Test Driver
Thread Starter
Thanks Lav......
other responses.......I will pull the plugs back out and take better pics so they can be analyzed.........they all looked pretty much identical to me.....I will assume u guys are clicking on the pics to enlarge them?????? They all had sort of a grey look to them....and maybe one looked like the gap was a little off.
Boca......I think LAV got the deal of a lifetime on the plug install.......Well....around here a local shop would prob do it for that price.....but no way a dealer would. They quoted me at $20 per plug so thats $160......that leaves $340 for labor.............Yes the passenger side is a little tricky.but no more tricky then the drivers side given the dipstick is in the way on the front plug.....on the passenger side the battery is in the way. The key here is to have the correct tools for the job.....this is imperative!!!! With locking extensions.......and the correct length extensions.....and a multi jointed wrench......this job is not difficult....its more nerve racking that u might screw something up....and frustrating because u are working in tight spaces.......no doubt with the knowledge I have now the job would be a breeze....but those plugs aren't coming out for another 100K so that knowledge wont do me any good ...thats the beauty of the forum is to give others that extra bit of knowledge to do these jobs w confidence.
one more tip...........these plug boot have a little flexibility to them.....to be clear I did everything I could to not force anything.....but for the battery plug and the dipstick plug.....u gotta use just a tiny bit of that boot flex to get her out of the hole......
other responses.......I will pull the plugs back out and take better pics so they can be analyzed.........they all looked pretty much identical to me.....I will assume u guys are clicking on the pics to enlarge them?????? They all had sort of a grey look to them....and maybe one looked like the gap was a little off.
Boca......I think LAV got the deal of a lifetime on the plug install.......Well....around here a local shop would prob do it for that price.....but no way a dealer would. They quoted me at $20 per plug so thats $160......that leaves $340 for labor.............Yes the passenger side is a little tricky.but no more tricky then the drivers side given the dipstick is in the way on the front plug.....on the passenger side the battery is in the way. The key here is to have the correct tools for the job.....this is imperative!!!! With locking extensions.......and the correct length extensions.....and a multi jointed wrench......this job is not difficult....its more nerve racking that u might screw something up....and frustrating because u are working in tight spaces.......no doubt with the knowledge I have now the job would be a breeze....but those plugs aren't coming out for another 100K so that knowledge wont do me any good
...thats the beauty of the forum is to give others that extra bit of knowledge to do these jobs w confidence.one more tip...........these plug boot have a little flexibility to them.....to be clear I did everything I could to not force anything.....but for the battery plug and the dipstick plug.....u gotta use just a tiny bit of that boot flex to get her out of the hole......
07-06-15, 06:24 PM
#14
Lexus Test Driver
Thread Starter
per your request....closer pics of the old plugs....will try to upload in as big of a file that the sire will let me for detailed viewing......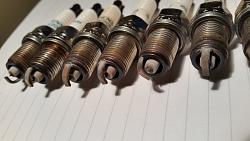
will attach another pic next post

will attach another pic next post
