LS430 Oxygen O2 Sensor Location and Part Numbers
 06-26-10, 09:10 AM
#16
Instructor

At 8 years / 83500km, my CEL came on. Techstream showed code P0155 (Front Right O2 Sensor Heater Element Failure). You will need a proper car lift to change this sensor - a scissor jack is nowhere near enough room to work with.
The dealership charged me 1hr of labor ($106+tax) just to pull the code. I have since bought a Techstream kit for $30 and it takes less than 10 minutes to pull all codes for all 28 ECUs in the car. The dealership wanted $372 for the sensor and 1hr of labor @ $106/hr, plus tax on both. I saved $435 by doing the work myself.
The front right sensor is Lexus part # 89465-50130, OEM Denso part # 234-4630 - both parts are exactly the same. I bought one from sparkplugs.com for $79+$25.20 USPS shipping to Canada (and no customs/duties/brokerage fees), got free access to a car lift, and did the work myself.
If you have time, I recommend doing this job when the engine/oilpan/exhaust/etc are cooled off, otherwise you'll have to be real careful not to touch anything hot.
Steps:
1) Raise car on lift, undo both of the underbody covers (there many 10mm bolts)
2) For the front right sensor, it is easy to unclip the harness, so do that first. Then you can slide a normal socket all the way into the sensor. This can help if your O2 sensor socket is too large or at a tough angle.
3) Unscrew the sensor. My sensor was stuck very solidly on there and I needed to use a torch to heat it up enough to free it.
4) Screw in new sensor - thread in by hand first, then tighten to OEM spec (32ft-lb)
5) After it's torqued in, run the wiring away from heat sources and plug in the harness.
6) Reattach the 2 underbody covers and you're all done. The DTC code doesn't need to be manually reset - after the O2 sensor drive cycle completes, it will see that the new sensor doesn't have a problem anymore.
Total time for replacing the front-right sensor was 1 hour. If the sensor isn't seized, you could do it in 30mins.
Last edited by StanVanDam; 08-07-13 at 12:59 PM.
 09-21-10, 04:56 PM
#17
Driver School Candidate
Join Date: Mar 2007
Location: OH
Posts: 37
Likes: 0
Received 0 Likes
on
0 Posts
Replaced (2) FRONT O2 sensors... but after driving it for about 10 minutes, the Idiot Lights come back on. Hook up the OBD-2 ... and get the same error message - P0031 O2 Sensor Heated Circuit Low Sensor-1, Bank-1.
Next step is to "ring out" the harness... any other suggestions??
Next step is to "ring out" the harness... any other suggestions??
09-21-10, 06:15 PM
#18

At approximately what mileage are the O2 sensors going bad or can it happen at any time?
01-16-11, 09:03 PM
#19

Does anyone happen to know what size O2 sensor socket is needed to remove our O2 sensors? I'm guessing 13/16" but wasn't 100%.
Thanks,
Randy G
'02 LS430
Thanks,
Randy G
'02 LS430
01-21-11, 01:34 PM
#20
Instructor
The standard O2 sensor socket size works, but more importantly is dimension/style of the socket. I bought a plain 7/8 straight socket like the first pic below and it was very difficult to work with. Luckily someone nearby had a socket like the second pic below.
Bad socket:
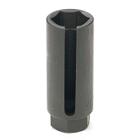
Good socket:
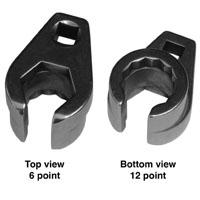
Bad socket:
Good socket:
01-22-11, 06:37 PM
#21
Driver School Candidate

Join Date: Oct 2009
Location: GA
Posts: 2
Likes: 0
Received 0 Likes
on
0 Posts
HELP,
I have sensor 1 bank 1 stuck! I have tried everything, heat, soaking with PB blaster, 22mm deep well, 7/8" and it split my socket! This one is bad (northern salt road car). Now the bolt head is stripped. I cut the wires trying to get a better angle and now I'm in deep do do! Will I have to pull the manifold to get this beast out??? Any additional advise would be a great help!
I have sensor 1 bank 1 stuck! I have tried everything, heat, soaking with PB blaster, 22mm deep well, 7/8" and it split my socket! This one is bad (northern salt road car). Now the bolt head is stripped. I cut the wires trying to get a better angle and now I'm in deep do do! Will I have to pull the manifold to get this beast out??? Any additional advise would be a great help!
08-17-11, 09:36 AM
#22
Driver School Candidate

Join Date: Aug 2011
Location: Texas
Posts: 22
Likes: 0
Received 0 Likes
on
0 Posts
Ok, applause to Pilotsmith and Tallermike for their outstanding photos and instruction on changing these troublesome O2 sensors.
I just changed my Bank2 sensor1 on the code P051.
All I used was a Craftsman 7/8 closed-end wrench and a screw driver. I first used the screwdriver to unsnap the wire connector from the engine and disconnected the harness with my hands. Next, I fed the connector throught the closed end of the wrench down to the sensor head. I just loosened the sensor with the wrench and replaced it the same way. I bought my sensor for about $25 from ebay and had to cut and splice the wires which was no problem at all if you can match color and know how to use a wire splicer.
Last edited by MAXUMIZED; 08-22-11 at 02:14 PM. Reason: add pictures
08-17-11, 10:27 AM
#23
Driver School Candidate
Join Date: Jun 2011
Location: California
Posts: 45
Likes: 0
Received 0 Likes
on
0 Posts
As the title prompted, here are the OEM o2 sensor part numbers:
89465-50160, 89465-50140, 89465-50130, 89465-50120.
And the locations are shown in this Chilton diagram:
http://content.chiltonsonline.com/co...LEXU_G0025.pdf
89465-50160, 89465-50140, 89465-50130, 89465-50120.
And the locations are shown in this Chilton diagram:
http://content.chiltonsonline.com/co...LEXU_G0025.pdf
05-11-12, 07:39 PM
#25
Driver School Candidate

"TallerMike" did a great job with his post replacing the 02 sensor on a 2002 LS-430.
I followed his instructions and pictures and was able to do the job.
I"m adding some pictures and ideas that I found when doing the installation, to make it easier for the next guy.
First of all, I decided to try the $19.95 universal 02 sensor sold for my lexus on Ebay. My first thought was it was cheap because it was an off brand made in China. I installed it correctly and reset the trouble light, but the light kept coming on. I discovered that the sensor should put out about .5 volts DC when hot, so I attached a volt meter to the connector and found the universal went to .9 volts and then dropped off to milivolts - NO GOOD. Now my guess is that the guy selling the 02 sensors on Ebay cheap is selling factory rejects - otherwise how could he buy them cheap enough to sell for $19.95 including shipping. I then bought a Denso and it is working correctly - putting out about .8 volts continually. So, this is what I have to add to help you guys doing this yourself.
I used the part number from the original for Bank 2 Sensor 2 - the passenger side with access from under the car without removing the splash pans - the downstream - Toyota 89465-50140 and that converts to a Denso # 234-4167.
The part I ordered had the connector and the rubber grommet.

The blue and white wires are the connections for your voltmeter and should output .2 to .9 volts. If not then you need to replace it.
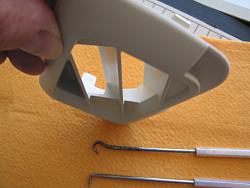
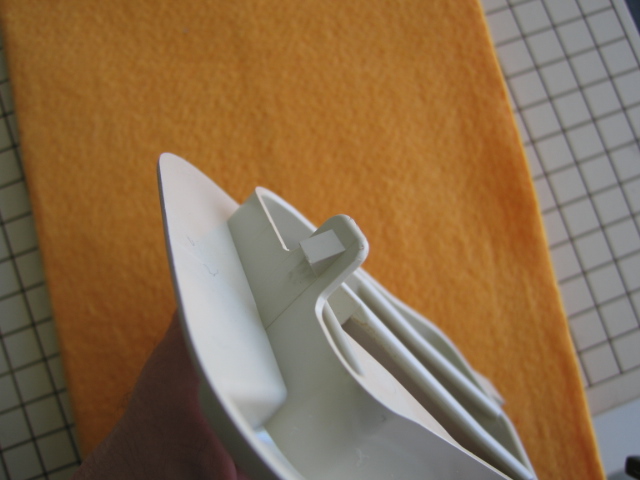
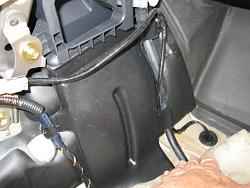
Working under the car was easy, but figuring out some of the details about moving the carpet was my issue. The first thing is to remove the vent. Here is a picture of the vent with the tab that locks it in place. Be careful not to break the tab because the tight fitting vent helps keep the carpet in place. Use a tool to pull the tab out while pulling on the vent.

Once you have the vent out you need to push down and pull out to get the carpet out enough to expose the cable and hole in the floor.
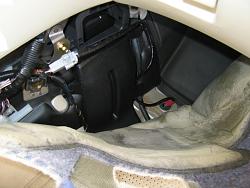
In this picture you can see the original 02 sensor wire and the 4 red butt connectors are from the universal POS 02 sensor that I installed completely from under the car. If the universal 02 sensor worked correctly I would not have had to open the inside to work on it. Oh Well! I had to open the inside to test the voltage of the universal 02 sensor - and it was bad.
The clip is reusable if you don't F&@*$&^ it up. Notice that you have to squeeze the length of the clip to release the tabs so you can remove it from the bracket. I've run out of picture space in this post, so I will do another post with some more helpful info.
Richard from Rambo Battery com
I followed his instructions and pictures and was able to do the job.
I"m adding some pictures and ideas that I found when doing the installation, to make it easier for the next guy.
First of all, I decided to try the $19.95 universal 02 sensor sold for my lexus on Ebay. My first thought was it was cheap because it was an off brand made in China. I installed it correctly and reset the trouble light, but the light kept coming on. I discovered that the sensor should put out about .5 volts DC when hot, so I attached a volt meter to the connector and found the universal went to .9 volts and then dropped off to milivolts - NO GOOD. Now my guess is that the guy selling the 02 sensors on Ebay cheap is selling factory rejects - otherwise how could he buy them cheap enough to sell for $19.95 including shipping. I then bought a Denso and it is working correctly - putting out about .8 volts continually. So, this is what I have to add to help you guys doing this yourself.
I used the part number from the original for Bank 2 Sensor 2 - the passenger side with access from under the car without removing the splash pans - the downstream - Toyota 89465-50140 and that converts to a Denso # 234-4167.
The part I ordered had the connector and the rubber grommet.
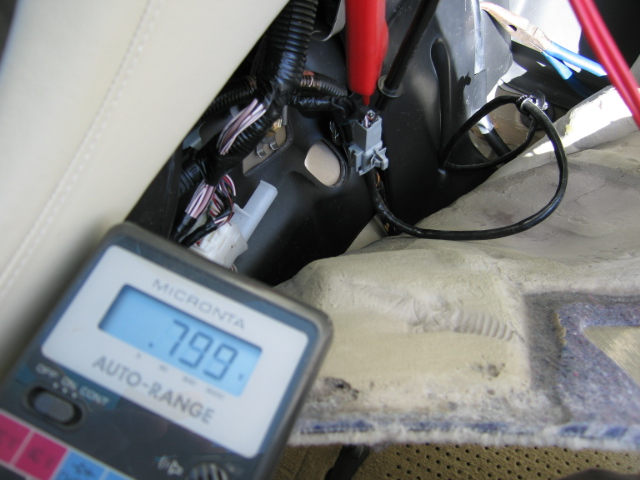
The blue and white wires are the connections for your voltmeter and should output .2 to .9 volts. If not then you need to replace it.
Working under the car was easy, but figuring out some of the details about moving the carpet was my issue. The first thing is to remove the vent. Here is a picture of the vent with the tab that locks it in place. Be careful not to break the tab because the tight fitting vent helps keep the carpet in place. Use a tool to pull the tab out while pulling on the vent.

Once you have the vent out you need to push down and pull out to get the carpet out enough to expose the cable and hole in the floor.
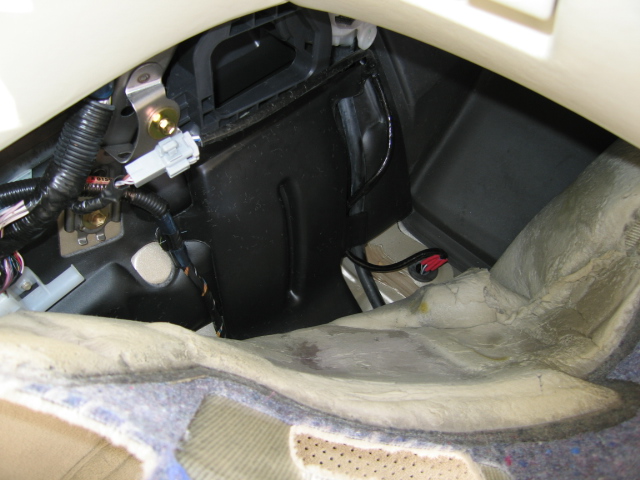
In this picture you can see the original 02 sensor wire and the 4 red butt connectors are from the universal POS 02 sensor that I installed completely from under the car. If the universal 02 sensor worked correctly I would not have had to open the inside to work on it. Oh Well! I had to open the inside to test the voltage of the universal 02 sensor - and it was bad.

The clip is reusable if you don't F&@*$&^ it up. Notice that you have to squeeze the length of the clip to release the tabs so you can remove it from the bracket. I've run out of picture space in this post, so I will do another post with some more helpful info.
Richard from Rambo Battery com
Last edited by rickcad; 05-14-12 at 07:30 PM.
The following 2 users liked this post by rickcad:
coug66 (05-27-17),
Howard300c (04-07-19)
05-11-12, 08:09 PM
#26
Driver School Candidate
If you didn't see the first post then find it now and read it first.
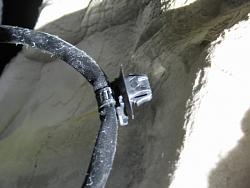
I left off showing the clip that secures the wire and how to remove it.
To get the clip off the wire, so it can be used on the new 02 sensor you must release the lock and push out the strap - it is made like a wire tie.
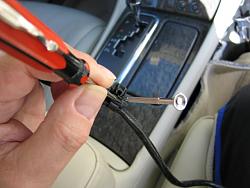
I used a very small jewelers screwdriver to push the lock out of the way and then another screwdriver to push the strap out of the holder. Now put it on the new 02 sensor wire and push in the strap, but don't make it tight yet, so you can adjust it later.

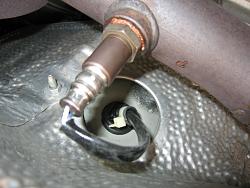
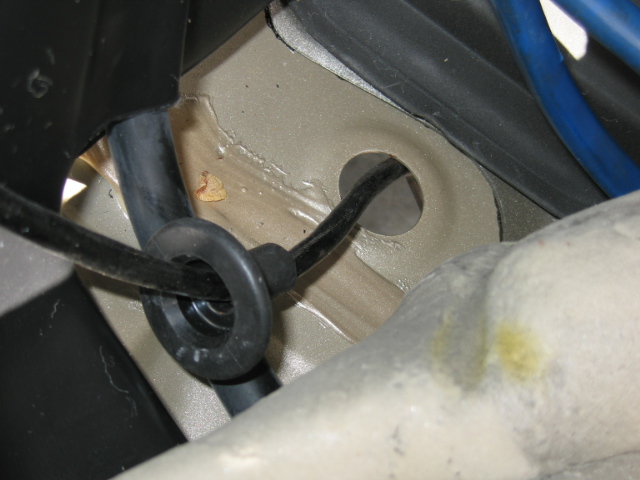
After pulling back the carpet far enough you will see the grommet in the floor. You can push the grommet through the hole and then push the connector through. Then unscrew the old sensor using a 7/8" open wrench. The pic above shows the new sensor I dropped down through the hole and the new grommet is in position. Go under the car and screw in the new 02 sensor. Then come back inside and push the grommet into the hole.
It is important to have the correct amount of wire under the car for flexing, but not too much where it might hit the exhaust pipe. Since the new grommet has a larger hole than necessary I used a wire tie to squeeze the opening closed so dirt or water won't come in underneath.
Here is the completed installation of the new Denso 02 sensor.

Now you can test the new 02 sensor. Put the DC volt meter connections to the white and blue wires (they are a different color on the mating connector) and start the car. The voltage should start at milivolts and gradually increase to .5 to .8 volts DC. and stay there.
It was a little tricky getting the carpet back in correctly - just be patient and work it into the space it came out of, so that the opening for the vent lines up correctly. Snap in the vent and then reset your trouble light.
I purchased a ELM327 OBD2 USB adapter that came with some software and used my laptop computer to read and reset the car's computer - worked great and the adapter cost me about $18 on Ebay.
Be sure to check out our new power tool battery products at Rambo Battery dot com
I hope this makes your life easier! Of course - use at your own risk - for informational purposes only.
Regards,
Richard - Rambo Battery Com
I left off showing the clip that secures the wire and how to remove it.
To get the clip off the wire, so it can be used on the new 02 sensor you must release the lock and push out the strap - it is made like a wire tie.
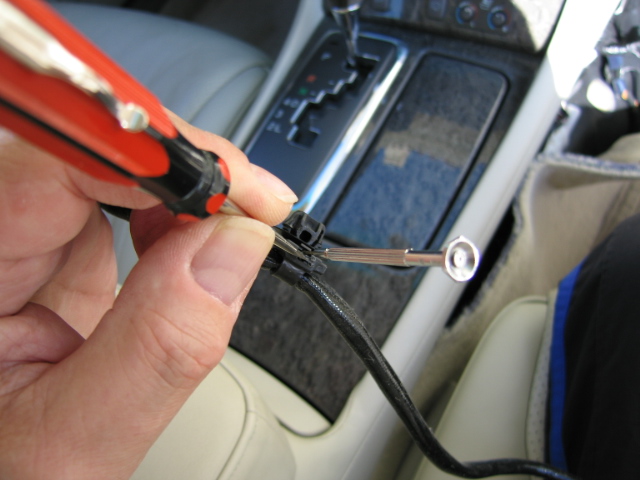
I used a very small jewelers screwdriver to push the lock out of the way and then another screwdriver to push the strap out of the holder. Now put it on the new 02 sensor wire and push in the strap, but don't make it tight yet, so you can adjust it later.
After pulling back the carpet far enough you will see the grommet in the floor. You can push the grommet through the hole and then push the connector through. Then unscrew the old sensor using a 7/8" open wrench. The pic above shows the new sensor I dropped down through the hole and the new grommet is in position. Go under the car and screw in the new 02 sensor. Then come back inside and push the grommet into the hole.

It is important to have the correct amount of wire under the car for flexing, but not too much where it might hit the exhaust pipe. Since the new grommet has a larger hole than necessary I used a wire tie to squeeze the opening closed so dirt or water won't come in underneath.

Here is the completed installation of the new Denso 02 sensor.

Now you can test the new 02 sensor. Put the DC volt meter connections to the white and blue wires (they are a different color on the mating connector) and start the car. The voltage should start at milivolts and gradually increase to .5 to .8 volts DC. and stay there.
It was a little tricky getting the carpet back in correctly - just be patient and work it into the space it came out of, so that the opening for the vent lines up correctly. Snap in the vent and then reset your trouble light.
I purchased a ELM327 OBD2 USB adapter that came with some software and used my laptop computer to read and reset the car's computer - worked great and the adapter cost me about $18 on Ebay.
Be sure to check out our new power tool battery products at Rambo Battery dot com
I hope this makes your life easier! Of course - use at your own risk - for informational purposes only.
Regards,
Richard - Rambo Battery Com
Last edited by rickcad; 05-14-12 at 07:29 PM.
05-22-12, 02:26 AM
#27
Driver School Candidate
"Pilotsmith" did a great job with his 02 sensor replacement and his pictures where very helpful.
I just replaced the passenger side upstream sensor (bank 2 sensor 1).
I removed the plastic splash guard and then the little wing like splash panel that only has one nut holding it on.
From under the car I cracked loose the sensor using an 02 socket from harbor freight and a 1" box end wrench. I didn't unscrew it yet.
I used a long screwdriver to pry out the clip that holds the wire to the frame, but you need to squeeze the locking tab with long pliers and pry out with the screwdriver at the same time.
Then I was able to get my hand through openings in the frame and onto the connector. As the other post stated, you need to push down on the locking tab on the back of the connector where you can't see it. At the same time I used pliers to pull on the wire until the connector came out of the socket. With the wire free you can unscrew the sensor. I used the other type 02 sensor socket with the 3/8" square drive on the side - harbor freight also. I guess the Asian who installed the original 02 sensor forgot the anti-seize compound because the threads galled. What should have been less than 1 minute took an hour of back and forth to get it out - even with WD-40. The threads were galled, so I got an 18mm x 1.5mm thread chaser from O'Reilly's autoparts and fixed the hole.
I checked the Denso 234-4630 heater (black wires) with an ohm meter and got 12 ohms. I removed the clip from the old wire by prying up the plastic lock and pushing out the band (it is just like a wire tie) and measured it from the sensor. Then I put it loosely on the new sensor wire, the same distance from the sensor. Then I screwed the sensor in tight with anti-seize compound. I carefully pushed the connector into the housing using one hand and then pushed the clip into the frame. I adjusted the wire so there was some slack between the clip and sensor and then tightened the clip's band around the wire. I felt the wire near the connector was too loose and would rub on something, so I used a wire tie and tied it onto a pipe nearby.
The next step was cleaning all the tools and putting everything away. It would have been easier if I had a lift, but it was not too bad of a job except for the galled threads. I wonder what the dealer would have charged for this job?
I'm taking the time to write this because we need to help each other - the dealers keep their service info among themselves - their manuals are not even in the San Diego CA public library.
07-04-12, 11:06 AM
#28
Lexus Test Driver
Join Date: Jul 2008
Location: Philly, Yes Philly is a state!!
Posts: 1,269
Likes: 0
Received 2 Likes
on
2 Posts
Very old post i see. My O2 sensor 1, Bank 1 just threw check engine/TRAC off/Check engine lights.
I searched and this is what i came up with. Extremely informative. Unfortunately for me the only think i have is a jack and i'm not trusting it to hold the car up to get underneath.
Dealership tried to charge almost $700!!!. I bought the sensor from autozone for $90 and i'm supposed to take the car to the mechanic tomorrow. Guess roughyly $200 trumps $700 anyday!!!
Thanks for the info guys
12-29-12, 04:53 PM
#29

AWESOME thread!!
Just got the 0031 code today, 2006 LS430. Are these part #'s listed in the thread going to work for a 2006 model?
Also just to confirm, is Bank 1 Sensor 2 the same as Bank 2 Sensor 2 Denso # 234-4167 ?
Just got the 0031 code today, 2006 LS430. Are these part #'s listed in the thread going to work for a 2006 model?
Also just to confirm, is Bank 1 Sensor 2 the same as Bank 2 Sensor 2 Denso # 234-4167 ?
Last edited by L8RSk8R; 12-29-12 at 05:20 PM.
07-15-13, 09:20 AM
#30

I have been trying to change out my DS Bank 1 sensor as I have gotten the check engine light. I was able to remove the old sensor. I cut the wires off of the old sensor so it would be easier to remove.
I can't for the life of me get the clip undone though. I have tried to use a coat hanger with a bent tip to push the locking tab while pulling but I can only get one hand in the tight area. Any other suggestions?
I can't for the life of me get the clip undone though. I have tried to use a coat hanger with a bent tip to push the locking tab while pulling but I can only get one hand in the tight area. Any other suggestions?