When you click on links to various merchants on this site and make a purchase, this can result in this site earning a commission. Affiliate programs and affiliations include, but are not limited to, the eBay Partner Network.
This is my write up on how to retro fit your 98-00 headlights with the Morimoto mini d2s 3.0s. Not saying this is the correct or only way to do it but this is how I did it. First remove the headlights out the car. To do this you will need a screwdriver and a 10mm socket and rachet. To remove your headlights you will need to remove the top screw off the corner light. Then with a flat head pry between the headlight assembly and corner assembly and the corner should pop out of place. The headlight assembly itself has 3 screws and 1 nut holding it in place. Make sure you remove all of them before trying to remove. Once you have both headlights out remove all the rubber groments the headlight has. You will be placing these in the oven so you don't want anything that can melt on them. I used a razor blade to remove the tip weather strip off the headlights. They should be bare before you put them into the oven
Once you have gotten to this stage preheat the oven to 270 degrees. Make sure you buy a cooking sheet. If you place this on the grill of the oven the lines of the grill will melt into your headlight assembly. Place the grill to the lowest mounting point to allow the headlight to fit. Once the oven has reached 270 place the headlight into the oven for 7mins.
Be careful when pulling these out the oven as they will be really hot. Put the headlight on its back resting on the housing and begin pulling back the tabs holding the lense in place back gently. Do not pull on these hard as they are soft and will break.
Next with a flat head screwdriver begin to pry between the housing and the lense. I found doing this in the inner corner of the headlight was the best way. The glue should be very soft but still be careful and patient. You don't want to crack or break anything.
Make sure you are wearing some gloves as the glue is very sticky and will stick to your fingers. Once you have this much of a gap (with the housing facing down and the lense facing up) grab the bottom housing with one hand and the lense with the other hand and separate them gently.. the glue should be very soft and allow the separation easily.
Here is the Morimoto d2s mini 3.0 Square that I bought from The Retrofit Source. 120 For the set plus you need to buy the shroud of your choice. I think this is a great choice for a first time retrofit since it has a threaded back end making the process extremely easy for a first timer. They sell these round or square and with many different shroud choices. You will need a 46mm socket to tighten the nut on these so make sure you go out and get one before starting. The bulb on the headlight originally was a 9006 which is very tiny compared to the back end of this projector. Modification of the housing is necessary to allow these to fit. Take your time when cutting and be as even as possible.
Next gauge the size of the projector and how much will need to be cut to fit it. Try to be as even as possible and TAKE YOUR TIME! If you mess this up you will be needing to buy another headlight so make sure you take your time and be patient. Cutting little by little is the way to go. Here is the harbor freight tool i used
Here is how i modified the housing to make these fit. Not saying this is the right way to do it but this is how I did it.
besides making the hole bigger to fit the projectors you will also need to cut off some of the back off it so you have enough threads to tighten the projector.. the factory housing is pretty deep so this will be a trial and error process. keep cutting till it all fits.. Again take your time and cut little by little.
Now blow off the assembly as best as possible and then clean off the chrome pieces with a microfiber cloth and alcohol
Place the projector in place and hand tighten the nut. The proper way of of aligning the cut off of the projector reinstalling in your car and making adjustments with your bulbs on. I got lazy on this part and decided to do it with a flashlight. Now that I'm all done one of the projectors is just a tiny bit off. I highly recommend doing this the proper way and not the way I'm illustrating.
Once you have lined up the cut off from both projectors properly tighten the 46mm nut while holding the projector with the other hand. Do not touch the lense. Common sense is key here when tightening. you don't want to crack the housing. Make sure you tighten enough where you know the projector won't move and that should be enough.
now you will need JB weld to install the shroud. Apply JB weld on the inner ring of the shroud and install. Allow Ten mins to cure
Next I bought Plastic X from Meguiars to restore the lenses.
Now I was ready for reassembly. I placed the lense back onto the housing and pushed it in as far as it would allow before heating it up again. Preheat oven at 270 degrees again and after putting the lense back on place it back into the oven for 7mins
Once you pull the headlight out of the oven the lense should slide back into place very easily. with the housing facing down and the lense facing up push down on the and secure all the tabs get on to the lense. Once you see the lense is completely flush leave the headlight laying on the housing part until it cools down. Since i only really lost some factory glue on the corner where I pryed on to remove the lense I used a little black silicone on that corner after the headlight cooled down.
After the headlight has cooled down reinstall all the rubber groments and clean the outside of the lense. Then reinstall on car
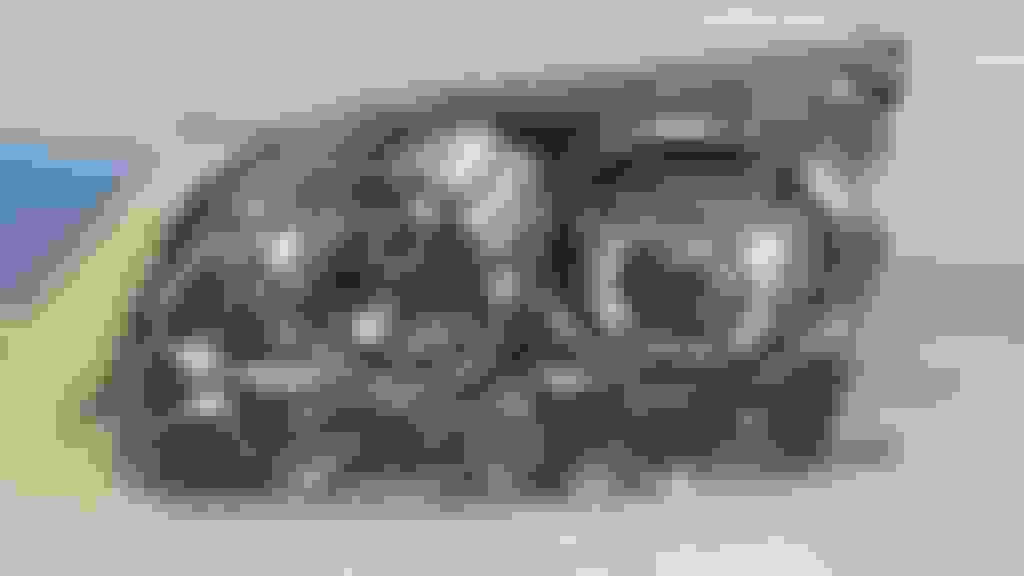
End result
Finally had the time to come back and fix this post. As far as the cutoff goes it's awsome.. this is the only pic i have at the moment but this was before I readjusted the projector since it was off. This is a quality projector and you really get a lot of bang for your buck. Only thing I do regret is the shroud I bought. It has acrylic pieces on it so that light can light through it and I'm not sure I'm diggin it yet... Maybe it will grow on me.
Been dieing to go for LS430s but just havent pulled the trigger. This is a nice in between set up. Can we get pics of the light output and cutoff at night? They look great and it seems easy enough of a retro.
Looks good man, I'm in for cutoff pics also. Why didn't you drop in some demon eyes while you were in there? I like the shrouds by the way, the square is definitely a different touch. I am in the process of having mine built and will post them up when they're done and hopefully everything else I have can go on when I install those. You motivate me, keep it up!
Looks good man, I'm in for cutoff pics also. Why didn't you drop in some demon eyes while you were in there? I like the shrouds by the way, the square is definitely a different touch. I am in the process of having mine built and will post them up when they're done and hopefully everything else I have can go on when I install those. You motivate me, keep it up!
I keep forgetting to take pics at night. I didn't do demon eyes because i was doing this set more as a test set. Wanted to see how easy it was going to be.. Now i'll definitely do something more aggressive. I'll probably end up selling this set after i get tired of them and building something else. The square is growing on me. Ya post yours i wanna see them
 09-06-16, 11:06 AM