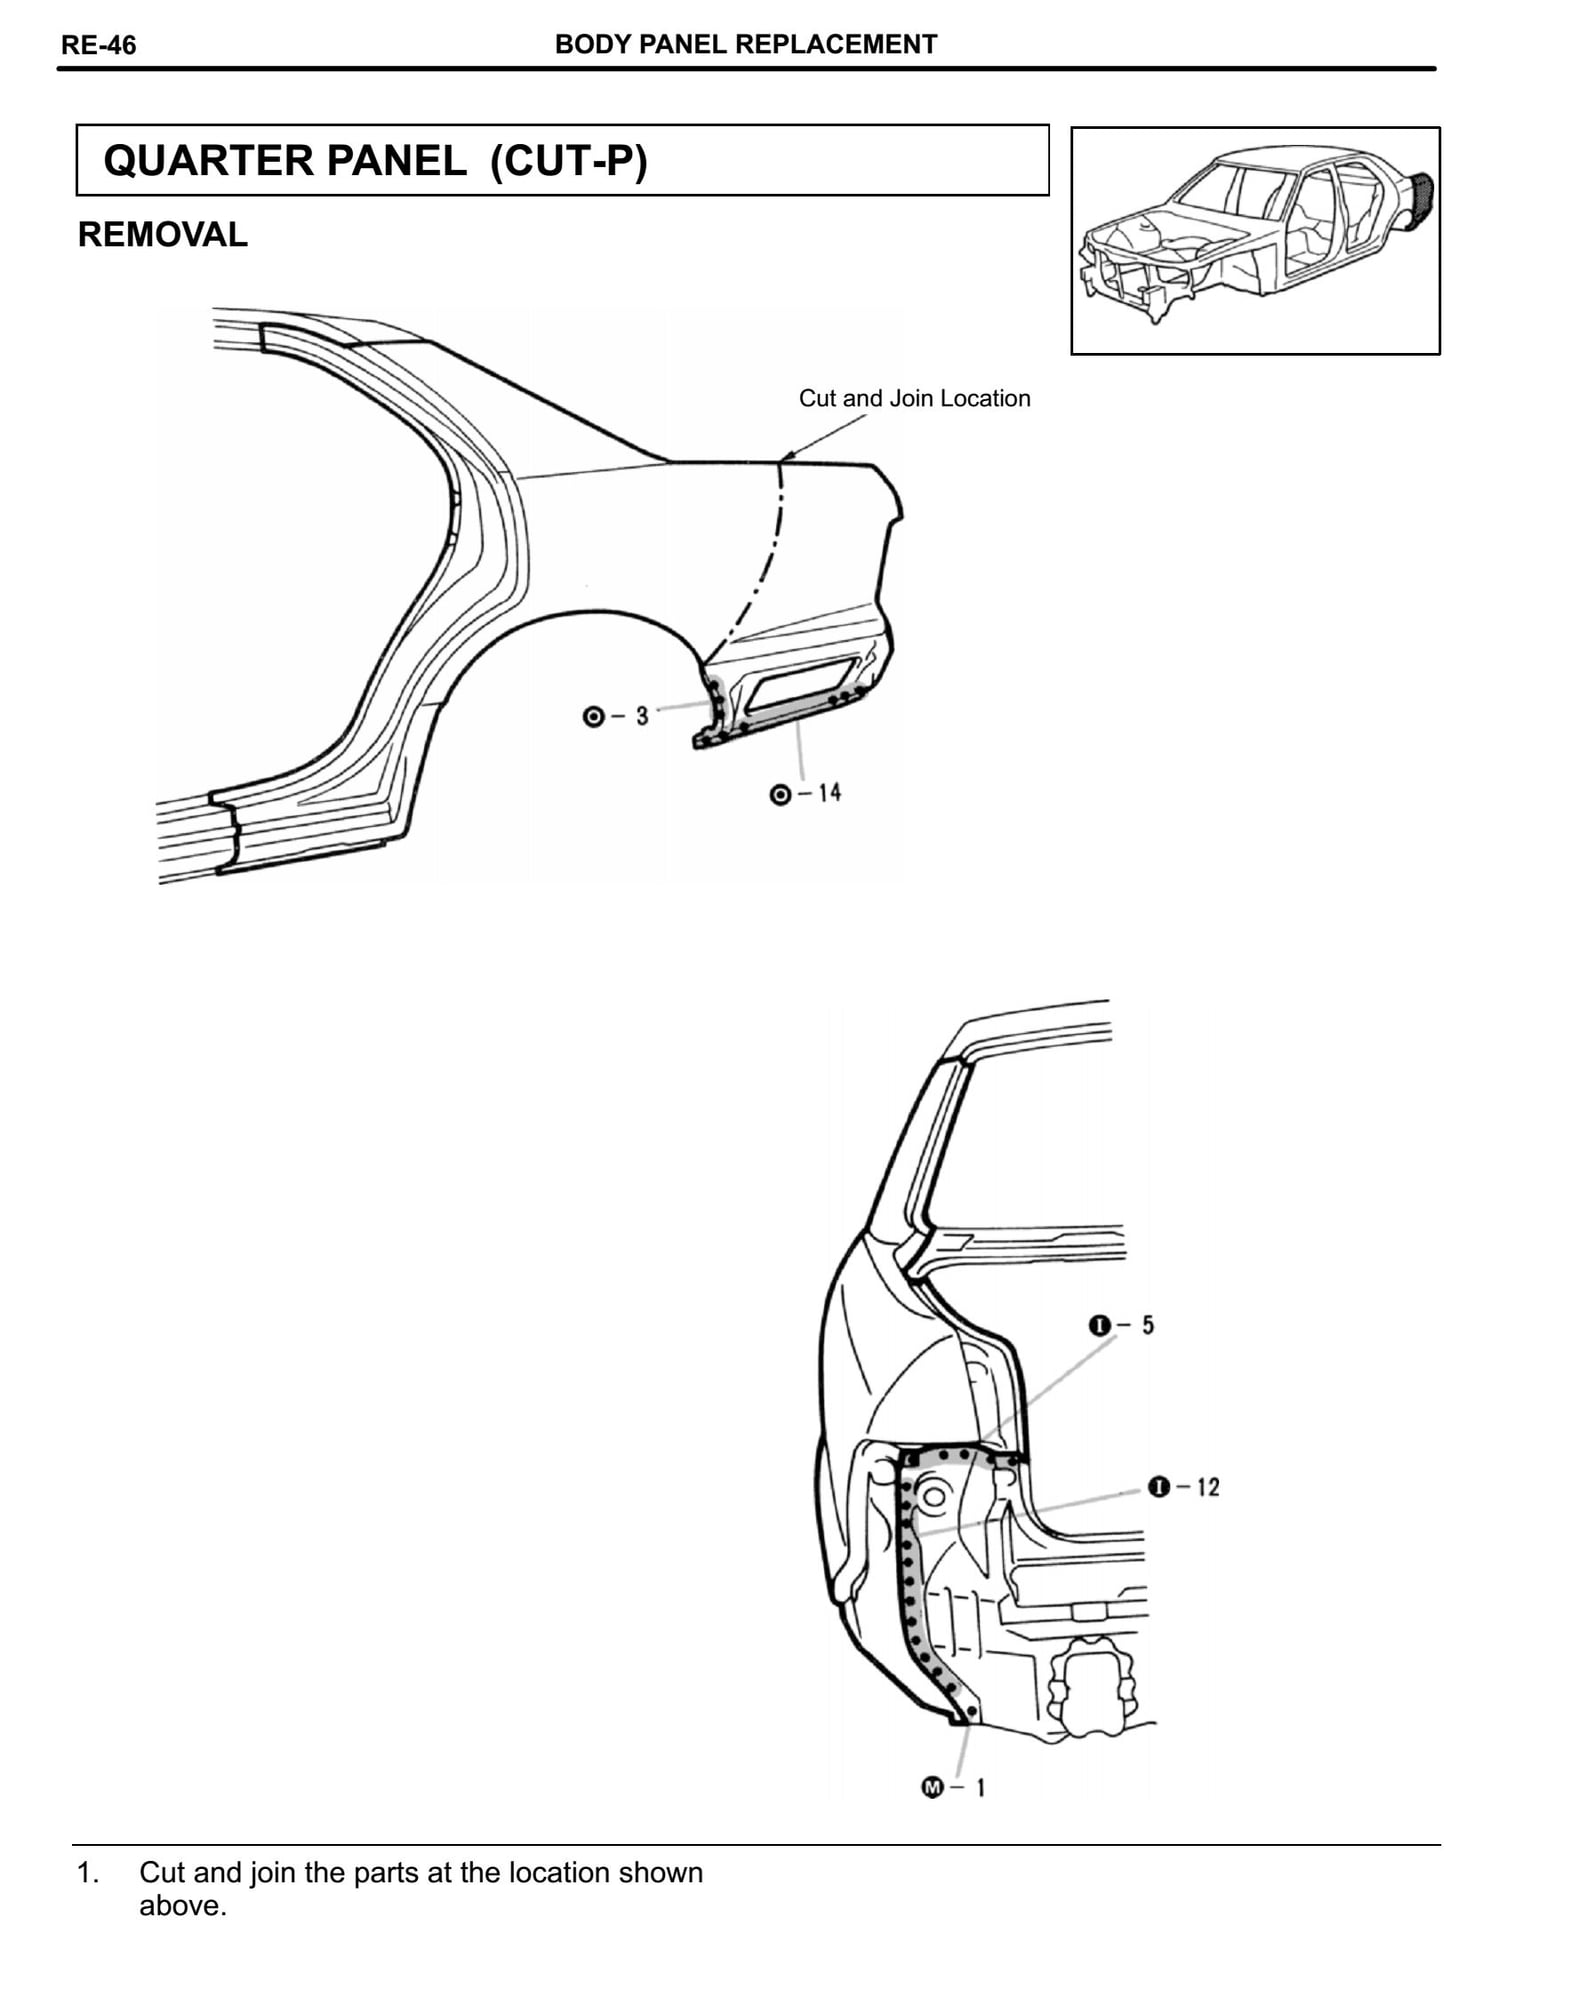
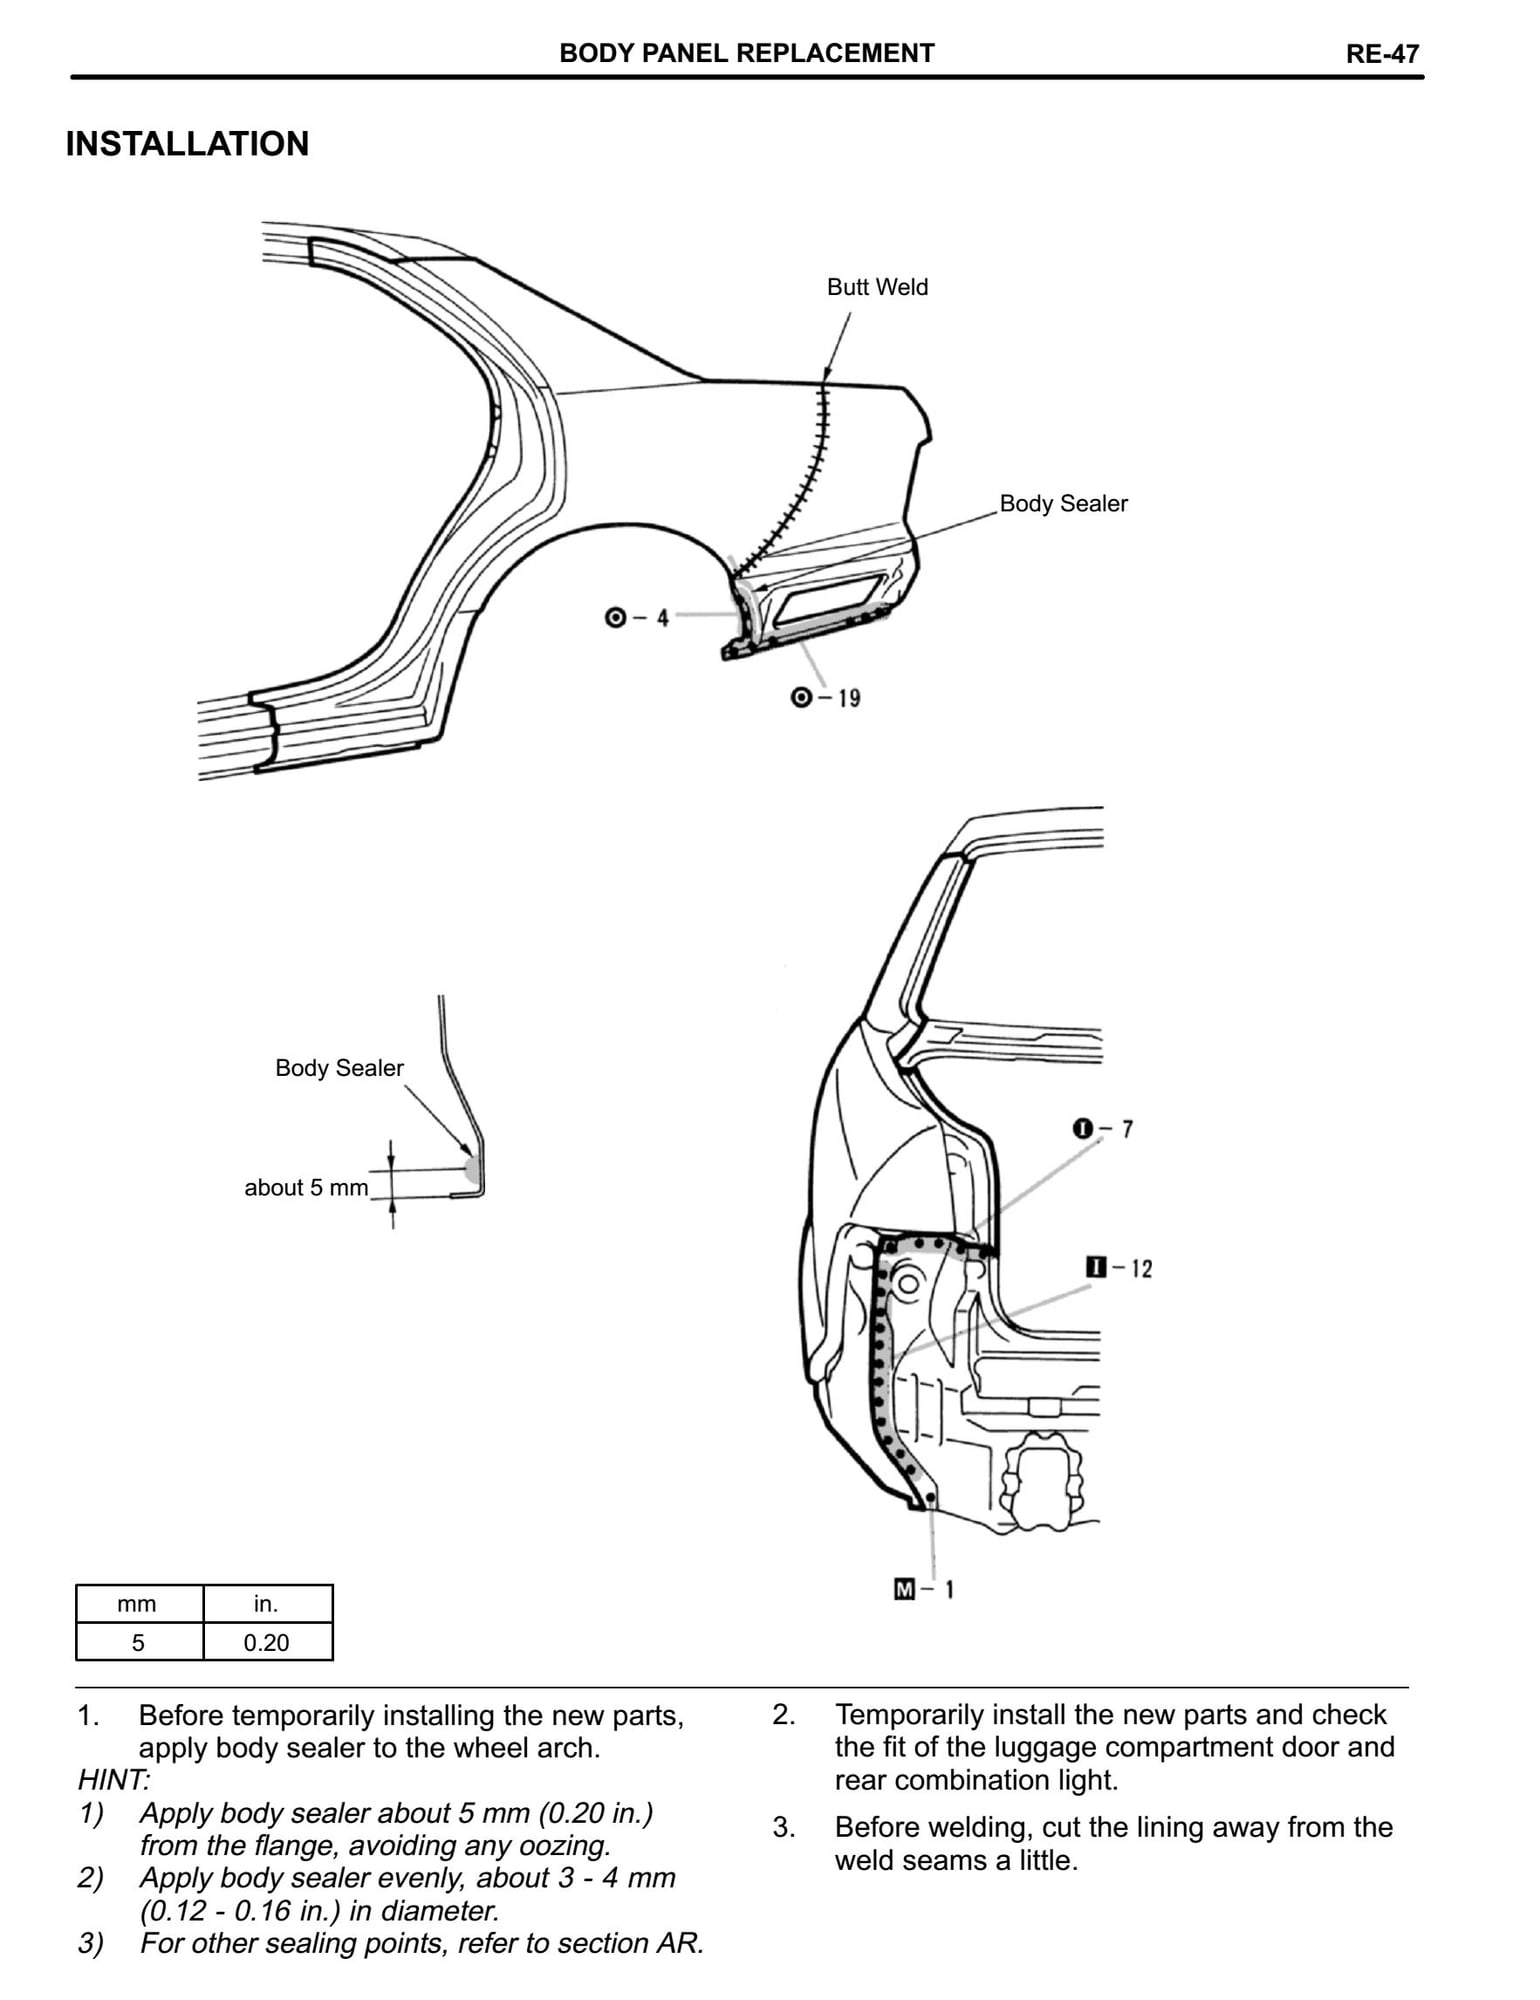
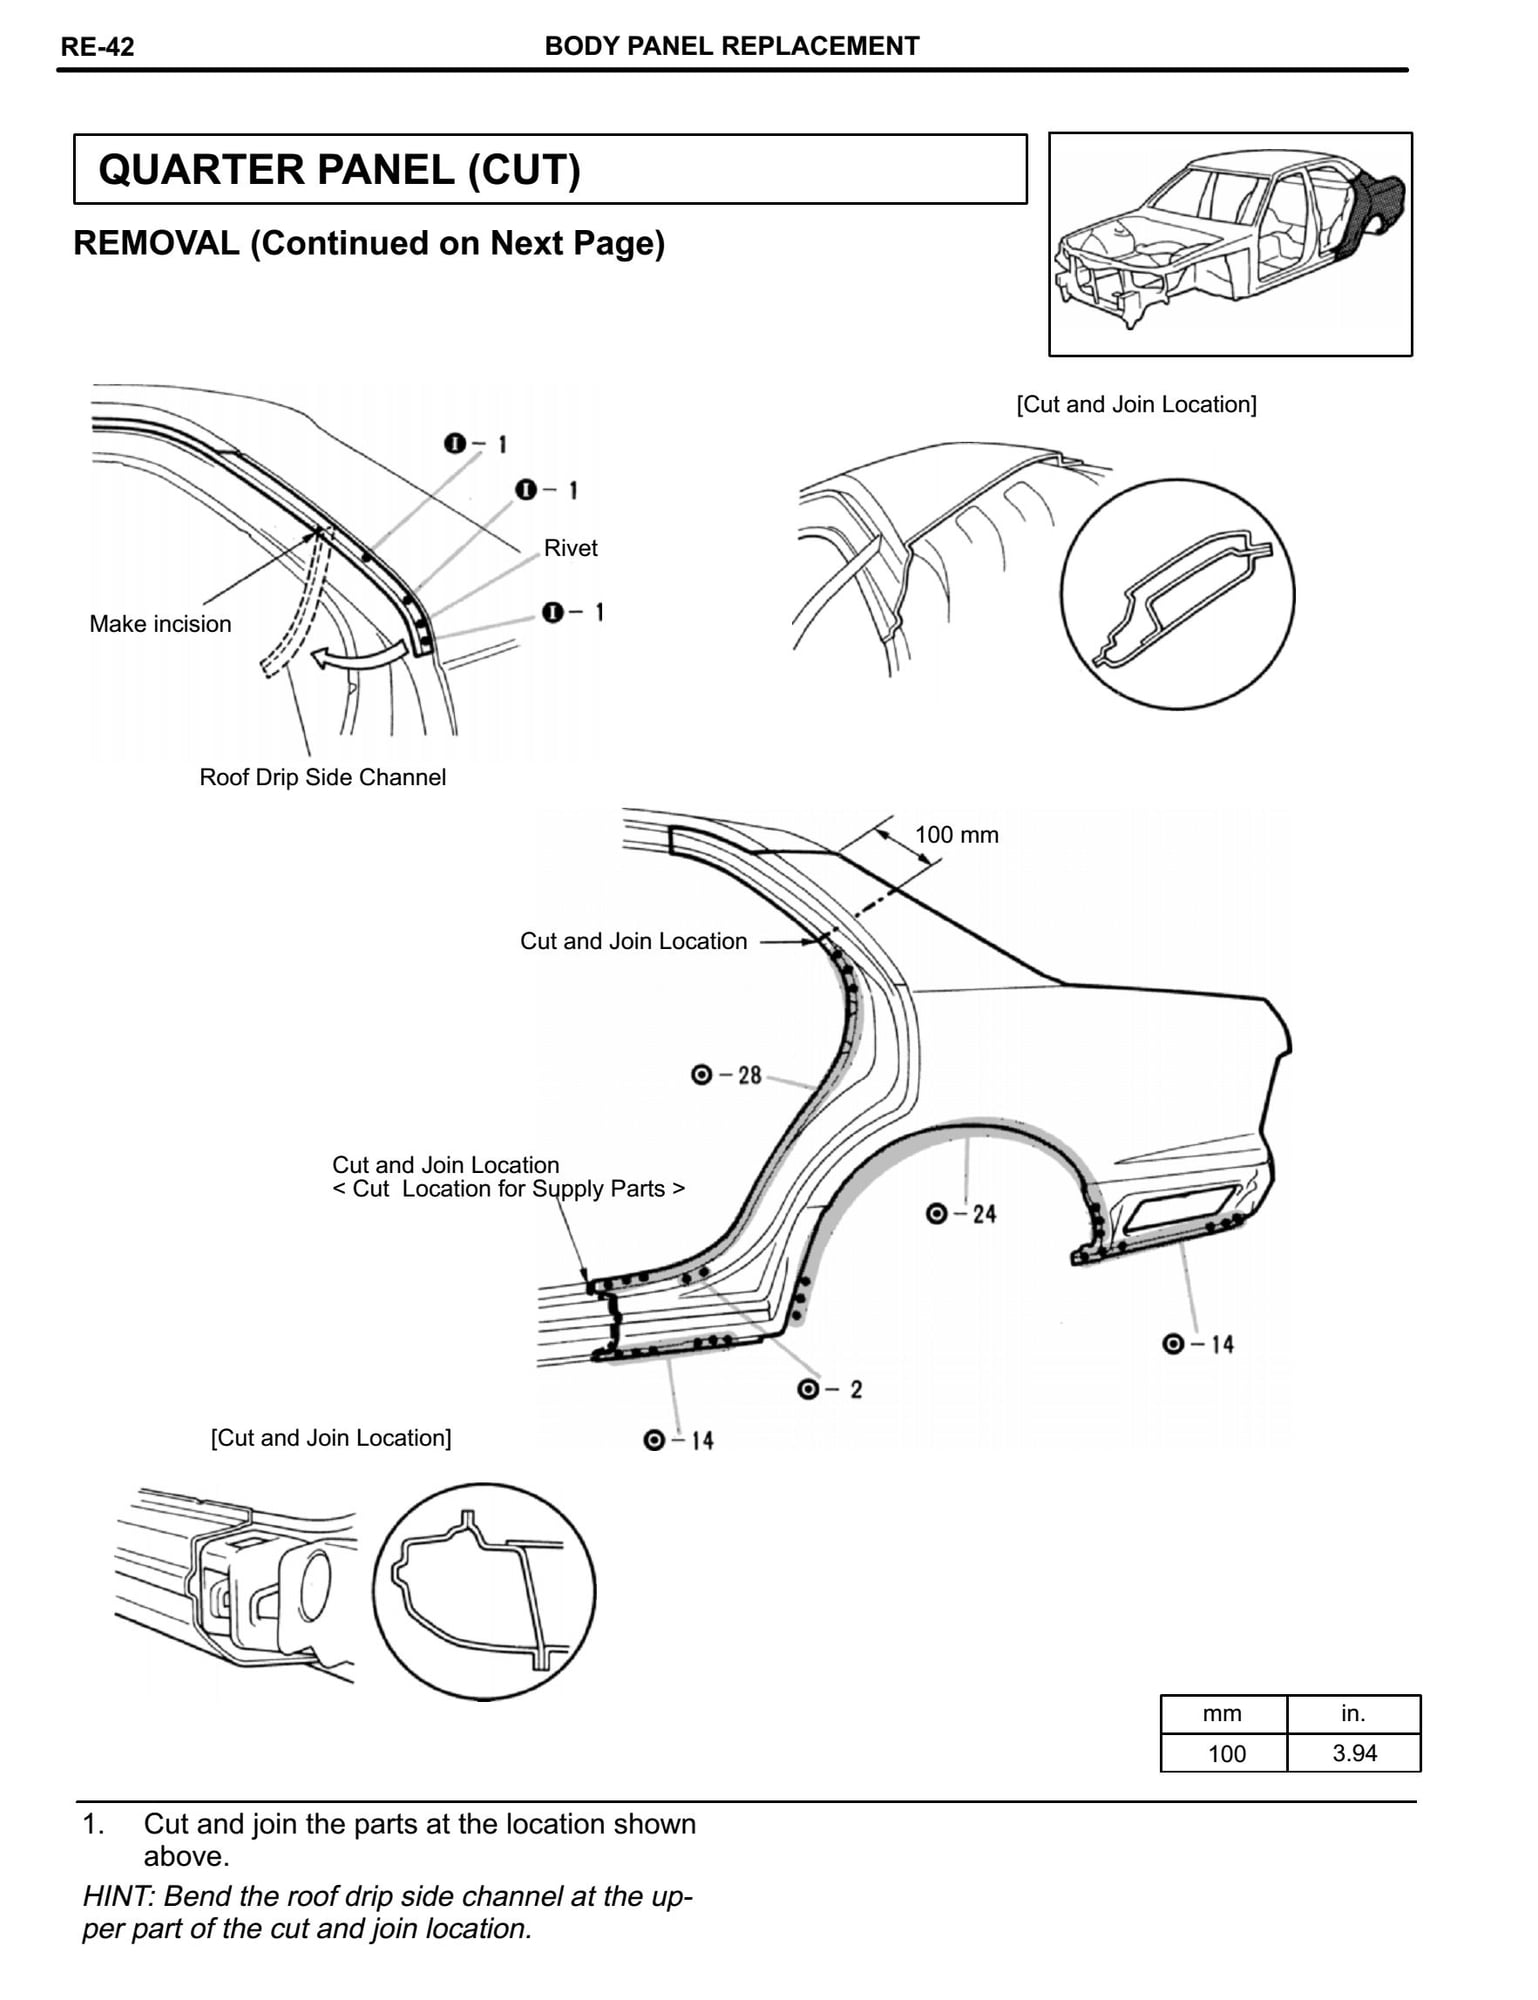
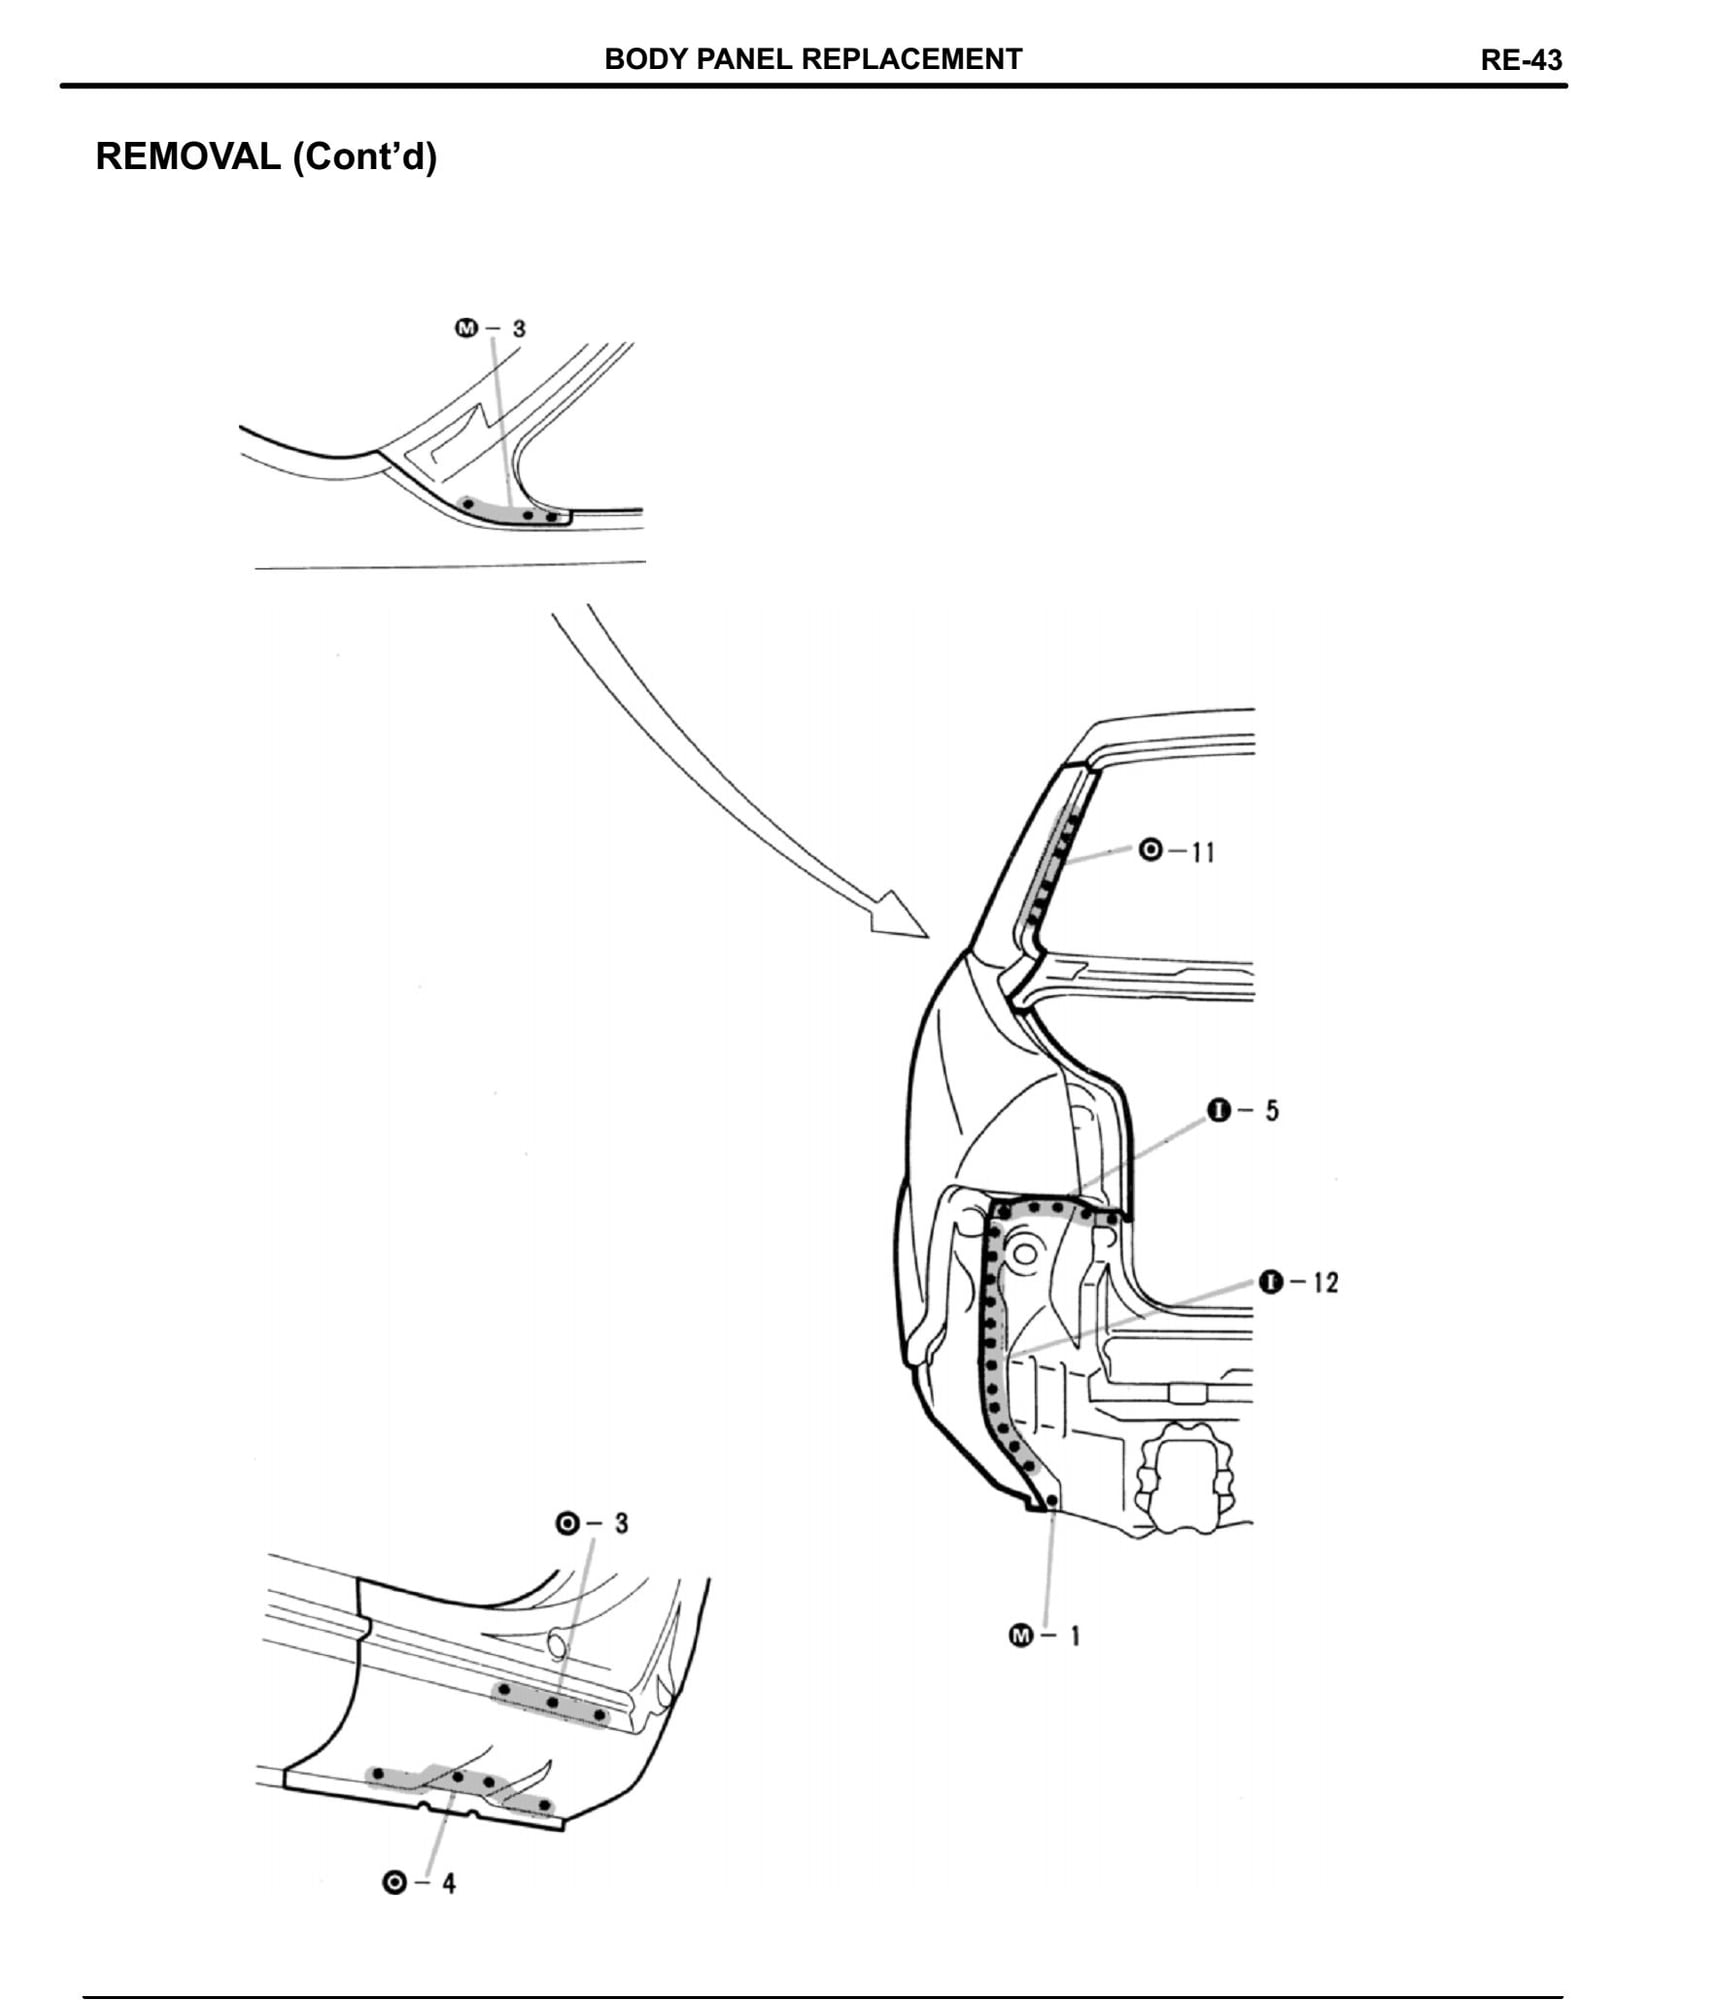
Rear quarter body damage. Need skeleton diagrams.
#1
Driver School Candidate
Thread Starter
Join Date: Jun 2016
Location: Oregon
Posts: 15
Likes: 0
Received 0 Likes
on
0 Posts
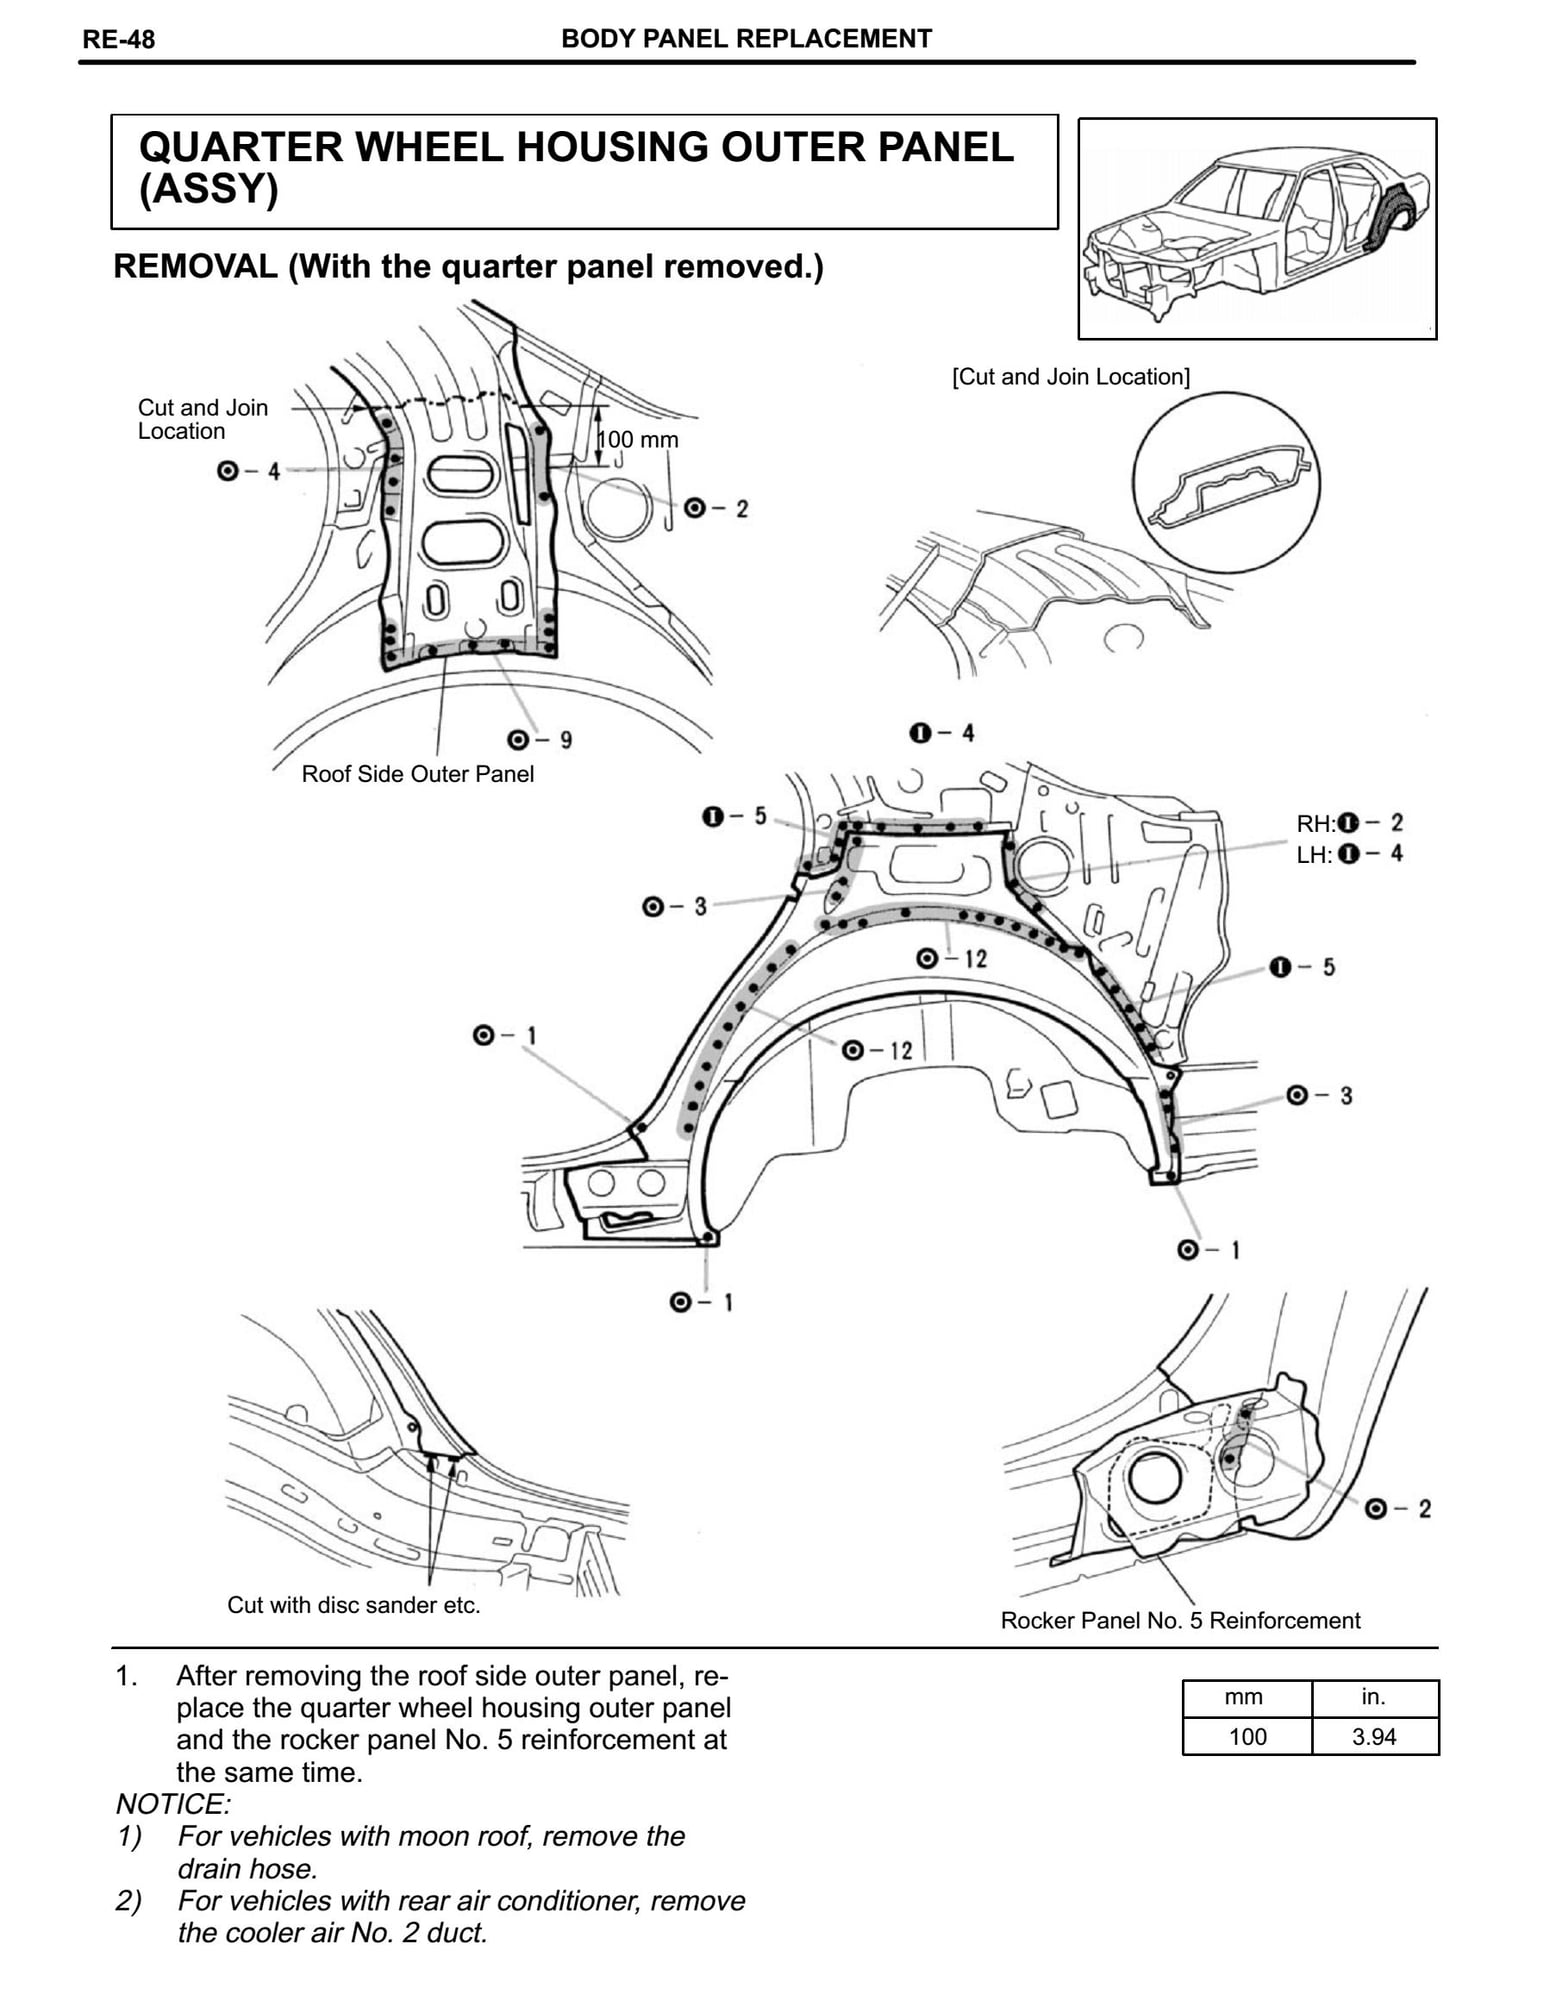
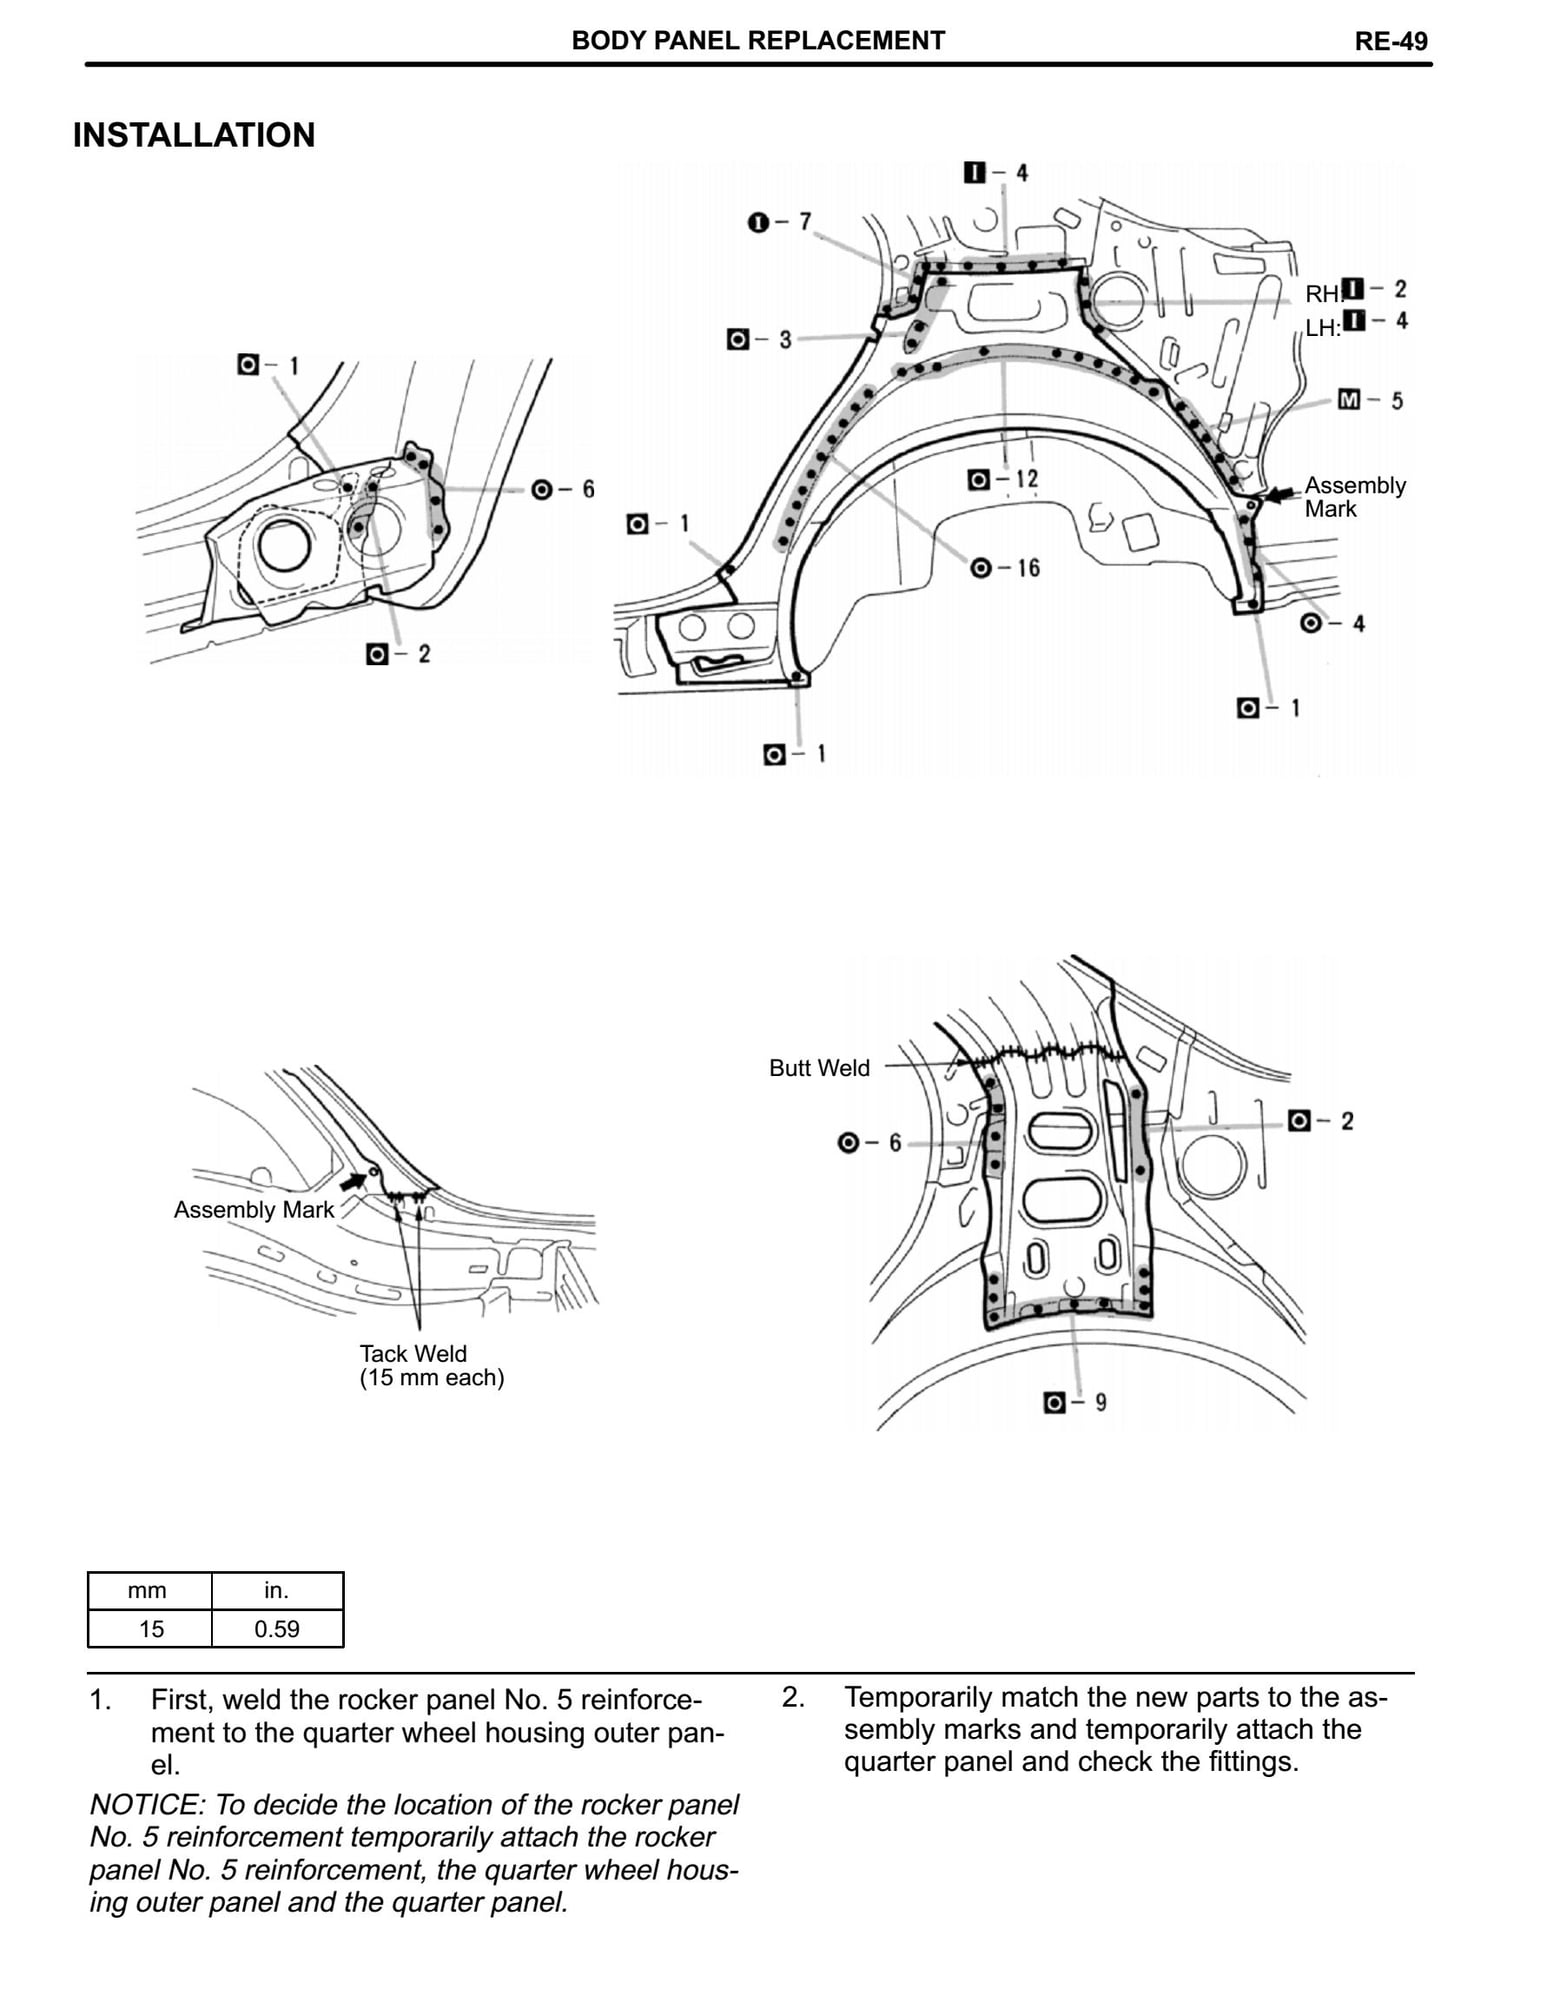
A few months ago i was in a fender bender/tear. Ford ranger lodged his front bumper into my fender and slammed on his brakes. Insurance says handle it yourself. Fixing/cutting body panels seems to just be a thing in the world of lexus and i think i can handle it. I just dont want to start cutting what i cant see. Does anyone have access to the autobody version of all data for a quick screen cap of a skeleton of the rear quarters? Thanks in advance.
#2
Driver School Candidate
Thread Starter
Join Date: Jun 2016
Location: Oregon
Posts: 15
Likes: 0
Received 0 Likes
on
0 Posts
Cant see it too well in the picture but theres a hole inside the fender well. It was toward the end of winter so i installed some high speed amp protecting tape over said incision.
#4
Driver School Candidate
Thread Starter
Join Date: Jun 2016
Location: Oregon
Posts: 15
Likes: 0
Received 0 Likes
on
0 Posts
Sorry about that its a 98 so the 2nd gen. Yeah im not exactly stoked haha anywhere else i wouldve been fine with. He had to hit the hard part haha
#5
Driver School Candidate
Thread Starter
Join Date: Jun 2016
Location: Oregon
Posts: 15
Likes: 0
Received 0 Likes
on
0 Posts
I have access to all data at my work but i dont think it has access to the body work section. If it does ill post a diagram here in case anyone needs it
#6
Sorry to hear about and see what happened in that accident; however, you may be in luck.
The UCF20/21 frame used from 1995-1997 is practically the same for 1998-2000, aside from a few cosmetic changes on the exterior unibody panel.
I've had this page stored from the University of Michigan about the frame for those model years. Here is the link to that.
Unfortunately, the bad news is that I don't have the passwords to the pdf documents attached there, which well tell you in-depth details about the frame's structure. Nonetheless, there are a few good images posted on that page which should help. If anyone is enrolled at the University of Michigan, it would be much appreciated if the info could be shared..
It would be great if you could gain access to the body work section at work.
#7
unless you're at least somewhat of an experienced body man this will likely require a trip to a shop.
You don't just buy the collision panel and replace parts, you have to straighten and align, then prep the underlaying structure prior to getting to that point. If the damage is more severe than what you can see you may be in worse shape than you think. Sadly you won't be able to determine without stripping the car down to some degree.
You don't just buy the collision panel and replace parts, you have to straighten and align, then prep the underlaying structure prior to getting to that point. If the damage is more severe than what you can see you may be in worse shape than you think. Sadly you won't be able to determine without stripping the car down to some degree.
Trending Topics
#8
Driver School Candidate
Thread Starter
Join Date: Jun 2016
Location: Oregon
Posts: 15
Likes: 0
Received 0 Likes
on
0 Posts
unless you're at least somewhat of an experienced body man this will likely require a trip to a shop.
You don't just buy the collision panel and replace parts, you have to straighten and align, then prep the underlaying structure prior to getting to that point. If the damage is more severe than what you can see you may be in worse shape than you think. Sadly you won't be able to determine without stripping the car down to some degree.
You don't just buy the collision panel and replace parts, you have to straighten and align, then prep the underlaying structure prior to getting to that point. If the damage is more severe than what you can see you may be in worse shape than you think. Sadly you won't be able to determine without stripping the car down to some degree.
Cut before the seems
Split at the seems
Align the panel
Add glue between panel
Straighten panel
Clamp in place
Weld grind and bondo the seem?
Im not sure if youre a body man but id assume someone here has a better understanding than i do. I just cant see it being terribly difficult when people make radius fenders amd crazy stuff on their own
#9
There are many different ways to go about it.
You could try to do the hammer and dolly deal, but you would need long arms for that.
To properly open the seams on an older spot welded body you drill out the spot welds and only on one of the panels since you do want a backing of sorts to weld back to when rewelding it.
But to open the seam and accomplish anything you would have to go a long ways.
In the picture a person only sees so much soooo.
I am thinking the best bet where it is so bad, you may just want to find a junk yard car that has a good area there and cut out what you need, and patch panel it. This is not a talk of how to do it deal. There is a bunch involved to do the job correctly, and will teach ya why body shops charge so much to do that type of work.
And since that tape obscures the damage, you always first want to try to fix it by straightening what you have, the patch panel deal is a last resort.
You need to get the tape out a the way, it looked like a huge bondo bulb. To protect it from rusting put a little bit of paint on it, just the bare metal.
Any water that gets under the tape is trapped and will cause more rust.
Last edited by dicer; 07-04-16 at 11:38 AM.
#10
Driver School Candidate
Thread Starter
Join Date: Jun 2016
Location: Oregon
Posts: 15
Likes: 0
Received 0 Likes
on
0 Posts
There are many different ways to go about it.
You could try to do the hammer and dolly deal, but you would need long arms for that.
To properly open the seams on an older spot welded body you drill out the spot welds and only on one of the panels since you do want a backing of sorts to weld back to when rewelding it.
But to open the seam and accomplish anything you would have to go a long ways.
In the picture a person only sees so much soooo.
I am thinking the best bet where it is so bad, you may just want to find a junk yard car that has a good area there and cut out what you need, and patch panel it. This is not a talk of how to do it deal. There is a bunch involved to do the job correctly, and will teach ya why body shops charge so much to do that type of work.
And since that tape obscures the damage, you always first want to try to fix it by straightening what you have, the patch panel deal is a last resort.
You need to get the tape out a the way, it looked like a huge bondo bulb. To protect it from rusting put a little bit of paint on it, just the bare metal.
Any water that gets under the tape is trapped and will cause more rust.
You could try to do the hammer and dolly deal, but you would need long arms for that.
To properly open the seams on an older spot welded body you drill out the spot welds and only on one of the panels since you do want a backing of sorts to weld back to when rewelding it.
But to open the seam and accomplish anything you would have to go a long ways.
In the picture a person only sees so much soooo.
I am thinking the best bet where it is so bad, you may just want to find a junk yard car that has a good area there and cut out what you need, and patch panel it. This is not a talk of how to do it deal. There is a bunch involved to do the job correctly, and will teach ya why body shops charge so much to do that type of work.
And since that tape obscures the damage, you always first want to try to fix it by straightening what you have, the patch panel deal is a last resort.
You need to get the tape out a the way, it looked like a huge bondo bulb. To protect it from rusting put a little bit of paint on it, just the bare metal.
Any water that gets under the tape is trapped and will cause more rust.
#13
Driver School Candidate
Thread Starter
Join Date: Jun 2016
Location: Oregon
Posts: 15
Likes: 0
Received 0 Likes
on
0 Posts
#14
Driver School Candidate
Thread Starter
Join Date: Jun 2016
Location: Oregon
Posts: 15
Likes: 0
Received 0 Likes
on
0 Posts
#15
Lexus Champion
Talked to several experienced Lexus bodymen pro and con on repairing vs replacing a rear quarter panel.
The build quality of the LS400 was achieved using laser precision automatic robotic welding and forming assembly equipment...
All professionals consulted expressed real concern over their ability for achieving 100% OEM fit, form and function.
It would be nearly impossible to fully and correctly weld and seal.all seams to OEM...which significantly increases chance of corrosion.
Once you cut and weld you can't redip the car to coat inaccessible areas as did the factory;
On information, AFTER the main stucture of LS400 was assembled, it was dipped in corrosion inhibitor tank and either color-dipped, color-sprayed or some combination of both.
The estimate (quality work) for repairing a rear quarter panel is about $3,300. The entire trunk, bumper cover, roof and rear door all have to be color blended. The trunk emblems have to come off and due to their adhesive backing, be replaced (hope you don't have gold emblems...discontinued)
Replacing a rear quarter panel.is about $6,000.
Be careful.of estimate you turn in... based on bluebook, a $6,000 repair and the insurance company is going to declare your car a total
I don't like bondo...not on a quarter panels...see if you can find an old school.bodyman to do lead.


