DIY: All red tails using vinyl, cheap & easy
 08-10-13, 05:47 PM
#1

Wanted to all red the tails on my recently purchased LS400, after looking at the various ways of doing this I decided to get a roll of translucent vinyl since it seemed to be the easiest and cheapest way.
After searching for a DIY I saw some for the GS and IS but nothin for the LS, its pretty much the same process but I thought I'd do a model specific one.
Tools Needed:
- a roll of translucent red vinyl. I bought mine from ebay and paid $10, now its $7 go figure
http://www.ebay.com/itm/12-x-48-Glossy-Red-Vinyl-Wrap-Overlay-Film-Tail-Lamps-Lights-Sidemarkers-/130963919832?pt=Motors_Car_Truck_Parts_Accessories&vxp=mtr&hash=item1e7e0ed3d8- razor or x-acto knife
- blue painters tape
- piece of paper to make a template
- spray bottle with a bit of car or dishwasher soap and water, bought one from WalMart for $0.97
- credit card
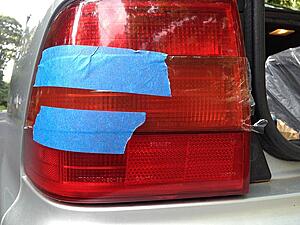
1) Lay out the painters tape where you want the vinyl to go

2) Tape a piece of paper and use a pencil to transfer the shape over, you can see in the picture below I tried to trace it but I'm pretty crappy at that so I just scribbled on the edge to transfer the shape

3) After cutting out a template I traced it onto the vinyl and cut it

4) Now comes the time to apply the vinyl, after cleaning the amber section of the taillight (I used rubbing alcohol and simple green). Spray the tail light generously with the soap mixture from your spray bottle, remove the backing from the vinyl piece and spray that aswell. Spray as you peel to prevent it from sticking to itself. Place the vinyl onto the tail light and adjust as necessary, once its in place where you like it use the credit card to squeegee the soap mixture starting in the middle and working your way out. Trim the end closest to the trunk
The vinyl that I bought had a very very thin layer of cellophane on the top, you can see in the picture below that if I let the top of the vinyl get too dry while scraping it would start to tear so make sure you keep spraying it.
5) On mine I had an issue with the corner in that it kept wanting to scrunch up around it since that corner also is angled top to bottom. To solve this I just kept working it as it dried and when I got it down for the most part I put some painters tape on the edge making sure to make it as flush as I could for it to dry that way. The bubble you see below isn't actually the vinyl, its the cellophane bubbling up from working it with my fingers.
6) After waiting for a bit I peeled the blue tape and top layer of cellophane praying that this worked and voila, it did!
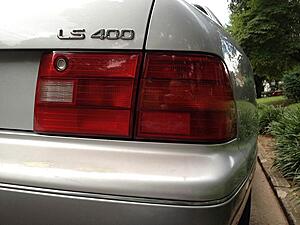
And here is the final result, apologies I REALLY wanted to do this picture with one side red and one side amber but there was a thunderstorm rolling in so I wanted to get done as quick as possible
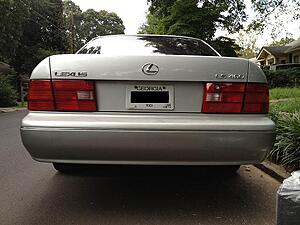
All in all this whole process was pretty simple and the actual install didn't take long at all, maybe 30 mins. I tried to be as thorough as I could for any noobs out there. Surprisingly I didn't get ANY bubbles either which I'm pretty happy about, the top layer of cellophane would bubble while I was scraping it so it was kinda hard to tell if there were any until I took that off.
FINAL THOUGHTS:
- There are definitely different ways of cuttin the vinyl to the shape needed, I just used what limited resources I had at my disposal
- If I had to do this again I'd probably get some better vinyl, after reading a bunch of DIYs on other sites I found that people seem to be pretty happy with RVinyl but I didn't find this out until i already bought the ebay vinyl.
http://www.rvinyl.com/Red-Smoke-Tint-Film.html
After searching for a DIY I saw some for the GS and IS but nothin for the LS, its pretty much the same process but I thought I'd do a model specific one.
Tools Needed:
- a roll of translucent red vinyl. I bought mine from ebay and paid $10, now its $7 go figure
http://www.ebay.com/itm/12-x-48-Glossy-Red-Vinyl-Wrap-Overlay-Film-Tail-Lamps-Lights-Sidemarkers-/130963919832?pt=Motors_Car_Truck_Parts_Accessories&vxp=mtr&hash=item1e7e0ed3d8- razor or x-acto knife
- blue painters tape
- piece of paper to make a template
- spray bottle with a bit of car or dishwasher soap and water, bought one from WalMart for $0.97
- credit card
1) Lay out the painters tape where you want the vinyl to go

2) Tape a piece of paper and use a pencil to transfer the shape over, you can see in the picture below I tried to trace it but I'm pretty crappy at that so I just scribbled on the edge to transfer the shape

3) After cutting out a template I traced it onto the vinyl and cut it

4) Now comes the time to apply the vinyl, after cleaning the amber section of the taillight (I used rubbing alcohol and simple green). Spray the tail light generously with the soap mixture from your spray bottle, remove the backing from the vinyl piece and spray that aswell. Spray as you peel to prevent it from sticking to itself. Place the vinyl onto the tail light and adjust as necessary, once its in place where you like it use the credit card to squeegee the soap mixture starting in the middle and working your way out. Trim the end closest to the trunk
The vinyl that I bought had a very very thin layer of cellophane on the top, you can see in the picture below that if I let the top of the vinyl get too dry while scraping it would start to tear so make sure you keep spraying it.
5) On mine I had an issue with the corner in that it kept wanting to scrunch up around it since that corner also is angled top to bottom. To solve this I just kept working it as it dried and when I got it down for the most part I put some painters tape on the edge making sure to make it as flush as I could for it to dry that way. The bubble you see below isn't actually the vinyl, its the cellophane bubbling up from working it with my fingers.

6) After waiting for a bit I peeled the blue tape and top layer of cellophane praying that this worked and voila, it did!

And here is the final result, apologies I REALLY wanted to do this picture with one side red and one side amber but there was a thunderstorm rolling in so I wanted to get done as quick as possible

All in all this whole process was pretty simple and the actual install didn't take long at all, maybe 30 mins. I tried to be as thorough as I could for any noobs out there. Surprisingly I didn't get ANY bubbles either which I'm pretty happy about, the top layer of cellophane would bubble while I was scraping it so it was kinda hard to tell if there were any until I took that off.
FINAL THOUGHTS:
- There are definitely different ways of cuttin the vinyl to the shape needed, I just used what limited resources I had at my disposal
- If I had to do this again I'd probably get some better vinyl, after reading a bunch of DIYs on other sites I found that people seem to be pretty happy with RVinyl but I didn't find this out until i already bought the ebay vinyl.
http://www.rvinyl.com/Red-Smoke-Tint-Film.html
Last edited by TMAdash1; 08-10-13 at 05:51 PM.
 08-10-13, 07:26 PM
#4
No problem, figured for my first post I'd go all out! And its completely reversible too, if you want it peels right off just might have to get some adhesive remover to get rid of the glue.
Trending Topics
08-12-13, 03:43 PM
#10

been done many times. i remember posting about it in a thread. good vinyl shouldn't require water. good vinyl is like a sticker. just stick it on and lay it out using a credit card and you're good to go. that's how i did mine. the vinyl i used was $5 and a perfect match for the red.

Last edited by xtremex626; 08-13-13 at 07:34 AM.
08-12-13, 10:35 PM
#11
been done many times. i rememebr posting about it in a thread. good vinyl shouldn't require water. good vinyl is like a sticker. just stick it on and lay it out using a credit card and you're good to go. that's how i did mine. the vinyl i used was $5 and a perfect match for the red.
08-13-13, 06:17 AM
#12
been done many times. i rememebr posting about it in a thread. good vinyl shouldn't require water. good vinyl is like a sticker. just stick it on and lay it out using a credit card and you're good to go. that's how i did mine. the vinyl i used was $5 and a perfect match for the red.
Do you still have some vinyl left? Aha I'm in the 626 too maybe I'll buy some off of you
 08-14-13, 07:34 AM
#15
Thanks for sharing this! I JUST bought some red Rvinyl yesterday and some 3M adhesion primer to get around the corners good. Then I see this post today hahahaha. Looks really good! Can't wait to do mine in a few days.