HOW-TO: 95-00 Coilover install
 11-13-12, 01:05 PM
#1
So I'll they and make this as comprehensive as possible.
I installed a set of BC BR's on my 96 so a couple of small things may be different for other brands.
tools needed:
3/8" dr long handle ratchet
3/8" dr 3" & 6" long extensions
3/8" dr 10mm 12mm, 14mm & 17mm deep sockets
3/8" dr 6mm allen key socket
3/8" dr 15-100ft/lbs torque wrench
1/2" dr flex-head extra long handle ratchet (24" or longer if possible)
1/2" dr breaker bar
1/2" dr 3" extension
1/2" dr 17mm, 19mm & 21mm
1/2" dr 50-150lbs torque wrench
17mm, 19mm, 21mm combo wrenches
interior trim popper tool
Drill with assorted drill bits and a 3/4" step-bit
center punch (automatic or manual)
assorted rubber grommets
1/16th-3/8th extra long tapered punch
Extra large channel lock pliers
Balljoint removal tool (pictured below) ***NOT A "PICKLE FORK" ***
wire brush
Anti-seize paste
vacuum.
BFH
Step 1, remove the rear seat base:
Open rear doors and sharply pull up on the seat base in the areas where the 4 pink/red ovals are shown below. once popped up, from the center of the seat, pull up to the roof and towards the front of the car to unclip the seat base from the seat back. Remove from car and put somewhere safe & clean. you will probably want to vacuum all the crap you'll find under the seat out now or later.
http://www.flickr.com/photos/zx3tuning/8174062310/http://www.flickr.com/photos/zx3tuning/8174062310/ by http://www.flickr.com/people/zx3tuning/, on Flickr
Step 2, remove rear seat backs:
Locate the 4 lower and 3 upper 12mm head bolts. Note, one is behind each headrest and behind the cover in the fold down arm rest along the top. The four lower bolts are easily seen along the lower edge of the seat back. You will also need to remove the 3 lower seat belt anchor bolts, 14mm heads, so you can removed or move the seat back out of the way.
http://www.flickr.com/photos/zx3tuning/8174062750/http://www.flickr.com/photos/zx3tuning/8174062750/ by http://www.flickr.com/people/zx3tuning/, on Flickr
http://www.flickr.com/photos/zx3tuning/8174030775/http://www.flickr.com/photos/zx3tuning/8174030775/ by http://www.flickr.com/people/zx3tuning/, on Flickr
http://www.flickr.com/photos/zx3tuning/8174065654/http://www.flickr.com/photos/zx3tuning/8174065654/ by http://www.flickr.com/people/zx3tuning/, on Flickr
http://www.flickr.com/photos/zx3tuning/8174033903/http://www.flickr.com/photos/zx3tuning/8174033903/ by http://www.flickr.com/people/zx3tuning/, on Flickr
http://www.flickr.com/photos/zx3tuning/8174036869/http://www.flickr.com/photos/zx3tuning/8174036869/ by http://www.flickr.com/people/zx3tuning/, on Flickr
U the trim-popper tool to remove the 2 plastic clips that hold the parcel tray down at the front so you can get a little more room to work on the upper strut mounts:
http://www.flickr.com/photos/zx3tuning/8174037541/http://www.flickr.com/photos/zx3tuning/8174037541/ by http://www.flickr.com/people/zx3tuning/, on Flickr
Here are the covers over the upper mounts that need to be removed, 14mm deep socket, before the rear shocks can be accessed
http://www.flickr.com/photos/zx3tuning/8174039855/http://www.flickr.com/photos/zx3tuning/8174039855/ by http://www.flickr.com/people/zx3tuning/, on Flickr
Step 3, jack the car up and remove the wheels.!
On flat level ground, if you don’t have an impact gun crack the wheel nuts just free then, jack the car up onto jack-stands so that it is well supported and safe to work under and around. With the wheel nuts cracked-free, and the car in the air, it is easy to spin them off and remove the tires and set aside.
Step 4, disassemble the fronts:
Start by unbolting the lower shock bolt with a 19mm socket and 17mm wrench, remove the bolt and push the shock back slightly so you can remove the swaybar link.
http://www.flickr.com/photos/zx3tuning/8174072124/http://www.flickr.com/photos/zx3tuning/8174072124/ by http://www.flickr.com/people/zx3tuning/, on Flickr
Note: You may encounter that the lower bolt is seized in the sleeve of the shock and wont turn. Shoot some penetrating lube at either end of the bolt and work the head of the bolt back and forth. Spin the nut back on to the other end of the bolt until flush with the end of the bolt and then strike the head of the nut squarely with your BFH. Shoot some more penetrating spray at either end of the bolt and keep working back and forth. If you have access to either or both, use an Oxy-Ace or propane torch to add some heat to either end of the bolt taking care not to put direct heat onto the shock and to keep the flame away from any sensitive parts. Continue the above process until the bolt begins to turn. You encounter a bolt so seized that no work can be done to free it from the sleeve. If this the case, differ to a skilled mechanic or shop as the bolt will need to be cut out and a new bolt will be required.
Step 5, the sway bar link:
Crack the link nut free with a 17mm socket and ratchet then place a 17mm wrench over the nut and tap the 6mm allen socket, with an extension, into the end of the link stud with a hammer to ensure full engagement of the socket. This will seem counter intuitive but you want to tighten the ratchet while you hold the wrench. this should feed out the sway bar link so it can be moved aside. if you strip the allen out, you can get a good set of vice grips on the backside of the joint and remove the nut. This usually results in a torn boot so you will probably need to replace the links if you get to into such a situation, replacement isn't a bad idea anyways as these pogo-style links can become a source of clunks with only 40k on them.
http://www.flickr.com/photos/zx3tuning/8174043107/http://www.flickr.com/photos/zx3tuning/8174043107/ by http://www.flickr.com/people/zx3tuning/, on Flickr
Step 6, Do the same to the other side:
With the shock and sway bar unbolted from the bottom of one side, do the same on the other side to simplify installation later. Take the large channel lock pliers and compress the upper and lower balljoints to check condition, as per video below, replace as needed IN PAIRS!!!
Sorry for the poor quality iphone video.
Step 7, the upper balljoint or UBJ:
Remove retainer clip or cotter pin from upper balljoint and crack the nut free and spin it off but then spin back on until the top of the castle-nut is flush with the end of the treaded section of the UBJ.
http://www.flickr.com/photos/zx3tuning/8176558936/http://www.flickr.com/photos/zx3tuning/8176558936/ by http://www.flickr.com/people/zx3tuning/, on Flickr
Loosen and remove the 10mm head bolt holding the ABS se�or wire to the UCA and set aside.
http://www.flickr.com/photos/zx3tuning/8176525433/http://www.flickr.com/photos/zx3tuning/8176525433/ by http://www.flickr.com/people/zx3tuning/, on Flickr
PREFERRED METHOD: Use your balljoint removal tool and pop the joint free from the knuckle and then remove nut. You should be able to purchase one of these from any good auto parts store for about $20-40. I highly recommend having one of these in your tool box, AWESOME for tire rod ends too!
http://www.flickr.com/photos/zx3tuning/8176560430/http://www.flickr.com/photos/zx3tuning/8176560430/ by http://www.flickr.com/people/zx3tuning/, on Flickr
LESS IDEAL METHOD: With the nut in the same position as above, take your BFH and find the little raised nipple on one side of the knuckle as pictured. With a very firm&hard strike, the ball joint will pop free, then remove the nut.. NOTE: don't be a ***** with this, hit the thing HARD! The nipple is a designed-in feature for just this and will momentarily deform the opening and pop the UBJ out of the knuckle. Make sure you take a few practice swings so you have your aim dialed in. The nut on the end of the treads of the UBJ is there to prevent damage to the treads from a mis-strike. If you're completely ham-fisted and hit just the nut, you'll likely bend or break off the end of the UBJ and will have to replace the entire upper control arm, so BE CAREFUL!
http://www.flickr.com/photos/zx3tuning/8176559592/http://www.flickr.com/photos/zx3tuning/8176559592/ by http://www.flickr.com/people/zx3tuning/, on Flickr
Note1: If the upper balljoints are in questionable condition, with the nut on the end of the stud, and the joint popped free of the knuckle, you may have difficulty removing the nut as the joint will just spin. Use the large channel lock pliers and compress the UCA down into the knuckle slightly, which will prevent the joint from spinning, and remove the nut.
Note 2: You can use a "pickle fork" if you plan on replacing any balljoint you use the pickle fork on, as odds are you are going to destroy the rubber dust boot separating the joint with this tool. I personally hate the pickle fork for anything but the hardest to get to joints.
Step 8, final steps to remove the strut:
Keep the UBJ loosely in the knuckle for now, pop the hood if you have not done so already, and remove the 3 upper strut mount nuts. Keep in mind that if the strut is removed from the lower mount completely, with the last nut removed the shock twill just drop out. Reach into the wheel well and grab it so it does not. With the shock free, flip the UCA up as high as it will go, tip the top of the shock out and remove from the car.
http://www.flickr.com/photos/zx3tuning/8176524665/http://www.flickr.com/photos/zx3tuning/8176524665/ by http://www.flickr.com/people/zx3tuning/, on Flickr
http://www.flickr.com/photos/zx3tuning/8176585743/http://www.flickr.com/photos/zx3tuning/8176585743/ by http://www.flickr.com/people/zx3tuning/, on Flickr
Note: At this point, you can mark where the UCA touches the towel with a sharpie or something else. This will allow you to accurately drill out the tower for clearance for going ultra low or if you are going the be running bags. If this is the case, at the point which the UCA touches the tower, use a small drill but and drill UP through the tower as a reference point to use while working from the top.
Step 9, The rear suspension:
The rear suspension comes apart much the same as the front. The rear sway bar does not need to be disconnected, however doing so WILL make removing the lower shock bolt easier. My rear sway bar links were in questionable condition and disconnecting the link would likely have lead to needing to replace the link(s). Without the new links on hand, I just worked around it. Start with the lower shock mounting bolt by cracking the 19mm head nut free and remove it. If the 19mm head bolt spins freely, use your hammer and punch to tap the bolt out from the nut side and pry the lower mount free of the knuckle. With the shock now free at the bottom, move back inside the car to unbolt the 3 14mm head strut bolts, keeping in mind that the last nut removed will allow the strut to drop so reach around and grab onto the strut when removing that nut so the strut does not drop and damage something. With the strut free, lower it around the axel, tip the top out of the wheel well and remove from the care.
Note: You may encounter that the lower bolt is seized in the sleeve of the shock and wont turn. Shoot some penetrating lube at either end of the bolt and work the head of the bolt back and forth. Spin the nut back on to the other end of the bolt until flush with the end of the bolt and then strike the head of the nut squarely with your BFH. Shoot some more penetrating spray at either end of the bolt and keep working back and forth. If you have access to either or both, use an Oxy-Ace or propane torch to add some heat to either end of the bolt taking care not to put direct heat onto the shock and to keep the flame away from any sensitive parts. Continue the above process until the bolt begins to turn. You encounter a bolt so seized that no work can be done to free it from the sleeve. If this the case, differ to a skilled mechanic or shop as the bolt will need to be cut out and a new bolt will be required.
Step 10, Compare what you have to your new parts:
Always compare your old parts to your new parts. Comparing things like the spacing of the studs on the upper strut mount and size of the lower shock bolt hole can save you a lot of grief. If it's not correct, call the supplier and ask whats up. If you do this now, your parts are still new and "un-installed" so they can be returned. If you start to install and find out after the fact you have the wrong parts, they are YOURS! Mis-boxed, mis-shipped parts happens so don’t freak out, just get it sorted. This is also the point I like to measure the length of my coilovers and adjust them so they are all even as far as pre-load on the springs, spacing of the collars and roughly set my overall length of the coilovers in axel pairs. I like to tighten up the pre-load so the height from the top of the shock body down to the top of the upper perch is the same on each shock. Not doing so can effect your ride heights and even your corner weighting if you plan on scaling the car or will use these tips for another car down the road. With the pre-load set, I spin the lower body all the way off, add a couple dabs of anti-seize to the threads of the shock body and spin the lower body all the way up. From this point, I set the height adjusting collar lightly against the lower body and spin the shock down to roughly set your ride height. Loosely tighten the height adjusting collar by hand.
On my BC’s all the way down would probably have you resting the UCA’s on the towers. I set my fronts 3” up from full down, for now.
http://www.flickr.com/photos/zx3tuning/8176561408/http://www.flickr.com/photos/zx3tuning/8176561408/ by http://www.flickr.com/people/zx3tuning/, on Flickr
I installed a set of BC BR's on my 96 so a couple of small things may be different for other brands.
tools needed:
3/8" dr long handle ratchet
3/8" dr 3" & 6" long extensions
3/8" dr 10mm 12mm, 14mm & 17mm deep sockets
3/8" dr 6mm allen key socket
3/8" dr 15-100ft/lbs torque wrench
1/2" dr flex-head extra long handle ratchet (24" or longer if possible)
1/2" dr breaker bar
1/2" dr 3" extension
1/2" dr 17mm, 19mm & 21mm
1/2" dr 50-150lbs torque wrench
17mm, 19mm, 21mm combo wrenches
interior trim popper tool
Drill with assorted drill bits and a 3/4" step-bit
center punch (automatic or manual)
assorted rubber grommets
1/16th-3/8th extra long tapered punch
Extra large channel lock pliers
Balljoint removal tool (pictured below) ***NOT A "PICKLE FORK" ***
wire brush
Anti-seize paste
vacuum.
BFH
Step 1, remove the rear seat base:
Open rear doors and sharply pull up on the seat base in the areas where the 4 pink/red ovals are shown below. once popped up, from the center of the seat, pull up to the roof and towards the front of the car to unclip the seat base from the seat back. Remove from car and put somewhere safe & clean. you will probably want to vacuum all the crap you'll find under the seat out now or later.
http://www.flickr.com/photos/zx3tuning/8174062310/http://www.flickr.com/photos/zx3tuning/8174062310/ by http://www.flickr.com/people/zx3tuning/, on Flickr
Step 2, remove rear seat backs:
Locate the 4 lower and 3 upper 12mm head bolts. Note, one is behind each headrest and behind the cover in the fold down arm rest along the top. The four lower bolts are easily seen along the lower edge of the seat back. You will also need to remove the 3 lower seat belt anchor bolts, 14mm heads, so you can removed or move the seat back out of the way.
http://www.flickr.com/photos/zx3tuning/8174062750/http://www.flickr.com/photos/zx3tuning/8174062750/ by http://www.flickr.com/people/zx3tuning/, on Flickr
http://www.flickr.com/photos/zx3tuning/8174030775/http://www.flickr.com/photos/zx3tuning/8174030775/ by http://www.flickr.com/people/zx3tuning/, on Flickr
http://www.flickr.com/photos/zx3tuning/8174065654/http://www.flickr.com/photos/zx3tuning/8174065654/ by http://www.flickr.com/people/zx3tuning/, on Flickr
http://www.flickr.com/photos/zx3tuning/8174033903/http://www.flickr.com/photos/zx3tuning/8174033903/ by http://www.flickr.com/people/zx3tuning/, on Flickr
http://www.flickr.com/photos/zx3tuning/8174036869/http://www.flickr.com/photos/zx3tuning/8174036869/ by http://www.flickr.com/people/zx3tuning/, on Flickr
U the trim-popper tool to remove the 2 plastic clips that hold the parcel tray down at the front so you can get a little more room to work on the upper strut mounts:
http://www.flickr.com/photos/zx3tuning/8174037541/http://www.flickr.com/photos/zx3tuning/8174037541/ by http://www.flickr.com/people/zx3tuning/, on Flickr
Here are the covers over the upper mounts that need to be removed, 14mm deep socket, before the rear shocks can be accessed
http://www.flickr.com/photos/zx3tuning/8174039855/http://www.flickr.com/photos/zx3tuning/8174039855/ by http://www.flickr.com/people/zx3tuning/, on Flickr
Step 3, jack the car up and remove the wheels.!
On flat level ground, if you don’t have an impact gun crack the wheel nuts just free then, jack the car up onto jack-stands so that it is well supported and safe to work under and around. With the wheel nuts cracked-free, and the car in the air, it is easy to spin them off and remove the tires and set aside.
Step 4, disassemble the fronts:
Start by unbolting the lower shock bolt with a 19mm socket and 17mm wrench, remove the bolt and push the shock back slightly so you can remove the swaybar link.
http://www.flickr.com/photos/zx3tuning/8174072124/http://www.flickr.com/photos/zx3tuning/8174072124/ by http://www.flickr.com/people/zx3tuning/, on Flickr
Note: You may encounter that the lower bolt is seized in the sleeve of the shock and wont turn. Shoot some penetrating lube at either end of the bolt and work the head of the bolt back and forth. Spin the nut back on to the other end of the bolt until flush with the end of the bolt and then strike the head of the nut squarely with your BFH. Shoot some more penetrating spray at either end of the bolt and keep working back and forth. If you have access to either or both, use an Oxy-Ace or propane torch to add some heat to either end of the bolt taking care not to put direct heat onto the shock and to keep the flame away from any sensitive parts. Continue the above process until the bolt begins to turn. You encounter a bolt so seized that no work can be done to free it from the sleeve. If this the case, differ to a skilled mechanic or shop as the bolt will need to be cut out and a new bolt will be required.
Step 5, the sway bar link:
Crack the link nut free with a 17mm socket and ratchet then place a 17mm wrench over the nut and tap the 6mm allen socket, with an extension, into the end of the link stud with a hammer to ensure full engagement of the socket. This will seem counter intuitive but you want to tighten the ratchet while you hold the wrench. this should feed out the sway bar link so it can be moved aside. if you strip the allen out, you can get a good set of vice grips on the backside of the joint and remove the nut. This usually results in a torn boot so you will probably need to replace the links if you get to into such a situation, replacement isn't a bad idea anyways as these pogo-style links can become a source of clunks with only 40k on them.
http://www.flickr.com/photos/zx3tuning/8174043107/http://www.flickr.com/photos/zx3tuning/8174043107/ by http://www.flickr.com/people/zx3tuning/, on Flickr
Step 6, Do the same to the other side:
With the shock and sway bar unbolted from the bottom of one side, do the same on the other side to simplify installation later. Take the large channel lock pliers and compress the upper and lower balljoints to check condition, as per video below, replace as needed IN PAIRS!!!
Step 7, the upper balljoint or UBJ:
Remove retainer clip or cotter pin from upper balljoint and crack the nut free and spin it off but then spin back on until the top of the castle-nut is flush with the end of the treaded section of the UBJ.
http://www.flickr.com/photos/zx3tuning/8176558936/http://www.flickr.com/photos/zx3tuning/8176558936/ by http://www.flickr.com/people/zx3tuning/, on Flickr
Loosen and remove the 10mm head bolt holding the ABS se�or wire to the UCA and set aside.
http://www.flickr.com/photos/zx3tuning/8176525433/http://www.flickr.com/photos/zx3tuning/8176525433/ by http://www.flickr.com/people/zx3tuning/, on Flickr
PREFERRED METHOD: Use your balljoint removal tool and pop the joint free from the knuckle and then remove nut. You should be able to purchase one of these from any good auto parts store for about $20-40. I highly recommend having one of these in your tool box, AWESOME for tire rod ends too!
http://www.flickr.com/photos/zx3tuning/8176560430/http://www.flickr.com/photos/zx3tuning/8176560430/ by http://www.flickr.com/people/zx3tuning/, on Flickr
LESS IDEAL METHOD: With the nut in the same position as above, take your BFH and find the little raised nipple on one side of the knuckle as pictured. With a very firm&hard strike, the ball joint will pop free, then remove the nut.. NOTE: don't be a ***** with this, hit the thing HARD! The nipple is a designed-in feature for just this and will momentarily deform the opening and pop the UBJ out of the knuckle. Make sure you take a few practice swings so you have your aim dialed in. The nut on the end of the treads of the UBJ is there to prevent damage to the treads from a mis-strike. If you're completely ham-fisted and hit just the nut, you'll likely bend or break off the end of the UBJ and will have to replace the entire upper control arm, so BE CAREFUL!
http://www.flickr.com/photos/zx3tuning/8176559592/http://www.flickr.com/photos/zx3tuning/8176559592/ by http://www.flickr.com/people/zx3tuning/, on Flickr
Note1: If the upper balljoints are in questionable condition, with the nut on the end of the stud, and the joint popped free of the knuckle, you may have difficulty removing the nut as the joint will just spin. Use the large channel lock pliers and compress the UCA down into the knuckle slightly, which will prevent the joint from spinning, and remove the nut.
Note 2: You can use a "pickle fork" if you plan on replacing any balljoint you use the pickle fork on, as odds are you are going to destroy the rubber dust boot separating the joint with this tool. I personally hate the pickle fork for anything but the hardest to get to joints.
Step 8, final steps to remove the strut:
Keep the UBJ loosely in the knuckle for now, pop the hood if you have not done so already, and remove the 3 upper strut mount nuts. Keep in mind that if the strut is removed from the lower mount completely, with the last nut removed the shock twill just drop out. Reach into the wheel well and grab it so it does not. With the shock free, flip the UCA up as high as it will go, tip the top of the shock out and remove from the car.
http://www.flickr.com/photos/zx3tuning/8176524665/http://www.flickr.com/photos/zx3tuning/8176524665/ by http://www.flickr.com/people/zx3tuning/, on Flickr
http://www.flickr.com/photos/zx3tuning/8176585743/http://www.flickr.com/photos/zx3tuning/8176585743/ by http://www.flickr.com/people/zx3tuning/, on Flickr
Note: At this point, you can mark where the UCA touches the towel with a sharpie or something else. This will allow you to accurately drill out the tower for clearance for going ultra low or if you are going the be running bags. If this is the case, at the point which the UCA touches the tower, use a small drill but and drill UP through the tower as a reference point to use while working from the top.
Step 9, The rear suspension:
The rear suspension comes apart much the same as the front. The rear sway bar does not need to be disconnected, however doing so WILL make removing the lower shock bolt easier. My rear sway bar links were in questionable condition and disconnecting the link would likely have lead to needing to replace the link(s). Without the new links on hand, I just worked around it. Start with the lower shock mounting bolt by cracking the 19mm head nut free and remove it. If the 19mm head bolt spins freely, use your hammer and punch to tap the bolt out from the nut side and pry the lower mount free of the knuckle. With the shock now free at the bottom, move back inside the car to unbolt the 3 14mm head strut bolts, keeping in mind that the last nut removed will allow the strut to drop so reach around and grab onto the strut when removing that nut so the strut does not drop and damage something. With the strut free, lower it around the axel, tip the top out of the wheel well and remove from the care.
Note: You may encounter that the lower bolt is seized in the sleeve of the shock and wont turn. Shoot some penetrating lube at either end of the bolt and work the head of the bolt back and forth. Spin the nut back on to the other end of the bolt until flush with the end of the bolt and then strike the head of the nut squarely with your BFH. Shoot some more penetrating spray at either end of the bolt and keep working back and forth. If you have access to either or both, use an Oxy-Ace or propane torch to add some heat to either end of the bolt taking care not to put direct heat onto the shock and to keep the flame away from any sensitive parts. Continue the above process until the bolt begins to turn. You encounter a bolt so seized that no work can be done to free it from the sleeve. If this the case, differ to a skilled mechanic or shop as the bolt will need to be cut out and a new bolt will be required.
Step 10, Compare what you have to your new parts:
Always compare your old parts to your new parts. Comparing things like the spacing of the studs on the upper strut mount and size of the lower shock bolt hole can save you a lot of grief. If it's not correct, call the supplier and ask whats up. If you do this now, your parts are still new and "un-installed" so they can be returned. If you start to install and find out after the fact you have the wrong parts, they are YOURS! Mis-boxed, mis-shipped parts happens so don’t freak out, just get it sorted. This is also the point I like to measure the length of my coilovers and adjust them so they are all even as far as pre-load on the springs, spacing of the collars and roughly set my overall length of the coilovers in axel pairs. I like to tighten up the pre-load so the height from the top of the shock body down to the top of the upper perch is the same on each shock. Not doing so can effect your ride heights and even your corner weighting if you plan on scaling the car or will use these tips for another car down the road. With the pre-load set, I spin the lower body all the way off, add a couple dabs of anti-seize to the threads of the shock body and spin the lower body all the way up. From this point, I set the height adjusting collar lightly against the lower body and spin the shock down to roughly set your ride height. Loosely tighten the height adjusting collar by hand.
On my BC’s all the way down would probably have you resting the UCA’s on the towers. I set my fronts 3” up from full down, for now.
http://www.flickr.com/photos/zx3tuning/8176561408/http://www.flickr.com/photos/zx3tuning/8176561408/ by http://www.flickr.com/people/zx3tuning/, on Flickr
Last edited by Shmee; 12-20-12 at 01:01 AM. Reason: Fixed broken video in step 6!!
 11-13-12, 01:05 PM
#2
Step 11; Reverse the order for installation:
It is virtually the same method to put the front and rear suspension back together at this point so I’ll write this once. Refer back here for the rear installation procedures.
NOTE: you should apply a liberal coating of anti-seize to all bolt shanks, sleeves and even a dab on the treaded sections. Rust, even in areas where harsh winters road salt is not an issue, to suspension hardware. A little preventative work here will allow easy repairs/ changes down the road. If you encountered a very difficult bolt to remove along the way, be sure to wire brush the heck out of that bolt and nut, even run a thread chasers over both the bolt and the nut to ensure good engagement.
There are 2 ways to put the fronts and the rears back together.
One is to install the lower mount of the shock into the knuckle/LCA first, then put the jack under the lower balljoint or control arm and raise everything up so the strut mount lines up and the studs pass through the holes then spin on the strut mount nuts.
The other is to hang the strut from the nuts on the tower and use the jack to bring the knuckle/LCA up to fit the lower bolt . Both ways take some finagling to get everything to line up. On my (6, the front was a lot easier to do than the rears for this step
This step is where the long tapered punch comes into play as you can use it to centre the knuckle and the lower shock mount together before you try and screw in the lower bolt. A couple light taps with a hammer to the lower mounting point on the shock to get the sleeve closer the the bolt-holes on the knuckles may also be needed. Really, you are just going to have to take your time here and think about what you are doing, unless it falls together there is no one best way to get the lower bolt sleeve into the knuckle. Once the knuckle and the shock sleeve are close to line up, start to thread in the bolt with a small ratchet and socket by hand pushing lightly as you spin it in. Anti-seize on the bolt and in the shock sleeve here will help prevent damage. With the bolt going in on one side, use the long punch on the other to manipulate the knuckle and sleeve so the bolt passes through easily all the while adjusting the jack up and down as needed. My car was not one that just fell together in the rear like other cars I have worked on, so you may need more or less fidgeting to get everything line up. My fronts basically fell together while my rears required a lot more effort. I usually hang my struts and bring the knuckle up but on one side in the rear, I had to do it the opposite way as the lower shock mounting sleeve kept getting jammed in the knuckle preventing me from getting the bolt even close
Once everything is line up, bolts are through and nuts are one, snug up the top strut mount nuts with just your fingers and leave them for later.
Begin by torquing the lower shock bolts and sway bar links. Torque the upper ball joint nut in the front and replace the clip or cotter pin. Re-attatch the ABS wire holder to the UCA over the raised locating nipple on the UCA.
Step 12, put car on the ground and start to put back together:
Once the bottom side is all buttoned up, torqued down and safety-clipped or cotter-pinned in place. You can mount the wheels and tires and lower the cars off the stands.
With the car on the ground, adjust all your shocks to full soft, roll the car back and forth turning the front wheels slightly to settle out the suspension from bushing-bind, tighten the upper strut mount nuts front and rear and check your ride heights. If you need to adjust the heights, jack the car back up and do so. Remember that if you need to adjust one wheel up and the other wheel down, divide the total of the difference by 2 and only adjust up and down by that much. That sounds obvious but after 4-6hours of working on the car, little things like this can be easily forgotten. Also remember that if you adjust the front right corner, the back left corner will also be slightly effected. With your adjustments done, and you are confident in them, make sure all your adjusting collars are tight. Put the wheels on, put the car back down on the ground, roll the car back and forth turning the front wheels slightly to settle out the suspension from bushing-bind and recheck ride heights. If you have the heights even, torque your wheels and take the car for a test drive. Once back, recheck your ride heights. If everything is good, proceed to put the rear seat area back together.
Step 13, rear extenders:
My BC’s came with rear shock extenders so I could adjust the dampening of the shocks without removing the seats. To install these you either need to remove the upper strut covers or modify them. I choose to modify them.
With your extenders and covers in hand, move to your work bench.
Take your center punch and dimple the center of the cover as pictured here:
http://www.flickr.com/photos/zx3tuning/8176620876/http://www.flickr.com/photos/zx3tuning/8176620876/ by http://www.flickr.com/people/zx3tuning/, on Flickr
Measure the thickness(diameter) of the flexible section of the extender. Find a rubber grommet with an ID slightly bigger than the thickness of the flexible section. Measure the diameter of the grommet inside the channel and write that down. Drill a small pilot hole into the cover and then use your step drill to open the hole to the size of the grommet measurement you just wrote down. Remove any burrs from the hole you just drilled in the cover and install the grommet into the cover.
Using the supplied allen key, remove one end off the flexible section and set that piece aside. Slide the flexible section through the grommet to get this:
http://www.flickr.com/photos/zx3tuning/8176589825/http://www.flickr.com/photos/zx3tuning/8176589825/ by http://www.flickr.com/people/zx3tuning/, on Flickr
http://www.flickr.com/photos/zx3tuning/8176623216/http://www.flickr.com/photos/zx3tuning/8176623216/ by http://www.flickr.com/people/zx3tuning/, on Flickr
Repeat process for the other cover.
http://www.flickr.com/photos/zx3tuning/8176591139/http://www.flickr.com/photos/zx3tuning/8176591139/ by http://www.flickr.com/people/zx3tuning/, on Flickr
Move back to the car and decide where you want to have your extender come through. I chose a spot approximately 11” in from the C-pillar which would put the extender just behind the rear headrests. Mark and drill through the parcel with your step-bit below the top edge of the parcel tray, slightly bigger than the thickness of the flexible section of the extender. With the hole drilled, remove the sleeve off the flexible section and insert through the hole.as shown:
http://www.flickr.com/photos/zx3tuning/8176592723/http://www.flickr.com/photos/zx3tuning/8176592723/ by http://www.flickr.com/people/zx3tuning/, on Flickr
http://www.flickr.com/photos/zx3tuning/8176591839/http://www.flickr.com/photos/zx3tuning/8176591839/ by http://www.flickr.com/people/zx3tuning/, on Flickr
With the extender disassembled, and the shocks set to full soft, install the adaptor end over the shock adjuster. Make sure the set screw is fully back off so the adaptor slides completely over the adjuster **** on the shock and then tighten the set screw:
http://www.flickr.com/photos/zx3tuning/8176626324/http://www.flickr.com/photos/zx3tuning/8176626324/ by http://www.flickr.com/people/zx3tuning/, on Flickr
Slide the flexible section back through the cover and slip the cover over the strut. Insert the flexible section back into the sleeve and work the sleeve down so it is seated against the adaptor and the end of the flexible section is fully extended from the sleeve on the other end. Install the extender adjustment **** and tighten with supplied allen key Tighten the nuts for the strut cover and repeat process on the other side.:
http://www.flickr.com/photos/zx3tuning/8176595671/http://www.flickr.com/photos/zx3tuning/8176595671/ by http://www.flickr.com/people/zx3tuning/, on Flickr
Step 14, the rear seats:
With the extenders in place, vacuum up the dust from drilling the parcel tray. Install the plastic clips to secure the parcel tray and then begin installing the rear seat backs. Lift the base of the seat back over the buckle receivers and slide into place with the upper bolt holes lined up. Loosely install all 7 bolts to secure the seat back before tightening them down. Re-install the lower belt anchors and torque all bolts to spec. At this point, if you have not done so already, vacuum the crap out from under the rear seat base. Note the 2 loops that extend out on the bottom of the seat backs, as seen in the center left edge of the picture here:
http://www.flickr.com/photos/zx3tuning/8174030775/http://www.flickr.com/photos/zx3tuning/8174030775/ by http://www.flickr.com/people/zx3tuning/, on Flickr
also not the 2 long fingers that extend back and up from the seat base. Install the seat base by lining up and engaging the fingers on the seat base into the loops of the seat backs by angling the front of the seat up, the rear down and sliding backwards. Once the fingers and loops are engaged, lower the front of the seat and insert the 4 wire fingers down into their corresponding pink oval receivers and firmly force the seat base down along the front and side edges. You may need to force these fingers over the lip of the pink ovals to get them to engage and sit down properly. http://www.flickr.com/photos/zx3tuning/8174062310/http://www.flickr.com/photos/zx3tuning/8174062310/ by http://www.flickr.com/people/zx3tuning/, on Flickr
If your car is equipped with factory Air Suspension, you will need to remove the following fuse inorder to keep the light on the dash from coming on with the system disconnected.. Thank you Yamae for the info needed for this step!
With the seat installed, go over all your work again and make sure didn’t forget anything or have any extra bolts. If all is well, take the car for a proper drive and enjoy your new stance and ride.
It is virtually the same method to put the front and rear suspension back together at this point so I’ll write this once. Refer back here for the rear installation procedures.
NOTE: you should apply a liberal coating of anti-seize to all bolt shanks, sleeves and even a dab on the treaded sections. Rust, even in areas where harsh winters road salt is not an issue, to suspension hardware. A little preventative work here will allow easy repairs/ changes down the road. If you encountered a very difficult bolt to remove along the way, be sure to wire brush the heck out of that bolt and nut, even run a thread chasers over both the bolt and the nut to ensure good engagement.
There are 2 ways to put the fronts and the rears back together.
One is to install the lower mount of the shock into the knuckle/LCA first, then put the jack under the lower balljoint or control arm and raise everything up so the strut mount lines up and the studs pass through the holes then spin on the strut mount nuts.
The other is to hang the strut from the nuts on the tower and use the jack to bring the knuckle/LCA up to fit the lower bolt . Both ways take some finagling to get everything to line up. On my (6, the front was a lot easier to do than the rears for this step
This step is where the long tapered punch comes into play as you can use it to centre the knuckle and the lower shock mount together before you try and screw in the lower bolt. A couple light taps with a hammer to the lower mounting point on the shock to get the sleeve closer the the bolt-holes on the knuckles may also be needed. Really, you are just going to have to take your time here and think about what you are doing, unless it falls together there is no one best way to get the lower bolt sleeve into the knuckle. Once the knuckle and the shock sleeve are close to line up, start to thread in the bolt with a small ratchet and socket by hand pushing lightly as you spin it in. Anti-seize on the bolt and in the shock sleeve here will help prevent damage. With the bolt going in on one side, use the long punch on the other to manipulate the knuckle and sleeve so the bolt passes through easily all the while adjusting the jack up and down as needed. My car was not one that just fell together in the rear like other cars I have worked on, so you may need more or less fidgeting to get everything line up. My fronts basically fell together while my rears required a lot more effort. I usually hang my struts and bring the knuckle up but on one side in the rear, I had to do it the opposite way as the lower shock mounting sleeve kept getting jammed in the knuckle preventing me from getting the bolt even close
Once everything is line up, bolts are through and nuts are one, snug up the top strut mount nuts with just your fingers and leave them for later.
Begin by torquing the lower shock bolts and sway bar links. Torque the upper ball joint nut in the front and replace the clip or cotter pin. Re-attatch the ABS wire holder to the UCA over the raised locating nipple on the UCA.
Step 12, put car on the ground and start to put back together:
Once the bottom side is all buttoned up, torqued down and safety-clipped or cotter-pinned in place. You can mount the wheels and tires and lower the cars off the stands.
With the car on the ground, adjust all your shocks to full soft, roll the car back and forth turning the front wheels slightly to settle out the suspension from bushing-bind, tighten the upper strut mount nuts front and rear and check your ride heights. If you need to adjust the heights, jack the car back up and do so. Remember that if you need to adjust one wheel up and the other wheel down, divide the total of the difference by 2 and only adjust up and down by that much. That sounds obvious but after 4-6hours of working on the car, little things like this can be easily forgotten. Also remember that if you adjust the front right corner, the back left corner will also be slightly effected. With your adjustments done, and you are confident in them, make sure all your adjusting collars are tight. Put the wheels on, put the car back down on the ground, roll the car back and forth turning the front wheels slightly to settle out the suspension from bushing-bind and recheck ride heights. If you have the heights even, torque your wheels and take the car for a test drive. Once back, recheck your ride heights. If everything is good, proceed to put the rear seat area back together.
Step 13, rear extenders:
My BC’s came with rear shock extenders so I could adjust the dampening of the shocks without removing the seats. To install these you either need to remove the upper strut covers or modify them. I choose to modify them.
With your extenders and covers in hand, move to your work bench.
Take your center punch and dimple the center of the cover as pictured here:
http://www.flickr.com/photos/zx3tuning/8176620876/http://www.flickr.com/photos/zx3tuning/8176620876/ by http://www.flickr.com/people/zx3tuning/, on Flickr
Measure the thickness(diameter) of the flexible section of the extender. Find a rubber grommet with an ID slightly bigger than the thickness of the flexible section. Measure the diameter of the grommet inside the channel and write that down. Drill a small pilot hole into the cover and then use your step drill to open the hole to the size of the grommet measurement you just wrote down. Remove any burrs from the hole you just drilled in the cover and install the grommet into the cover.
Using the supplied allen key, remove one end off the flexible section and set that piece aside. Slide the flexible section through the grommet to get this:
http://www.flickr.com/photos/zx3tuning/8176589825/http://www.flickr.com/photos/zx3tuning/8176589825/ by http://www.flickr.com/people/zx3tuning/, on Flickr
http://www.flickr.com/photos/zx3tuning/8176623216/http://www.flickr.com/photos/zx3tuning/8176623216/ by http://www.flickr.com/people/zx3tuning/, on Flickr
Repeat process for the other cover.
http://www.flickr.com/photos/zx3tuning/8176591139/http://www.flickr.com/photos/zx3tuning/8176591139/ by http://www.flickr.com/people/zx3tuning/, on Flickr
Move back to the car and decide where you want to have your extender come through. I chose a spot approximately 11” in from the C-pillar which would put the extender just behind the rear headrests. Mark and drill through the parcel with your step-bit below the top edge of the parcel tray, slightly bigger than the thickness of the flexible section of the extender. With the hole drilled, remove the sleeve off the flexible section and insert through the hole.as shown:
http://www.flickr.com/photos/zx3tuning/8176592723/http://www.flickr.com/photos/zx3tuning/8176592723/ by http://www.flickr.com/people/zx3tuning/, on Flickr
http://www.flickr.com/photos/zx3tuning/8176591839/http://www.flickr.com/photos/zx3tuning/8176591839/ by http://www.flickr.com/people/zx3tuning/, on Flickr
With the extender disassembled, and the shocks set to full soft, install the adaptor end over the shock adjuster. Make sure the set screw is fully back off so the adaptor slides completely over the adjuster **** on the shock and then tighten the set screw:
http://www.flickr.com/photos/zx3tuning/8176626324/http://www.flickr.com/photos/zx3tuning/8176626324/ by http://www.flickr.com/people/zx3tuning/, on Flickr
Slide the flexible section back through the cover and slip the cover over the strut. Insert the flexible section back into the sleeve and work the sleeve down so it is seated against the adaptor and the end of the flexible section is fully extended from the sleeve on the other end. Install the extender adjustment **** and tighten with supplied allen key Tighten the nuts for the strut cover and repeat process on the other side.:
http://www.flickr.com/photos/zx3tuning/8176595671/http://www.flickr.com/photos/zx3tuning/8176595671/ by http://www.flickr.com/people/zx3tuning/, on Flickr
Step 14, the rear seats:
With the extenders in place, vacuum up the dust from drilling the parcel tray. Install the plastic clips to secure the parcel tray and then begin installing the rear seat backs. Lift the base of the seat back over the buckle receivers and slide into place with the upper bolt holes lined up. Loosely install all 7 bolts to secure the seat back before tightening them down. Re-install the lower belt anchors and torque all bolts to spec. At this point, if you have not done so already, vacuum the crap out from under the rear seat base. Note the 2 loops that extend out on the bottom of the seat backs, as seen in the center left edge of the picture here:
http://www.flickr.com/photos/zx3tuning/8174030775/http://www.flickr.com/photos/zx3tuning/8174030775/ by http://www.flickr.com/people/zx3tuning/, on Flickr
also not the 2 long fingers that extend back and up from the seat base. Install the seat base by lining up and engaging the fingers on the seat base into the loops of the seat backs by angling the front of the seat up, the rear down and sliding backwards. Once the fingers and loops are engaged, lower the front of the seat and insert the 4 wire fingers down into their corresponding pink oval receivers and firmly force the seat base down along the front and side edges. You may need to force these fingers over the lip of the pink ovals to get them to engage and sit down properly. http://www.flickr.com/photos/zx3tuning/8174062310/http://www.flickr.com/photos/zx3tuning/8174062310/ by http://www.flickr.com/people/zx3tuning/, on Flickr
If your car is equipped with factory Air Suspension, you will need to remove the following fuse inorder to keep the light on the dash from coming on with the system disconnected.. Thank you Yamae for the info needed for this step!
remove the fuse indicated by the red oval [in the picture below].
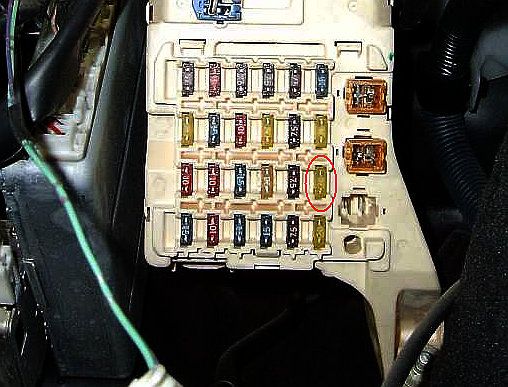
[Look for the] fuse panel with a lid under the dash [on the] driver's side which is also under the air vent next to the door mirror [control pad]. It is a 20A fuse. To see and remove the fuse you need to remove the lid. At the lid side "エアサスペンション" is [or may be] printed and you can confirm it. "エアサスペンション" means "Air suspension" in English.
[Look for the] fuse panel with a lid under the dash [on the] driver's side which is also under the air vent next to the door mirror [control pad]. It is a 20A fuse. To see and remove the fuse you need to remove the lid. At the lid side "エアサスペンション" is [or may be] printed and you can confirm it. "エアサスペンション" means "Air suspension" in English.
Last edited by Shmee; 11-15-12 at 10:07 AM.
11-13-12, 02:23 PM
#5

did I miss something or did you not post how to do the rears? 
You definitely don't need to open a balljoint up to do those .
.
also, this would apply to all '95-00, not just '95-97 (i'll edit the title). And is there a reason you put the rear shock mount (no struts on the LS mate, shocks only) covers back on? you're the first person with coils i've seen use them on top of the coilovers lol.
otherwise not bad
You definitely don't need to open a balljoint up to do those
.also, this would apply to all '95-00, not just '95-97 (i'll edit the title). And is there a reason you put the rear shock mount (no struts on the LS mate, shocks only) covers back on? you're the first person with coils i've seen use them on top of the coilovers lol.
otherwise not bad
Last edited by PureDrifter; 11-13-12 at 06:31 PM.
11-13-12, 02:29 PM
#6
lol, you are right... i must have missed writing up the rears with how long it already was. and yeah, you definitely do not need to pull the upper ball joint in the rear to remove the strut. when i have time, i'll amend that. 
if you like and can go through and edit any mention of struts to shocks.
I opted to re-install the covers for a little more noise reduction from the virtually solid upper mounts of my coilovers
if you like and can go through and edit any mention of struts to shocks.
I opted to re-install the covers for a little more noise reduction from the virtually solid upper mounts of my coilovers


The following users liked this post:
LS400nooby (01-25-20)
Trending Topics
 11-14-12, 11:13 AM
#10
Driver

Join Date: Oct 2012
Location: Netherlands
Posts: 138
Likes: 0
Received 0 Likes
on
0 Posts
Nice How-To you have made ! I also just fitted the exact same coilover set on my celsior. But now the air-suspension lights up in the dash as it has a problem.
I allready tried without the fuse, no difference. Also diconnect both connectors from the compressor, but the light still lights up. What did you do about this? Just remove the light-bulb from the dash? Or is there an easier way?
Thanks

I allready tried without the fuse, no difference. Also diconnect both connectors from the compressor, but the light still lights up. What did you do about this? Just remove the light-bulb from the dash? Or is there an easier way?
Thanks

Last edited by Dutchy; 11-14-12 at 11:16 AM.
11-14-12, 03:38 PM
#13
Dutchy,
I did not have air so i do not have an answer for you?
Timmy,
If you had a big pry-bar and the car fairly high in the air, you could probably pull the control arms down and shift the strut to one side and then pull it out... it would be a pretty tight squeeze though
i didn't try, it is not difficult to pop the UBJ out and it makes the job no more difficult..
yeah, i have B&A pics, i'll pot them later
11-14-12, 03:48 PM
#14
Moderator

Nice How-To you have made ! I also just fitted the exact same coilover set on my celsior. But now the air-suspension lights up in the dash as it has a problem.
I allready tried without the fuse, no difference. Also diconnect both connectors from the compressor, but the light still lights up. What did you do about this? Just remove the light-bulb from the dash? Or is there an easier way?
Thanks
I allready tried without the fuse, no difference. Also diconnect both connectors from the compressor, but the light still lights up. What did you do about this? Just remove the light-bulb from the dash? Or is there an easier way?
Thanks
A JDM has this fuse panel with a lid under the dash at driver's side which is also under the air vent next to the door mirror. It is a 20A fuse. To see and remove the fuse you need to remove the lid. At the lid side "エアサスペンション" is printed and you can confirm it. "エアサスペンション" means "Air suspension" in English.
Last edited by Yamae; 11-14-12 at 03:54 PM.