When you click on links to various merchants on this site and make a purchase, this can result in this site earning a commission. Affiliate programs and affiliations include, but are not limited to, the eBay Partner Network.
I was fixing some other common LS "issues" when I decided to plug my ACV. Seemed easy enough, I crawled under the night before to get a worms eye view, and developed a plan. I found a 14 x 1.5 thread bolt at my local Ace hardware. Cut it to length and dressed the threads. My plan involved a myriad of tools working both from above and below. Everything was going ok until I had to remove the reservoir to facilitate access to the pump. When pulling up on the reservoir the larger FEED hose split like a waffle cone. Granted I live in Arizona where summer temps occasionally exceed 115 degrees and the car has 193XXX miles but WOW this thing frayed apart like old cardboard!
This is exactly what happened along with several other hoses. I had to take short trip to AutoZone to get replacement hose for about $4 and cut it to length.
Note: This is just to provide useful information and I am NOT responsible for your safety nor if you break any parts. Always use caution when working on cars and know when you are over your head! - enjoy!
This is for the 98-00 LS400 Powersteering pumps only (May apply to LS430 and any same generation PS pump GS's - but cannot confirm)
I currently have a 99 LS400 and this is my 3rd 400. I love them but I am pretty disappointed in Toyotas power steering leak issues over all the years. I have had leaks on all of my AE86 Corollas (granted they are pretty old) and all of my LS400's and nearly every Toyota I have worked on.
So when I got my 99 it already had a nasty leak and I decided to dive into it and figure it out before it ruined my alternator. There are a lot of different fixes for the different generations, but I could not find anything specific on the 98-00 LS400 since their PS system is a bit different.
To give you some info on me...I am a mechanic by trade and I am Honda and ASE certified...I am a co-owner of a repair/service and performance shop. I am very meticulous and always strive to repair things in the best manor possible.
The problem:
Power steering fluid (ATF) was leaking from the Power steering pump from several sources on the pump. One of which I could determine while the pump was still in the vehicle. This was from the "Flow control valve" port. This can be seen while the pump is still on the vehicle. It is a round port just under the timing belt /cam gear cover. It looks like it has a hex head bolt (allen) in the center. This was full of fluid and when I cleaned it of it was full again in a few days. This was dumping a lot of ATF on my alternator....but I knew this was not the only place it was leaking from. So I knew I was going to have to pull the PS pump.
Taking out the pump:
- It would be best to disconnect your battery considering you will be working next to live power wires (alternator).
- Jack up the car and put it safely on jack stands to support the front of the vehicle so you can get under it and work safely.
- Remove the large lower splash shield.
- Take out all of the intake parts all the way to the throttle body including the air box...make sure you unplug the MAF sensor. Also remove the large black box that sits on top of the passenger side valve cover.
- You will need to release the tensioner to remove the serpentine belt. You can use a 14mm socket. While releasing the tensioner take off the belt ***remember how it is routed.
** - The factory manual says that you have to take out the ABS modulator and replace it and bleed the brakes...DO NOT DO THIS UNLESS YOU WANT A BIG MESS AND YOU WILL RUN THE RISK OF NOT GETTING YOUR BRAKES BLED PROPERLY.
INSTEAD - Remove the bracket that is holding the ABS modulator (the box with all the brake lines going into it) to the frame rail. When you do this you will be able to move the modulator left and right gently.
- Drain the power steering reservoir by disconnecting the large hose from the top of the power steering pump and let it drain into a container below.
- Disconnect the rest of the PS lines from the reservoir and remove the reservoir from the engine bay. There is a small hard coolant line that has one bolt holding it to the engine - remove this bolt and disconnect the wire harness from this area too so it can be moved out of the way.
- To unbolt the PS pump there are (2) bolts and (1) nut. You will need to access the nut with a wobblie and a short 14mm. This is accessed by going through one of the holes on the PS pulley and it sits below the timing cover to the right of the PS pump. Be careful NOT to tweak the pulley or put pressure on it enough to bend it. The (2) bolts are at the rear of the pump and are accessed more easily from underneath with a long extension, wobblie and 14mm. If you havent disconnected you battery you need to be careful at this point NOT to ground out the (+) terminal on the alternator!! The two bolts are above the alternator on the bottom side of the head. Remove these two bolts and go to the front of the car.
- To remove the PS pump - Make sure everything is disconnected from the PS Pump. Gently take and move the ABS modulator to the left (passenger fender)...you will need to pull out the PS pump while holding the ABS modulator to the left. MAKE SURE YOU DONT DAMAGE THE LINES...only move it enough to get the PS pump out.
Stock position of ABS modulator (pic is with PS pump out):
Pic with ABS modulator gently moved over with bracket disconnected:
Fixing the pump:
- While inspecting the pump I realized that it was leaking from the Flow Control Valve (as previously thought), and from where the 2 halves of the PS pump meet / where it bolts together. This is stupid cause when it leaks from the (2) halves it drains right into the center of the alternator!!
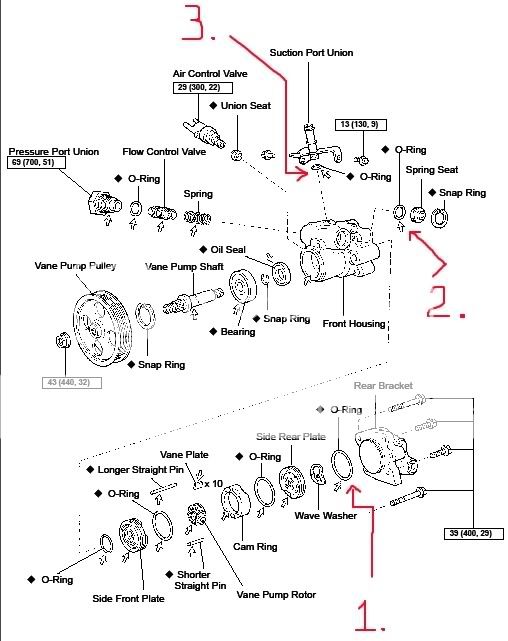
So you will need to get these Orings:
I also replaced #3 just to be safe.
Replace #1 O'ring:
- You will need to separate the two halves of the PS Pump. This is done by removing the 4 bolts on the back -
- Make sure to keep the pulley side down while working with the PS Pump apart. When it is apart you will see the "#1" O'ring on the back half.
As you can see the O'ring is very flat...it was also very brittle. This is def what caused the case to leak.
- Replace this O'ring. I put just a dab of ATF on the oring to lube it up...Clean the mating surfaces and gently put the two halves together. You want to do it gently with even pressure and install them together being aligned as to not twist or pinch the new O'ring. Once you have bolted them together then torque to 29ft lbs each.
Replace #2 O'ring:
- You need to locate the flow control valve port (the end in the diagram with the snap ring) and remove the snap ring and wipe this area out. Once you do this then you need to take a bolt that fits and thread it into the spring seat to pull it out. MAKE SURE you keep this end up while the spring seat is out! Replace the O'ring on the seat and again use a dab of ATF to lube the O'ring. Make sure the port and seat are clean and carefully re-install the seat. Push the seat in and install the snap ring.
Replace #3 O'ring:
- Unbolt the tube and its mount (2 bolts) from the PS pump and do the same to replace the O'ring as above with the other O'rings.
Now is a good time to clean up the mess in the hard to reach spaces on the engine with brake clean before you put it back together.
Reinstall everything in reverse order.
Once you have everything together and properly installed (DOUBLE AND TRIPLE CHECK) then you can fill the reservoir with Regular toyota ATF (NOT TYPE IV). Start the car and check for leaks.
To Bleed the PS system - after you fill the reservoir while the car is started turn the wheel all the way right, then left a few times all the way to stop and hold it there for a few seconds. Turn it off and let it sit for a little bit and fill the reservoir to its mark on the dipstick. You may have to repeat this several times to get all the air out.
When you know you are good and have no leaks then I would degrease the area and clean with a pressure washer carefully and NOT when the engine is really hot.
Good luck!
***This may apply to LS430 PS pumps as well but cannot confirm.
Also for reference, I had to fix the air intake plastic that just broke off. So I did this per another member's idea/post from this forum. To find this part, go to where the air tool accessories are. They do sell this brass fitting at Lowes and Home Depot.
Its a real pain to get all the air out of the system. With the front end jacked up you turn both directions stop to stop, and keep eye on the fluid level and, idle and rev up.
And turn it off and let it set for a bit and do it some more. There maybe an easier way, but the turning stop to stop is how the manual says to do it.
Thanks for the information. I will do mine. I bought the following parts:
1. Bolt to plug the ACV: M14 x 1.5 thread bolt (Oil pan drain plug bolt from atuzone)
2. O-ring #1 - 90301-53007 (the biggest O ring)
3. O-ring #2 - 90301-18013
4. O-ring #3 - 90301-11016
5. O-ring #4 -90301-19018 (for High pressure port, the one with 27mm head)
6. Gasket between the pump and high pressure line: 44327-30030
When I rebuilt the pump in my '91, I bought a gasket kit, Lexus PN 04446-30173. It might have those o-rings, plus several other items. Been a while, so I don't know. I do remember it being a lot cheaper to buy this pre-packaged kit than if I were to buy the individual seals one at a time.
Kind of old thread but could someone confirm whether the kit 04446-30173 has all the required o-rings are well that additional bearing? Also I do have 98 LS400 and can someone spot me the PN for gasket/o-ring between the reservoir and the house. I have leak going on.
Is there a good website where I can find all the parts diagrams which also show these orings etc? I've looked at mylparts.com but it didn't get detailed enough to show the orings and gaskets.
 09-08-16, 05:05 PM