
Rear Knuckle bushings - source (pic attached)

 09-08-06, 06:42 AM
#17
Pole Position

Join Date: Jun 2006
Location: GA
Posts: 347
Likes: 0
Received 0 Likes
on
0 Posts
I found a place online that sells them..right here
http://www.l-tunedparts.com/product/?id=1905
PS. which number in that diagram is the Trailer Arm?
http://www.l-tunedparts.com/product/?id=1905
PS. which number in that diagram is the Trailer Arm?
09-12-06, 03:29 PM
#19
Driver School Candidate
Thread Starter

Join Date: Sep 2006
Location: CT
Posts: 9
Likes: 0
Received 0 Likes
on
0 Posts
I didn't have a press big enough to push out the bearing like Aussie did. I happened to have a Pitman Arm which fit perfectly and used that (with my impact gun) to push out the middle of the old bushing.
You could always drill holes around the outside of the rubber and then push it out. Next, I used a sawzall and cut thru the metal that remained from the bushing. Be careful, you don't want to cut into the knuckle (a little nick won't hurt).
Next, I used my air hammer with the chisel end and knocked out the metal part. If you don't have air tools, you could do this with a hammer and chisel, no big deal.
Disconnect the TOP sway bar nut, not the bottom. I didn't really look and the bottom nut is partially obstructed. I didn't need/use the inner bushings either just the ones pressed into the knuckle.
Bob
09-13-06, 03:02 AM
#21
Driver School Candidate

Join Date: May 2006
Location: vic
Posts: 46
Likes: 0
Received 0 Likes
on
0 Posts
Just remember that the rear carrier (no.10) is very different to the (no. 9) bush. I originally sent these photo's to lexls.com but i guess he thought the photo's seemed too similar to the article he already had. Good luck.
09-19-06, 06:28 AM
#22
Pole Position
Join Date: Jun 2006
Location: GA
Posts: 347
Likes: 0
Received 0 Likes
on
0 Posts
I plan on changing out these RAC & Lateral arm bushings when I do my breaks and change out my rear strut rod bushings, and the other Knuckle bushings...woot woot, looking fwd to it! I'll let you know how it goes..
04-05-09, 06:04 PM
#23

I didn't have a press big enough to push out the bearing like Aussie did. I happened to have a Pitman Arm which fit perfectly and used that (with my impact gun) to push out the middle of the old bushing.
You could always drill holes around the outside of the rubber and then push it out. Next, I used a sawzall and cut thru the metal that remained from the bushing. Be careful, you don't want to cut into the knuckle (a little nick won't hurt).
Next, I used my air hammer with the chisel end and knocked out the metal part. If you don't have air tools, you could do this with a hammer and chisel, no big deal.
Disconnect the TOP sway bar nut, not the bottom. I didn't really look and the bottom nut is partially obstructed. I didn't need/use the inner bushings either just the ones pressed into the knuckle.
Bob
You could always drill holes around the outside of the rubber and then push it out. Next, I used a sawzall and cut thru the metal that remained from the bushing. Be careful, you don't want to cut into the knuckle (a little nick won't hurt).
Next, I used my air hammer with the chisel end and knocked out the metal part. If you don't have air tools, you could do this with a hammer and chisel, no big deal.
Disconnect the TOP sway bar nut, not the bottom. I didn't really look and the bottom nut is partially obstructed. I didn't need/use the inner bushings either just the ones pressed into the knuckle.
Bob
04-05-09, 06:51 PM
#24
Lexus Test Driver

(90-94) ADUS 583
Rear Axle Carrier
& Lateral Arm Kit
Kits Per Car = 2
http://www.foreignautosalvage.com/bushings.htme This is the bush you want. For some reason they only sell the inner and outer kit as one. I found i only needed the outer bush. The old bush will push out with a large socket and large bearing pushing tool. Hope this helps. I gather you have changed the carrier bush. Also you will need to align the rear after as mine was out 15 degrees.
Did you have any symptoms / reason to replace the rear carrier bushings (adus 505) and then again when you replaced the lower control arm (adus 583) bushings?
Thx
12-03-10, 02:03 PM
#25

Had my right front lower ball joint replaced at the Lexus dealer today and the mechanic noticed the bushing in the right rear knuckle (aka carrier assembly) connected to the toe control arm was bad and in need of a replacement. Pointed out in the picture below (same picture as in the first post in this tread)
If you want to go OEM you have to replace the hole knuckle just to replace this bushing. This is very costly and luckily according to earlier post in this tread you can replace this bushing with one half of the ADUS 583 bushing kit (http://www.mybushings.com/lexus-ls-4...-kit-p-93.html).
But whats making me a bit confused is that the bushing in the rear knuckle is ball joint type of bushing (according to the Lexus service technician and information found on some sites, like this on: http://www.priracing.com/product.php...--inner-bushes). So my question is, can someone confirm that you can replace the bushing in the rear knuckle with the ADUS 583 kit. It's looks really clear that you can when you are looking at pictures from AussiLS400 in this tread and this information just makes it more clear that you can, http://www.foreignautosalvage.com/catdesc/583d.jpg.
But I just want to be 100% sure before I order the bushing kit and start trying to change the bushings on the car.
Thanks in advance.
/Joel
12-04-10, 02:04 AM
#27
01-17-11, 04:54 AM
#28

well, i installed the bushings saturday. was alot more trouble then i had planned on since i forgot my brothr has my puller and he was at work so couldnt get it back. had to torch the bushings out of the arms themselves, then cut a slit in the sleeves to pop them out. had to do this to the sleeves in the knuckle as well. though 1 slit was enough to pop them out. didnt have to do 2 as mentioned in other threads here.
well, the bushings on the knuckles didnt exist at all. there was NO RUBBER at all. just the metal pin banging around in the sleeve. well, got the 505's and 5056's in. car rides sooooooooo much better. no more clunking from the rear end, and no more pulsing when hitting the brakes easy, and also, it just seems to coast alot better too. i will do the 583 bushings next. they arnt bad, but getting a lil soft.
well, the bushings on the knuckles didnt exist at all. there was NO RUBBER at all. just the metal pin banging around in the sleeve. well, got the 505's and 5056's in. car rides sooooooooo much better. no more clunking from the rear end, and no more pulsing when hitting the brakes easy, and also, it just seems to coast alot better too. i will do the 583 bushings next. they arnt bad, but getting a lil soft.
01-20-11, 06:23 AM
#29
Rookie

Join Date: May 2007
Location: MD
Posts: 86
Likes: 0
Received 0 Likes
on
0 Posts
This thread was super helpful for me when I went to replace my 505 bushings this weekend. For future reference, it is possible to cut out the metal sleeve with a hacksaw blade if you don't have a punch of the right size (sawzal method). Difficult, but possible.
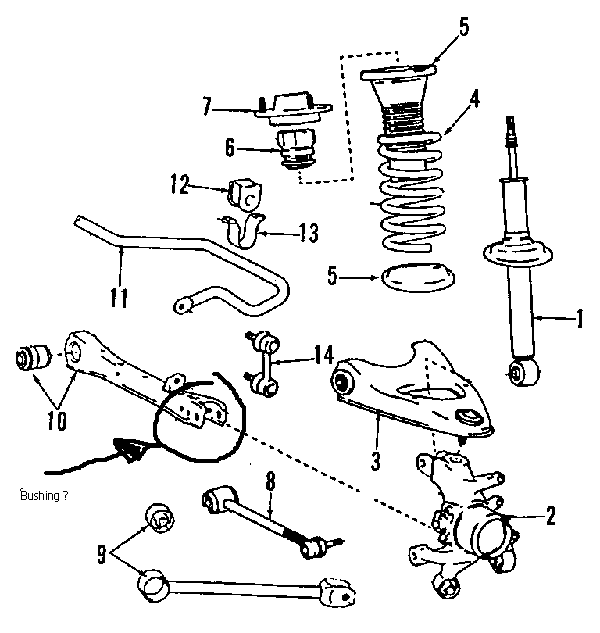
Since I located all of the bushings, I thought it would be helpful to post up everything in one parts diagram. Hope it helps someone in the future...
As shown in the diagram, the adus 5056 is available OEM. Both are about the same price ($22).
Half of the 583 is also available OEM.
The silicone lube I used was: FORMULA 5 PRELUBE This was FAR thicker than the "Super Lube" tub I had and seemed to be identical to what is supplied with the daizen sway bar bushings (which I have never had squeak after 5+ years).
Good luck!
LS400 LS 400 1990 1991 1992 1993 1994
01-20-11, 08:19 AM
#30
where did you get the "FORMULA 5 PRELUBE " and my 5056 and 505 bushings were ~$28 each plus shipping. with the coupon i found for my bushings web site, it was like $120 total shipped for 2 of each to do both sides. btw, i didnt use a punch. i cut a slit in the sleeve with a sawzall, which is basically a powered hack saw, and then used a flat head screwdriver and hammer to push them out. popped right out after the slit was cut.