Pimp my SC300!!!! Brand spankin new HID retrofit live on Clublexus.com!!!!!
 11-09-05, 09:34 AM
#1
Pole Position
Thread Starter
Here it is! I'm about 40% done at this point I write the first post but let's see if I can bring everyone up to speed here
This time I'll let the pics do the talking and then I'll backtrack
Here the projectors (taken with my crappy V710 Moto phone camera)

Here are the pics of their output taken last night from a different digicam.


Pics of the preperation stage


This time I'll let the pics do the talking and then I'll backtrack
Here the projectors (taken with my crappy V710 Moto phone camera)
Here are the pics of their output taken last night from a different digicam.
Pics of the preperation stage
Last edited by tiguy99; 11-09-05 at 09:58 AM.
 11-09-05, 09:35 AM
#2
Pole Position
Thread Starter
More pics


Another shot of the lense


Another shot of the lense
11-09-05, 09:57 AM
#3
Pole Position
Thread Starter
Ok...now here's the explaintion....
LexAnt previously had a 5 Series BMW retrofit done to his car a while back but over time grew disastified with a few aspects of it and decided he wanted some assistance on updating his project. So here we are.
First thing's first, I unsealed the lamps as per the instructions listed here on this thread
https://www.clublexus.com/forums/sho...d.php?t=185906
However, there are a couple differences that should be noted if you own an SC300/400 and would like to attempt a retrofit OR unseal your lights to clear the corners, paint the trims or even perform a simple cleaning.
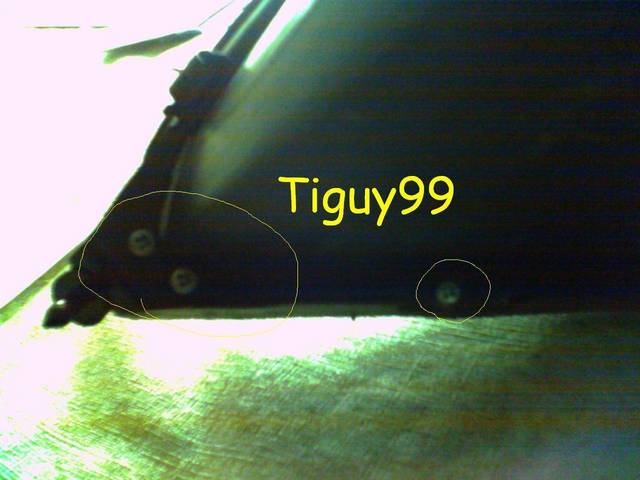
1. Take note of these highlighted areas and make a mental note to unscrew these first before your place the headlamp in the oven.
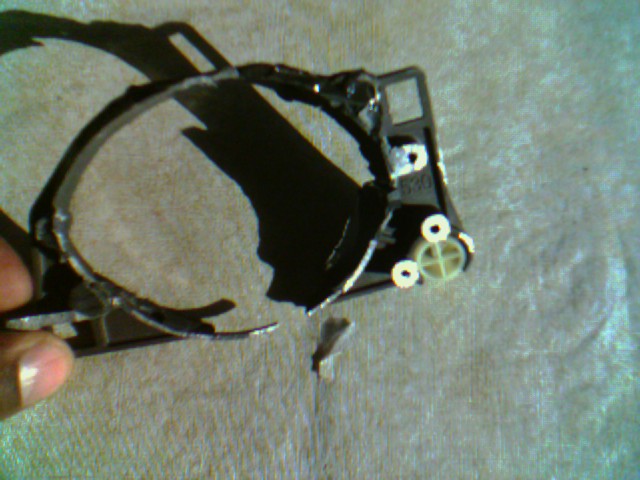
2. Next, remove the silver and black tabs that hold the lamp together.
3. Place the assembly in the oven on 3-4 layers of aluminum sheets to protect the plastic from melting and let them sit in the oven for 8 mins at 260 degrees (don't forget to preheat it to 260 first)
4. Once they're ready, remove them with oven mits and use a butter knife to pry at the corners here in the pic
5. wedge the butter knife in there and use it to wedge enough room where you can stick a finger in or two. Grasp the lamp with both hands and gently pull the lense apart from the assembly.
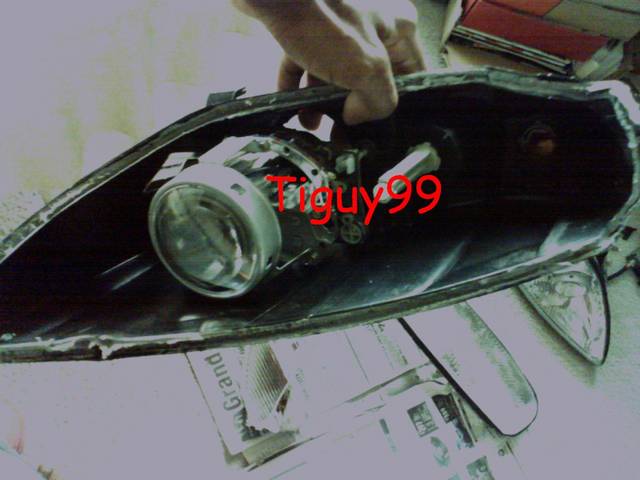
Now you should be here
6. Observe the internal structure and take note of the task you're setting out to do.
Here we decided to sand the lines down off the lense seen here (for better clarity of the beam pattern and also to reduce glare.
We also decided to replace the older E39 Hella mono xenon HID projectors with something with some pizzaz. For this task, we chose to go with the Valeo brand Hybrid projector known for its beautiful colorful projections, small size and outstanding performance. Found on some of the most expensive cars in the world including many exotics, LexAnt's SC will resemble that Ferarri or Audi you saw in your rearview mirror flicking its deep violet colors at you or that Porshe you saw in traffic that made you say, you know what, I want HID now.
Stay tuned as part two debutes here in a few hours!!!!!!!!!!!!!
LexAnt previously had a 5 Series BMW retrofit done to his car a while back but over time grew disastified with a few aspects of it and decided he wanted some assistance on updating his project. So here we are.
First thing's first, I unsealed the lamps as per the instructions listed here on this thread
https://www.clublexus.com/forums/sho...d.php?t=185906
However, there are a couple differences that should be noted if you own an SC300/400 and would like to attempt a retrofit OR unseal your lights to clear the corners, paint the trims or even perform a simple cleaning.
1. Take note of these highlighted areas and make a mental note to unscrew these first before your place the headlamp in the oven.
2. Next, remove the silver and black tabs that hold the lamp together.
3. Place the assembly in the oven on 3-4 layers of aluminum sheets to protect the plastic from melting and let them sit in the oven for 8 mins at 260 degrees (don't forget to preheat it to 260 first)
4. Once they're ready, remove them with oven mits and use a butter knife to pry at the corners here in the pic
5. wedge the butter knife in there and use it to wedge enough room where you can stick a finger in or two. Grasp the lamp with both hands and gently pull the lense apart from the assembly.
Now you should be here
6. Observe the internal structure and take note of the task you're setting out to do.
Here we decided to sand the lines down off the lense seen here (for better clarity of the beam pattern and also to reduce glare.
We also decided to replace the older E39 Hella mono xenon HID projectors with something with some pizzaz. For this task, we chose to go with the Valeo brand Hybrid projector known for its beautiful colorful projections, small size and outstanding performance. Found on some of the most expensive cars in the world including many exotics, LexAnt's SC will resemble that Ferarri or Audi you saw in your rearview mirror flicking its deep violet colors at you or that Porshe you saw in traffic that made you say, you know what, I want HID now.
Stay tuned as part two debutes here in a few hours!!!!!!!!!!!!!
Last edited by tiguy99; 11-09-05 at 10:05 AM.
11-09-05, 10:32 AM
#6
Pole Position
Thread Starter
Originally Posted by Lvangundy
I'm not sure if it's the driveway or the parking angle, but the aim seems REALLY high up.
Trending Topics
11-10-05, 09:27 AM
#8
Pole Position
Thread Starter
Originally Posted by soarer5780
hey tiguy did u get to finish the headlights at all???
Here's what the lense looks like after going through 30-60 mins of 60grit, 80 grit, 100 grit, 120 grit, and 240 grit.

Today, I've got to do the other side but with the help of a nice tool

I'm able to speed up the process a little bit! This part usually takes the longest (about one day per side to get them right) because you have to go through each step of wetsanding throughly (30-60 mins each sometimes 60-90)
(60-80-100-120-240-400-600-800-1000-1500-2000-Rubbing Compound-Plastic Polish)
Don't worry. I won't keep young guys/gals waiting too long! The show must go on (in my best thespian voice which sounds more like Jeffery the butler from the Fresh Prince Show hehe)
Last edited by tiguy99; 11-10-05 at 09:33 AM.

 11-10-05, 11:13 AM
#10
Pole Position
Thread Starter

This is what the lamp looks like after 400grit. Time to do the 600 now.
11-10-05, 12:31 PM
#12
Pole Position
Thread Starter
Originally Posted by LEXISM
just a question ..why dont you get rid of all the lines? 
The sanding is only effective in the areas where the light will be shining through. The owner of these only asked for the lines to be sanded where the projector sits so the image of the HID beam will be more optically clear and produce 0 glare vs. when the dithered lines are there. In other words, whatever he tells me to do is what I'm gonna do hehe. Plus it saves us a hell of alot of time.
To do all of it would probably be few more days extra and a hell of alot more work because the SC has thicker lines outside of the sanded area and I'm learning the hard way that anything above 240 must be sanded by hand. Black and Decker only makes the available paper attachment from 80-240 grit only (grrrrrr) and because of the size of the headlamp space I can't fit anything else in there to power wetsand. (double grrrrr)
11-10-05, 12:39 PM
#13
Pole Position
Thread Starter
Quick update
I'm now wrapping up the 800 grit and am on my merry way to the 1000
Pics still look the same, the fogginess is still present up to this point only the swirls are gone plus its becoming more transperant which is a good thing! I'll have pics up after I knock out the 2000 or if I see a significant difference at the 1500 level.
Here are some shots of the polish and compounds just in case anyone outthere is following along and simultaneously working on this as well


Remember go light with the red Turtle wax compound if you're going to use it. Its strong stuff and can ruin the lenses. The green one is the one that's going to do the most work. I may not use the red one at all because the most of the scrathes are gone away from the higher grit sand paper and I"m only at 800. By the time 2000 rolls around I may not need any at all.
(Keep in mind I'm sanding one headlight at a time to do a compare and contrast with the HID light beam at the end of this mini project so we can see what the differences are and if the sanding solves what we set out to do
Stay tuned!!!!!!!!!!!!!!
I'm now wrapping up the 800 grit and am on my merry way to the 1000
Pics still look the same, the fogginess is still present up to this point only the swirls are gone plus its becoming more transperant which is a good thing! I'll have pics up after I knock out the 2000 or if I see a significant difference at the 1500 level.
Here are some shots of the polish and compounds just in case anyone outthere is following along and simultaneously working on this as well
Remember go light with the red Turtle wax compound if you're going to use it. Its strong stuff and can ruin the lenses. The green one is the one that's going to do the most work. I may not use the red one at all because the most of the scrathes are gone away from the higher grit sand paper and I"m only at 800. By the time 2000 rolls around I may not need any at all.
(Keep in mind I'm sanding one headlight at a time to do a compare and contrast with the HID light beam at the end of this mini project so we can see what the differences are and if the sanding solves what we set out to do
Stay tuned!!!!!!!!!!!!!!
11-10-05, 02:26 PM
#14
Pole Position
Thread Starter
1500 here I come hehe

