
 12-15-14, 01:10 PM
Last edit by: IB Advertising
See related guides and technical advice from our community experts:
Browse all: Interior
- How do I Install Aftermarket Amplifier power wire
Step by step instructions for do-it-yourself repairs
Browse all: Interior

HOW-TO: SC300/SC400 Install Aftermarket Head Unit, OEM Speakers and Sub Working!
06-21-09, 05:17 AM
#1
PLEASE READ THIS INFO ON TWO IMPORTANT SUBJECTS FIRST:
#1 - This is for a PIONEER SYSTEM. Not a NAKAMICHI, no matter how many times you ask!
Everything in this how-to was written for a Pioneer system. All of the wiring locations and specifications were based on a Pioneer system. If you have a Nakamichi system, this DOES NOT work as written. I can't help you with your Nakamichi system, stop asking.
#2 - IF YOU INSIST ON USING THE METRA HARNESS:
The second thing you need to know is I DID NOT USE THE METRA HARNESS.
That seems to be easy to understand right? I DIDN'T USE IT. But... people still try to and will ask me about it. Scanning through the posts made in this thread and in previous stereo-related threads, a few people maybe got lucky with the Metra harness and claimed decent results, but as far as I could tell most seem to have problems with it. It could be pin order, it could be some other reason - I wouldn't know and can't help you with it because I didn't use it. This how-to does NOT use the Metra harness and does not require it. I also do NOT recommend using it, as people seem to just have problems once they try using the Metra harness instead of following my how-to.
If you use the Metra harness anyway even though it doesn't work really well, that's YOUR decision.
If you use the Metra harness anyway and not everything works right, I already told you it wouldn't, but you didn't listen.
If you use the Metra harness anyway and you ask me how to fix it even if you already read this and knew I didn't use it in this how-to, then honestly that's you're problem - not mine. I didn't use the Metra harness for a reason.
Please get the two subjects above crystal clear before you decide to proceed. =) Thank you.
=====================
UPDATED 11-21-13: Revised disclaimers at the very top of the thread yet again
UPDATED 09-05-12: Added two disclaimers at the very top of the thread yet again
UPDATED 08-17-12: Revised wiring procedure for OEM subwoofer amp in section I; new wiring scheme allows head unit to power and have complete control of OEM sub amp and OEM antenna functions
UPDATED 08-12-12: Added install tip for more head unit clearance (for double-DIN head units) in section B; Direct link is here.
UPDATED 07-30-12: Added information on using home audio speaker wire; Added 4th item to parts list (15-feet of 18-ga wire); Updated section B. "MAIN CONNECTIONS" section; Extensively revised sections G, H, and I; installation no longer requires OEM main amp to function
UPDATED 06-28-12: Added "Compatibility Notes"
UPDATED 04-17-12: Clarified wiring in section C step 3
UPDATED 05-04-11: Added Metra harness text in post #1
UPDATED 07-29-09: Revised subwoofer/antenna fix; Updated harness diagrams for subwoofer/antenna fix; Added photo sample from RyanV
UPDATED 07-26-09: Added subwoofer/antenna fix; Updated harness diagrams for more clarity
=====================
On this and other boards I have gone through lots of info, all over the place, some contradicting each other, some REALLY confusing. This thread will try to clear it up and make it as easy as possible for my fellow SC owners. Some of the information below was compiled from other sources.
IS THIS THREAD FOR YOU?
For reference, this thread is for SC300/SC400 owners who can answer yes to ALL of the following:
1. I want to replace my factory head unit with an aftermarket one.
2. I still want to use my factory speakers.
3. I still want to use my factory subwoofer amp and subwoofer.
4. I want to use the amp of my aftermarket head unit to power the main speakers.
5. I DO NOT want to have to install any aftermarket amps yet.
6. I DO NOT install a separate amp for the subwoofer.
Any variation from above, and you're partly on your own. You'll need to be comfortable with cutting and splicing wires, and you'll have to remove the rear seats briefly. The goal here is to install an aftermarket head unit into an SC300/SC400, using the aftermarket head unit's built-in amplifier to power the main speakers (bypassing the OEM Lexus main amp) but using the OEM Lexus subwoofer amp to drive the OEM subwoofer. Because the OEM amplifiers are external (not part of the head unit) AND because there is no plug-and-play harness adaptor specifically made for our car, there's a little more work to be done, but not as hard as it may seem.
COMPATIBILITY NOTES (PLEASE READ!!)
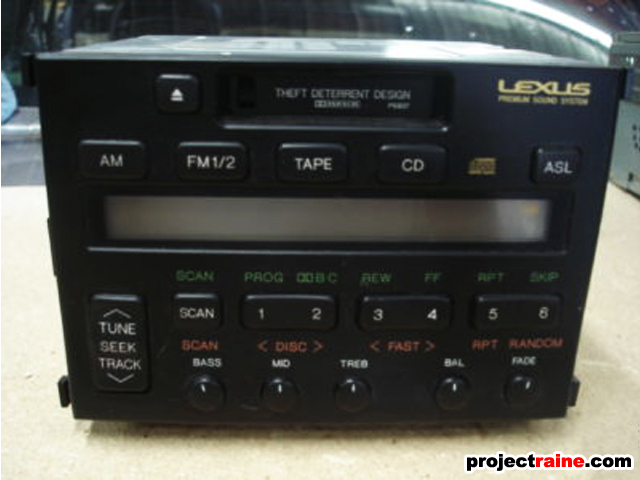
I've recently learned that my how-to should be compatible with all 1992-1998 SC300/SC400 that has the Pioneer double DIN factory head unit (radio/cassette/cd changer). The factory Pioneer setup has a 2.5-DIN radio/cassette up front, 12-disc CD changer in the right side of the trunk, the main amplifier (“main amp”) below the CD changer and the subwoofer amplifier (sub amp) on the rear deck between the sub and the right rear speaker. Image of the head unit is below:
If your factory head unit does not look like the one shown, I can't guarantee that you can use this thread, but it should be close. If your factory head unit is a 1999 model Pioneer with DIFFERENT plugs in the rear, I also cannot gaurantee that you can use this thread. Finally, If your factory head unit is a Nakamichi system, this probably won't work, or may work but not completely. Then you'll probably post here and ask me to solve your problem when you tried a Pioneer how-to on a Nakamichi system =P
WHAT YOU WILL NEED
Required Tools
1. Phillips screwdriver (Preferably with at least a 6" length to make the job easier)
2. Socket handle with a 10mm socket and 12mm socket
3. Wire cutters/strippers
4. Electrical tape
5. Masking tape to make wire labels
6. Sharpie marker to label each wire
7. OPTION soldering iron (for better connections)
8. OPTION heat shrink wrap (for better wire protection)
Parts Needed
1. Crimp-on ring connector, with a hole large enough for a 10mm bolt
2. 60-foot spool of 18ga speaker wire from Radio Shack (part #278-0008, $11.00)
3. Single 18ga wire about 15 feet long, to be used for the OEM subwoofer amp
3. RCA-to-speaker wire from Radio Shack (part #42-2457, $9.00)
UPDATE: Using 18/4 in-wall speaker wire designed for home audio makes installation much easier (see section D for more info)
HOW LONG WILL IT TAKE?
The job will take about 3 hours if you know how to take your car apart, or 4-5 hours if this is your first time.
NOTE: Use my diagrams in this how-to article to reference wire locations!! The diagrams I made for this how-to are if you were looking at the factory harness plug face, with the wires coming out from behind the plug. Other diagrams (FSM, Intellexual, etc.) may be labeled different, so use the ones I’ve provided. The pins with the white boxes are the only wires you need to work with.
Let's begin!
A. REMOVE THE OEM HEAD UNIT
1. Make sure you have a Pioneer head unit. As far as I know, Nakamichi head units say "Nakamichi" on the face of the head unit. Here's what mine looks like.
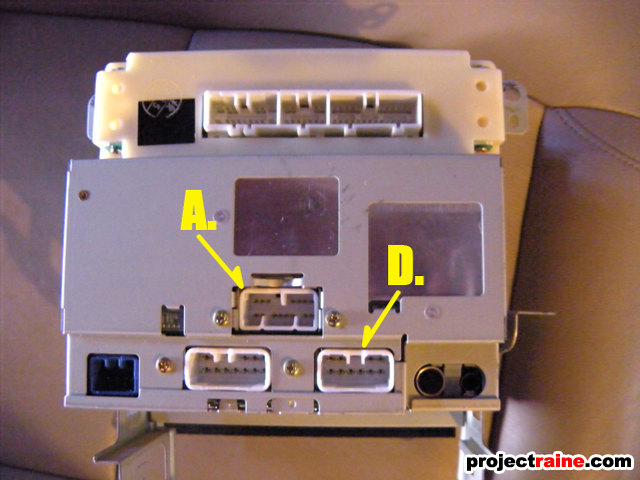
...and a look on the back shows the two harnesses we'll be using (they plug into the sockets labelled "A" and "D").
2. Follow my how-to here to remove your OEM head unit. (If you're using the Metra double-DIN installation kit, the thread listed also shows you how to mod it to make it stronger)
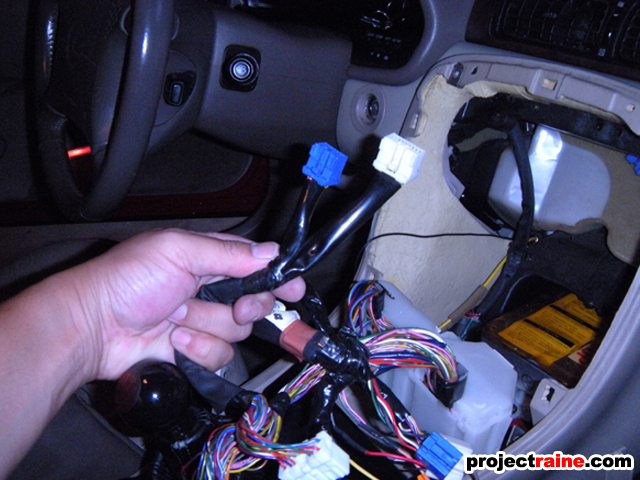
3. Take a look inside the center console, right under the top of the dashboard, there should be two harness plugs (blue and white) against the firewall area. If you unplug these, you can pull the radio harness out more in order to give you more room when wiring your new head unit up. This is optional, but if you do unplug these two harnesses, don't forget to plug them back in before you reinstall the center console!

B. MAKE THE MAIN CONNECTIONS (Updated 07.30.12)
All of the main connections below should be universal to whatever aftermarket head unit you are installing, be it CD/Cassette/Digital Media, single-DIN or double-DIN. Make your wire connections clean, I soldered my connections and used shrink tubing to protect the connections (if you do the twist-and-tape method, that’s your choice.)
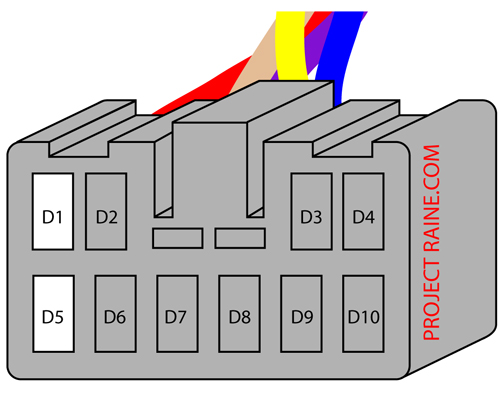
1. Connect your aftermarket head unit's main harness to the A-Harness as shown below.
A-Harness
15-pin plug with 14 wires, 7 per row, two rows, as shown below:
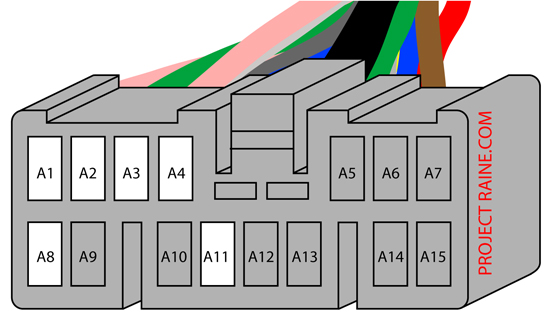
A-Harness Wire Color Guide
A1 pink with blue stripe and silver dots
A2 green (thick)
A3 gray
A4 blue with yellow stripe
A5 yellow
A6 blue
A7 red
A8 pink with green stripe
A9 white with green stripe
A10 no wire
A11 brown (thick)
A12 black
A13 green (thin)
A14 white
A15 brown (thin)
Here are the wires in the plug, and what to connect from your aftermarket harness:

A-Harness Connections (pin to aftermarket harness)
A1 - connect to ANTENNA wire (see NOTE 1 below)
A2 - connect to DIMMER wire (a.k.a.ILLUMINATION)
A3 - connect to ACC wire (12v+ switched)
A3 - OPTIONAL connect to 18ga single wire (see NOTE 2 below)
A4 – connect to POWER/BATTERY wire (12v+ constant a.k.a. memory)
A8 - connect to ANTENNA wire (see NOTE 1 below)
A11 - connect to GROUND wire (-) (see NOTE 3 below)
NOTE 1: Yes – connect both A1 and A8 to the antenna wire from your head unit. This will raise the factory telescopic antenna whenever you use the radio. I also found that connecting both wires will ensure that the antenna will go DOWN whenever you are using any other source besides the tuner in your aftermarket head unit.
NOTE 2: If your new head unit has an amp turn-on wire, extend it by connecting one end of the single 18ga wire in the parts list. If your head unit DOES NOT have an amp turn-on wire, connect one end of the 15-foot 18-ga. wire in the parts list to A3.
NOTE 3: As for the ground at A11, I’ve read that this works for some people, whereas others grounded the head unit directly to the chassis. I elected to ground my head unit to one of the chassis bolts found on the transmission tunnel directly below where the radio sits, using the crimp-ring listed in the parts list above. If A11 works for you, great! If not, crimp a ring and ground your head unit to the chassis.

2. With these wires spliced, you can reconnect your car battery, turn your key to ACC, plug in your aftermarket head unit and do a "power on" check. There will be no sound since we haven't wired the speakers up yet (we’ll get to that soon!) but you'll be able to check if your head unit is working. All good? then turn off the key, unplug the battery again, and let’s continue.
INSTALL TIP: If you have an aftermarket steering wheel installed, and you're installing a double-DIN head unit, here's a tip to get more installation space ---> go to this post.
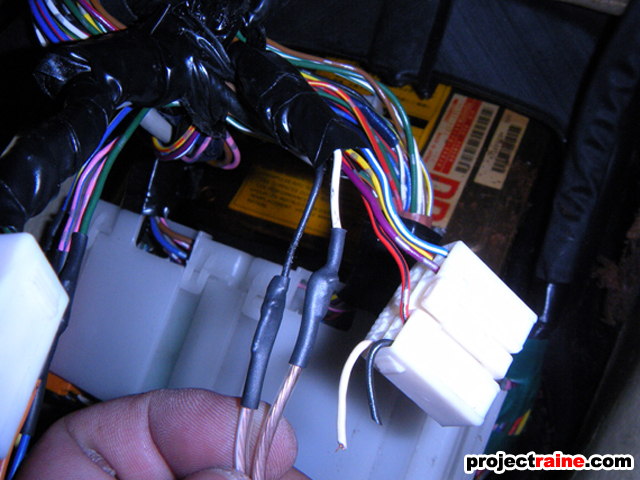
C. MAKE THE SUBWOOFER CONNECTION
To allow the OEM subwoofer amp to work with your aftermarket head unit, you’ll be using the RCA-to-speaker wire cable and the single 18ga amp turn-on wire.

1. Cut the RCA-to-speaker wire to about 8-inches long (when you buy it the speaker wire cable is 24-feet long!). Now locate the D-Harness.
2. Connect the RCA-to-speaker wire cable to the D-harness, as shown below.
D-Harness
10-pin plug with 10 wires, 4 on top and 6 on the bottom, as shown below:
D-Harness Wire Color Guide
D1 black
D2 red with black stripe and silver dots
D3 purple with silver dots
D4 blue with white stripe and silver dots
D5 white
D6 no wire
D7 no wire
D8 no wire
D9 no wire
D10 yellow wire with red stripe and silver dots
Here are the wires in the plug, and what to connect from your aftermarket harness:
D-Harness Connections (pin to aftermarket harness)
D1 – connect to RCA-to-speaker wire (-)
D5 – connect to RCA-to-speaker wire (+)
(thanks to twong 82 for figuring this out!)
3. When you're done, you should have something that looks like this:
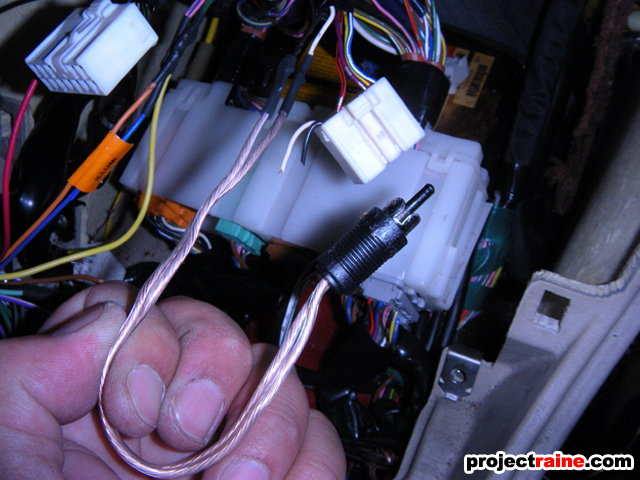
EDIT: It was pointed out to me by triumph013 that I have the positive and negative switched in the photo; the side with the white stripe is supposed to be negative, not positive. I've updated the D-Harness Connections above to reflect this. However the only thing this affects is your subwoofer phase. If you followed the original wiring and your head unit has a subwoofer phase setting, just flip it. As for me, I can't really hear the difference so I left mine as is.
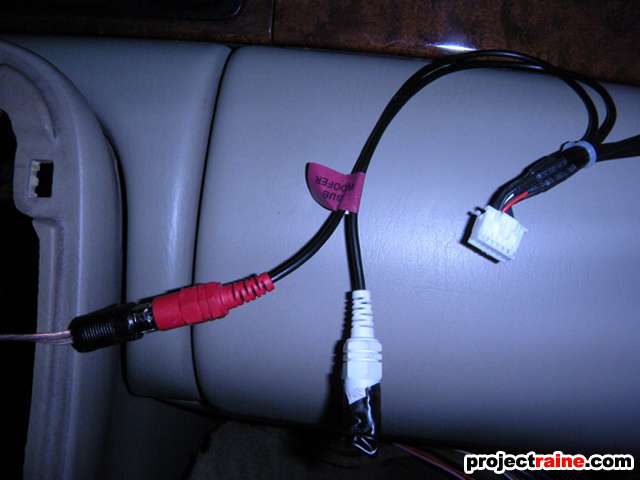
4. Plug the RCA end of the RCA-to-speaker wire cable into your aftermarket head unit's SUB OUT RCA plug. Your head unit is ready to send a signal to the OEM sub amp. But, we’re not quite done yet here.
D. EXTEND THE SPEAKER WIRES (Updated 07.30.12)
For the main sound, we'll be running speaker wires from the head unit location to the right-rear side of the car, in the trunk. This is to use the aftermarket amplifier (the one built-into the head unit) by bypassing the OEM factory amp, which coincidentally, is located in the right-rear side of the car, in the trunk. Some people have wired directly to the dash harness, but from research and by looking at the factory pin-out, the OEM sound system uses a common signal ground for the speakers. This is not the same as chassis ground! Some head units can be wired with a common signal ground, some can't. I didn't want to risk it, so I decided to run new speaker wire instead.
Yes - you can just run speaker wire from the head unit to each door, but that involves removing the door panels on each side, fishing cable through the door jam harness, etc.
OPTIONAL (07.30.12)
During the course of rewiring my car awhile after writing this how-to I decided to remove the 4 pairs of speaker wire shown in the photos and I went with 18/4 (18-ga 4 wire) in-wall speaker wire designed for home audio. I bought a 100-foot spool for $33 on Amazon.com; obviously you won’t need this much, but like I mentioned I was rewiring my car. I’m sure you can find shorter lengths of this type of wire at larger hardware outlets or home audio specialists.

And a photo of the wiring in the trunk now:

The two groups of wires sticking out of the left side is the 18/4 wires already connected to the OEM main speaker wires. The larger bundle of wires on the right is the rest of the OEM wiring for the OEM main amplifier, which is now removed from my car (see below.) Back to the 18/4 wires: with 4 wires each it effectively separated the front speakers from the rear speakers and the color-coded wires made it much easier to keep track of what wire is which (red/black for left side, green/white for right side), not to mention much easier to run through the interior from the center console to the trunk.
The rest of step D (below) still applies; you’ll just have a cleaner installation if you use the 18-4 wiring like I did.
1. Grab that 60-foot spool of speaker wire and cut four equal 15-foot lengths. Connect each length of speaker wire to the speaker outs from the aftermarket harness. Use some masking tape and label each pair of speaker wires (FL, FR, RL, RR) because you’ll have four pairs of wire running from the dash to the trunk!

2. Your extended speaker wires AND amp turn-on wire (Don't forget the amp turn-on wire!) must go behind the passenger carpet, along the right side door sill, up the right side of the rear seat area, and into the trunk. First, remove the door sill trim piece; grab the trailing end, and pull up, it will just pop out from the sill mounting clips.
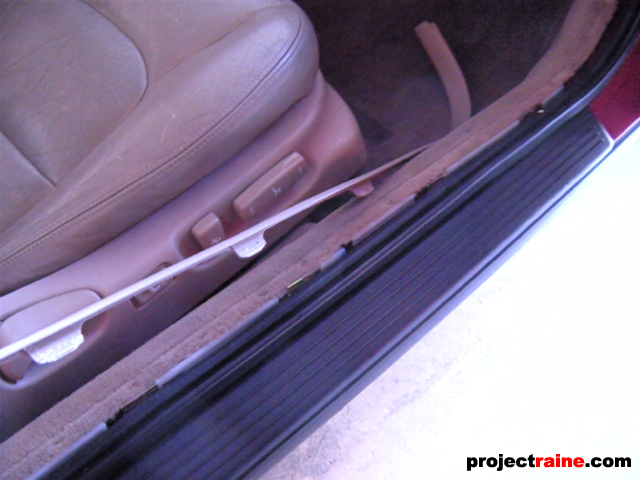
3. Now pull the rubber door seal to expose the sill clips even more.

4. Now carefully pull the sill clips from the door sill so that you can have access to the gap between the carpet and the door sill. This is where you'll be running those extended wires.

5. Now pull the front right edge of the passenger-side carpet, right below the edge of the dash.
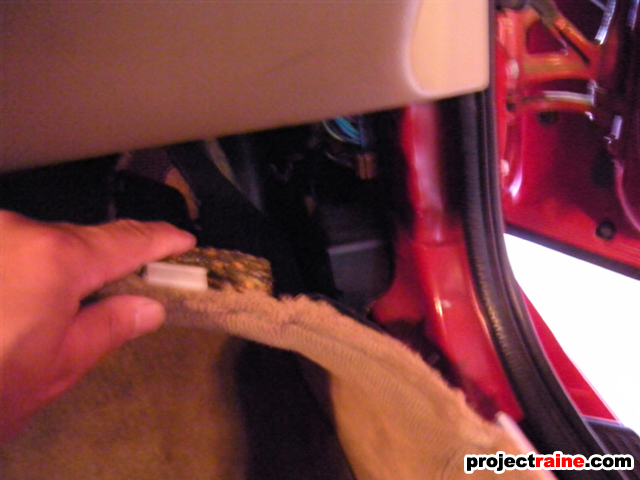
6. With a little tugging, you'll be able to fold over the passenger-side carpet away from the footwell area, so you can run your extended wires.

7. I used some wire ties to keep the bundle of extended wires and amp turn-on wire nice and neat. Run this behind the footwell carpet.

8. Continue running the bundle of wires along the door sill, behind the carpet.

Run the bundle behind the dash, underneath the glove box, down to the right-side door sill, until you get to the rear seat area.
(continued next post)
#1 - This is for a PIONEER SYSTEM. Not a NAKAMICHI, no matter how many times you ask!
Everything in this how-to was written for a Pioneer system. All of the wiring locations and specifications were based on a Pioneer system. If you have a Nakamichi system, this DOES NOT work as written. I can't help you with your Nakamichi system, stop asking.
#2 - IF YOU INSIST ON USING THE METRA HARNESS:
The second thing you need to know is I DID NOT USE THE METRA HARNESS.
That seems to be easy to understand right? I DIDN'T USE IT. But... people still try to and will ask me about it. Scanning through the posts made in this thread and in previous stereo-related threads, a few people maybe got lucky with the Metra harness and claimed decent results, but as far as I could tell most seem to have problems with it. It could be pin order, it could be some other reason - I wouldn't know and can't help you with it because I didn't use it. This how-to does NOT use the Metra harness and does not require it. I also do NOT recommend using it, as people seem to just have problems once they try using the Metra harness instead of following my how-to.
If you use the Metra harness anyway even though it doesn't work really well, that's YOUR decision.
If you use the Metra harness anyway and not everything works right, I already told you it wouldn't, but you didn't listen.
If you use the Metra harness anyway and you ask me how to fix it even if you already read this and knew I didn't use it in this how-to, then honestly that's you're problem - not mine. I didn't use the Metra harness for a reason.
Please get the two subjects above crystal clear before you decide to proceed. =) Thank you.
=====================
UPDATED 11-21-13: Revised disclaimers at the very top of the thread yet again
UPDATED 09-05-12: Added two disclaimers at the very top of the thread yet again
UPDATED 08-17-12: Revised wiring procedure for OEM subwoofer amp in section I; new wiring scheme allows head unit to power and have complete control of OEM sub amp and OEM antenna functions
UPDATED 08-12-12: Added install tip for more head unit clearance (for double-DIN head units) in section B; Direct link is here.
UPDATED 07-30-12: Added information on using home audio speaker wire; Added 4th item to parts list (15-feet of 18-ga wire); Updated section B. "MAIN CONNECTIONS" section; Extensively revised sections G, H, and I; installation no longer requires OEM main amp to function
UPDATED 06-28-12: Added "Compatibility Notes"
UPDATED 04-17-12: Clarified wiring in section C step 3
UPDATED 05-04-11: Added Metra harness text in post #1
UPDATED 07-29-09: Revised subwoofer/antenna fix; Updated harness diagrams for subwoofer/antenna fix; Added photo sample from RyanV
UPDATED 07-26-09: Added subwoofer/antenna fix; Updated harness diagrams for more clarity
=====================
On this and other boards I have gone through lots of info, all over the place, some contradicting each other, some REALLY confusing. This thread will try to clear it up and make it as easy as possible for my fellow SC owners. Some of the information below was compiled from other sources.
IS THIS THREAD FOR YOU?
For reference, this thread is for SC300/SC400 owners who can answer yes to ALL of the following:
1. I want to replace my factory head unit with an aftermarket one.
2. I still want to use my factory speakers.
3. I still want to use my factory subwoofer amp and subwoofer.
4. I want to use the amp of my aftermarket head unit to power the main speakers.
5. I DO NOT want to have to install any aftermarket amps yet.
6. I DO NOT install a separate amp for the subwoofer.
Any variation from above, and you're partly on your own. You'll need to be comfortable with cutting and splicing wires, and you'll have to remove the rear seats briefly. The goal here is to install an aftermarket head unit into an SC300/SC400, using the aftermarket head unit's built-in amplifier to power the main speakers (bypassing the OEM Lexus main amp) but using the OEM Lexus subwoofer amp to drive the OEM subwoofer. Because the OEM amplifiers are external (not part of the head unit) AND because there is no plug-and-play harness adaptor specifically made for our car, there's a little more work to be done, but not as hard as it may seem.
COMPATIBILITY NOTES (PLEASE READ!!)
I've recently learned that my how-to should be compatible with all 1992-1998 SC300/SC400 that has the Pioneer double DIN factory head unit (radio/cassette/cd changer). The factory Pioneer setup has a 2.5-DIN radio/cassette up front, 12-disc CD changer in the right side of the trunk, the main amplifier (“main amp”) below the CD changer and the subwoofer amplifier (sub amp) on the rear deck between the sub and the right rear speaker. Image of the head unit is below:
If your factory head unit does not look like the one shown, I can't guarantee that you can use this thread, but it should be close. If your factory head unit is a 1999 model Pioneer with DIFFERENT plugs in the rear, I also cannot gaurantee that you can use this thread. Finally, If your factory head unit is a Nakamichi system, this probably won't work, or may work but not completely. Then you'll probably post here and ask me to solve your problem when you tried a Pioneer how-to on a Nakamichi system =P
WHAT YOU WILL NEED
Required Tools
1. Phillips screwdriver (Preferably with at least a 6" length to make the job easier)
2. Socket handle with a 10mm socket and 12mm socket
3. Wire cutters/strippers
4. Electrical tape
5. Masking tape to make wire labels
6. Sharpie marker to label each wire
7. OPTION soldering iron (for better connections)
8. OPTION heat shrink wrap (for better wire protection)
Parts Needed
1. Crimp-on ring connector, with a hole large enough for a 10mm bolt
2. 60-foot spool of 18ga speaker wire from Radio Shack (part #278-0008, $11.00)
3. Single 18ga wire about 15 feet long, to be used for the OEM subwoofer amp
3. RCA-to-speaker wire from Radio Shack (part #42-2457, $9.00)
UPDATE: Using 18/4 in-wall speaker wire designed for home audio makes installation much easier (see section D for more info)
HOW LONG WILL IT TAKE?
The job will take about 3 hours if you know how to take your car apart, or 4-5 hours if this is your first time.
NOTE: Use my diagrams in this how-to article to reference wire locations!! The diagrams I made for this how-to are if you were looking at the factory harness plug face, with the wires coming out from behind the plug. Other diagrams (FSM, Intellexual, etc.) may be labeled different, so use the ones I’ve provided. The pins with the white boxes are the only wires you need to work with.
Let's begin!
A. REMOVE THE OEM HEAD UNIT
1. Make sure you have a Pioneer head unit. As far as I know, Nakamichi head units say "Nakamichi" on the face of the head unit. Here's what mine looks like.
...and a look on the back shows the two harnesses we'll be using (they plug into the sockets labelled "A" and "D").
2. Follow my how-to here to remove your OEM head unit. (If you're using the Metra double-DIN installation kit, the thread listed also shows you how to mod it to make it stronger)
3. Take a look inside the center console, right under the top of the dashboard, there should be two harness plugs (blue and white) against the firewall area. If you unplug these, you can pull the radio harness out more in order to give you more room when wiring your new head unit up. This is optional, but if you do unplug these two harnesses, don't forget to plug them back in before you reinstall the center console!
B. MAKE THE MAIN CONNECTIONS (Updated 07.30.12)
All of the main connections below should be universal to whatever aftermarket head unit you are installing, be it CD/Cassette/Digital Media, single-DIN or double-DIN. Make your wire connections clean, I soldered my connections and used shrink tubing to protect the connections (if you do the twist-and-tape method, that’s your choice.)
1. Connect your aftermarket head unit's main harness to the A-Harness as shown below.
A-Harness
15-pin plug with 14 wires, 7 per row, two rows, as shown below:
A-Harness Wire Color Guide
A1 pink with blue stripe and silver dots
A2 green (thick)
A3 gray
A4 blue with yellow stripe
A5 yellow
A6 blue
A7 red
A8 pink with green stripe
A9 white with green stripe
A10 no wire
A11 brown (thick)
A12 black
A13 green (thin)
A14 white
A15 brown (thin)
Here are the wires in the plug, and what to connect from your aftermarket harness:
A-Harness Connections (pin to aftermarket harness)
A1 - connect to ANTENNA wire (see NOTE 1 below)
A2 - connect to DIMMER wire (a.k.a.ILLUMINATION)
A3 - connect to ACC wire (12v+ switched)
A3 - OPTIONAL connect to 18ga single wire (see NOTE 2 below)
A4 – connect to POWER/BATTERY wire (12v+ constant a.k.a. memory)
A8 - connect to ANTENNA wire (see NOTE 1 below)
A11 - connect to GROUND wire (-) (see NOTE 3 below)
NOTE 1: Yes – connect both A1 and A8 to the antenna wire from your head unit. This will raise the factory telescopic antenna whenever you use the radio. I also found that connecting both wires will ensure that the antenna will go DOWN whenever you are using any other source besides the tuner in your aftermarket head unit.
NOTE 2: If your new head unit has an amp turn-on wire, extend it by connecting one end of the single 18ga wire in the parts list. If your head unit DOES NOT have an amp turn-on wire, connect one end of the 15-foot 18-ga. wire in the parts list to A3.
NOTE 3: As for the ground at A11, I’ve read that this works for some people, whereas others grounded the head unit directly to the chassis. I elected to ground my head unit to one of the chassis bolts found on the transmission tunnel directly below where the radio sits, using the crimp-ring listed in the parts list above. If A11 works for you, great! If not, crimp a ring and ground your head unit to the chassis.
2. With these wires spliced, you can reconnect your car battery, turn your key to ACC, plug in your aftermarket head unit and do a "power on" check. There will be no sound since we haven't wired the speakers up yet (we’ll get to that soon!) but you'll be able to check if your head unit is working. All good? then turn off the key, unplug the battery again, and let’s continue.
INSTALL TIP: If you have an aftermarket steering wheel installed, and you're installing a double-DIN head unit, here's a tip to get more installation space ---> go to this post.
C. MAKE THE SUBWOOFER CONNECTION
To allow the OEM subwoofer amp to work with your aftermarket head unit, you’ll be using the RCA-to-speaker wire cable and the single 18ga amp turn-on wire.
1. Cut the RCA-to-speaker wire to about 8-inches long (when you buy it the speaker wire cable is 24-feet long!). Now locate the D-Harness.
2. Connect the RCA-to-speaker wire cable to the D-harness, as shown below.
D-Harness
10-pin plug with 10 wires, 4 on top and 6 on the bottom, as shown below:
D-Harness Wire Color Guide
D1 black
D2 red with black stripe and silver dots
D3 purple with silver dots
D4 blue with white stripe and silver dots
D5 white
D6 no wire
D7 no wire
D8 no wire
D9 no wire
D10 yellow wire with red stripe and silver dots
Here are the wires in the plug, and what to connect from your aftermarket harness:
D-Harness Connections (pin to aftermarket harness)
D1 – connect to RCA-to-speaker wire (-)
D5 – connect to RCA-to-speaker wire (+)
(thanks to twong 82 for figuring this out!)
3. When you're done, you should have something that looks like this:
EDIT: It was pointed out to me by triumph013 that I have the positive and negative switched in the photo; the side with the white stripe is supposed to be negative, not positive. I've updated the D-Harness Connections above to reflect this. However the only thing this affects is your subwoofer phase. If you followed the original wiring and your head unit has a subwoofer phase setting, just flip it. As for me, I can't really hear the difference so I left mine as is.
4. Plug the RCA end of the RCA-to-speaker wire cable into your aftermarket head unit's SUB OUT RCA plug. Your head unit is ready to send a signal to the OEM sub amp. But, we’re not quite done yet here.
D. EXTEND THE SPEAKER WIRES (Updated 07.30.12)
For the main sound, we'll be running speaker wires from the head unit location to the right-rear side of the car, in the trunk. This is to use the aftermarket amplifier (the one built-into the head unit) by bypassing the OEM factory amp, which coincidentally, is located in the right-rear side of the car, in the trunk. Some people have wired directly to the dash harness, but from research and by looking at the factory pin-out, the OEM sound system uses a common signal ground for the speakers. This is not the same as chassis ground! Some head units can be wired with a common signal ground, some can't. I didn't want to risk it, so I decided to run new speaker wire instead.
Yes - you can just run speaker wire from the head unit to each door, but that involves removing the door panels on each side, fishing cable through the door jam harness, etc.
OPTIONAL (07.30.12)
During the course of rewiring my car awhile after writing this how-to I decided to remove the 4 pairs of speaker wire shown in the photos and I went with 18/4 (18-ga 4 wire) in-wall speaker wire designed for home audio. I bought a 100-foot spool for $33 on Amazon.com; obviously you won’t need this much, but like I mentioned I was rewiring my car. I’m sure you can find shorter lengths of this type of wire at larger hardware outlets or home audio specialists.
And a photo of the wiring in the trunk now:
The two groups of wires sticking out of the left side is the 18/4 wires already connected to the OEM main speaker wires. The larger bundle of wires on the right is the rest of the OEM wiring for the OEM main amplifier, which is now removed from my car (see below.) Back to the 18/4 wires: with 4 wires each it effectively separated the front speakers from the rear speakers and the color-coded wires made it much easier to keep track of what wire is which (red/black for left side, green/white for right side), not to mention much easier to run through the interior from the center console to the trunk.
The rest of step D (below) still applies; you’ll just have a cleaner installation if you use the 18-4 wiring like I did.
1. Grab that 60-foot spool of speaker wire and cut four equal 15-foot lengths. Connect each length of speaker wire to the speaker outs from the aftermarket harness. Use some masking tape and label each pair of speaker wires (FL, FR, RL, RR) because you’ll have four pairs of wire running from the dash to the trunk!
2. Your extended speaker wires AND amp turn-on wire (Don't forget the amp turn-on wire!) must go behind the passenger carpet, along the right side door sill, up the right side of the rear seat area, and into the trunk. First, remove the door sill trim piece; grab the trailing end, and pull up, it will just pop out from the sill mounting clips.
3. Now pull the rubber door seal to expose the sill clips even more.
4. Now carefully pull the sill clips from the door sill so that you can have access to the gap between the carpet and the door sill. This is where you'll be running those extended wires.
5. Now pull the front right edge of the passenger-side carpet, right below the edge of the dash.
6. With a little tugging, you'll be able to fold over the passenger-side carpet away from the footwell area, so you can run your extended wires.
7. I used some wire ties to keep the bundle of extended wires and amp turn-on wire nice and neat. Run this behind the footwell carpet.
8. Continue running the bundle of wires along the door sill, behind the carpet.
Run the bundle behind the dash, underneath the glove box, down to the right-side door sill, until you get to the rear seat area.
(continued next post)
Last edited by raine; 11-26-20 at 11:50 PM.
 06-21-09, 05:19 AM
#2
(continued from previous post)
E. PULL THE REAR SEATS
To get your extended speaker wires all the way to the trunk, we'll have to remove the rear seats temporarily.
1. Stick your hands under the rear seat-bottom, right in the center of each side, and pull up with a good tug. Two clips will release, no tools necessary. The seat bottom will then easily come out of the car.

2. With both clips removed, pull up on the rear seat-bottom and remove the rear seat-bottom from the car.
3. Along the base of the rear seat-back, there are three retaining bolts holding it in place. These are 12mm, remove all of them.
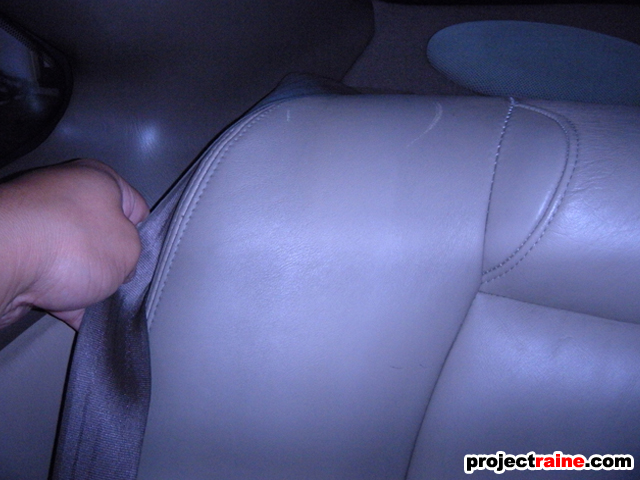
4. You don't have to unbolt the rear seatbelts to remove the rear seat-back. Just tuck them up and around the top edge of the rear seat-back first.

5. To get the actual rear seatback out of the car, don't just try to pry it out - push the seatback up vertically first. The seatback is held in place by three large clips, similar to how the seat bottom was attached. Push up on the cushion until it "unclips" itself, then simply remove the rear seatback.

6. Remove the rear seat-back from the car, and you're ready to continue running the extended speaker wire back to the trunk.

F. FEED THE EXTENDED WIRES TO THE TRUNK
Now we'll finish running the extended wires from the door sill to the trunk.
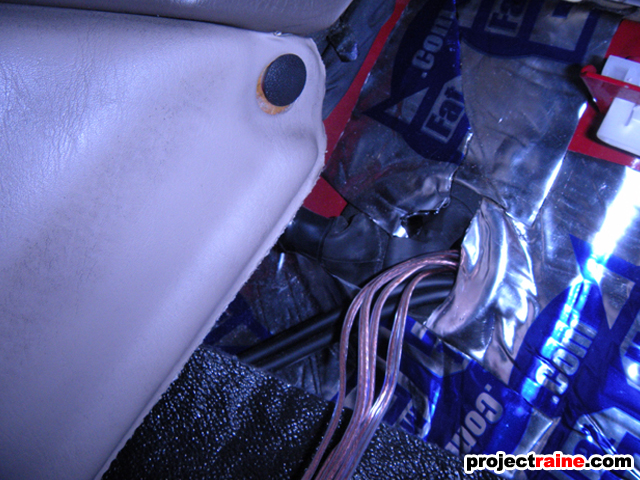
1. Squeeze the extended wires below the back edge of the door sill carpet and the side panel of the rear passenger area.
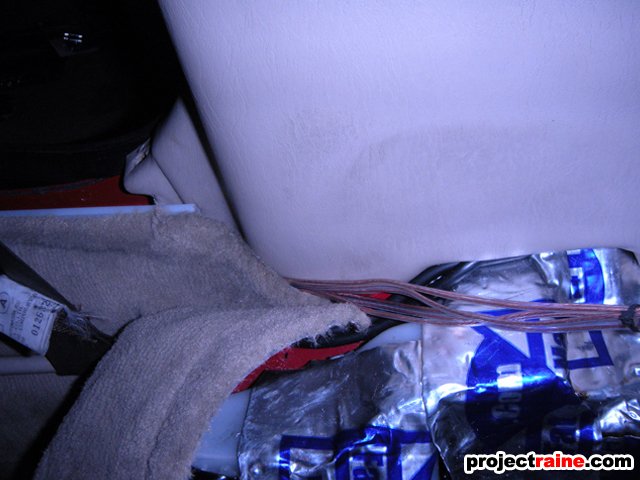
2. Run the extended wires up the side towards the top of the rear seat-back area.

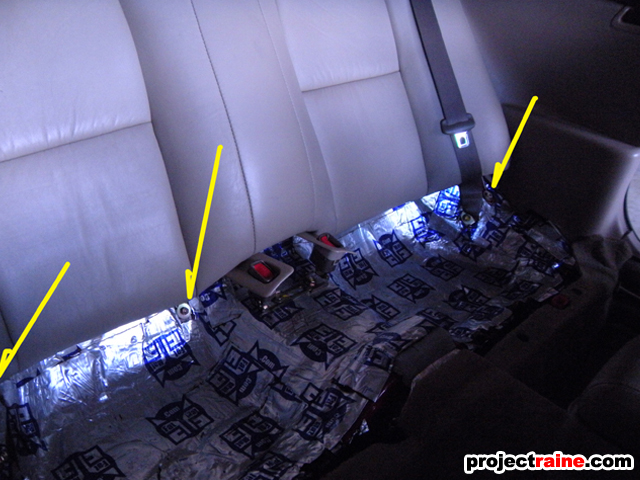
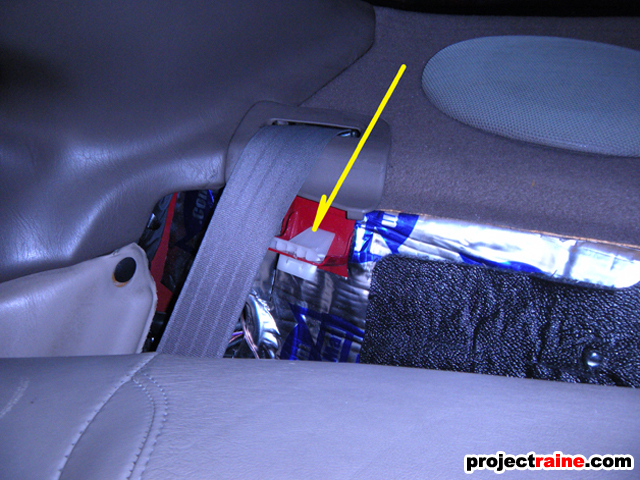
3. There’s a large rubber grommet at the top of the rear seat-back area, right rear passenger side, that feeds into the trunk area. You can poke a small hole in this grommet to run your extended wires through it.
4. Open the trunk, then pull the front trim panel (the largest panel nearest the fuel tank, with the vent holes in it) and right-side panel (the panel surrounding the CD changer) out so you have access. You should see your extended wires poking through the grommet. Run the extended wires down to where your factory CD changer is, because most of your connections will happen here for sound.

G. CD CHANGER AND MAIN AMP REMOVAL
Here we’ll be ditching two things: we’ll remove the OEM CD Changer and the OEM main amplifier from the car, since there’s no need for either now. Sorry no photos – but it’s easy, you should have no problems.
1. The OEM CD Changer is held in place by 3 10mm bolts. Remove all 3 bolts, tilt CD changer to the side.
2. Unplug the CD Changer harnesses (there's two), and remove CD Changer from trunk - remember, you will not be able to use this anymore with your new head unit, so don't forget to eject any CD changer magazines BEFORE you unplug the CD changer. The changer is held in by 3 10mm bolts: 2 near the bottom of the changer, one near the right-rear taillight area) and one 10mm nut (at the front end of the changer near the fuel tank area).
3. See that silver box that is caged directly under the CD changer location? That’s the OEM main amp. Remove the OEM main amp cage; there are three 10mm nuts around the base of the cage on the trunk floor, very easy to find and remove.
4. With the OEM main amp out, remove the two plugs from the OEM main amplifier.
H. BYPASS THE OEM MAIN AMP
Here we’ll be bypassing the OEM amplifier (since you’re using your aftermarket head unit’s output instead). The plug you'll be working with is the smaller plug that was connected to the OEM amplifier (the correct plug has 10 wires). Time for some cutting/splicing again. Locate the output harness:
Output-Harness (F-Harness):
10-pin plug with 10 wires, 4 on top and 6 on the bottom, as shown below:

F-Harness Wire Color Guide
F1 teal green
F2 pink with silver dots
F3 red with silver dots
F4 white
F5 blue
F6 purple with silver dots
F7 brown with silver dots
F8 black with silver dots
F9 yellow with silver dots
F10 blue with yellow stripe and silver dots
Here are the wires in the plug, and what to connect from your extended speaker wires:
F-Harness Connections (pin to extended speaker wires)
Front Speakers
F2 – goes to FL positive (front/left speaker +)
F6 – goes to FL negative (front/left speaker - )
F1 – goes to FR positive (front/right speaker +)
F5 – goes to FR negative (front/right speaker - )
Rear Speakers
F9 – goes to RL negative (rear/left speaker - )
F8 – goes to RL positive (rear/left speaker + )
F4 – goes to RR negative (rear/right speaker -)
F3 – goes to RR positive (rear/right speaker +)
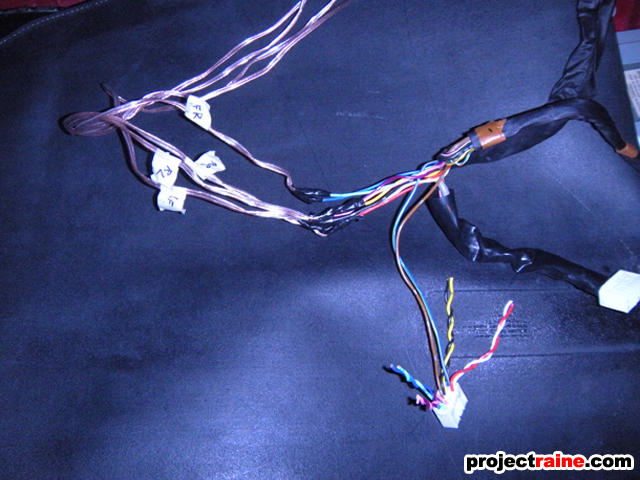
As for the amp turn-on wire, we'll get to it in section I (below). Now about the rest of the wires/harnesses that were attached to the OEM main amp? They’re pretty much not needed anymore. Tape them up and tuck the harness away behind the trunk interior panel.
I. ANTENNA/SUBWOOFER AMP RECONFIGURATION (updated 08.17.12)
1. (sorry no pic) While your rear seats are still out, remove the 3rd brake light/subwoofer grille by pulling the leading edge upward to release the clips (don't yank it up - just pull up enough to release the metal clips) then slide the 3rd brake light/subwoofer grill towards the front of the car to release the hooks. Unplug the 3rd brake light for now.
2. (sorry no pic) With a little easing you can get the package shelf off, exposing your rear speakers, subwoofer, and the subwoofer amp (located between the right-rear speaker and the subwoofer.) You should now be able to access the subwoofer amp, which is recessed to the passenger-side of the subwoofer.

3. Locate the Subwoofer Amp harness:
Sub-Amp-Harness (G-Harness):
10-pin plug with 10 wires, 4 on top and 6 on the bottom, as shown below:

G-Harness Wire Color Guide
G1 black
G2 red with black stripe and silver dots
G3 blue with white stripe
G4 grey
G5 white
G6 blue with black stripe
G7 brown with silver dots
G8 brown with black stripe and silver dots
G9 black with white stripe and silver dots
G10 red with white stripe and silver dots
Here are the wires in the plug, and where to connect them:
G-Harness Connections
G3 to amp turn-on wire
G4 to amp turn on wire
G6 to amp turn on wire
4. First cut G3, G4, and G6 on the PLUG SIDE (the side nearest the rear window area) leaving about 3 inches of wire attached to the plug - don't cut the wires flush to the plug!
5. Now, splice together G3, G4, and G6 with the amp turn-on wire. See the diagram below for a clearer picture:
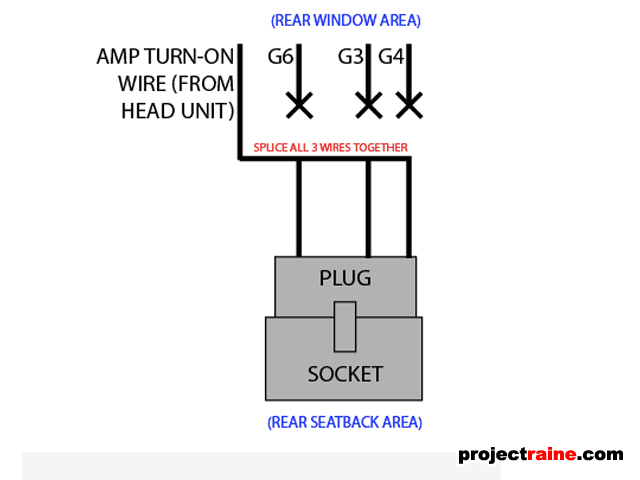

By the way, to get the amp turn-on wire (the 15-ft. wire you routed to the trunk along with the speaker wire extensions) from the trunk to the subwoofer harness, there should be a few open holes on the package shelf; use one of these holes to run the amp turn-on wire from the trunk to the subwoofer amp harness area.
These connections do three important things:
A. Allows your new aftermarket head unit to power and control the OEM sub amp.
B. Allows the sub amp to stay on regardless of which source you're using.
C. Allows the antenna to function normally - up when the tuner is on, down for all other sources.
J. SYSTEM CHECK/FINAL STEPS
Now for a few final steps as well as a test run.
1. Turn the key to ACC or ON, and see if you hear sound from all the speakers, including the subwoofer (you should!). Also, use the head unit's balance and fader controls to make sure that your front/left is playing front/left, etc. Try different sources to ensure everything is functioning, as it should be. If you followed everything step-by-step and there is sound coming from all 7 speakers, then from here you can reinstall the trunk panels and cabin interior panels.
Done! You will now have an aftermarket head unit working, with the OEM speakers running off the new head unit, with the OEM power antenna working, and using the factory subwoofer amplifier and subwoofer

END
E. PULL THE REAR SEATS
To get your extended speaker wires all the way to the trunk, we'll have to remove the rear seats temporarily.
1. Stick your hands under the rear seat-bottom, right in the center of each side, and pull up with a good tug. Two clips will release, no tools necessary. The seat bottom will then easily come out of the car.
2. With both clips removed, pull up on the rear seat-bottom and remove the rear seat-bottom from the car.
3. Along the base of the rear seat-back, there are three retaining bolts holding it in place. These are 12mm, remove all of them.
4. You don't have to unbolt the rear seatbelts to remove the rear seat-back. Just tuck them up and around the top edge of the rear seat-back first.
5. To get the actual rear seatback out of the car, don't just try to pry it out - push the seatback up vertically first. The seatback is held in place by three large clips, similar to how the seat bottom was attached. Push up on the cushion until it "unclips" itself, then simply remove the rear seatback.
6. Remove the rear seat-back from the car, and you're ready to continue running the extended speaker wire back to the trunk.
F. FEED THE EXTENDED WIRES TO THE TRUNK
Now we'll finish running the extended wires from the door sill to the trunk.
1. Squeeze the extended wires below the back edge of the door sill carpet and the side panel of the rear passenger area.
2. Run the extended wires up the side towards the top of the rear seat-back area.
3. There’s a large rubber grommet at the top of the rear seat-back area, right rear passenger side, that feeds into the trunk area. You can poke a small hole in this grommet to run your extended wires through it.
4. Open the trunk, then pull the front trim panel (the largest panel nearest the fuel tank, with the vent holes in it) and right-side panel (the panel surrounding the CD changer) out so you have access. You should see your extended wires poking through the grommet. Run the extended wires down to where your factory CD changer is, because most of your connections will happen here for sound.
G. CD CHANGER AND MAIN AMP REMOVAL
Here we’ll be ditching two things: we’ll remove the OEM CD Changer and the OEM main amplifier from the car, since there’s no need for either now. Sorry no photos – but it’s easy, you should have no problems.
1. The OEM CD Changer is held in place by 3 10mm bolts. Remove all 3 bolts, tilt CD changer to the side.
2. Unplug the CD Changer harnesses (there's two), and remove CD Changer from trunk - remember, you will not be able to use this anymore with your new head unit, so don't forget to eject any CD changer magazines BEFORE you unplug the CD changer. The changer is held in by 3 10mm bolts: 2 near the bottom of the changer, one near the right-rear taillight area) and one 10mm nut (at the front end of the changer near the fuel tank area).
3. See that silver box that is caged directly under the CD changer location? That’s the OEM main amp. Remove the OEM main amp cage; there are three 10mm nuts around the base of the cage on the trunk floor, very easy to find and remove.
4. With the OEM main amp out, remove the two plugs from the OEM main amplifier.
H. BYPASS THE OEM MAIN AMP
Here we’ll be bypassing the OEM amplifier (since you’re using your aftermarket head unit’s output instead). The plug you'll be working with is the smaller plug that was connected to the OEM amplifier (the correct plug has 10 wires). Time for some cutting/splicing again. Locate the output harness:
Output-Harness (F-Harness):
10-pin plug with 10 wires, 4 on top and 6 on the bottom, as shown below:
F-Harness Wire Color Guide
F1 teal green
F2 pink with silver dots
F3 red with silver dots
F4 white
F5 blue
F6 purple with silver dots
F7 brown with silver dots
F8 black with silver dots
F9 yellow with silver dots
F10 blue with yellow stripe and silver dots
Here are the wires in the plug, and what to connect from your extended speaker wires:
F-Harness Connections (pin to extended speaker wires)
Front Speakers
F2 – goes to FL positive (front/left speaker +)
F6 – goes to FL negative (front/left speaker - )
F1 – goes to FR positive (front/right speaker +)
F5 – goes to FR negative (front/right speaker - )
Rear Speakers
F9 – goes to RL negative (rear/left speaker - )
F8 – goes to RL positive (rear/left speaker + )
F4 – goes to RR negative (rear/right speaker -)
F3 – goes to RR positive (rear/right speaker +)
As for the amp turn-on wire, we'll get to it in section I (below). Now about the rest of the wires/harnesses that were attached to the OEM main amp? They’re pretty much not needed anymore. Tape them up and tuck the harness away behind the trunk interior panel.
I. ANTENNA/SUBWOOFER AMP RECONFIGURATION (updated 08.17.12)
1. (sorry no pic) While your rear seats are still out, remove the 3rd brake light/subwoofer grille by pulling the leading edge upward to release the clips (don't yank it up - just pull up enough to release the metal clips) then slide the 3rd brake light/subwoofer grill towards the front of the car to release the hooks. Unplug the 3rd brake light for now.
2. (sorry no pic) With a little easing you can get the package shelf off, exposing your rear speakers, subwoofer, and the subwoofer amp (located between the right-rear speaker and the subwoofer.) You should now be able to access the subwoofer amp, which is recessed to the passenger-side of the subwoofer.
3. Locate the Subwoofer Amp harness:
Sub-Amp-Harness (G-Harness):
10-pin plug with 10 wires, 4 on top and 6 on the bottom, as shown below:
G-Harness Wire Color Guide
G1 black
G2 red with black stripe and silver dots
G3 blue with white stripe
G4 grey
G5 white
G6 blue with black stripe
G7 brown with silver dots
G8 brown with black stripe and silver dots
G9 black with white stripe and silver dots
G10 red with white stripe and silver dots
Here are the wires in the plug, and where to connect them:
G-Harness Connections
G3 to amp turn-on wire
G4 to amp turn on wire
G6 to amp turn on wire
4. First cut G3, G4, and G6 on the PLUG SIDE (the side nearest the rear window area) leaving about 3 inches of wire attached to the plug - don't cut the wires flush to the plug!
5. Now, splice together G3, G4, and G6 with the amp turn-on wire. See the diagram below for a clearer picture:
By the way, to get the amp turn-on wire (the 15-ft. wire you routed to the trunk along with the speaker wire extensions) from the trunk to the subwoofer harness, there should be a few open holes on the package shelf; use one of these holes to run the amp turn-on wire from the trunk to the subwoofer amp harness area.
These connections do three important things:
A. Allows your new aftermarket head unit to power and control the OEM sub amp.
B. Allows the sub amp to stay on regardless of which source you're using.
C. Allows the antenna to function normally - up when the tuner is on, down for all other sources.
J. SYSTEM CHECK/FINAL STEPS
Now for a few final steps as well as a test run.
1. Turn the key to ACC or ON, and see if you hear sound from all the speakers, including the subwoofer (you should!). Also, use the head unit's balance and fader controls to make sure that your front/left is playing front/left, etc. Try different sources to ensure everything is functioning, as it should be. If you followed everything step-by-step and there is sound coming from all 7 speakers, then from here you can reinstall the trunk panels and cabin interior panels.
Done!
You will now have an aftermarket head unit working, with the OEM speakers running off the new head unit, with the OEM power antenna working, and using the factory subwoofer amplifier and subwoofer END
Last edited by raine; 08-17-12 at 01:31 AM.
The following users liked this post:
yick99 (03-24-22)


Trending Topics


 06-30-09, 07:46 AM
#13
Driver

Join Date: Sep 2008
Location: NJ
Posts: 133
Likes: 0
Received 0 Likes
on
0 Posts
Use some ground loop isolators to get rid of the alternator whine. I had that noise initially and tried everything but eventually went with the isolators. Hope that helps.
07-02-09, 08:27 AM
#14
Alright so i am doing this right now and i have a few things to add.
First bypassing the front speakers at the amp is a really bad idea. Under your D section, step 5 you can see the door wiring harness. All you have to do is tap into the speaker wire there. The advantage of this is you minimize the voltage drop since your are not running the front speakers to the trunk and back.
First bypassing the front speakers at the amp is a really bad idea. Under your D section, step 5 you can see the door wiring harness. All you have to do is tap into the speaker wire there. The advantage of this is you minimize the voltage drop since your are not running the front speakers to the trunk and back.
Dude with the aftermarket built-in power and stock speakers any voltage drop is trivial, there's no audible difference. If that concerns you so much, run line-level and external amps and skip this thread
Third about power antenna, i have a feeling the 2 pink wires thing is wrong. If i am reading this diagram right, pink/green, yel/red and blu/wht are what control the antenna.
And lastly if i am reading that diagram right, b+ should be blu/yel and acc should be gray.
My bad on that on the errors, the intellexual swf pinout sucks and that pdf file is far superior.
And lastly if i am reading that diagram right, b+ should be blu/yel and acc should be gray.
My bad on that on the errors, the intellexual swf pinout sucks and that pdf file is far superior.
")
