
Custom fibreglass tub "How-to" with *PICS*
 06-27-07, 12:05 AM
#1
Pole Position
Thread Starter

Now that I have completed my Fibreglass trunk enclosure, here is a write up of how I did it. Here is a list of what you will need:
- 2-3 rolls of packing tape
- 4-5 yards of 1.5 OZ fibreglass mat
- 10 litres of unwaxxed fibreglass resin (make sure its marine grade for better results)
- staple gun and 1/4" upholstery staples (air stapler is mucho faster!)
- 500 mils of Catalyst
- Small bottle of dye (optional if you want the tub to be a certain color)
- 5-10 mixing pails (1 liter)
- 10 cheap 2" paintbrushes
- Roll of tinfoil
- Drop cloths
- latex gloves
- Acetone for clean-up
Finishing supplies:
- 40, 60, 80, 120 grit sandpaper (5 sheets of each)
- 4 litres of body filler with hardener
- 1 litre of Icing finishing filler
- tube of glazing or spot putty
- 5-6 plastic spreaders
You will also need some 3/4" MDF for the subwoofer rings, stilt supports, the tub frame and front and back pieces of the enclosure.
Unfortunately I lost a lot of pics of the initial build of the trunk tub so I will post other pics of a similar process.
Here I made frames for two enclosures in a truck. Notice underneath I used packing tape over the carpet so the resin wouldn't soak through and damage underneath. On metal surfaces I use tinfoil so its a lot easier to release from the surface.

Depending on what subs I am using and the size of the enclosure, I generally apply 5-10 layers of fibreglass mat. In this application I applied 3 layers at first, then 3 more layers once the 'pods' were removed from the vehicle.

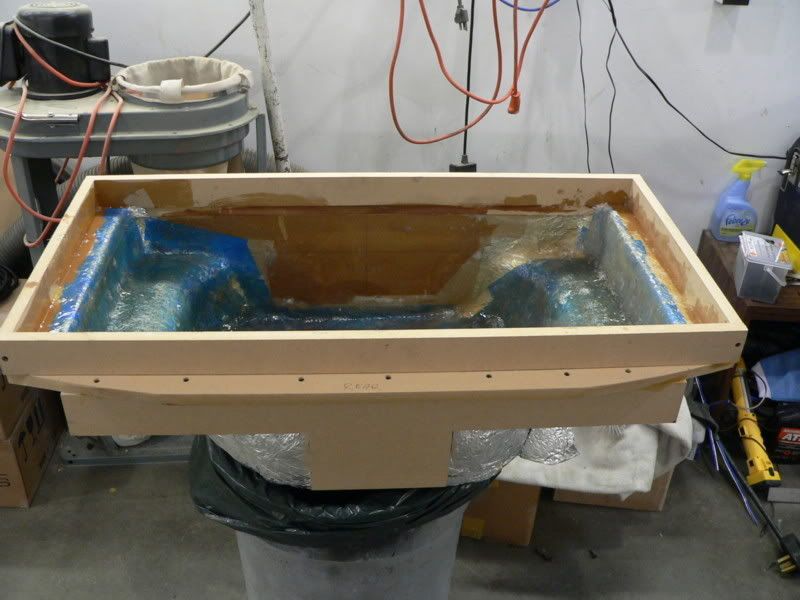
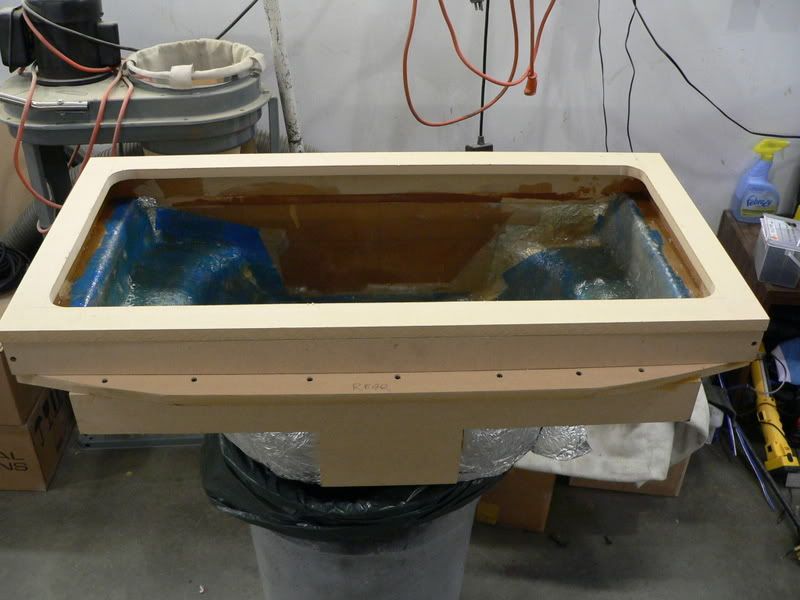
Now, onto my Lexus tub. I used 10 layers of fibreglass in my tub. The reason for this was that I was running at least 1000 watts and the tub was quite large. More fibreglass means a thicker, stronger tub. I did front and rear panels in MDF and quite an elaborate frame to attach my top panel (baffle) to. You can see tape (blue) and tinfoil in this picture:
After making a simple frame, I used a router to cut out my subwoofer rings (routers rock for situations like this!!). With the rings cut out, I made some cross braces and stilts to attach the rings to on the top frame panel. I did it this way so I can emove the top panel afterwards and apply fibreglass to the underside of the baffle. You'll see what I mean.
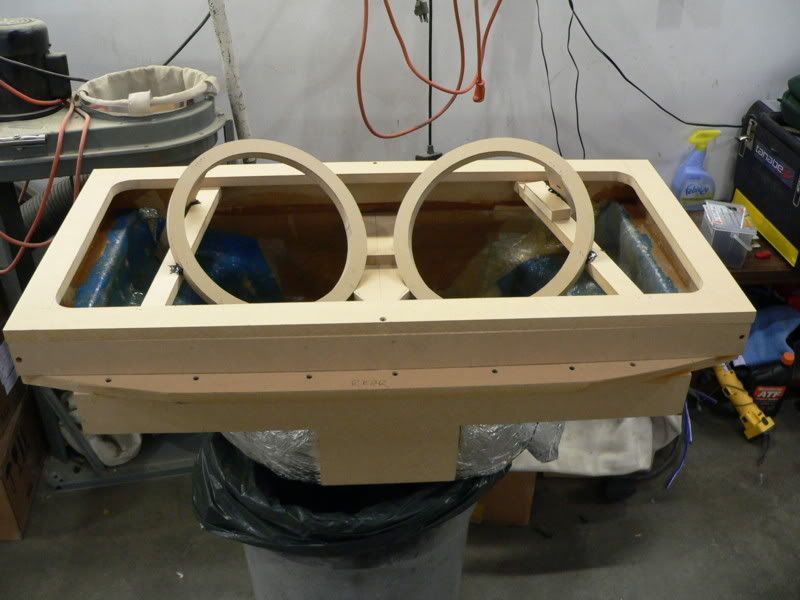
Once everything was in place I attached the top frame/ring panel to the lower enclosure with two screws to keep everything in one place. I will remove these screws later. Now I can strecth my fleece tightly over the entire top panel. I used spray glue to get it all to stay in one place. After it was all attached I used my air stapler and 1/4" upholstery staples to hold the fleece down to the frame and rings. Make sure you staple fairly close together (1/4" apart or so) and start from the middle and work your way outward. Two people is a must for this procedure! This pic is prior to staples:
Now we can apply our first coat of resin and hardener over top of the fleece. I did one 'soaker' coat to make sure the entire fleece had soaked up all the resin. Once this was dry I did another coat to make sure I got all the areas and to make sure the baffle was sturdy enough for fibreglass.

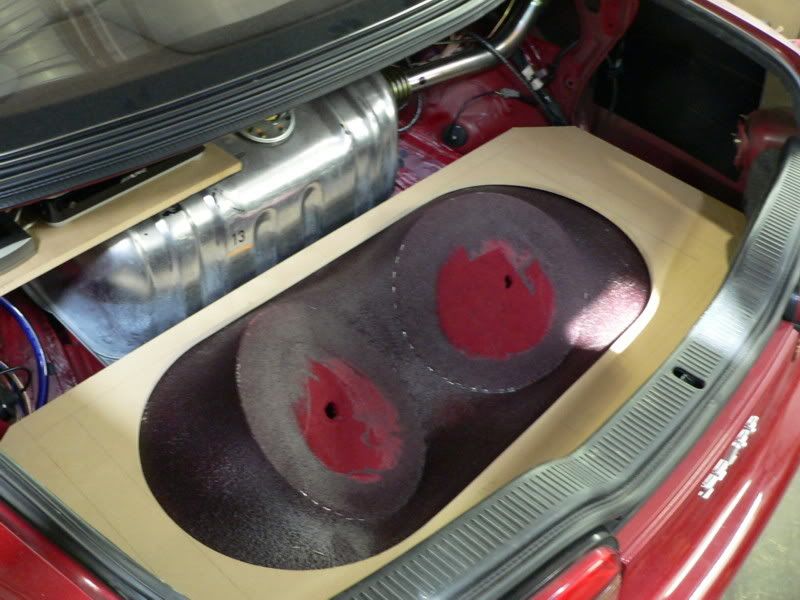
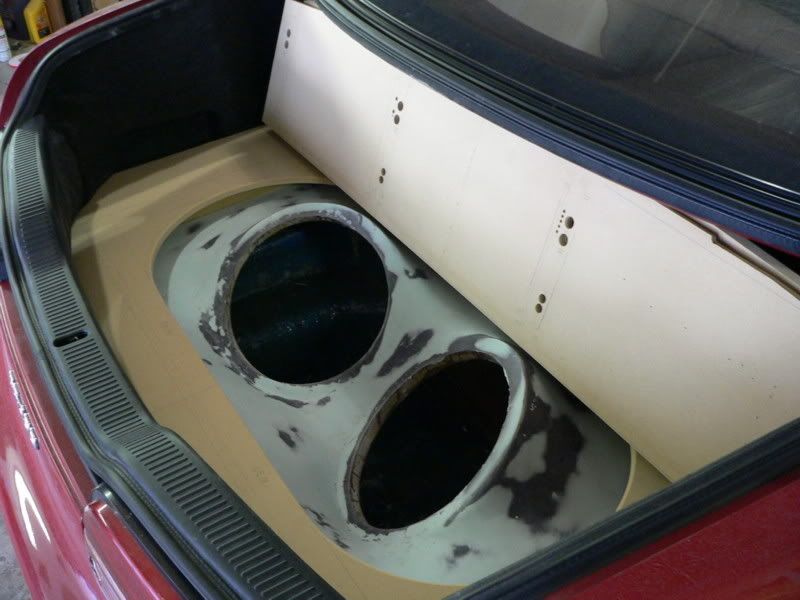
Now, the next part I didn't take too many pics but I hope you'll be able to get the idea. Once I let the resin dry I cut out the holes for the subs and sanded down any drops of resin on the frame or underside of the baffle. I also cut out the stilts and spacers that I used for the placemement of the rings initially. Its ok, because now the rings are perfectly held in place by the hardened fleece. Once I did this I applied two layers of fibreglass mat and resin on the top to stiffen up the baffle. After this had hardened I applied 5 layers of mat and resin on the underside. Once I cut away more excess mat and resin 'goop' I added my final 3 layers on the underside of the baffle.
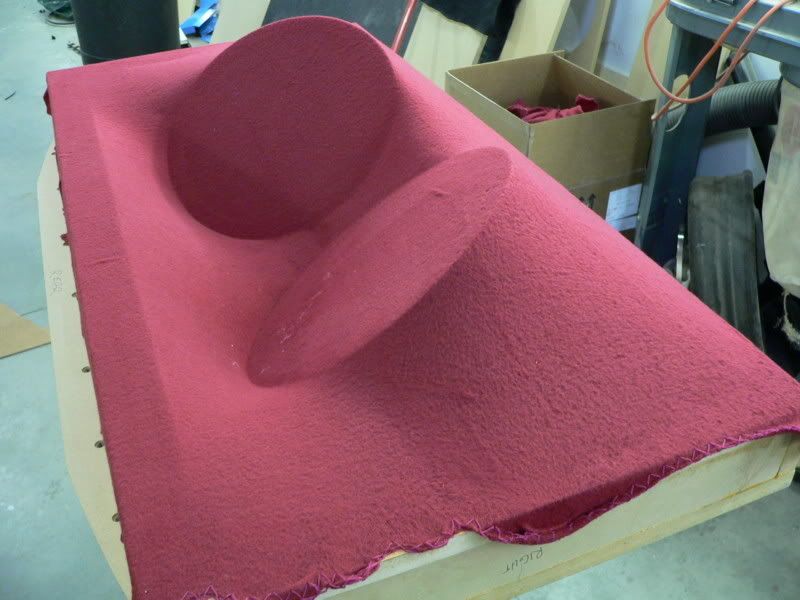
Now the sanding. I took down as much of the high spots of fibreglass on the top of the baffle to smooth it out and get it ready for body filler. Once it was reasonably smooth (after 4-5 hours of sanding with a belt, palm and then hand sander using 40-60 grit). I used about a liter and a half of body filler and smoothed it out over the low spots. Before the body filler completely dried, I took a 40 grit sanding block and a mech 'cheese-grater' type shaver to sculpt the round parts and take off as much excess body filler as possible. This took about an hour. Now onto the Icing. The icing is like body filler but much nicer to spread and sand. This was used in the final sculpting phase. After a few hours of sanding the Icing, it turned out like this:
- 2-3 rolls of packing tape
- 4-5 yards of 1.5 OZ fibreglass mat
- 10 litres of unwaxxed fibreglass resin (make sure its marine grade for better results)
- staple gun and 1/4" upholstery staples (air stapler is mucho faster!)
- 500 mils of Catalyst
- Small bottle of dye (optional if you want the tub to be a certain color)
- 5-10 mixing pails (1 liter)
- 10 cheap 2" paintbrushes
- Roll of tinfoil
- Drop cloths
- latex gloves
- Acetone for clean-up
Finishing supplies:
- 40, 60, 80, 120 grit sandpaper (5 sheets of each)
- 4 litres of body filler with hardener
- 1 litre of Icing finishing filler
- tube of glazing or spot putty
- 5-6 plastic spreaders
You will also need some 3/4" MDF for the subwoofer rings, stilt supports, the tub frame and front and back pieces of the enclosure.
Unfortunately I lost a lot of pics of the initial build of the trunk tub so I will post other pics of a similar process.
Here I made frames for two enclosures in a truck. Notice underneath I used packing tape over the carpet so the resin wouldn't soak through and damage underneath. On metal surfaces I use tinfoil so its a lot easier to release from the surface.
Depending on what subs I am using and the size of the enclosure, I generally apply 5-10 layers of fibreglass mat. In this application I applied 3 layers at first, then 3 more layers once the 'pods' were removed from the vehicle.
Now, onto my Lexus tub. I used 10 layers of fibreglass in my tub. The reason for this was that I was running at least 1000 watts and the tub was quite large. More fibreglass means a thicker, stronger tub. I did front and rear panels in MDF and quite an elaborate frame to attach my top panel (baffle) to. You can see tape (blue) and tinfoil in this picture:
After making a simple frame, I used a router to cut out my subwoofer rings (routers rock for situations like this!!). With the rings cut out, I made some cross braces and stilts to attach the rings to on the top frame panel. I did it this way so I can emove the top panel afterwards and apply fibreglass to the underside of the baffle. You'll see what I mean.
Once everything was in place I attached the top frame/ring panel to the lower enclosure with two screws to keep everything in one place. I will remove these screws later. Now I can strecth my fleece tightly over the entire top panel. I used spray glue to get it all to stay in one place. After it was all attached I used my air stapler and 1/4" upholstery staples to hold the fleece down to the frame and rings. Make sure you staple fairly close together (1/4" apart or so) and start from the middle and work your way outward. Two people is a must for this procedure! This pic is prior to staples:
Now we can apply our first coat of resin and hardener over top of the fleece. I did one 'soaker' coat to make sure the entire fleece had soaked up all the resin. Once this was dry I did another coat to make sure I got all the areas and to make sure the baffle was sturdy enough for fibreglass.
Now, the next part I didn't take too many pics but I hope you'll be able to get the idea. Once I let the resin dry I cut out the holes for the subs and sanded down any drops of resin on the frame or underside of the baffle. I also cut out the stilts and spacers that I used for the placemement of the rings initially. Its ok, because now the rings are perfectly held in place by the hardened fleece. Once I did this I applied two layers of fibreglass mat and resin on the top to stiffen up the baffle. After this had hardened I applied 5 layers of mat and resin on the underside. Once I cut away more excess mat and resin 'goop' I added my final 3 layers on the underside of the baffle.
Now the sanding. I took down as much of the high spots of fibreglass on the top of the baffle to smooth it out and get it ready for body filler. Once it was reasonably smooth (after 4-5 hours of sanding with a belt, palm and then hand sander using 40-60 grit). I used about a liter and a half of body filler and smoothed it out over the low spots. Before the body filler completely dried, I took a 40 grit sanding block and a mech 'cheese-grater' type shaver to sculpt the round parts and take off as much excess body filler as possible. This took about an hour. Now onto the Icing. The icing is like body filler but much nicer to spread and sand. This was used in the final sculpting phase. After a few hours of sanding the Icing, it turned out like this:
 06-27-07, 12:06 AM
#2
Pole Position
Thread Starter
A little bit of glazing putty for the pinholes and nicks and now its off to the painter! 3 coats of factory Lexus red and 3 coats of clearcoat made this thing shine better than my car after wax. It makes me want to repaint the whole car now.
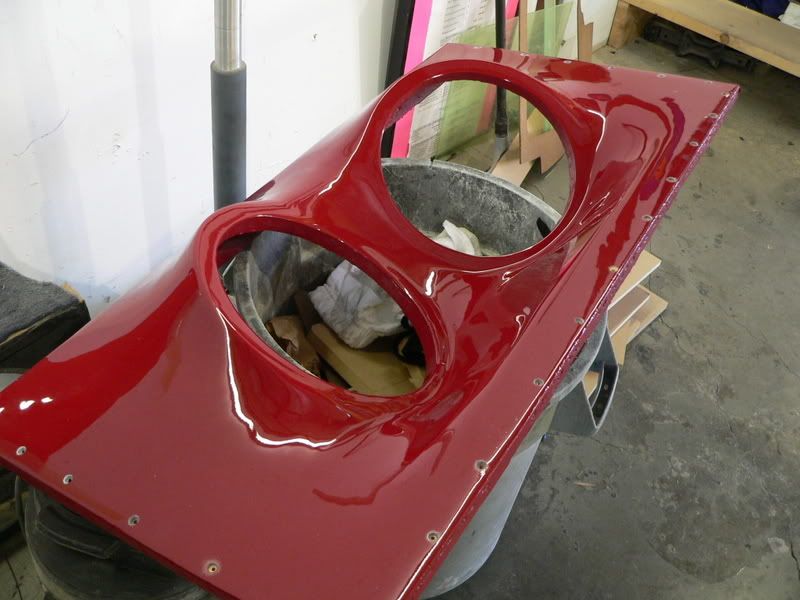
I attached the baffle using 1 5/8" drywall screws. You can see the countersunk holes made to attach the baffle to the bottom part. I used 1 1/2 tubes of GE silicone II to seal the top to the bottom and air dried it to perfection. Total weight is about 65 lbs without the subs.

I hope you learned a bit from this write-up!
I attached the baffle using 1 5/8" drywall screws. You can see the countersunk holes made to attach the baffle to the bottom part. I used 1 1/2 tubes of GE silicone II to seal the top to the bottom and air dried it to perfection. Total weight is about 65 lbs without the subs.
I hope you learned a bit from this write-up!
Last edited by kratos; 06-27-07 at 12:11 AM.


 06-27-07, 01:36 PM
#6
Driver School Candidate
Join Date: Jun 2007
Location: CA
Posts: 42
Likes: 0
Received 0 Likes
on
0 Posts
question...
How much of the bass is audible inside the car? Looks like the subs are very isolated from the passenger compartment?
thanks... I have never owned a sedan before, until now... so this is something I've always wondered.
How much of the bass is audible inside the car? Looks like the subs are very isolated from the passenger compartment?
thanks... I have never owned a sedan before, until now... so this is something I've always wondered.
06-27-07, 02:00 PM
#7
Pole Position
Thread Starter
I removed the stock sub and rear speakers so I do get a fair bit of bass into the cabin believe it or not. Of course I wish I could get even more without removing the rear firewall access panels but I consider that to be dangerous.


