
 12-15-14, 01:03 PM
Last edit by: IB Advertising
See related guides and technical advice from our community experts:
Browse all: Interior
- How to Wrap your Interior in Carbon Fiber Foil
Step by step instructions for do-it-yourself repairs
Browse all: Interior

Anyone install carbon fiber wrap for their interior?

 01-10-15, 12:41 PM
#47
Pole Position
All the pics look great everyone - nice jobs! 
Question for those that did it themselves...how did you handle the contours around the areas that are raised/sunken? Did you simply heat the ***** out of the material and stretch/wrap it or did you have to cut certain areas beneath? Just curious how you got around any bubbles or creases in/around those areas. TIA.
Question for those that did it themselves...how did you handle the contours around the areas that are raised/sunken? Did you simply heat the ***** out of the material and stretch/wrap it or did you have to cut certain areas beneath? Just curious how you got around any bubbles or creases in/around those areas. TIA.
01-31-15, 06:20 PM
#50

DIY Trim Removal
Tools needed
- vinyl wrap of your choice
- trim removal tool, available for $6 on eBay or amazon
- phillips screwdriver
- exacto knife or razor blade
- 3m adhesive/primer (this is optional as the vinyl already has an adhesive)
- hair dryer or heat gun
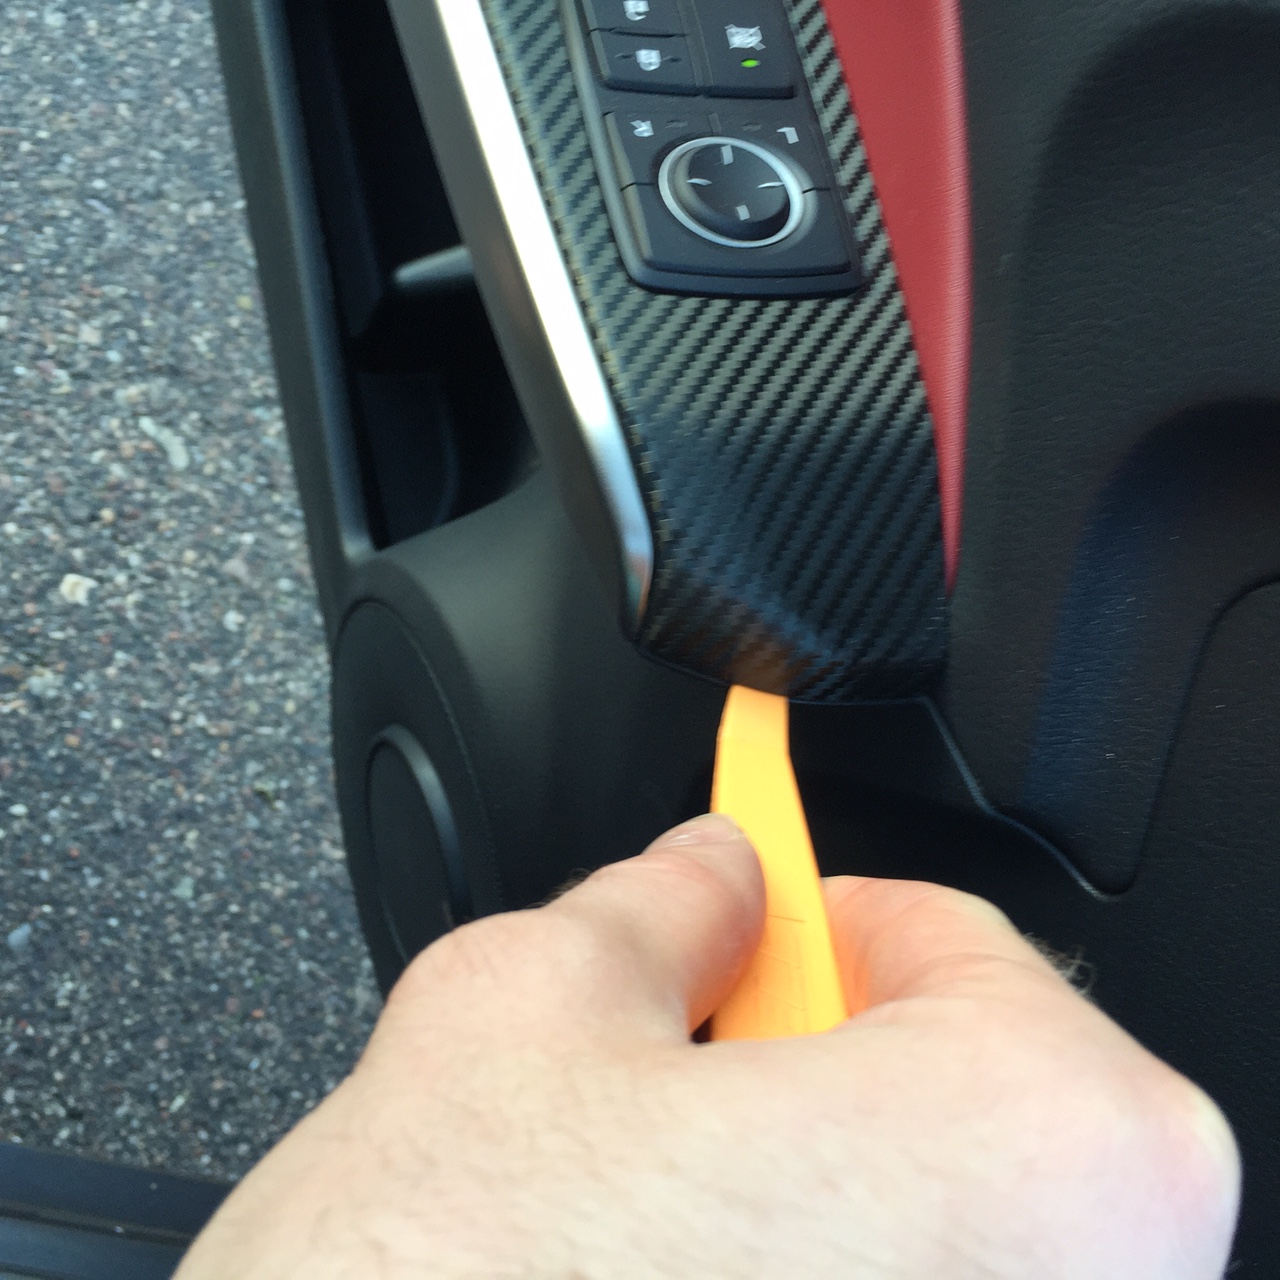
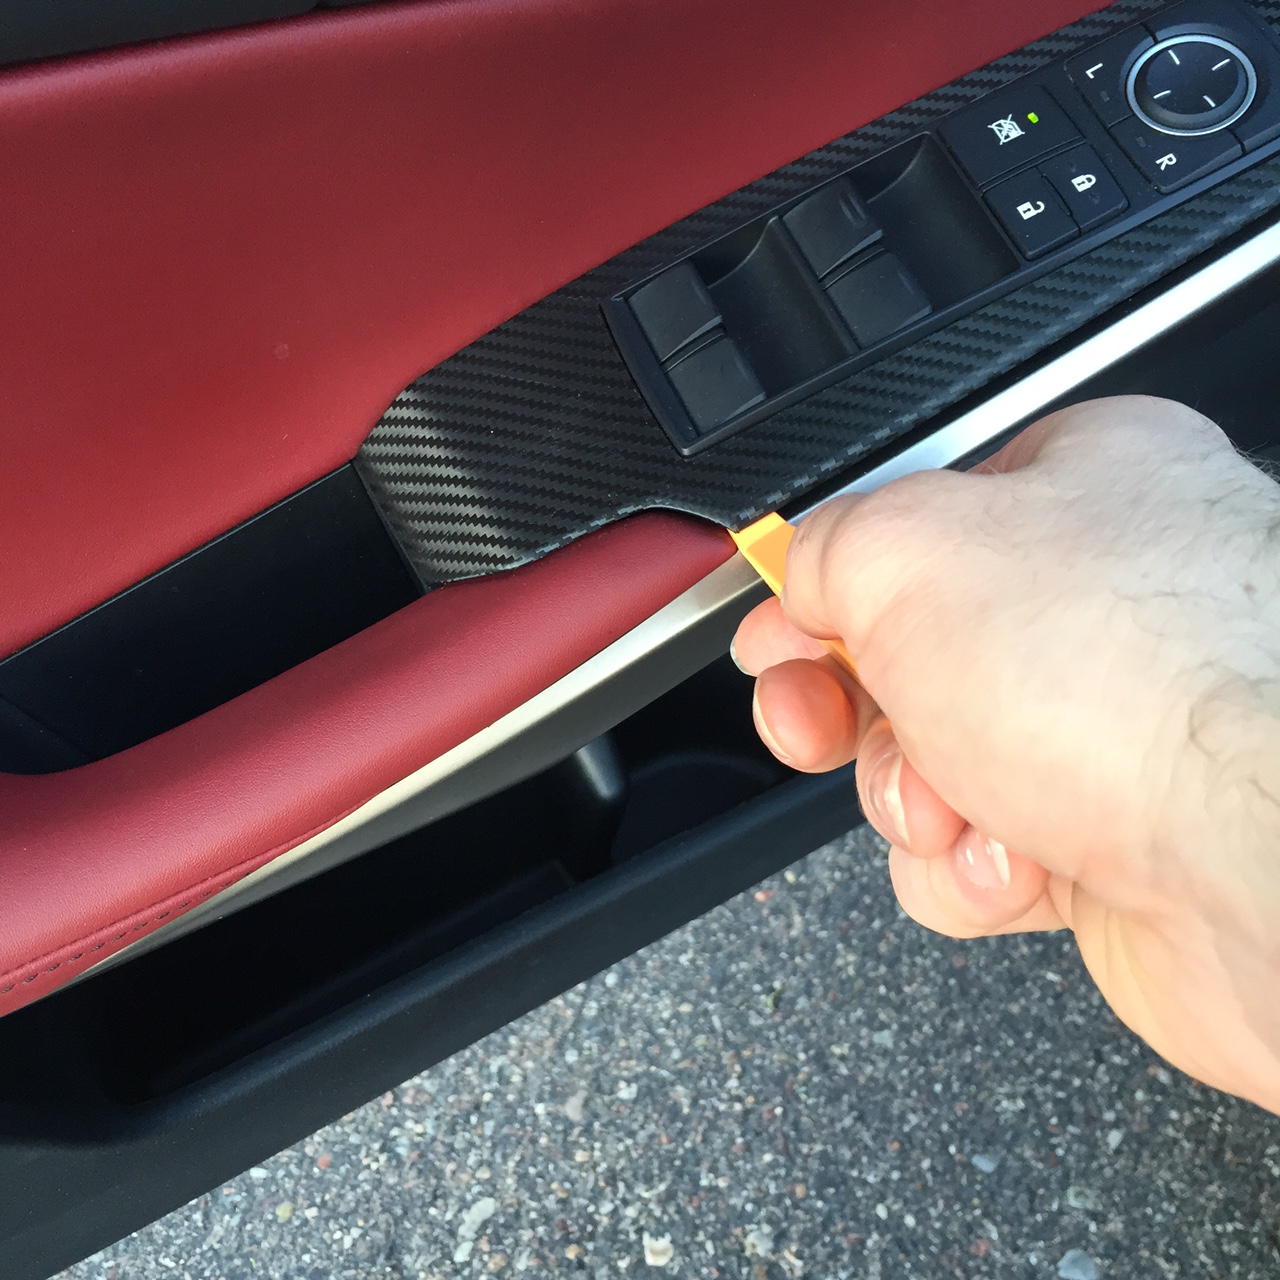
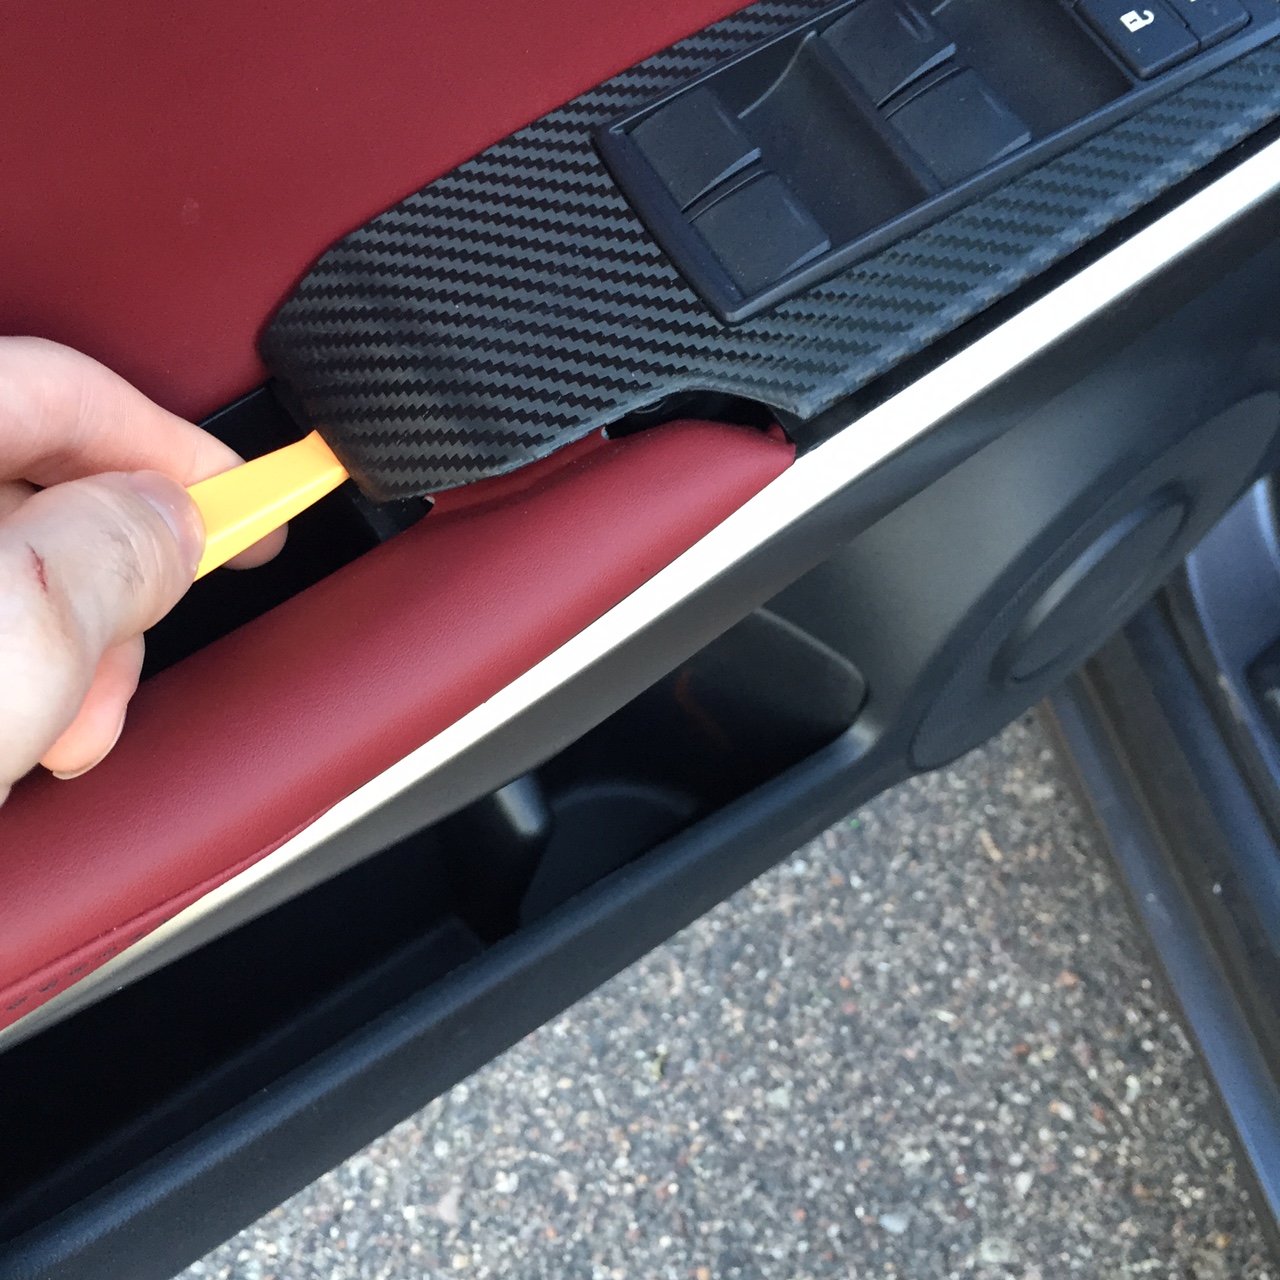
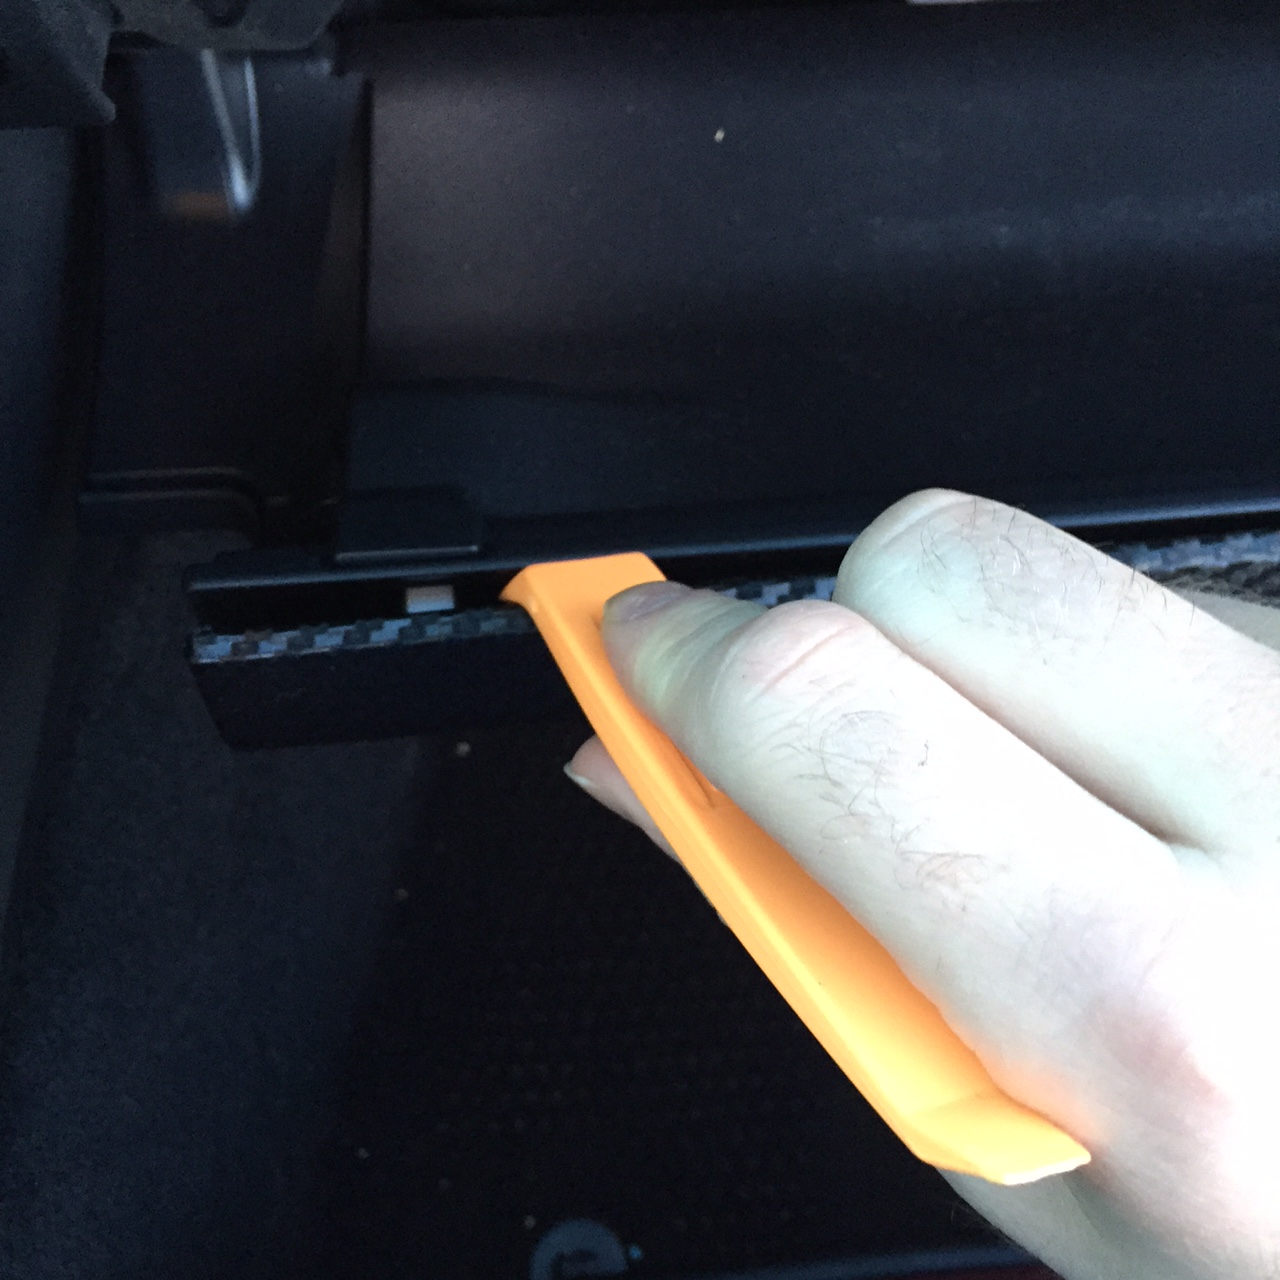
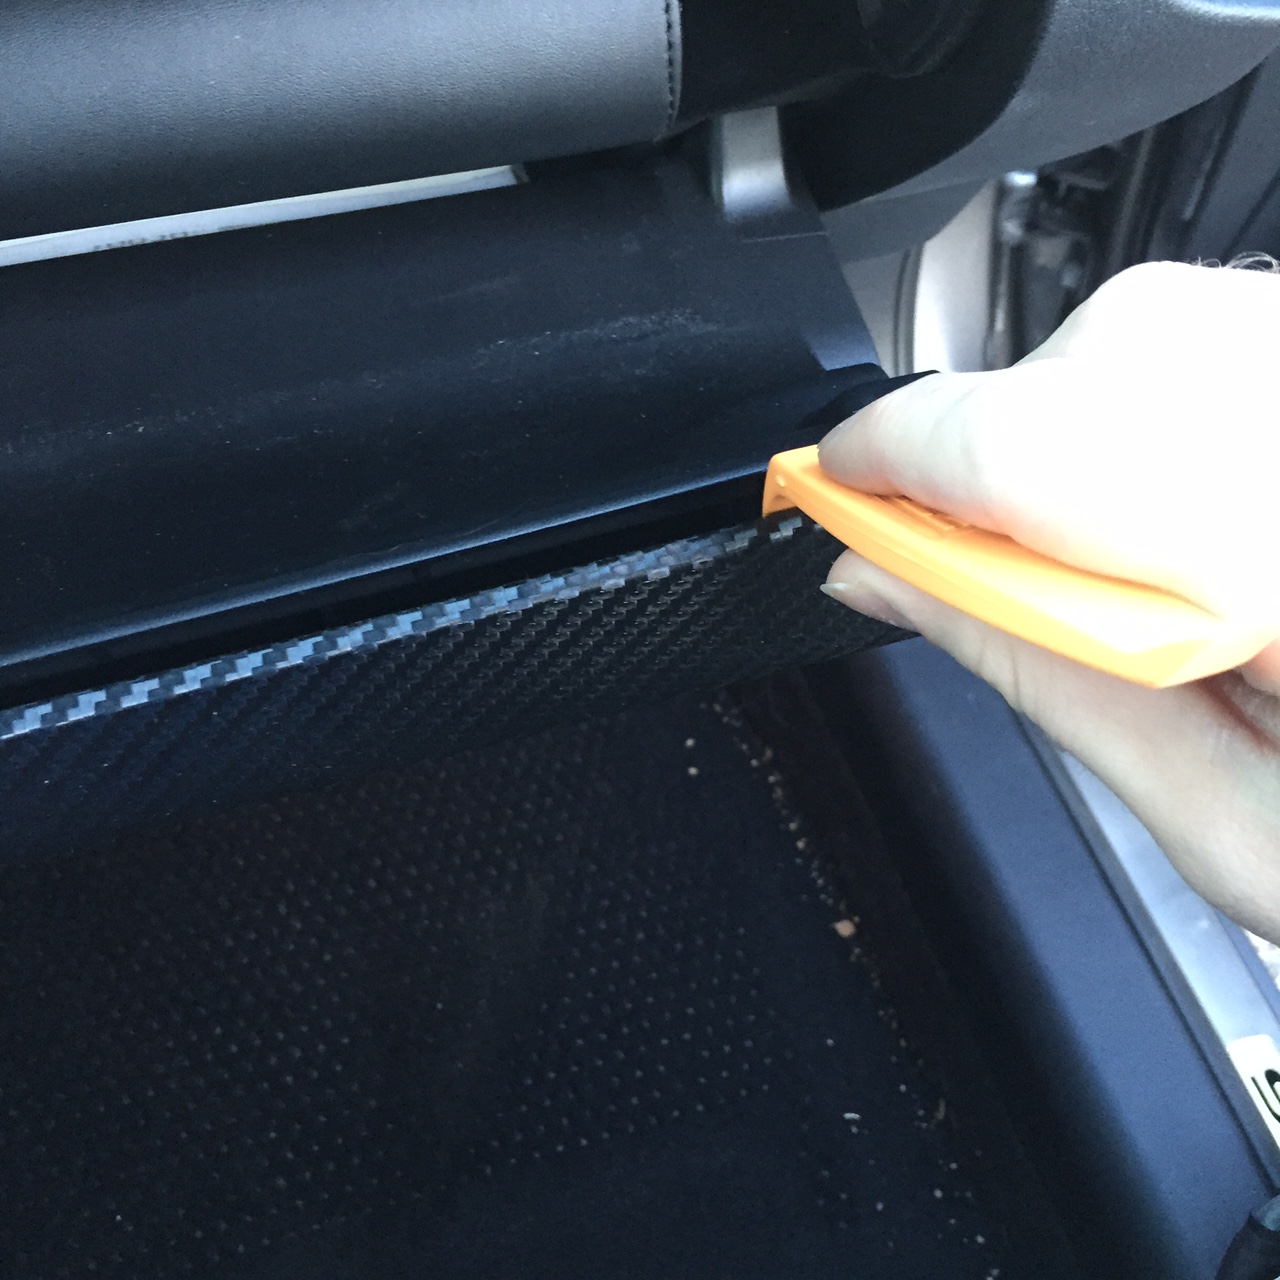
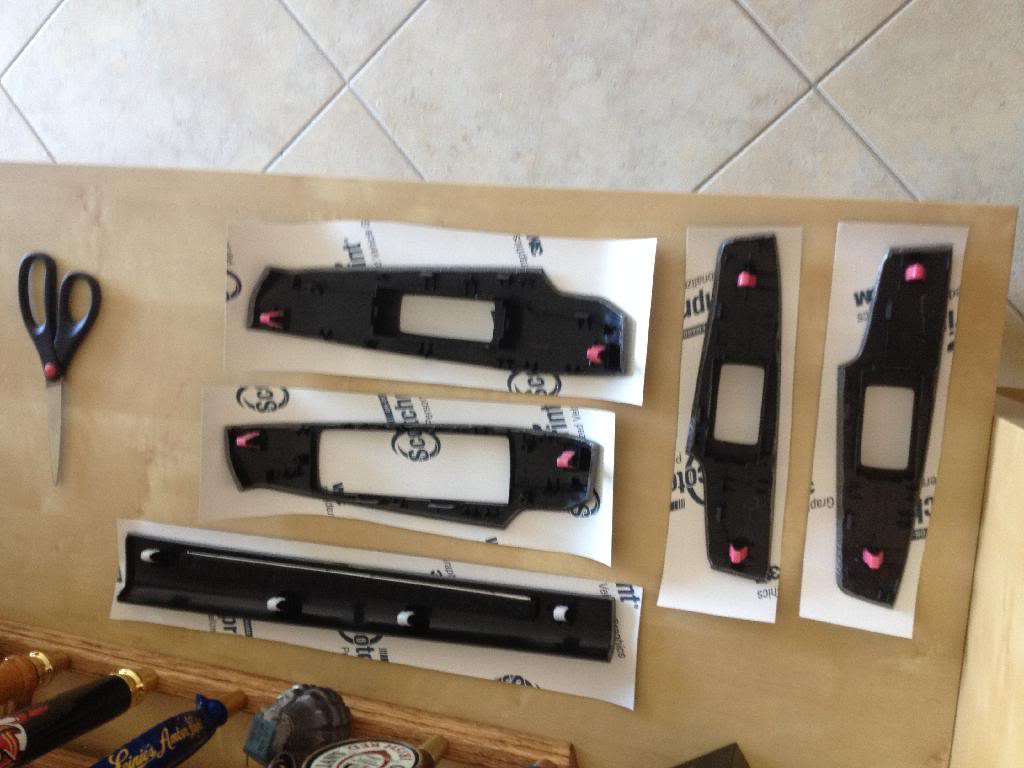
To remove the trim pieces for wrapping, simply follow the pictures, placing the trim tool underneath/in between the trim and lifting up. You will want to work your way around each piece, prying upwards along the sides, until the pieces are ready to fully pop off. Little force is needed for removal, they actually pop out rather easily.
Driver side trim, same applies for the removal of the other three window trim pieces

glove box trim
Tools needed
- vinyl wrap of your choice
- trim removal tool, available for $6 on eBay or amazon
- phillips screwdriver
- exacto knife or razor blade
- 3m adhesive/primer (this is optional as the vinyl already has an adhesive)
- hair dryer or heat gun
To remove the trim pieces for wrapping, simply follow the pictures, placing the trim tool underneath/in between the trim and lifting up. You will want to work your way around each piece, prying upwards along the sides, until the pieces are ready to fully pop off. Little force is needed for removal, they actually pop out rather easily.
Driver side trim, same applies for the removal of the other three window trim pieces


glove box trim


Last edited by electrohou; 03-18-15 at 01:27 AM.
01-31-15, 06:23 PM
#51
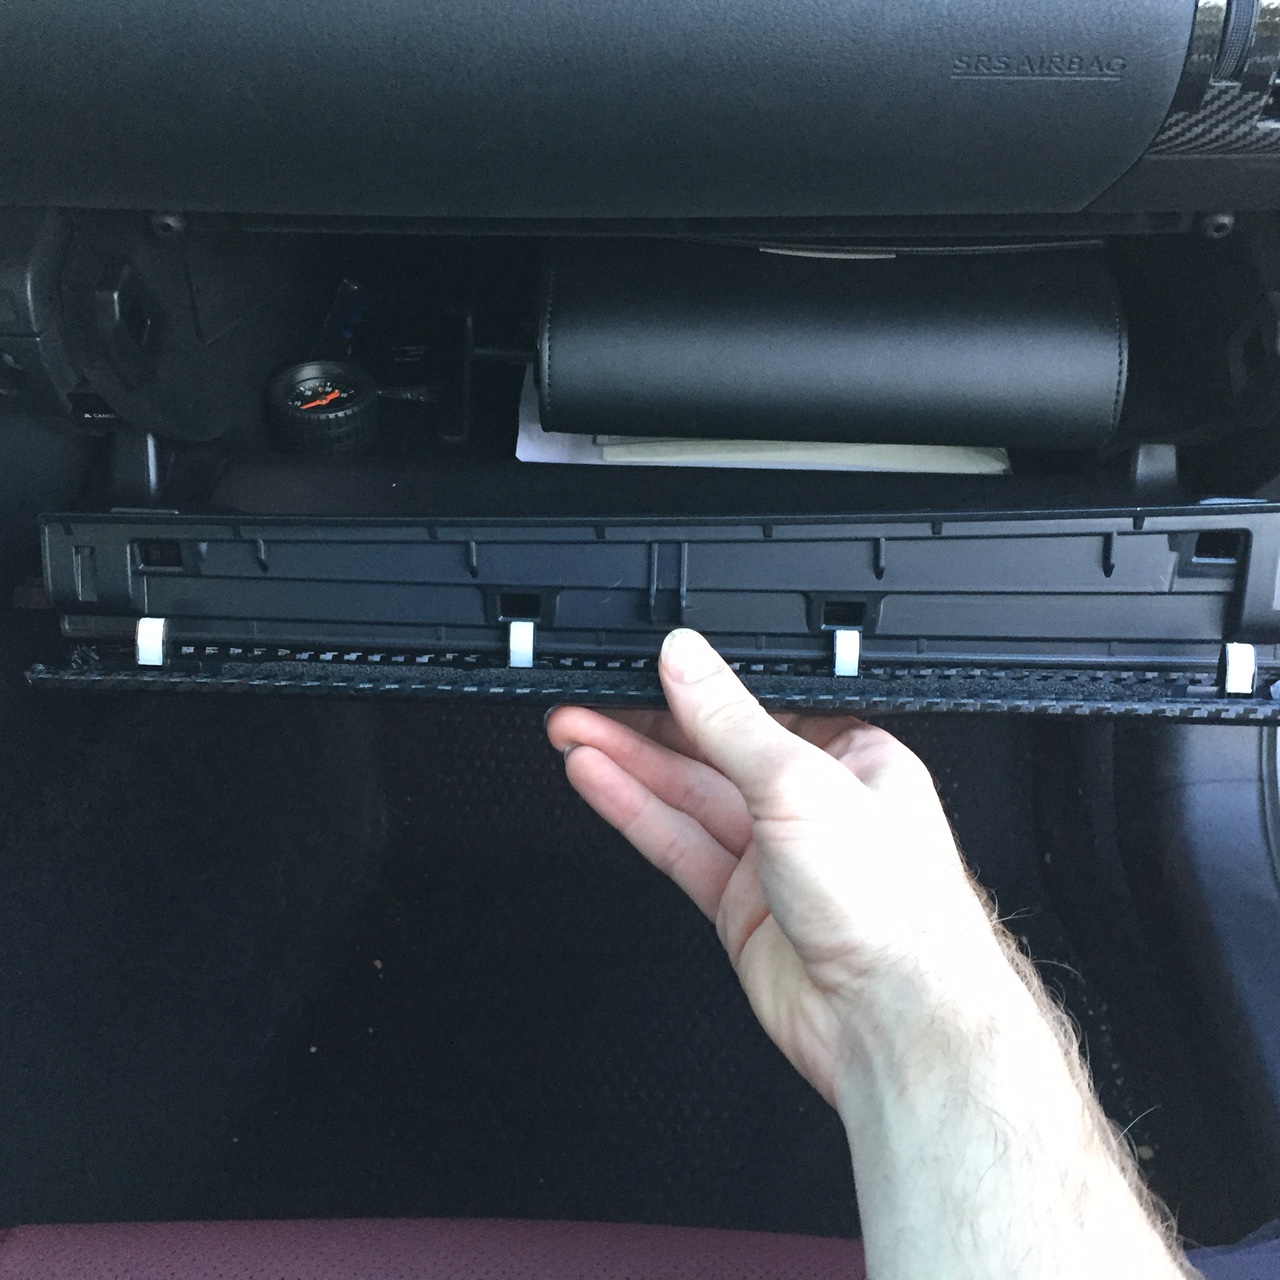
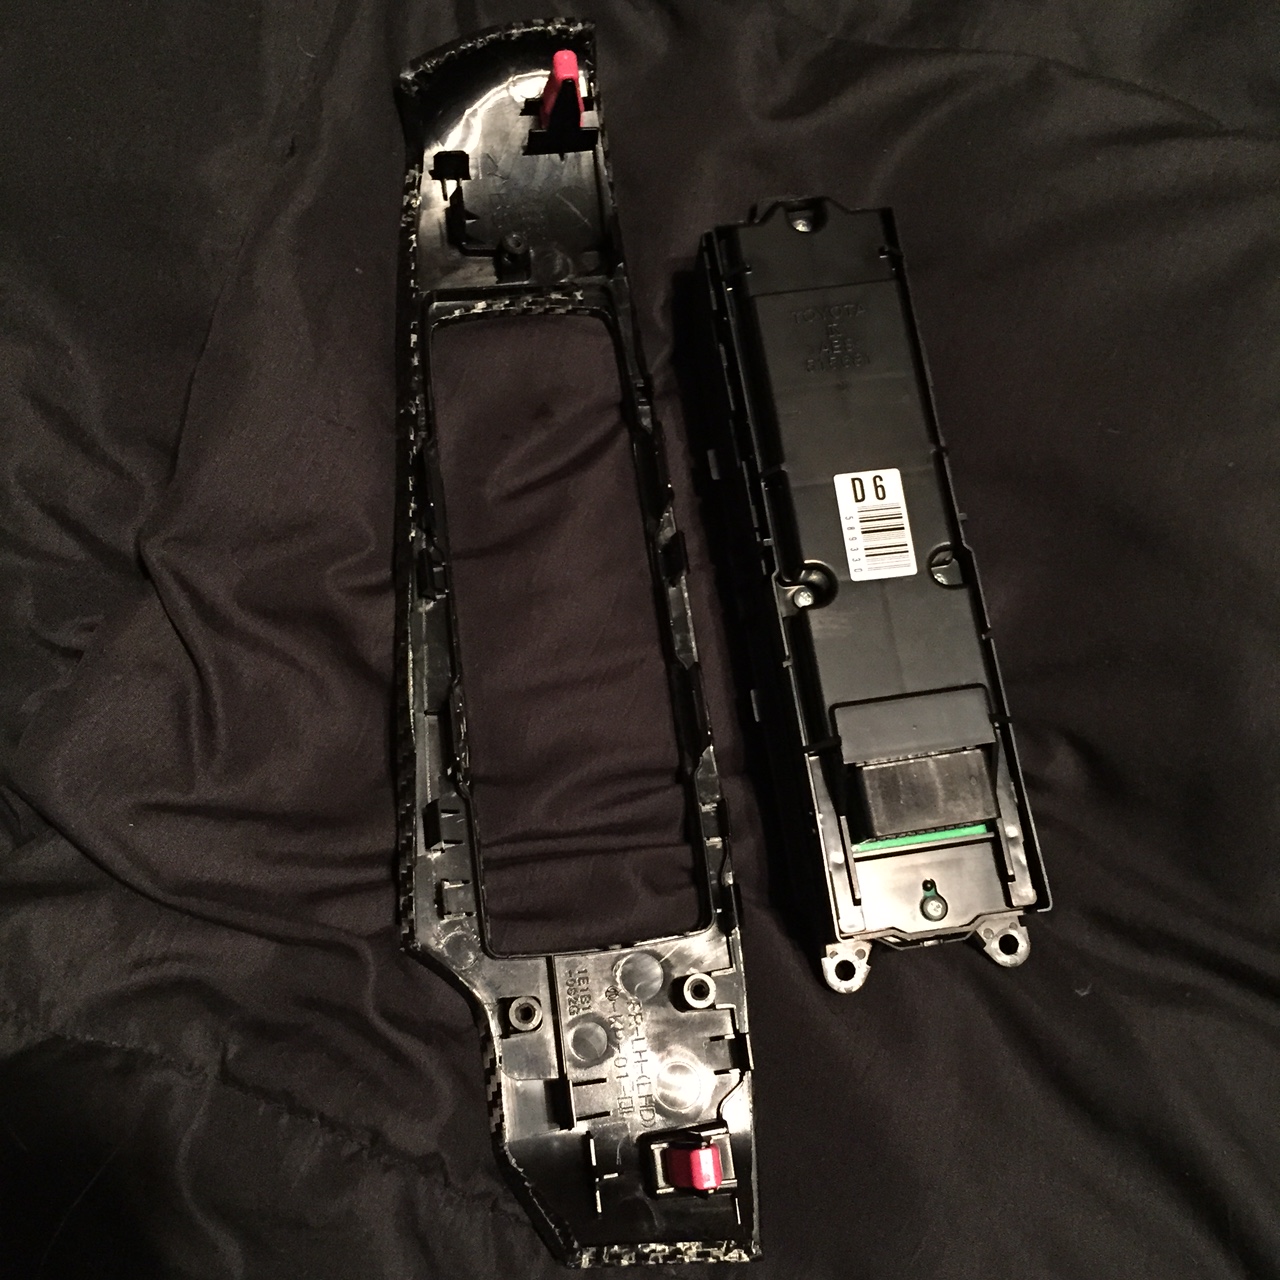
The glove box trim piece has no wiring or anything to disconnect, once it is removed, it is immediately ready to wrap.
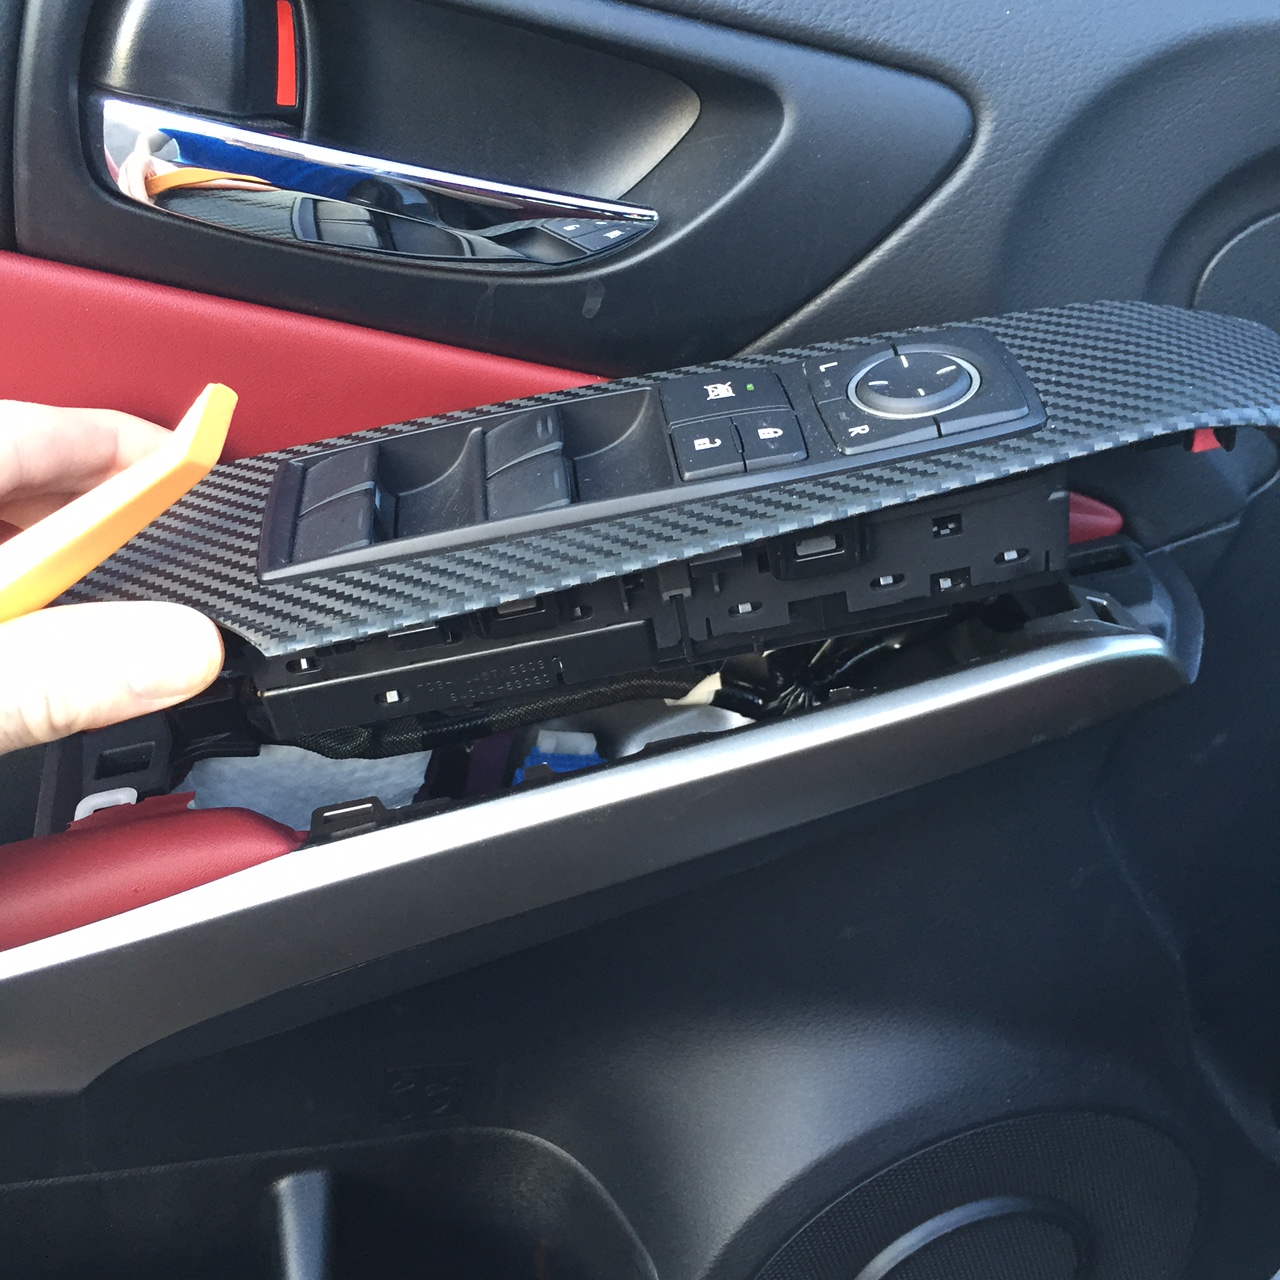
The four window trim pieces each have a single wire harness plug/clip to release before they can exit from the vehicle. Once the four window trims have been unplugged and removed, you will want to release the clips holding the window buttons in place. Note the driver side trim piece/window button additionally has three screws to remove with a phillips screwdriver, before it can can be removed. These details are shown in the following images.
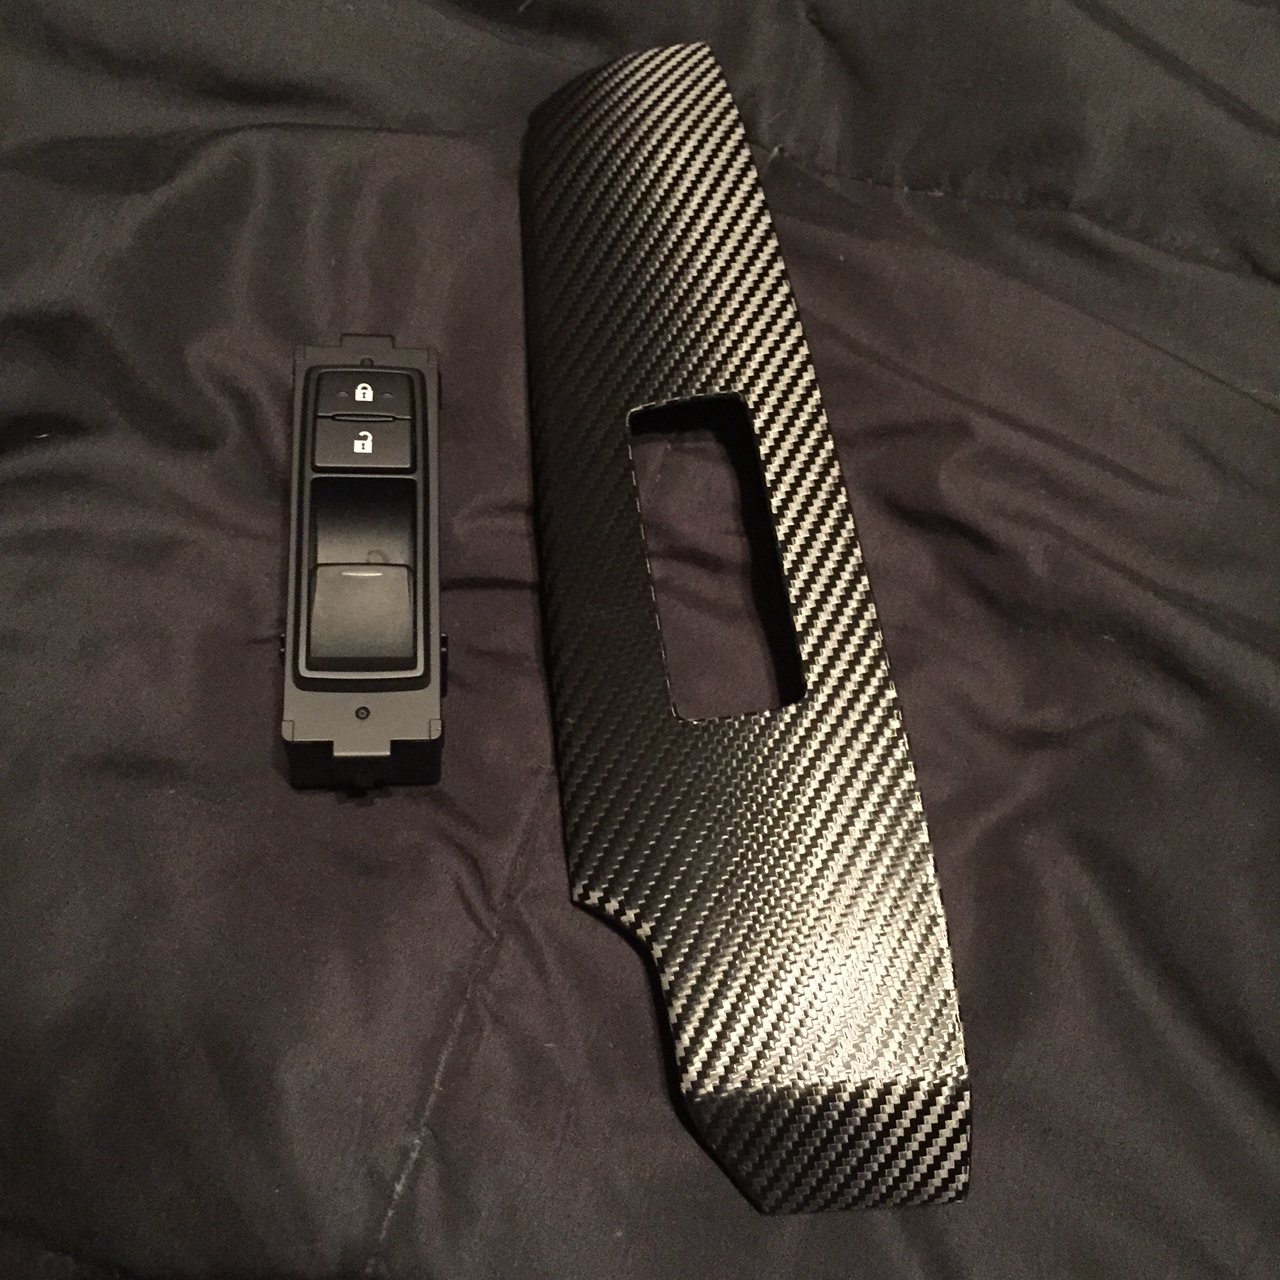
Driver window trim
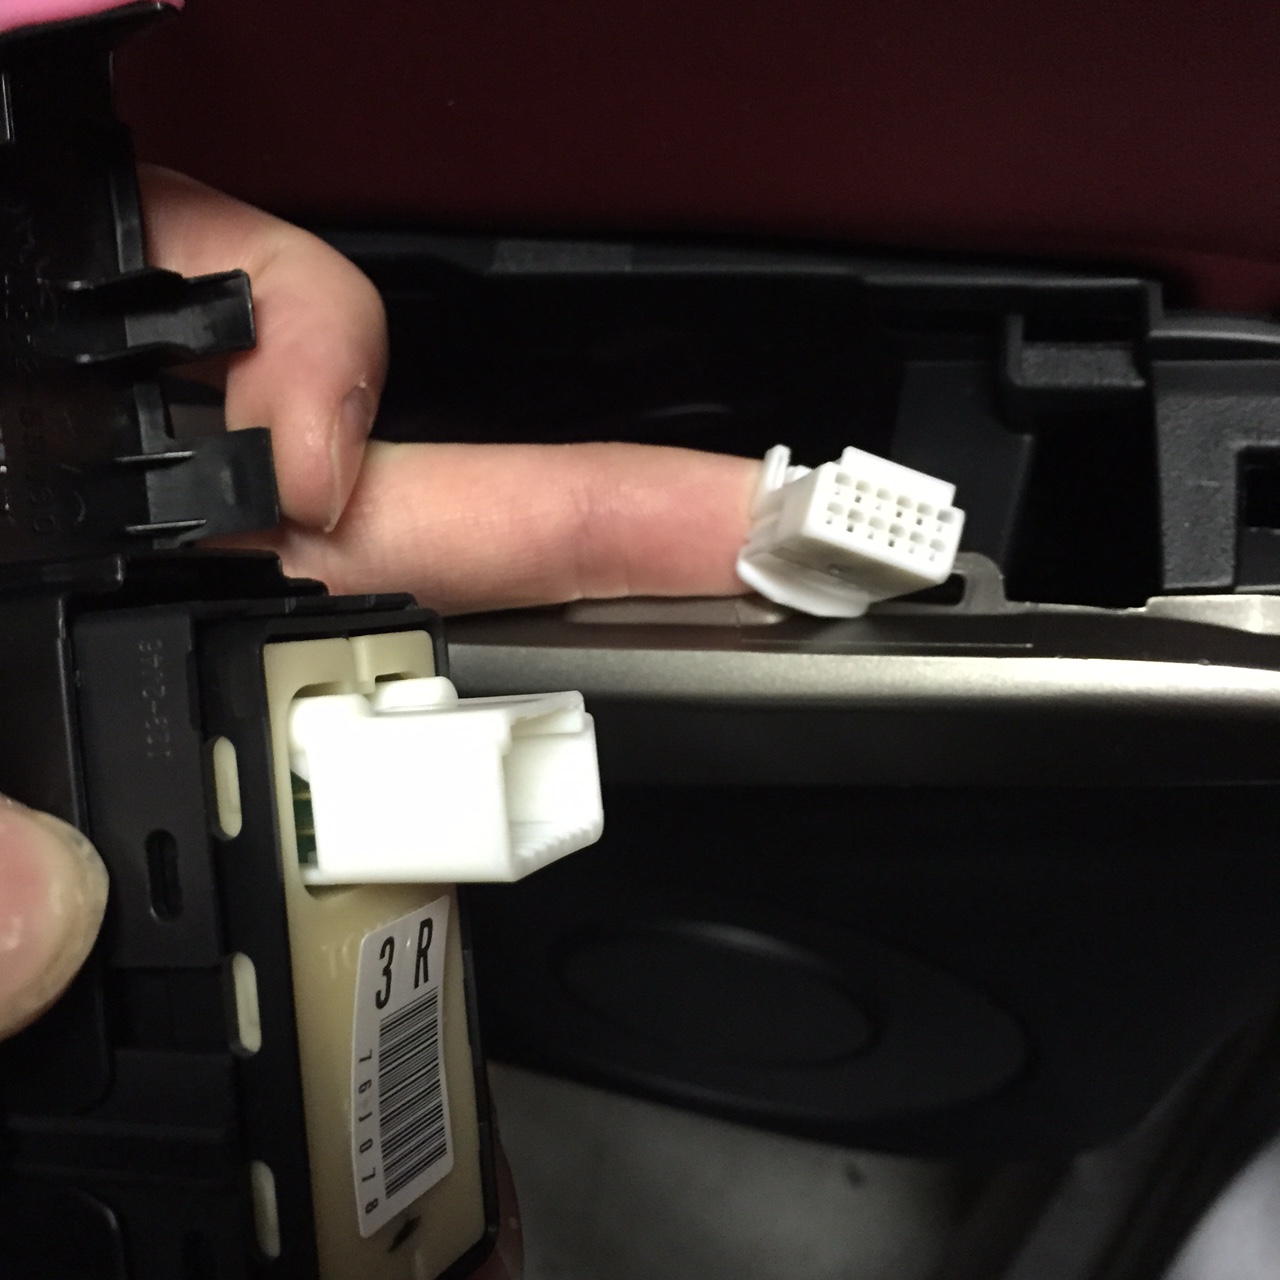
Undo the wire harness/clip as shown in the following two images, press down on the plastic where the red arrow points and then pull, now the wire harness will safely release
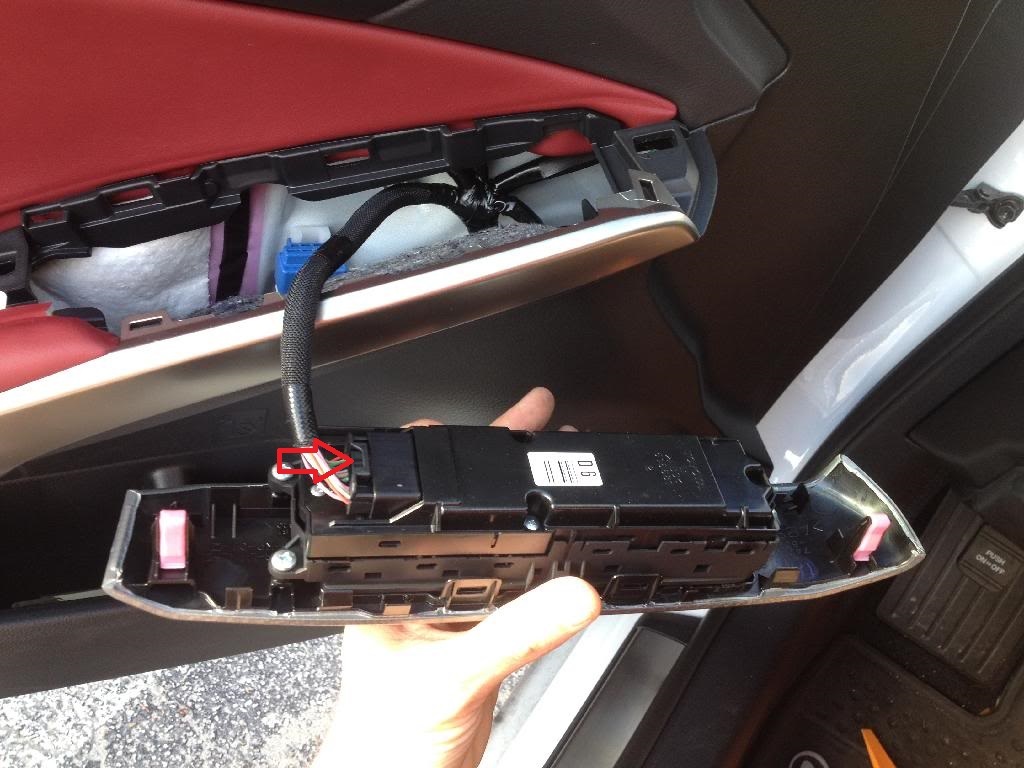
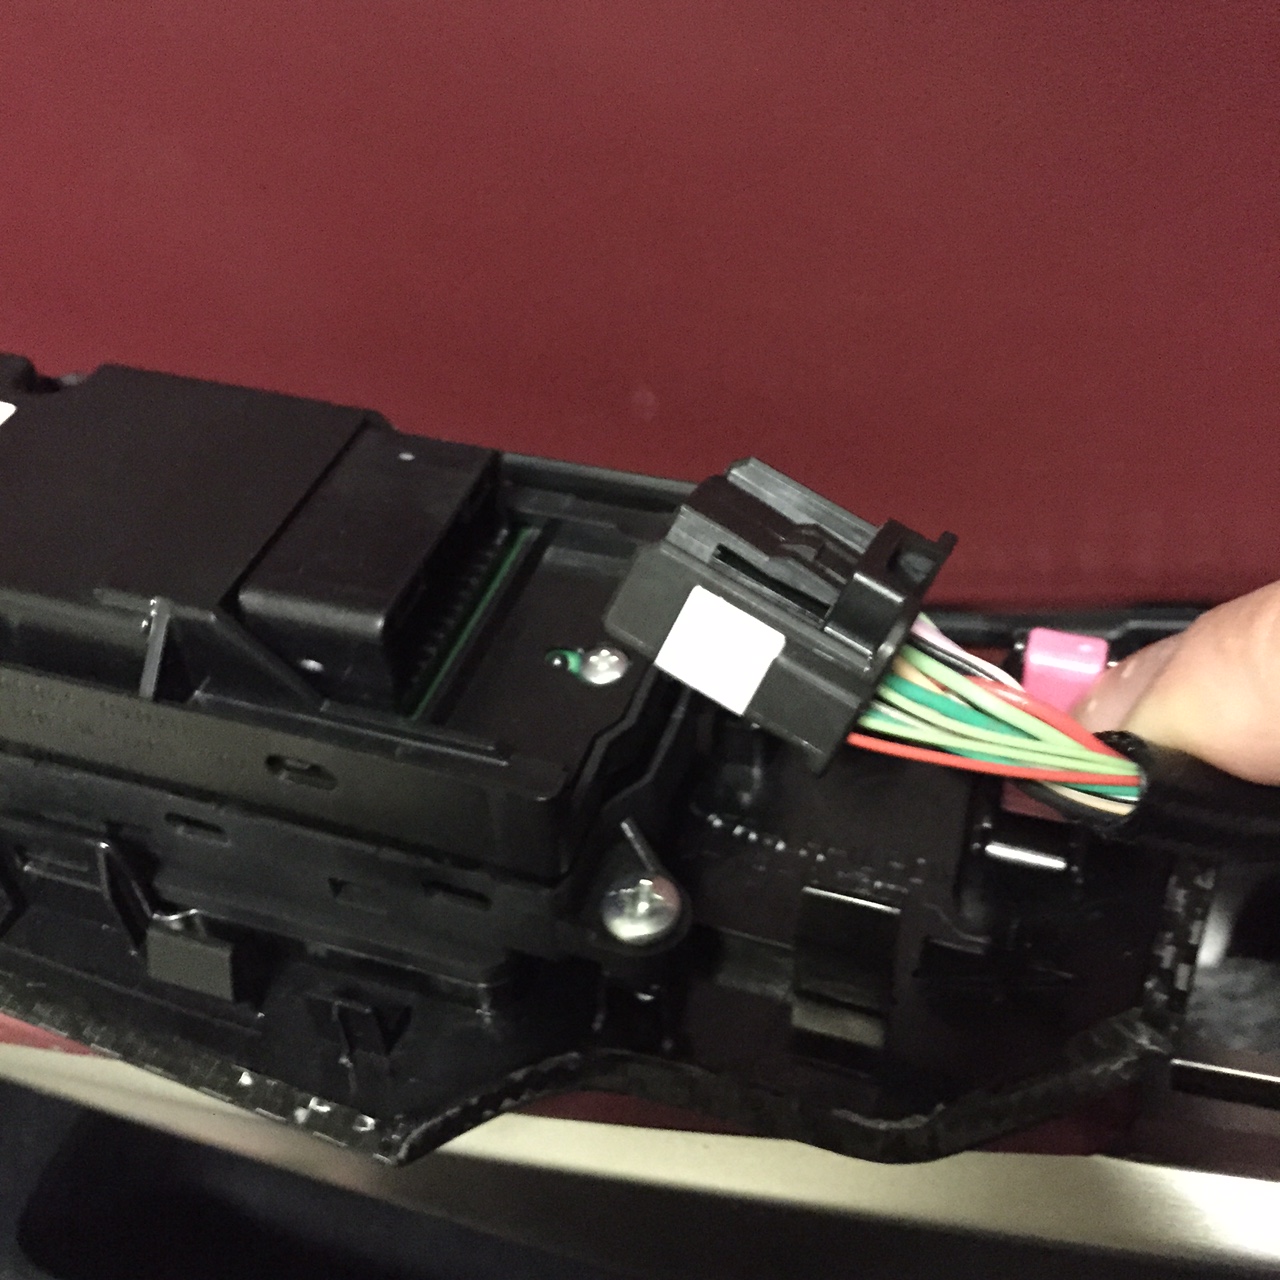
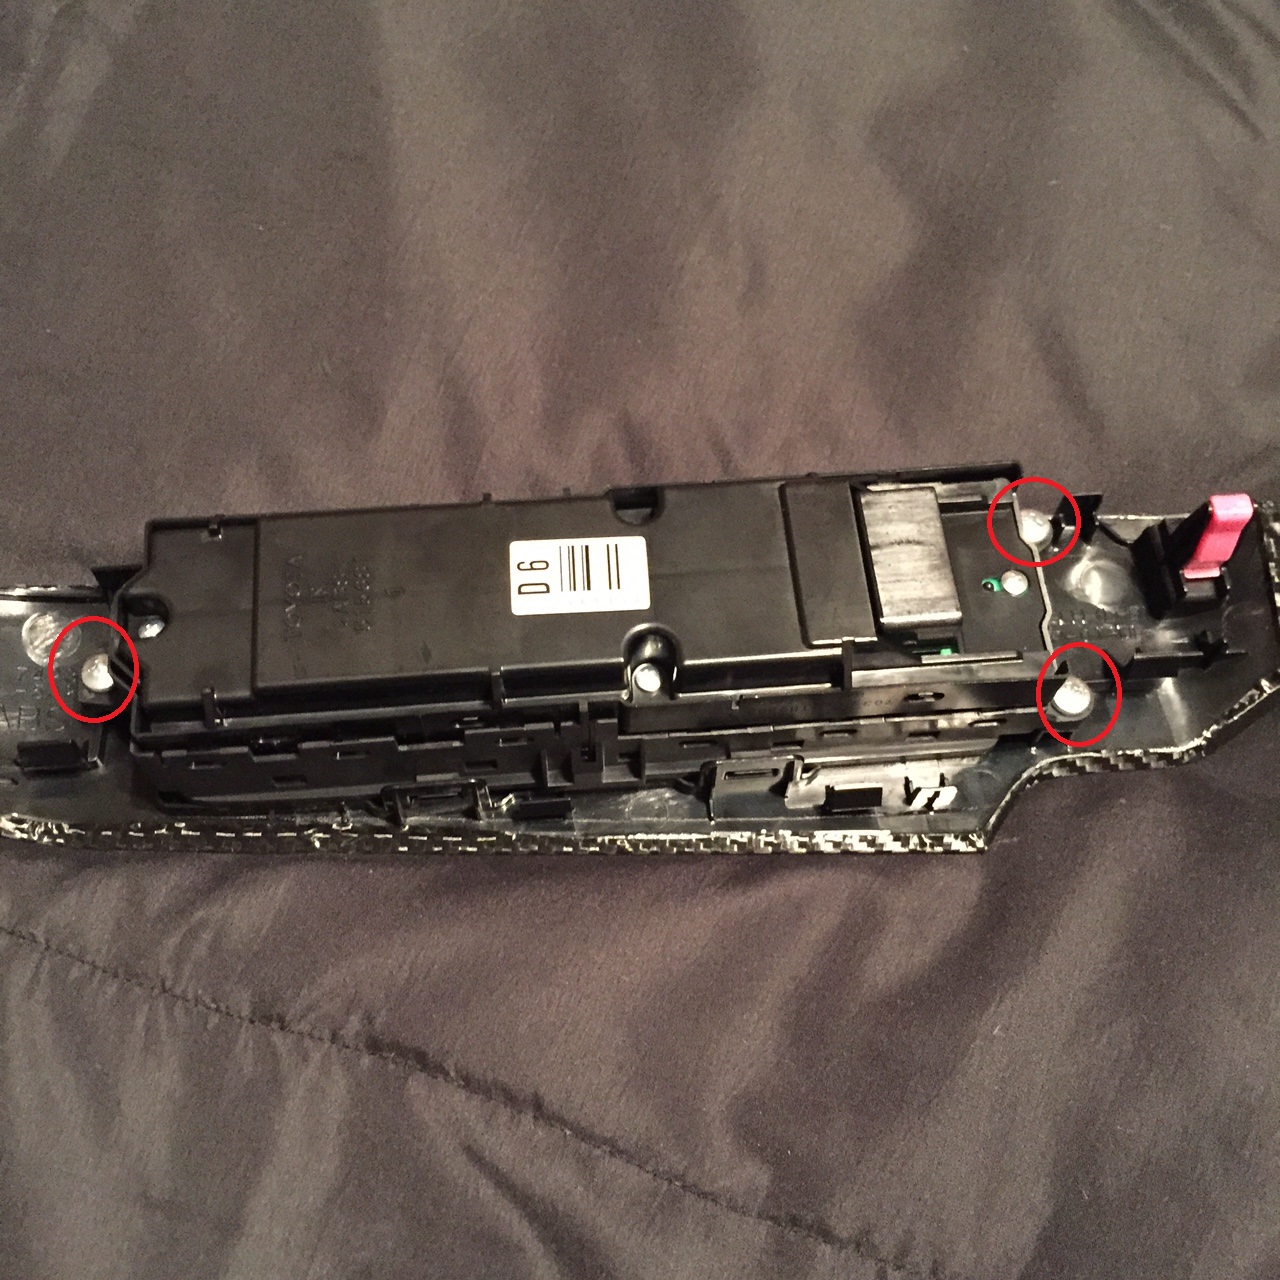
This is what comes out, undo the three screws circled in the following image
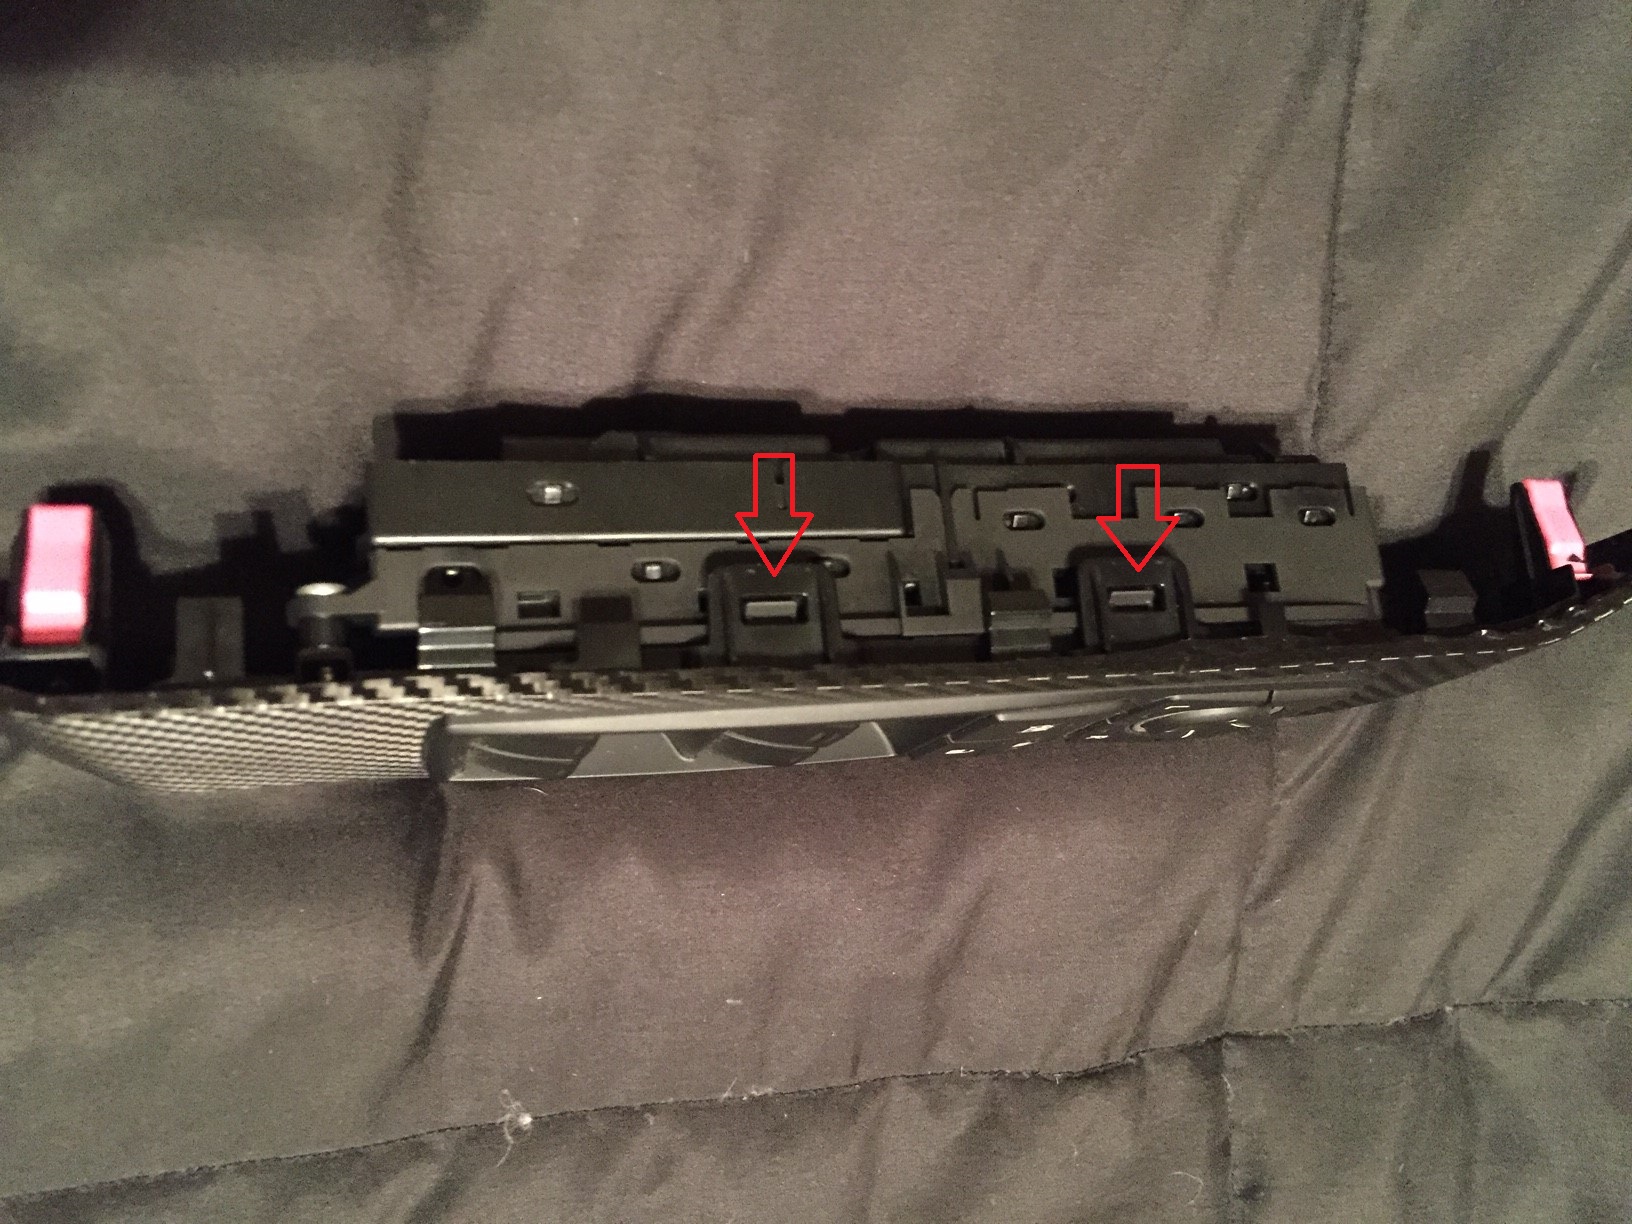
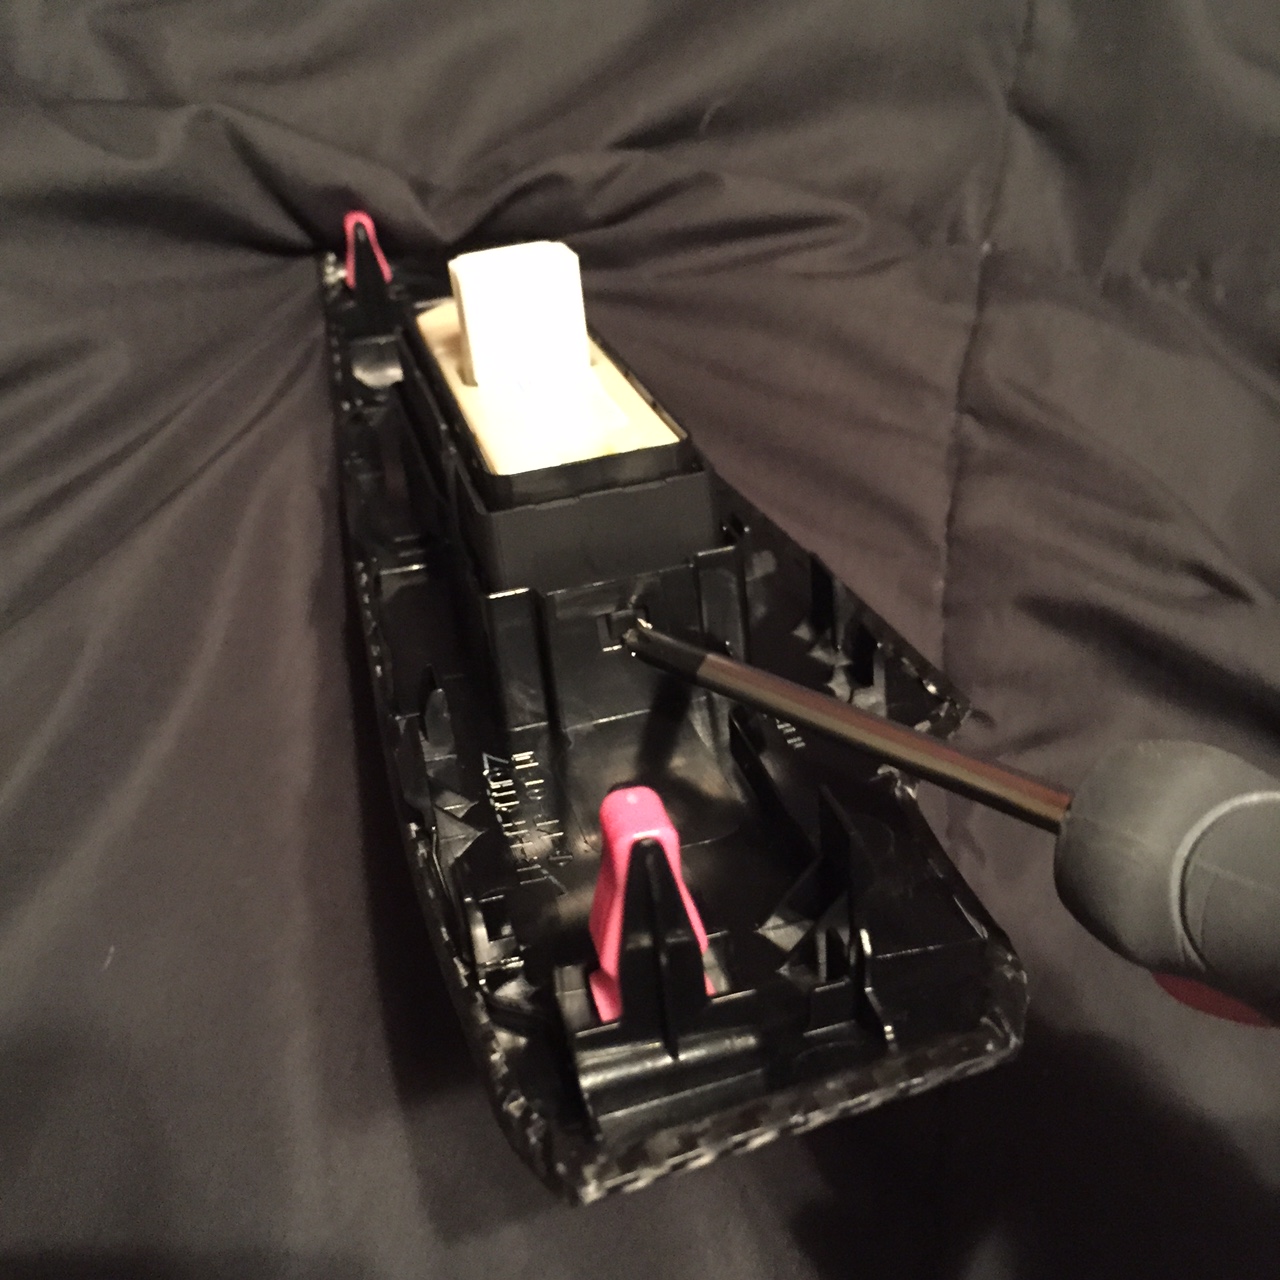
Then, release the four clips where the arrows are pointing, no tool is needed, hands work fine.
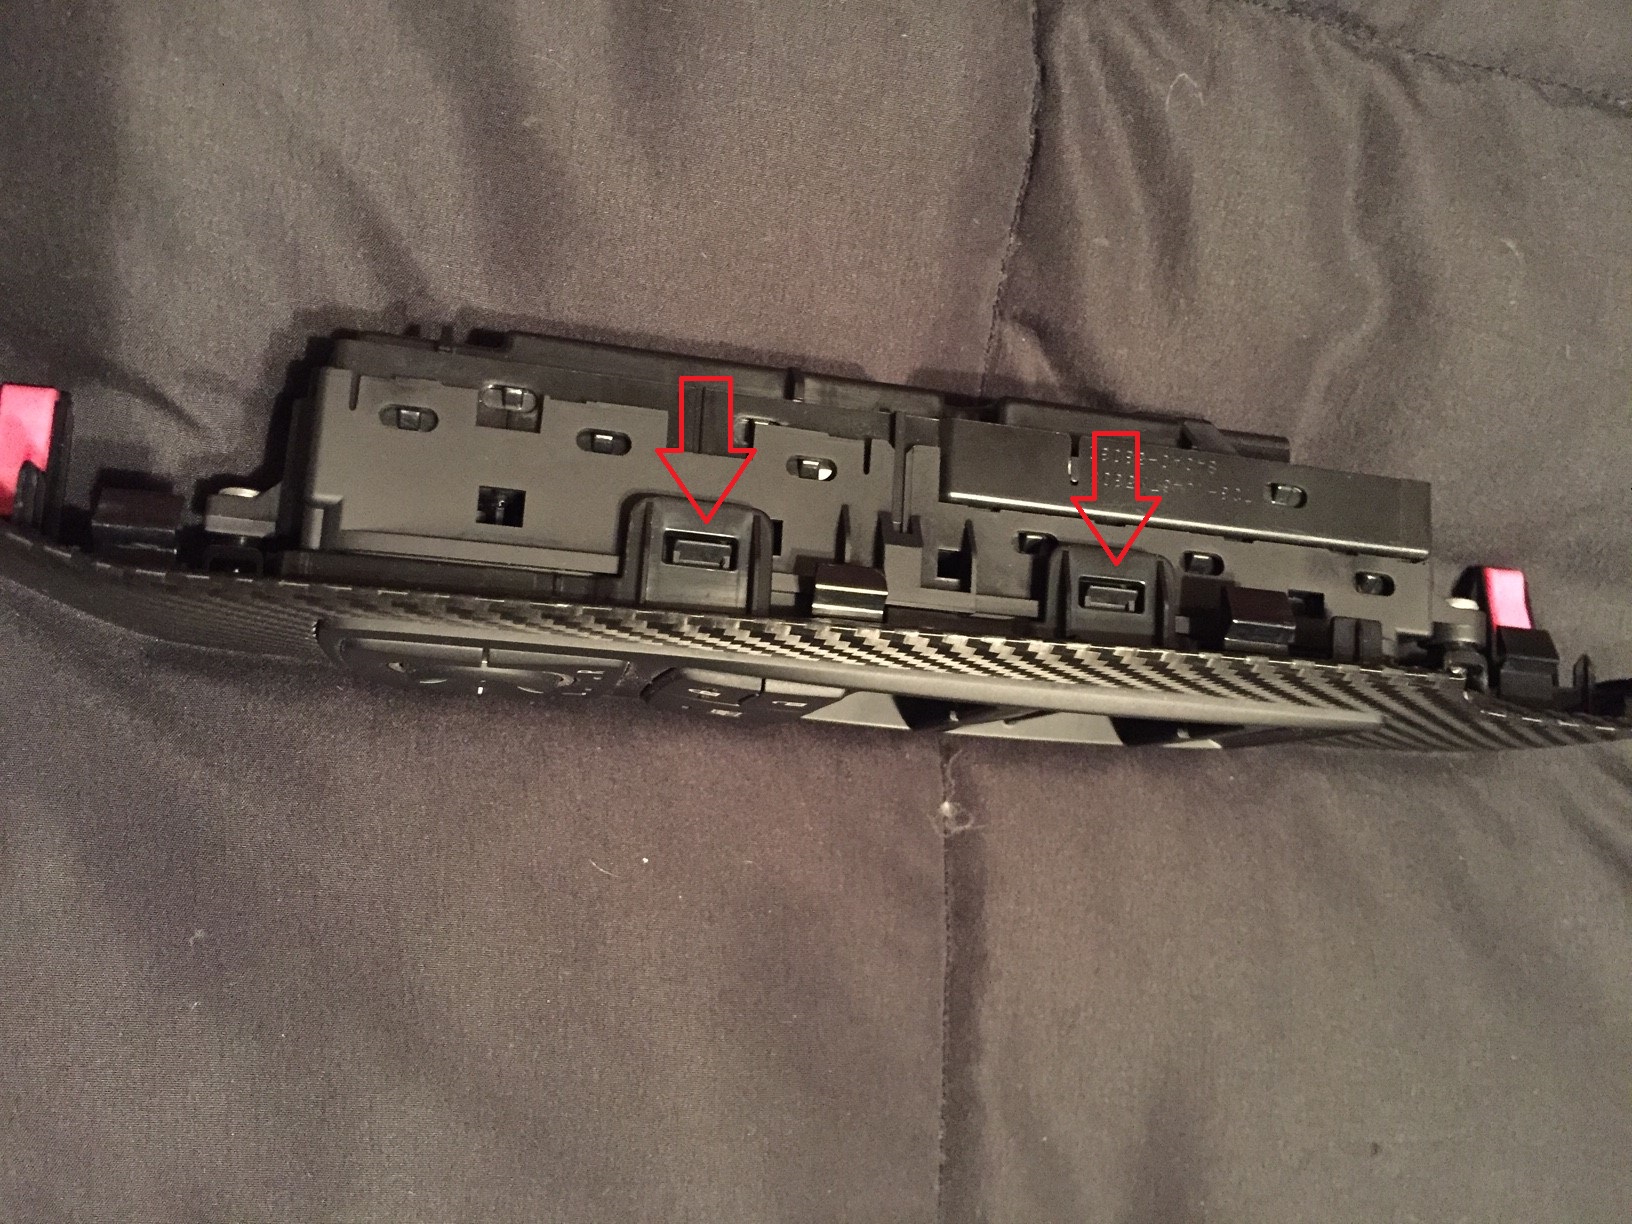
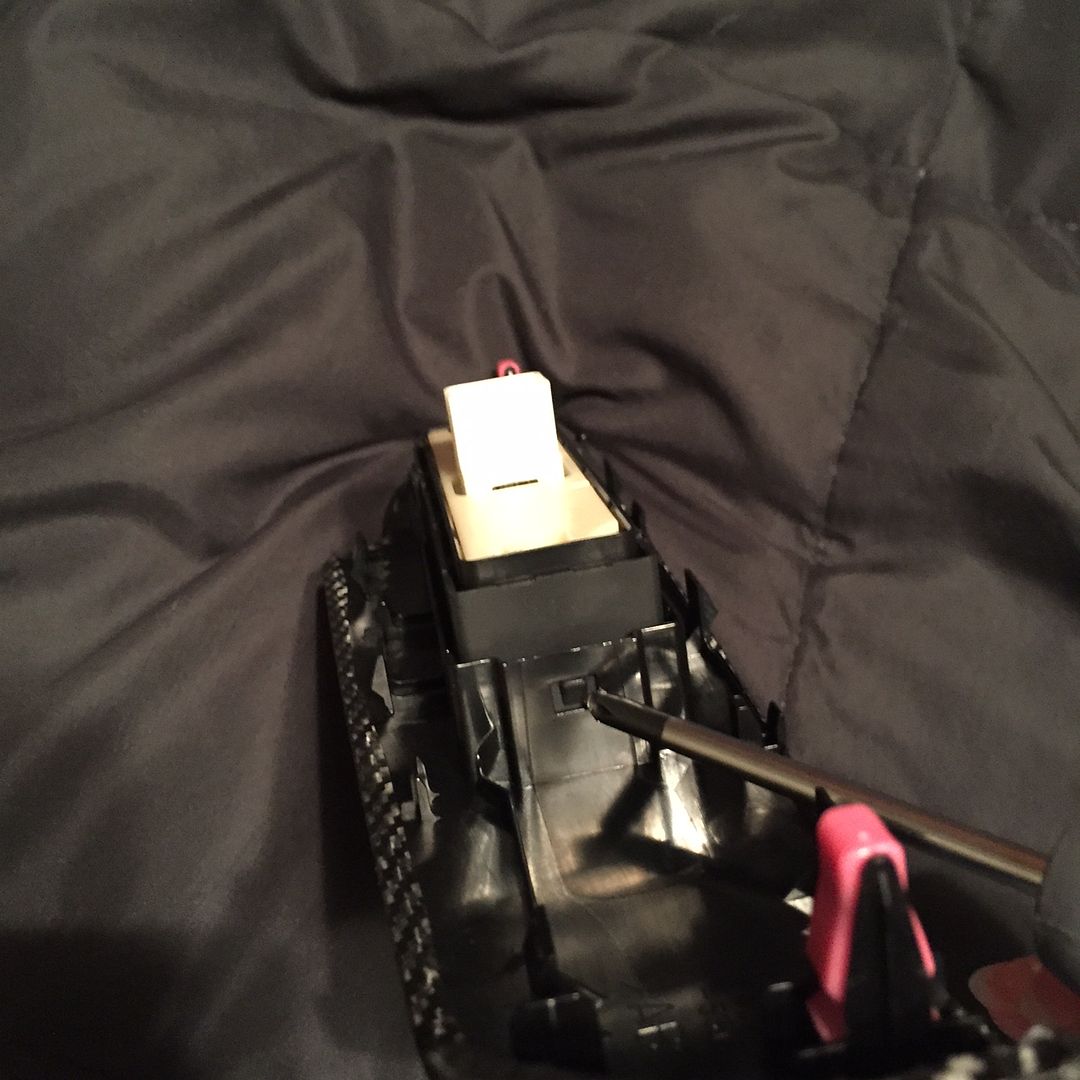
Then, the window button can fully detach.
Removal of front passenger side door trim / each rear door trim
Note the front passenger trim is pictured below, but the two rear door trim pieces/buttons are removed the exact same way.
Undo the wire harness by pressing on the clip, just like done for the first trim piece above
Then, use a screwdriver to press on the following clips as shown in the next two images
The window button now detaches
Simply pre-cut your vinyl slightly larger than the actual trim pieces, like shown in the next image. You will actually want to cut the vinyl a little closer to the actual trim size in comparison to what the photo suggests, so there is not a lot of excess vinyl to wrap underneath. Roughly 1cm extra sticking out over the trim edges is good to work with. You will then need to heat the vinyl in order to make it flexible/bend when wrapping around and under the edges of each trim piece. You will also need to pre-cut holes in the vinyl where the window buttons will be, leave a little extra (1cm) in these areas just like the edges, and the excess will wrap underneath just like the outer edges. When cutting the window button spaces into the vinyl, you can lay each window trim piece on top of the pre-cut vinyl (like shown in the image), and then draw/cut out the necessary amount for the window spaces.
The four window trim pieces each have a single wire harness plug/clip to release before they can exit from the vehicle. Once the four window trims have been unplugged and removed, you will want to release the clips holding the window buttons in place. Note the driver side trim piece/window button additionally has three screws to remove with a phillips screwdriver, before it can can be removed. These details are shown in the following images.
Driver window trim
Undo the wire harness/clip as shown in the following two images, press down on the plastic where the red arrow points and then pull, now the wire harness will safely release


This is what comes out, undo the three screws circled in the following image

Then, release the four clips where the arrows are pointing, no tool is needed, hands work fine.


Then, the window button can fully detach.

Removal of front passenger side door trim / each rear door trim
Note the front passenger trim is pictured below, but the two rear door trim pieces/buttons are removed the exact same way.
Undo the wire harness by pressing on the clip, just like done for the first trim piece above

Then, use a screwdriver to press on the following clips as shown in the next two images


The window button now detaches

Simply pre-cut your vinyl slightly larger than the actual trim pieces, like shown in the next image. You will actually want to cut the vinyl a little closer to the actual trim size in comparison to what the photo suggests, so there is not a lot of excess vinyl to wrap underneath. Roughly 1cm extra sticking out over the trim edges is good to work with. You will then need to heat the vinyl in order to make it flexible/bend when wrapping around and under the edges of each trim piece. You will also need to pre-cut holes in the vinyl where the window buttons will be, leave a little extra (1cm) in these areas just like the edges, and the excess will wrap underneath just like the outer edges. When cutting the window button spaces into the vinyl, you can lay each window trim piece on top of the pre-cut vinyl (like shown in the image), and then draw/cut out the necessary amount for the window spaces.

Last edited by electrohou; 03-18-15 at 01:49 AM.
01-31-15, 06:31 PM
#52
The vinyl applies to the trim pieces just like as a normal sticker would (simply peel and stick), though you need to heat the material to make it flexible in order to wrap around the trim edges. Little to no actual stretching is required of the vinyl when applied to the basic five trim pieces.
Wrapping the center console however does require heat stretching of the vinyl (for the lower part that dips inward near the center storage), if you decide to go that far and wrap it.
A hair dryer works perfectly fine to heat/bend/stretch the vinyl.
This video explains well the process of heating and stretching the vinyl. Note that the trim pieces are flat and much easier to wrap than the bowl in the video.
Last edited by electrohou; 11-08-15 at 05:00 PM.
02-01-15, 08:07 AM
#53
Additionally, if anyone would like to see photos I took while taking apart the center console let me know and I'll post some pictures.
The job itself was not extremely hard. However, patience is key!
The job itself was not extremely hard. However, patience is key!
02-02-15, 04:48 PM
#54
We don't have any pics for the center removal on here yet, so if you have some to post they would be great!
Also wrapping my AC vents in CF will post pics soon.
02-02-15, 08:08 PM
#55
Here are some pictures I took disassembling the center console. Like I mentioned it's not extremely hard but requires lots of patience.
I would suggest picking up an auto trim removal kit. I picked up a set made of nylon fiberglass composite. Do not use a flat head screwdriver or you will scratch the pieces.
Step 2
Remove 3 screws. I believe there is 2 clips along the side panel to remove. I started from the front working my way towards rear of console.
Step 3 & 4
Start from the rear to remove the cup holder piece. When you get to the front release front clip and unplug wiring.
Step 5
Center piece is actually 2 pieces. For this step you will be removing the rear piece. Start from the back and work your way towards the front. Don't be friend to put some pressure and the clips should release and then unplug wiring.
Steps 6 & 7
You will need to remove a screw that holds the center part of the console in place. It's located underneath the shifter. ** BE CAREFUL ** when removing and don't drop down inside the console I almost dropped it!
Next, start from just behind shifter and slowly begin detaching clips working your way to front. I suggest putting your shifter in neutral to remove the piece.
NOT PICTURED
Step 8
To remove the button on the console you will need to pry it off. Be gentle and it should come off.
Step 9 (Optional)
If you want to wrap the piece on the front center console you can pry open the 4 clips and I believe a few screws and it should come off. Again, this part of the project is optional.
If you need any help feel free to leave a comment here or direct message me.
Ricky
03-07-15, 02:29 PM
#56
Here is a video showing the removal of the center console. Note that the only part not shown is the removal of the screws that attach the leather surrounding area of the shift **** to the center. Some of the screws are shown near the end of the video with about 10-20 seconds remaining, there is just no footage of them actually unscrewing.


 03-18-15, 09:55 PM
#59
Intermediate
The real CF looks great!! Did you see the glove box cover they have too? And does the door trim set only include the two front pieces?
http://www.ebay.com/itm/231502366818
http://www.ebay.com/itm/231502366818
03-20-15, 06:03 PM
#60
The real CF looks great!! Did you see the glove box cover they have too? And does the door trim set only include the two front pieces?
http://www.ebay.com/itm/231502366818
http://www.ebay.com/itm/231502366818