When you click on links to various merchants on this site and make a purchase, this can result in this site earning a commission. Affiliate programs and affiliations include, but are not limited to, the eBay Partner Network.
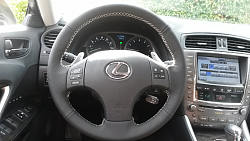
Done! Not perfect but not bad considering I'm a novice. I would recommend taking out the controls and airbag. It might fit a lot better had I done that. It's a little baggy at the back of the spokes. It may be it just needs more double sided tape. I might take it apart and redo it if it bothers me too much.
It looks like the sale ended and they are back up to the $58 price tag. I am wondering if this is the same one. The picture is exactly the same but I wonder about the quality
It looks like the sale ended and they are back up to the $58 price tag. I am wondering if this is the same one. The picture is exactly the same but I wonder about the quality
saw that link last night too. my best guess is that it should be the same. everyone gets the parts from the same supplier it seems on alibaba, just different prices. for example, the replica led headlights fluctuate in price from $300 to almost $700
saw that link last night too. my best guess is that it should be the same. everyone gets the parts from the same supplier it seems on alibaba, just different prices. for example, the replica led headlights fluctuate in price from $300 to almost $700
I think I may just order it. It has the refund or keep items if they are not what you expected so I dont see any risk. Plus I like the clarity of ordering the stitching color on this one as opposed to the link from the OP
I figured out I had the darn thing on backwards. The front of the cover is the one with the "tails" on the spokes. I took it off when I got home from work today and put it on the right way and it now is much more snug and cleaner looking. I didnt remove the airbag and just used the spatula. It was also much faster the second time around. Took all of 45 minutes from undoing the stitches to finishing.
The steering wheel feels MUCH better now that it is thicker. This is how thick it shoulde have come from the factory. The leather material of the cover is very sturdy (Imagine after tucking and untucking using that spatula, there is not one scratch on the leather, Event he loops for the stitching heldup after stitching it over and over. Not bad for 30 bucks. I contemplated buying another one while its cheap just in case this one gets jacked up.
Another tip, when tying off the strings, on your last loop per section, stick the needle through the leather and start tying the knot to hold the string in place, I used a drop of super glue on the ends after tying a few knots. That oughta hold it together.
Anyway, good luck guys and enjoy. I'm loving it!
Good post and congrats Joel! Now that you're an expert at this, how about a DIY video brah :P? LOL!
Good post and congrats Joel! Now that you're an expert at this, how about a DIY video brah :P? LOL!
I was going to take a video or pics but I didnt have time last night. I was fighting daylight. I am by no means an expert LOL. Its really simple if you go slowly. You shouldn't have any probs.
BTW, The video I posted on the last page was how I figured out the stitching.
Stitched mine on yesterday.. turned out ok. Had trouble getting the spoke regions flush and tight so it's a little baggy on the front and back side.
Would be difficult to do if you didn't remove the SRS airbag and the controls. I tried at first w/ everything in tact and was getting no where so removing everything is the way to go. Had issues getting the cover to line up right on the spoke regions and probably didn't use enough double sided tape.
Overall, i think it was worth the $30. Did this mainly to make the wheel thicker. Looks and feels pretty good for that price. I might try to redo it if the spoke region baggyness bothers me but so far it doesn't since the majority of the time im holding the lower left area which is nice and tight. Definitely coulda turned out better if I had spent more time working on the cover alignment but whatever. We'll see how the cover holds up over time.
Mine is the same. On the front I have it nice and tight. The back was tight, but as the day goes on, the tape lets loose and the back sides turn into air pillows. When I get in, I always squeeze it back down.
I dunno about crazy glue, maybe something that wouldn't mess up the OEM leather. I might try to take a hair dryer to it and see if it helps but I doubt it.
Either way hard to complain about a $30 cover. Meets my needs for a thicker wheel.
Good luck and post up tips if you find a good process to tighten the spoke areas. I may redo this if you guys figure out some best practices.
 08-10-14, 05:53 PM


 ! LOL!
 !!!
!!!