DIY - Upgrade Factory Alarm
 09-28-10, 09:51 PM
#1
Lead Lap
Thread Starter
This is my first DIY, so I hope you can bare with me, and let me know if I should make any changes. Sorry in advance for the iphone pics also, my cybershot is on the fritz.
Disclaimer - I am not liable for any damage you do to your car, or yourself, while following this DIY. This is a moderately difficult DIY so please be honest with yourself in your assessment of whether you can complete the job or not.
In this DIY I will show you how to install a tilt sensor, and glass break sensor, into your factory alarm system. This DIY was done on an 08 IS350 with Nav, so I cannot attest to whether the connections, wire locations, or colors will be the same for other years, always check with a voltmeter if you are unsure. As for those without Nav, this is still doable and I will try to get you to the right place, but I have no photos for you...Sorry.
Here are the items you will need -
Flash Light
Wire Strippers
Voltmeter
VHB Double Sided Tape
18-16 Gauge wire (I recommend at least 2 colors)
2 Pin Rocker Switch
T-Taps
Butt Connectors
Electrical Tape
Zip Ties
12v Diode (Radio Shack)
30amp 5-Pin Relay (Can be found at most auto parts stores)
Timer Relay DEI 528T (Check ebay)
Glass Break Sensor DEI 506T (Check ebay)
Directed Tilt Sensor 507M (Check ebay)
Lets get started by looking at a diagram of all the connections we will be making. It looks complicated, but in reality you are only making 4 connections to the car itself, 3 of which are in the same area.
Here is how this system works - the ground for the two sensors are run through a timer relay as well as a standard relay. When you turn your car on the standard relay cuts the ground to the sensors, and timer relay, so they will be inactive while you drive. When you shut your car off the standard relay reconnects the ground, and this in turn activates the timer relay which will use its relay to cut the sensor ground for a set time period. This allows you to exit the vehicle, unload the trunk, etc. before the sensors are activated. This delay is most essential for the tilt sensor which calibrates itself to its inclination when activated.

Have I lost you yet? If not lets begin.
Start by removing the center console components and head unit, this DIY will show you how -
https://www.clublexus.com/forums/is-...en-moving.html
Next remove the lower passenger footwell panel, it is held in by clips along the front and tabs in the back. Just pull down on the front, then remove the footwell LED connector.
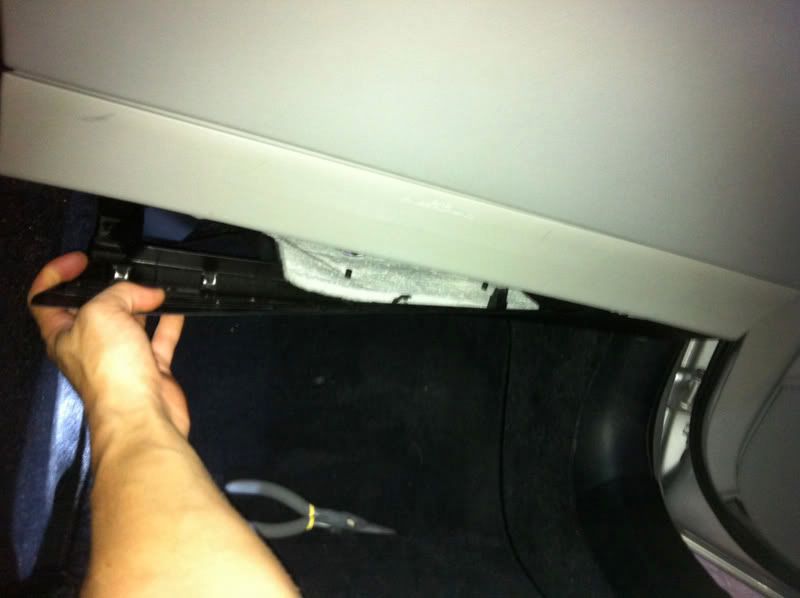
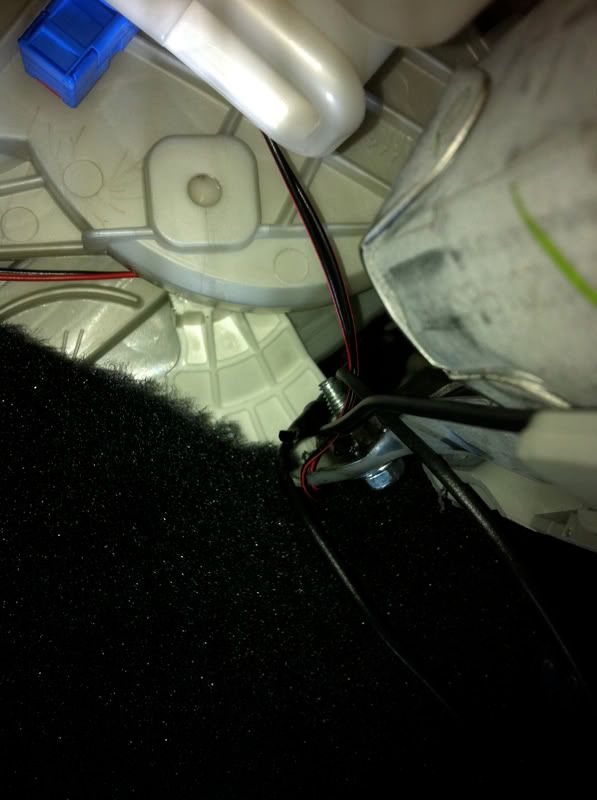
Now pull back the plastic trim rising above the sill plates and you should see a white clip holding the carpet to the inside panel.
Use your wire strippers to push in the tabs, and pull the carpeting down. You should see a junction block. Remove the wrapping from the bundle shown bellow. The black wire is what you will be taping into the trigger the alarm system.

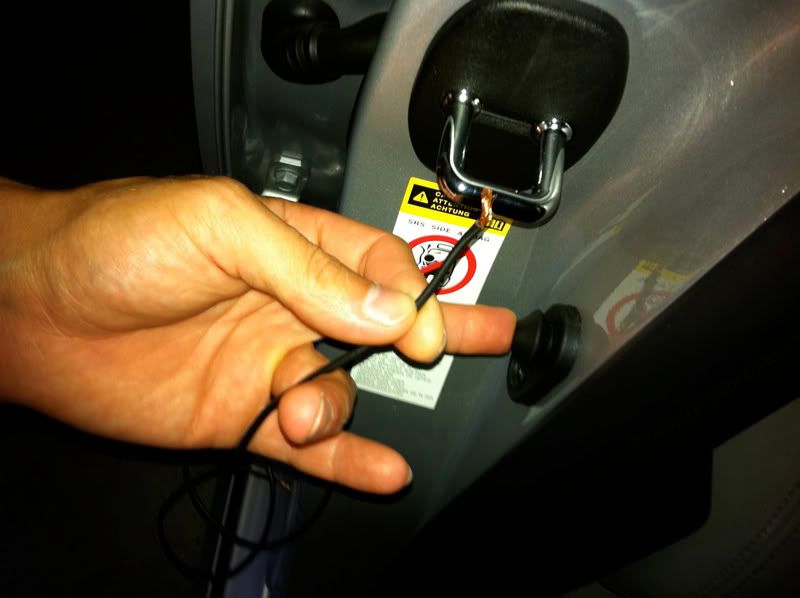
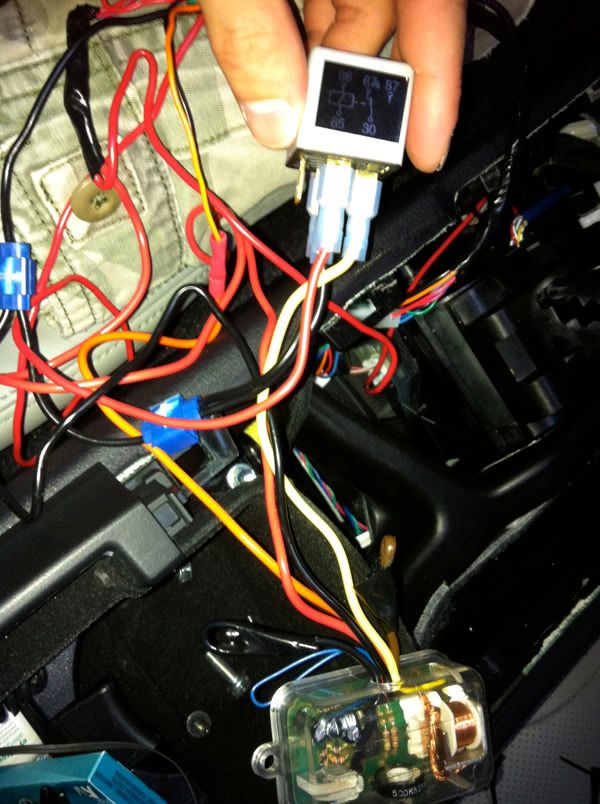
After installing your t-tap, you need to install the diode. This ensures that the electrical current will flow in the correct direction. There will be a stripe on the diode, make sure it is pointing away from the t-tap you just installed. (In this photo I am only testing the orientation, do not install like this!)
When installing the diode, encase it between two butt connectors, and crimp it in. Dont forget to label which side has the stripe as you will no longer be able to see the diode. Then crimp the wires to the outside of the connected butt connectors.
This is a good point to test whether you have made a proper connection. Give yourself enough slack on the wire you just hooked up to be able to run it under the dash, trough the head unit area, and to the floor of the drivers side footwell were you will be installing the switch (a good amount of extra slack never hurts).
Close all doors, except the passenger door, and make sure door illumination is set to on. Push in the door switch and hold, the lights should go off, now while still holding in the door switch touch the wire to stike plate and the lights should come on. If nothing happens, you need to check your tap, and diode orientation.
Now run this wire under the passenger side dash, through the head unit area (shine your flashlight in there to find openings, they are towards the front of cabin), and out to the drivers side footwell.
You will need to remove the lower dash panel on the drivers side, as you did on the passenger side. It is held in by two screws on the front, once those are removed pull down from the front. Don't worry about disconnecting the wires on the panel, just move it off to the side.
Next run another wire from the drivers footwell, into the head unit area, and up to the rear of the center armrest. Crimp a pin connectors onto each of the wires in the footwell.
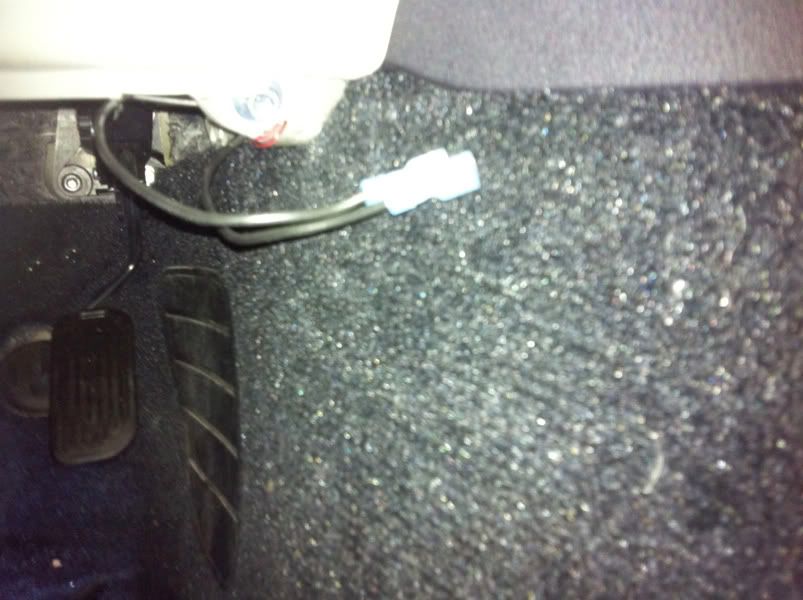
Using some VHB double sided tape, stick your rocker switch to the right side of the removed drivers footwell panel. When installed it will wedge nicely between the panel and the carpet, holding it securely in place.

Leave this panel off for now, there is one more wire to run through here.
At this time I recommend disconnecting the negative battery terminal as we will be taping V+ lines. If you have a non nav system, you may need to leave the battery hooked up so you can use a multimeter to verify the wires I specify are correct.
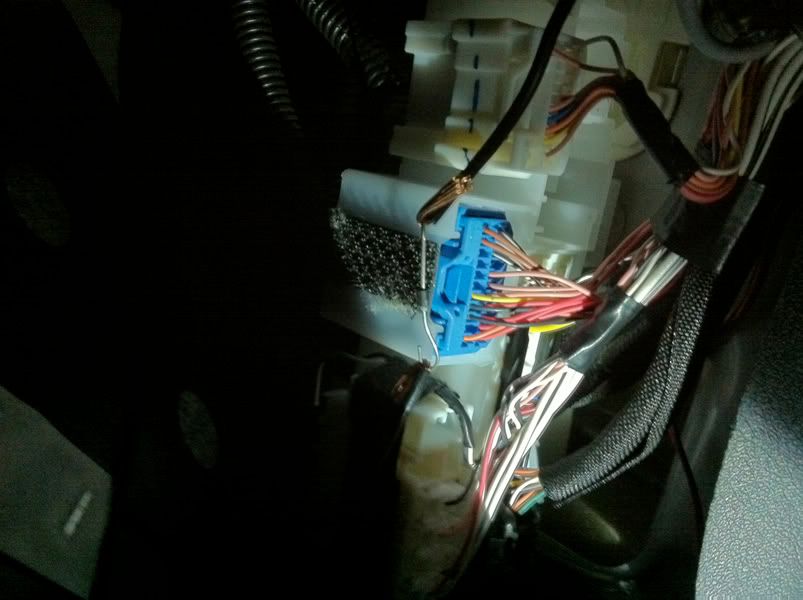
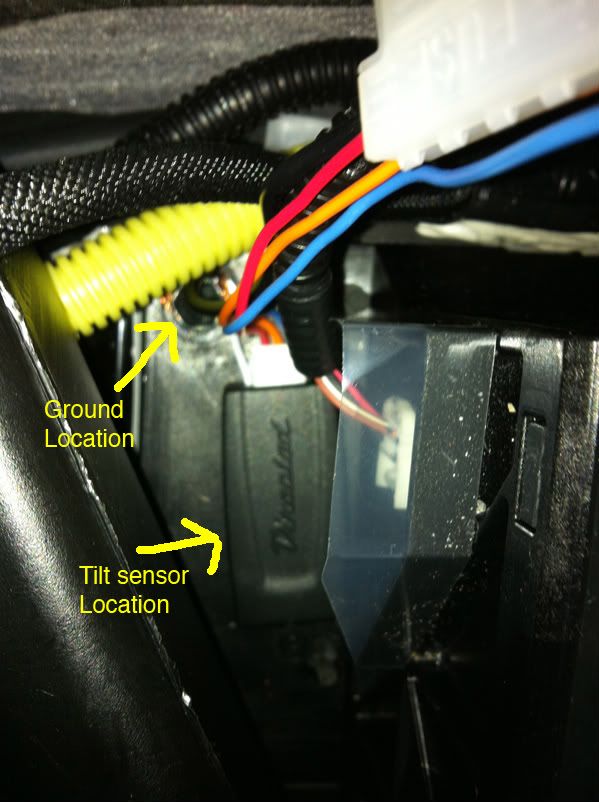
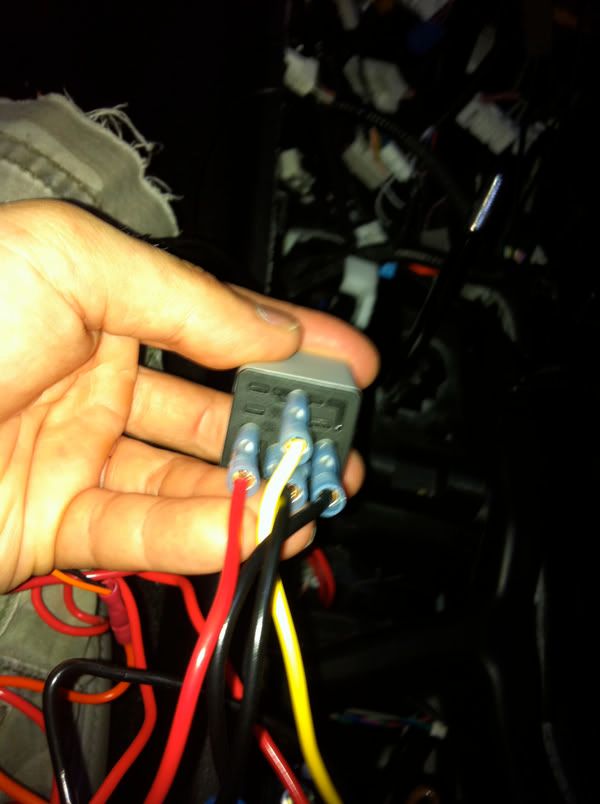
Now we need to tap into a battery source for the sensors, and either an ignition or acc source for the relay trigger. For those with nav you will want to find the J50 plug that looks like this. (This photo is from the nav hack thread by tim817, I hope it's ok that I use it, let me know otherwise)
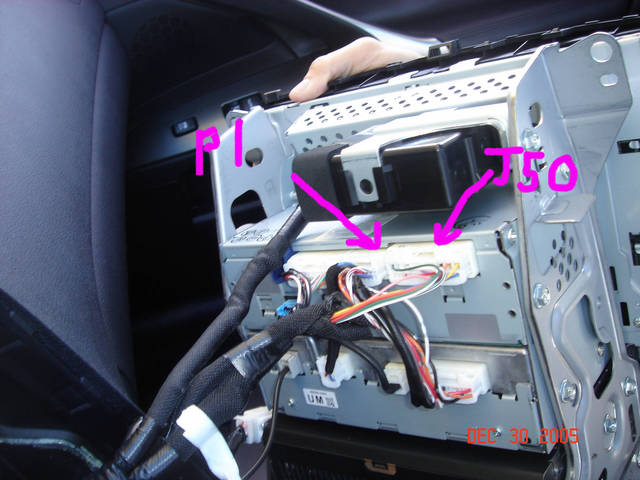
You will tap into the Yellow wire for Battery, and the Black Wire for IGN.
Make the wires long enough to reach the back of the center armrest. And make sure you know which is BATT and which is IGN!
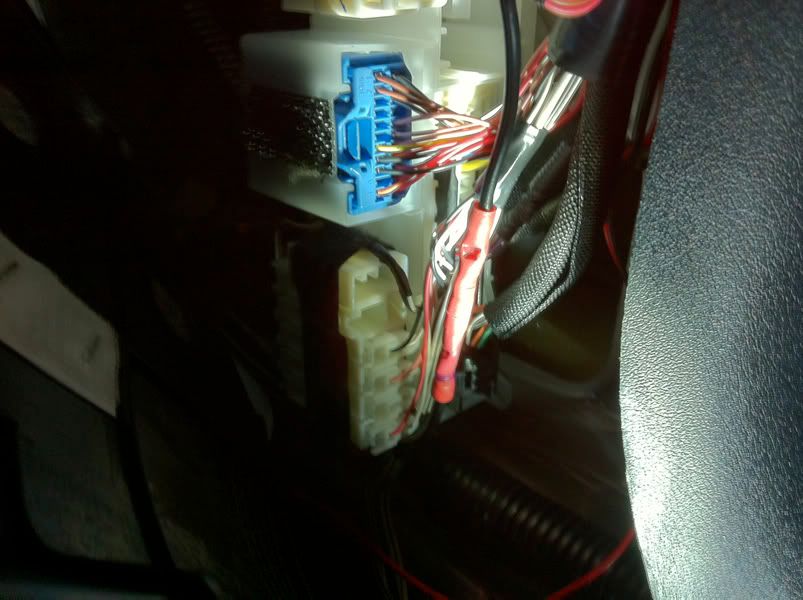
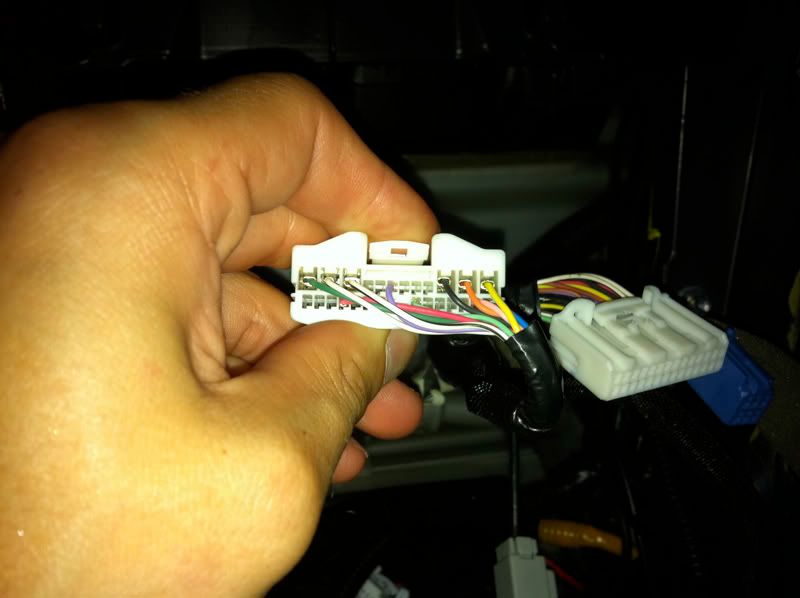
For those with non nav, you will need to look for a plug, that when looked at from the back, as the photo above, will start with a Green wire (BATT) in the top right corner and 10 slots later (Right to left) should have an Orange wire (ACC). These are your tap locations. I highly recommend you use a voltmeter to test these to make sure they are correct. If you do this, please take a pic of the plug so I can post for others, thanks!
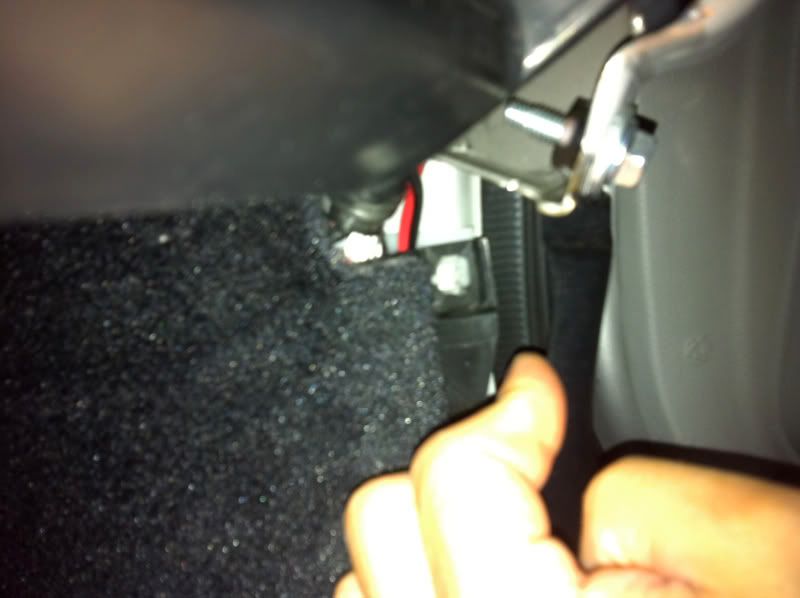
Now we need to make the last connection to the car, the ground. The best place I found was a bolt on the end of the shifter closest to you.
You only need to use one piece of wire for the ground, and you will use t-taps for the rest of the ground connections.
Install the tilt sensor as in the picture above, but don't stick it down yet. If you clip the loop on the tilt sensor you adjust its sensitivity from 5degrees to 1, but I assure you 5 is plenty sensitive, and you are just asking for false alarms at that sensitivity.
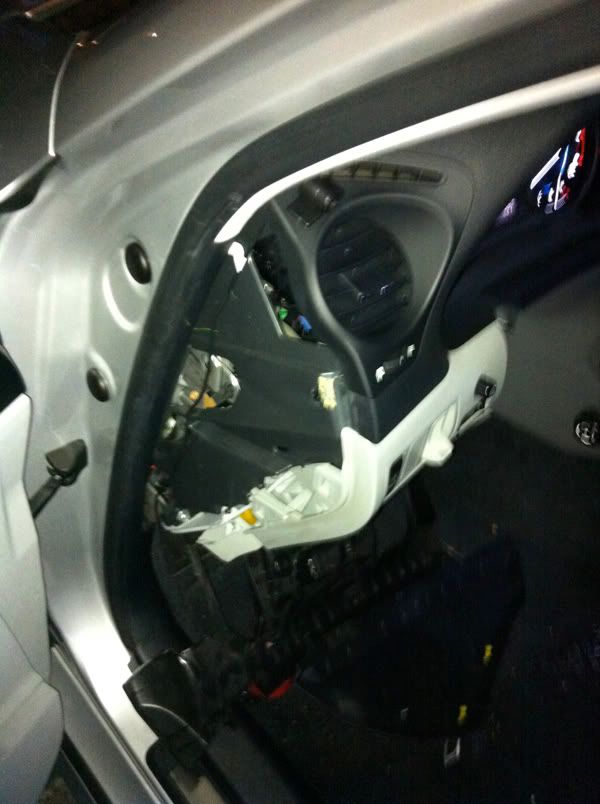
Now lets run the microphone for the glass break sensor. The microphone must be installed with a line of sight to the windows in the car to work effectively. I mounted mine on the drivers side air vent. To do this you need to remove the panel on the side of the drivers side dash. To do this just grab it from the front and pull towards the opened door. It should just pop out.
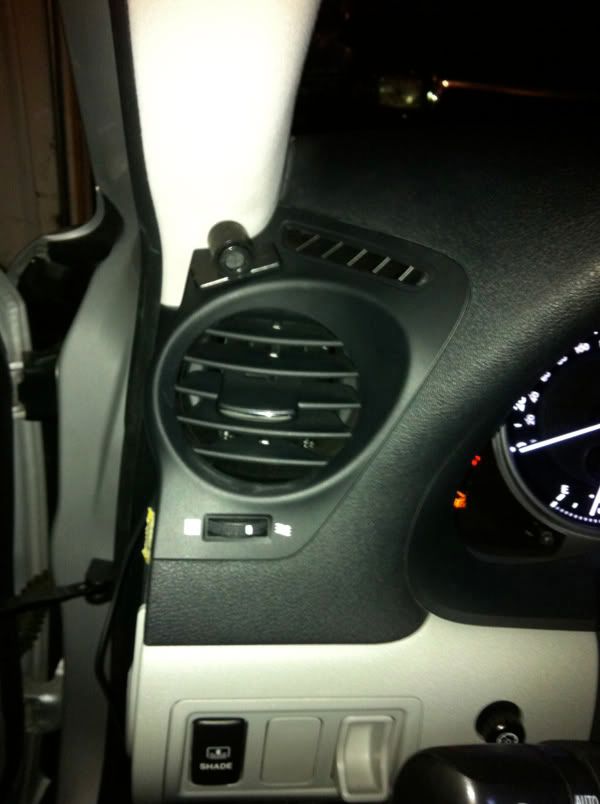
Slide the cable in-between the pillar and the dash and mount the microphone with double-sided tape. Then run the wire down, then across the underside of the dash into the head unit area ending around the shifter area.
Now its time to put everything together. Rather than taking another 50 paragraphs telling you each wire connection, use my diagram as a guide to hook everything up.
All the wire colors are exactly as they are on the sensors and timer relay, the only difference will be with what colors of wire you used to hook up to the car.
Here are two pictures of my connections as I was making them, and the diagram once again. Don't forget to hook up the switch!
Got it all hooked up?? Hopefully your answer is yes! If no shoot me a PM and I may be able to help. Otherwise lets move on to testing and setting sensitivities.
Before you reconnect you negative battery terminal, adjust you timer relay to the shortest time period. To do this use a small screw driver and turn the rotary dial counter clockwise until it stops.
Now reconnect your negative battery terminal. Wait about 30 seconds to be sure the timer relay has deactivated.
Now using a set of keys, shake them hard in front of the glass sensor microphone. You should see both the small red light on the sensor body, and well as your passenger side door light flash. This means its working. If it's not working the first place to check is the switch you installed try switching it to the other position.
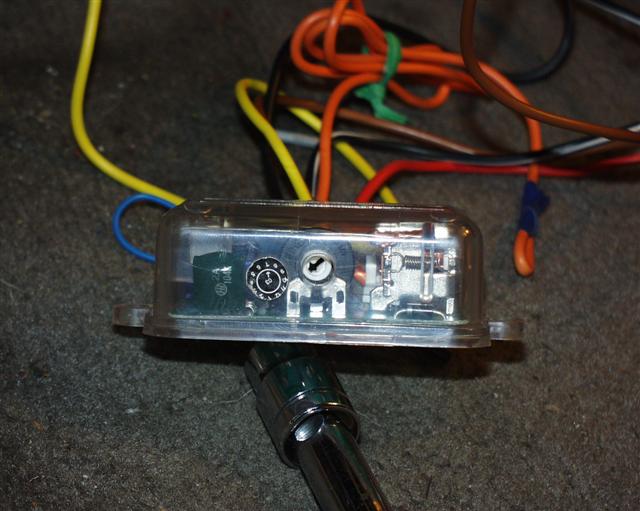
Now to set it properly you need to close all the doors (amplifies the key noises) and begin turning the small dial on the glass break sensor up or down as you shake your keys. I set mine so that it does not go off when gently moving the keys around while in the drivers seat, but it will go off if I shake the ***** out of them both in the front and back seats.
Once that is set it is time to check the relay and the timer relay operation. Set the dial on the timer relay all the way clockwise, what this means is that the sensors should be inactive for around 60 seconds after the car is shut off.
Start the car, you do not need to reinstall the nav/radio for this, leave it out just in case. You should hear your 5-pin relay click. With the car running shake the ****** out of your keys right in front of the microphone, neither the light on the sensor, nor the door light should flicker. While the car is still running pick up the tilt sensor if it's disabled, as it should be, your drivers side door light should not flicker. Hopefully everything is going to plan.
Set the tilt sensor in the location it's to be installed. Now shut the car off and immediately begin to shake your keys again (while trying to not rock the car!), your passenger door light should not begin to flicker for about 60 seconds as the timer relay is in control. Once the door light begins to flicker the sensors are active. Wait 10 seconds for the tilt sensor to calibrate, and then slowly pick up one side of it, your passenger side door light should turn on.
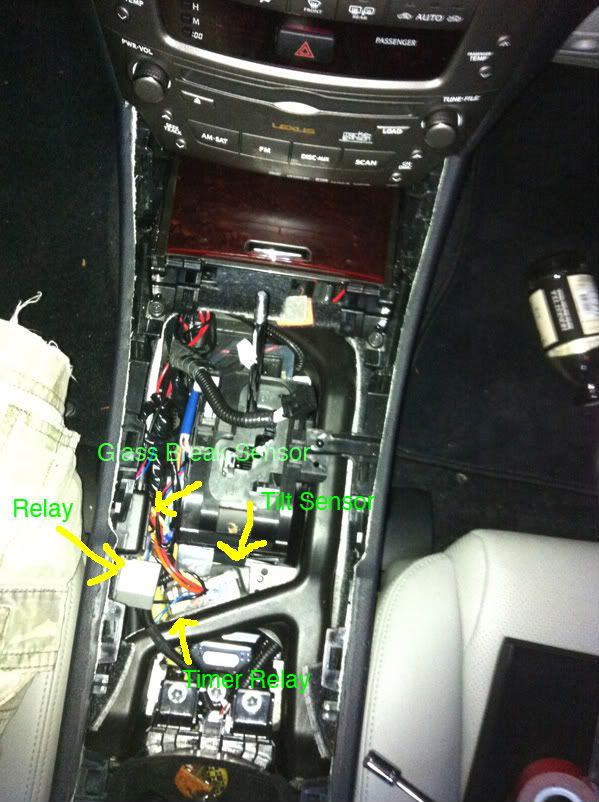
If up to this point everything has gone as I said it would then you have done it! It's all downhill from here. Mount the tilt sensor using double sided tape. Use electrical tape to clean up the rats nest of wires you have created (I know I did) and stuff the components into the center console area. I also mounted my glass break sensor brain to the inside wall with double sided tape. Here's what it looked like with everything stuffed in.
Reinstall the lower footwell panels, drivers side-dash panel, head unit, ashtray, and center console stuff and you should be good to go.
For the final tests, start the car, then turn it off, get out and arm. Go have a beer, you deserve it and this gives the timer relay time to do its thing. Now go back to the car and try jacking it up from any of the four corners. Your horn should start squackin before the tire lifts of the ground. Next, give your friend your key fob. Take a seat in the back and continue enjoying that beer while your friend locks you in there. Remember stay still. After about 90 seconds shake the ***** out of a set of keys, and bam the horn honks, and you are now 100% complete with this mod!!!!!!
If you have any questions feel free to PM me, and I will get back to you when I get a chance.
10/20/10: REVISION
If, when testing the sensors, you find the door pin is being triggered (light on passenger door is turning on) and the alarm is not going off you will need to tap a different wire for your trigger. This was the case on a second install I have done. In the passenger footwell, where you tapped the black wire, there is a white wire which is 2-slots over in the connector. This is for the door unlock detection, tapping this wire instead of the black wire (door pin) should solve the problem.
Disclaimer - I am not liable for any damage you do to your car, or yourself, while following this DIY. This is a moderately difficult DIY so please be honest with yourself in your assessment of whether you can complete the job or not.
In this DIY I will show you how to install a tilt sensor, and glass break sensor, into your factory alarm system. This DIY was done on an 08 IS350 with Nav, so I cannot attest to whether the connections, wire locations, or colors will be the same for other years, always check with a voltmeter if you are unsure. As for those without Nav, this is still doable and I will try to get you to the right place, but I have no photos for you...Sorry.
Here are the items you will need -
Flash Light
Wire Strippers
Voltmeter
VHB Double Sided Tape
18-16 Gauge wire (I recommend at least 2 colors)
2 Pin Rocker Switch
T-Taps
Butt Connectors
Electrical Tape
Zip Ties
12v Diode (Radio Shack)
30amp 5-Pin Relay (Can be found at most auto parts stores)
Timer Relay DEI 528T (Check ebay)
Glass Break Sensor DEI 506T (Check ebay)
Directed Tilt Sensor 507M (Check ebay)
Lets get started by looking at a diagram of all the connections we will be making. It looks complicated, but in reality you are only making 4 connections to the car itself, 3 of which are in the same area.
Here is how this system works - the ground for the two sensors are run through a timer relay as well as a standard relay. When you turn your car on the standard relay cuts the ground to the sensors, and timer relay, so they will be inactive while you drive. When you shut your car off the standard relay reconnects the ground, and this in turn activates the timer relay which will use its relay to cut the sensor ground for a set time period. This allows you to exit the vehicle, unload the trunk, etc. before the sensors are activated. This delay is most essential for the tilt sensor which calibrates itself to its inclination when activated.
Have I lost you yet? If not lets begin.
Start by removing the center console components and head unit, this DIY will show you how -
https://www.clublexus.com/forums/is-...en-moving.html
Next remove the lower passenger footwell panel, it is held in by clips along the front and tabs in the back. Just pull down on the front, then remove the footwell LED connector.
Now pull back the plastic trim rising above the sill plates and you should see a white clip holding the carpet to the inside panel.
Use your wire strippers to push in the tabs, and pull the carpeting down. You should see a junction block. Remove the wrapping from the bundle shown bellow. The black wire is what you will be taping into the trigger the alarm system.
After installing your t-tap, you need to install the diode. This ensures that the electrical current will flow in the correct direction. There will be a stripe on the diode, make sure it is pointing away from the t-tap you just installed. (In this photo I am only testing the orientation, do not install like this!)
When installing the diode, encase it between two butt connectors, and crimp it in. Dont forget to label which side has the stripe as you will no longer be able to see the diode. Then crimp the wires to the outside of the connected butt connectors.
This is a good point to test whether you have made a proper connection. Give yourself enough slack on the wire you just hooked up to be able to run it under the dash, trough the head unit area, and to the floor of the drivers side footwell were you will be installing the switch (a good amount of extra slack never hurts).
Close all doors, except the passenger door, and make sure door illumination is set to on. Push in the door switch and hold, the lights should go off, now while still holding in the door switch touch the wire to stike plate and the lights should come on. If nothing happens, you need to check your tap, and diode orientation.
Now run this wire under the passenger side dash, through the head unit area (shine your flashlight in there to find openings, they are towards the front of cabin), and out to the drivers side footwell.
You will need to remove the lower dash panel on the drivers side, as you did on the passenger side. It is held in by two screws on the front, once those are removed pull down from the front. Don't worry about disconnecting the wires on the panel, just move it off to the side.
Next run another wire from the drivers footwell, into the head unit area, and up to the rear of the center armrest. Crimp a pin connectors onto each of the wires in the footwell.
Using some VHB double sided tape, stick your rocker switch to the right side of the removed drivers footwell panel. When installed it will wedge nicely between the panel and the carpet, holding it securely in place.
Leave this panel off for now, there is one more wire to run through here.
At this time I recommend disconnecting the negative battery terminal as we will be taping V+ lines. If you have a non nav system, you may need to leave the battery hooked up so you can use a multimeter to verify the wires I specify are correct.
Now we need to tap into a battery source for the sensors, and either an ignition or acc source for the relay trigger. For those with nav you will want to find the J50 plug that looks like this. (This photo is from the nav hack thread by tim817, I hope it's ok that I use it, let me know otherwise)
You will tap into the Yellow wire for Battery, and the Black Wire for IGN.
Make the wires long enough to reach the back of the center armrest. And make sure you know which is BATT and which is IGN!
For those with non nav, you will need to look for a plug, that when looked at from the back, as the photo above, will start with a Green wire (BATT) in the top right corner and 10 slots later (Right to left) should have an Orange wire (ACC). These are your tap locations. I highly recommend you use a voltmeter to test these to make sure they are correct. If you do this, please take a pic of the plug so I can post for others, thanks!
Now we need to make the last connection to the car, the ground. The best place I found was a bolt on the end of the shifter closest to you.
You only need to use one piece of wire for the ground, and you will use t-taps for the rest of the ground connections.
Install the tilt sensor as in the picture above, but don't stick it down yet. If you clip the loop on the tilt sensor you adjust its sensitivity from 5degrees to 1, but I assure you 5 is plenty sensitive, and you are just asking for false alarms at that sensitivity.
Now lets run the microphone for the glass break sensor. The microphone must be installed with a line of sight to the windows in the car to work effectively. I mounted mine on the drivers side air vent. To do this you need to remove the panel on the side of the drivers side dash. To do this just grab it from the front and pull towards the opened door. It should just pop out.
Slide the cable in-between the pillar and the dash and mount the microphone with double-sided tape. Then run the wire down, then across the underside of the dash into the head unit area ending around the shifter area.
Now its time to put everything together. Rather than taking another 50 paragraphs telling you each wire connection, use my diagram as a guide to hook everything up.
All the wire colors are exactly as they are on the sensors and timer relay, the only difference will be with what colors of wire you used to hook up to the car.
Here are two pictures of my connections as I was making them, and the diagram once again. Don't forget to hook up the switch!
Got it all hooked up?? Hopefully your answer is yes! If no shoot me a PM and I may be able to help. Otherwise lets move on to testing and setting sensitivities.
Before you reconnect you negative battery terminal, adjust you timer relay to the shortest time period. To do this use a small screw driver and turn the rotary dial counter clockwise until it stops.
Now reconnect your negative battery terminal. Wait about 30 seconds to be sure the timer relay has deactivated.
Now using a set of keys, shake them hard in front of the glass sensor microphone. You should see both the small red light on the sensor body, and well as your passenger side door light flash. This means its working. If it's not working the first place to check is the switch you installed
try switching it to the other position.Now to set it properly you need to close all the doors (amplifies the key noises) and begin turning the small dial on the glass break sensor up or down as you shake your keys. I set mine so that it does not go off when gently moving the keys around while in the drivers seat, but it will go off if I shake the ***** out of them both in the front and back seats.
Once that is set it is time to check the relay and the timer relay operation. Set the dial on the timer relay all the way clockwise, what this means is that the sensors should be inactive for around 60 seconds after the car is shut off.
Start the car, you do not need to reinstall the nav/radio for this, leave it out just in case. You should hear your 5-pin relay click. With the car running shake the ****** out of your keys right in front of the microphone, neither the light on the sensor, nor the door light should flicker. While the car is still running pick up the tilt sensor if it's disabled, as it should be, your drivers side door light should not flicker. Hopefully everything is going to plan.
Set the tilt sensor in the location it's to be installed. Now shut the car off and immediately begin to shake your keys again (while trying to not rock the car!), your passenger door light should not begin to flicker for about 60 seconds as the timer relay is in control. Once the door light begins to flicker the sensors are active. Wait 10 seconds for the tilt sensor to calibrate, and then slowly pick up one side of it, your passenger side door light should turn on.
If up to this point everything has gone as I said it would then you have done it! It's all downhill from here. Mount the tilt sensor using double sided tape. Use electrical tape to clean up the rats nest of wires you have created (I know I did) and stuff the components into the center console area. I also mounted my glass break sensor brain to the inside wall with double sided tape. Here's what it looked like with everything stuffed in.
Reinstall the lower footwell panels, drivers side-dash panel, head unit, ashtray, and center console stuff and you should be good to go.
For the final tests, start the car, then turn it off, get out and arm. Go have a beer, you deserve it and this gives the timer relay time to do its thing. Now go back to the car and try jacking it up from any of the four corners. Your horn should start squackin before the tire lifts of the ground. Next, give your friend your key fob. Take a seat in the back and continue enjoying that beer while your friend locks you in there. Remember stay still. After about 90 seconds shake the ***** out of a set of keys, and bam the horn honks, and you are now 100% complete with this mod!!!!!!
If you have any questions feel free to PM me, and I will get back to you when I get a chance.
10/20/10: REVISION
If, when testing the sensors, you find the door pin is being triggered (light on passenger door is turning on) and the alarm is not going off you will need to tap a different wire for your trigger. This was the case on a second install I have done. In the passenger footwell, where you tapped the black wire, there is a white wire which is 2-slots over in the connector. This is for the door unlock detection, tapping this wire instead of the black wire (door pin) should solve the problem.
Last edited by rcJten; 10-21-10 at 09:30 AM.

 09-28-10, 10:08 PM
#3
Thanks for the great write up on the DIY. This is definitely not for beginners. I would save this for intermediate/advance level stuff.
How long did it take you to do this? I was planning to do this, but I now know that this seems like it will take a whole day.
How long did it take you to do this? I was planning to do this, but I now know that this seems like it will take a whole day.
 09-28-10, 10:21 PM
#5
Lexus Test Driver
iTrader: (3)
Join Date: Sep 2009
Location: SF, CA
Posts: 931
Likes: 0
Received 0 Likes
on
0 Posts
Wow, Thanks for the very well detailed DIY. I will save these directions just in case something happens to this thread!
I'm intimidated by this DIY right now, but will definitely consider doing this in the future.
I'm intimidated by this DIY right now, but will definitely consider doing this in the future.
 09-29-10, 10:10 AM
#7
Lead Lap
Thread Starter
If I had to do it again, as long as I had all the supplies I needed from the start I could probably complete this in 3-4 hours.


