custom LED foglight insert - prototype 1
 07-18-10, 07:05 PM
#1
Pole Position
Thread Starter
iTrader: (1)

Join Date: Mar 2006
Location: ca
Posts: 333
Likes: 0
Received 0 Likes
on
0 Posts
DISCLAIMER: Try this mod at your own risk!! I also apologize for the picture flow the post. This is my first time posting many pictures and there were some hicups.
**************************************************
UPDATE: 11/18/2010
I finally finished my prototype2 and have been using it for a month (or 2) but did not have the time to post pictures. (Sorry, I work at a Silicon Valley start-up company and time is always short and this is just a hobby and not on top of my priority list.)
Linky1 - wrapped in 3M carbon fiber look alike vinyl.
Linky2 - a quick summary on how to wire them up
Linky3 - a friend of mine asked me to re-finish my prototype1 insert. I did but took too long and he sold his car. I might put this up on ebay to see if there is any taker when I have time.
I turn on my lowbeam (GARAX6000K) when I drive nowadays. I think someone put a yellow luminics highbeam and I may do the same thing.
**************************************************
end of update 11/18/2010
**************************************************
**************************************************
This post is an extension to my previous thread plus more:
https://www.clublexus.com/forums/is-...t-housing.html
Many people know about the junack foglight insert and I like it too. However, the price is too expensive and it is not available in US yet so I wanted to make one on my own (yeah, about 1 year ago). At the time, I had no good way to remove the black foglight insert without removing the front bumper first until recently when I installed DDM 5000K HID foglight by following this thread:
https://www.clublexus.com/forums/is-...-bulb-diy.html
To remove the driver side insert is easy. Just follow the take-out-fog-light thread above and you can reach in to "unlock" the insert. There are four locking places on the insert (highlight in yellow and red). See picture below.
Attachment 180171 - linky not working, pls see 2nd post
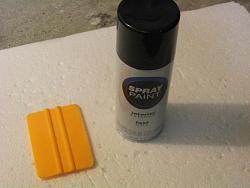
To remove the passenger side insert, I used simple tools that I could find at home. See pics below. I started out by unlocking highlight yellow #1 with the squeegee which will not damage paint. Simple jam the squeegee into yellow #1 and it will unlock. Then, with the paint opener (or whatever you can find) to grab hold of the black insert at yellow #1 to make sure it does not pop back in place. Use the squeegee (or credit card) to jam at yellow #2. It take a bit effort but the it will come out.
Attachment 180173 - linky not working, pls see 2nd post
Wiring - bringing wires to the fusebox. With the oem insert removed and engine cover taken off. I shine a high output flashlight at where the insert is so I can see from the engine bay where the light is coming out. I then use a cloth hanger to bring the wire to somewhere near the insert opening and use another hook (cloth hanger too) to pull the wire out. The rest is easy.
Now I am ready to custom make the LED insert. I used 5mm leds, acrylic sheets and black spray paint. The total cost is about $30 (this is after I already found what I need). The hardest part was to find the brightest LED with the lowest power consumption and I wasted some money on this search. I hooked up the LEDs to the "IGNITION ON" fuse (10A) so the led will turn on whenever the car is running or whenever the engine-on switch is pressed twice without foot on the gas pedal.
This is only prototype 1. I underestimated the thickness of the custom insert after putting all the wires and resistor in the back so it is definitly thicker than what I thought. I was going to put another cover over the LEDs but that will be even thicker. Now, my plan is to use SMD leds next time for prototype #2. However, the brightness level is only half of prototype #1. I will compare it once #2 is done. After reading all the junack related posts, I believe the junack insert stays on top of the existing black insert. Mine was to replace the original insert completely so I can alway go back to stock look in the future. There is also a plan to use purple LED but I was afraid to get into trouble with the law, especially in the bay area (California). The purple ones can only shine at night time since its output brightness can not be seen much during day time.

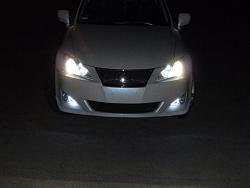
Night pictures (OEM lowbeam on for comparison)
**************************************************
UPDATE: 11/18/2010
I finally finished my prototype2 and have been using it for a month (or 2) but did not have the time to post pictures. (Sorry, I work at a Silicon Valley start-up company and time is always short and this is just a hobby and not on top of my priority list.)
Linky1 - wrapped in 3M carbon fiber look alike vinyl.
Linky2 - a quick summary on how to wire them up
Linky3 - a friend of mine asked me to re-finish my prototype1 insert. I did but took too long and he sold his car. I might put this up on ebay to see if there is any taker when I have time.
I turn on my lowbeam (GARAX6000K) when I drive nowadays. I think someone put a yellow luminics highbeam and I may do the same thing.
**************************************************
end of update 11/18/2010
**************************************************
**************************************************
This post is an extension to my previous thread plus more:
https://www.clublexus.com/forums/is-...t-housing.html
Many people know about the junack foglight insert and I like it too. However, the price is too expensive and it is not available in US yet so I wanted to make one on my own (yeah, about 1 year ago). At the time, I had no good way to remove the black foglight insert without removing the front bumper first until recently when I installed DDM 5000K HID foglight by following this thread:
https://www.clublexus.com/forums/is-...-bulb-diy.html
To remove the driver side insert is easy. Just follow the take-out-fog-light thread above and you can reach in to "unlock" the insert. There are four locking places on the insert (highlight in yellow and red). See picture below.
Attachment 180171 - linky not working, pls see 2nd post
To remove the passenger side insert, I used simple tools that I could find at home. See pics below. I started out by unlocking highlight yellow #1 with the squeegee which will not damage paint. Simple jam the squeegee into yellow #1 and it will unlock. Then, with the paint opener (or whatever you can find) to grab hold of the black insert at yellow #1 to make sure it does not pop back in place. Use the squeegee (or credit card) to jam at yellow #2. It take a bit effort but the it will come out.
Attachment 180173 - linky not working, pls see 2nd post
Wiring - bringing wires to the fusebox. With the oem insert removed and engine cover taken off. I shine a high output flashlight at where the insert is so I can see from the engine bay where the light is coming out. I then use a cloth hanger to bring the wire to somewhere near the insert opening and use another hook (cloth hanger too) to pull the wire out. The rest is easy.
Now I am ready to custom make the LED insert. I used 5mm leds, acrylic sheets and black spray paint. The total cost is about $30 (this is after I already found what I need). The hardest part was to find the brightest LED with the lowest power consumption and I wasted some money on this search. I hooked up the LEDs to the "IGNITION ON" fuse (10A) so the led will turn on whenever the car is running or whenever the engine-on switch is pressed twice without foot on the gas pedal.
This is only prototype 1. I underestimated the thickness of the custom insert after putting all the wires and resistor in the back so it is definitly thicker than what I thought. I was going to put another cover over the LEDs but that will be even thicker. Now, my plan is to use SMD leds next time for prototype #2. However, the brightness level is only half of prototype #1. I will compare it once #2 is done. After reading all the junack related posts, I believe the junack insert stays on top of the existing black insert. Mine was to replace the original insert completely so I can alway go back to stock look in the future. There is also a plan to use purple LED but I was afraid to get into trouble with the law, especially in the bay area (California). The purple ones can only shine at night time since its output brightness can not be seen much during day time.


Night pictures (OEM lowbeam on for comparison)


Last edited by dong888; 11-18-10 at 03:10 PM.


Trending Topics


 07-18-10, 08:13 PM
#11
Lead Lap
iTrader: (26)

Join Date: Dec 2007
Location: Bay Area, CA
Posts: 702
Likes: 0
Received 0 Likes
on
0 Posts
hey
where you located?
where you located?
The same day time but under shade.
Attachment 180207
Attachment 180208
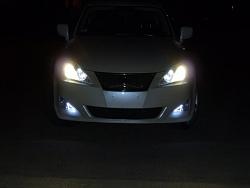
And these are the last pictures.
Attachment 180207
Attachment 180208
And these are the last pictures.
07-18-10, 08:16 PM
#12
A true test for those LEDs will be heat. For some strange reason, 5mm LEDs like those hate to be heated. In my experience, even running them at a lower voltage didn't mean much under the CA sun. Then again, mine were in the 3rd brake light housing so it got super hot inside...
I'd upgrade to Piranha's or any quality 5-chip LED for durability. Great job so far though
I'd upgrade to Piranha's or any quality 5-chip LED for durability. Great job so far though

 07-18-10, 08:41 PM
#15
Pole Position
Thread Starter
iTrader: (1)
Join Date: Mar 2006
Location: ca
Posts: 333
Likes: 0
Received 0 Likes
on
0 Posts
That was the plan before (to cover leds). But I do not intend to keep this one for long so the tips are currently exposed. Prototype #2 (to reduce the thickness of custom insert) using the SMD led is underway.
Last edited by dong888; 07-18-10 at 08:57 PM.