
DIY: 12V Power Supply for HID Ballasts

This is a DIY to turn your old PC ATX power supply into a 12v source of power. This idea is not my own, it was taken from a much more complicated one on HIDPlanet (which focused on the older AT power supplies). I figured I should put it out here as well, modified to make it much simpler to understand than anything I have found there.
Disclaimer: You're working with electric parts, and especially if you open the power supply to tidy up the wires leaving only the two we need, it is advisable to be prudent with handling.
Difficulty: Very easy.
Application: Ever wanted to test your HIDs before putting them in your car in the comfort of your home? See if they work? Test lens spacing on retrofits? Just want to blind yourself in your home?
Materials:
1x ATX Power Supply (I actually bought one on ebay for 19 dollars shipped for a new one, but you can easily find them out of old computers and the like)
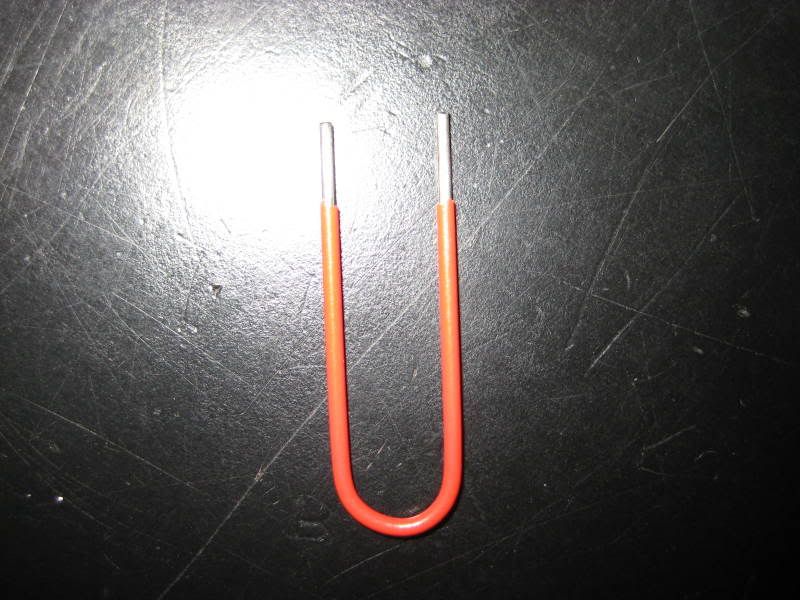
1x Paper Clip
2x Alligator Clips
1x Wire stripper/crimper
1x Ballast and Bulb
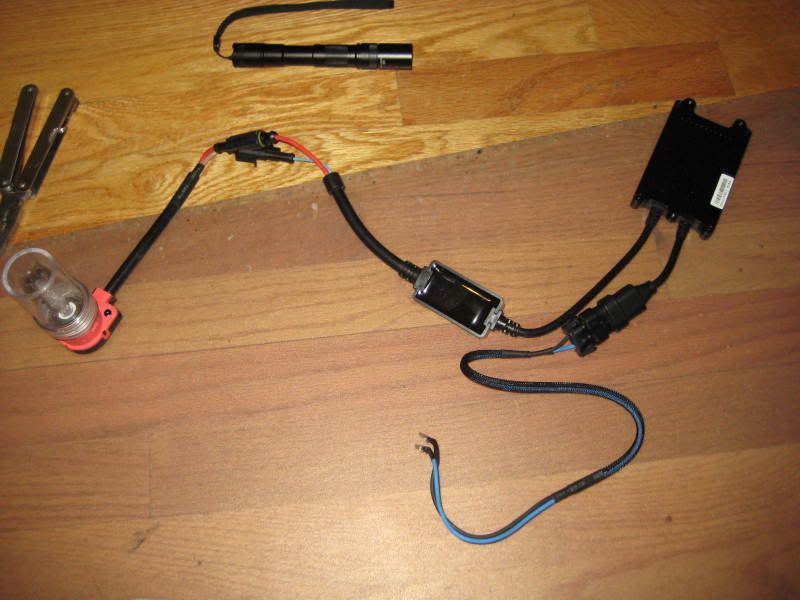
Picture of the ballast and bulb that I used:
Step One: Get a paper clip. Trim and cut some of the insulation off on each side, leaving bare wire.
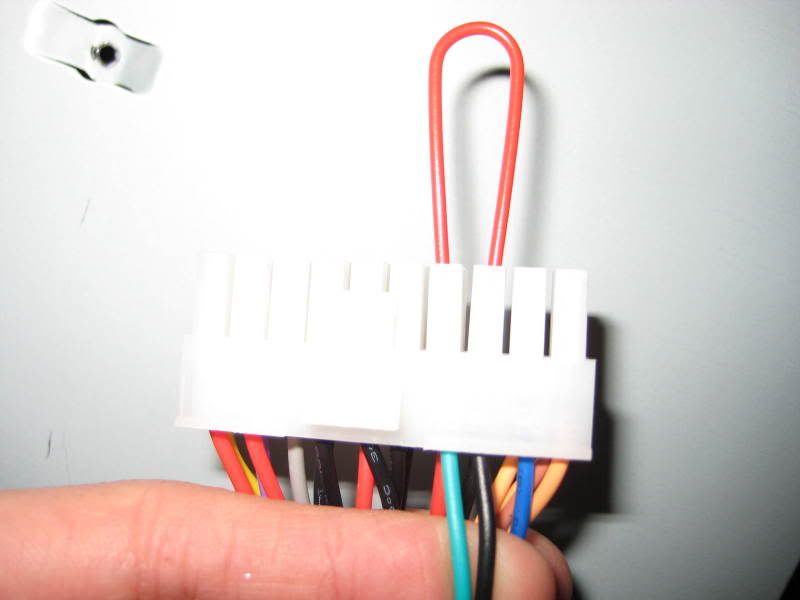
Step Two: Identify the green and black wires on the 20 plug ATX. Insert your paper clip into the two holes on each end. There are several black ground wires- For simplicity's sake I just chose the one next to the green.
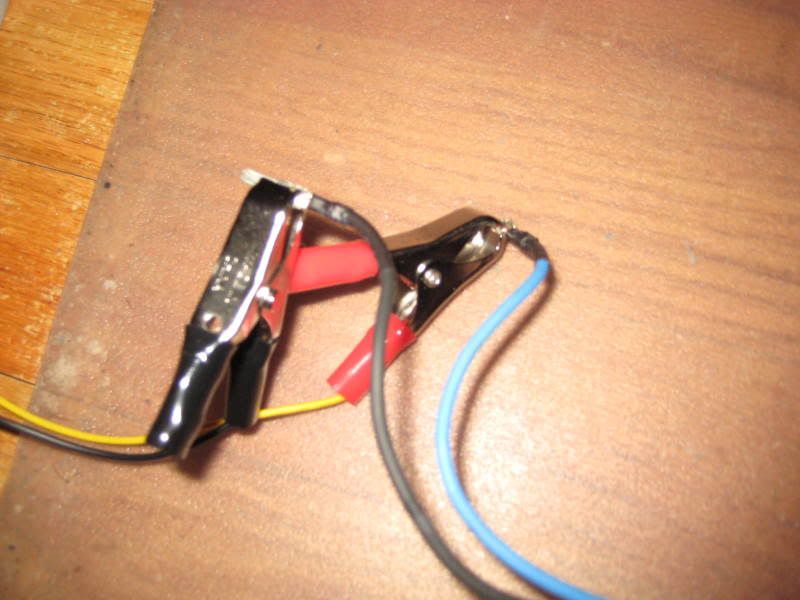
Step Three: Identify the 12V wire on the ATX connector. This will be denoted by a yellow color. Cut the wire and affix your alligator clip (or other tool) to that wire. I simply crimped it together. Do the same for another black wire (this will be the ground)

Step Four: Attach the positive yellow wire to the positive of the ballast, and the ground black wire to the negative of the ballast.
Step Five: Turn on the Power supply switch. (You can also put a switch between the black wire and green wire from step two and use that as the switch)

That's how I did it. Others surely have better ways, but I'm a DIY noob, and I like to keep my projects simple.
Disclaimer: You're working with electric parts, and especially if you open the power supply to tidy up the wires leaving only the two we need, it is advisable to be prudent with handling.
Difficulty: Very easy.
Application: Ever wanted to test your HIDs before putting them in your car in the comfort of your home? See if they work? Test lens spacing on retrofits? Just want to blind yourself in your home?
Materials:
1x ATX Power Supply (I actually bought one on ebay for 19 dollars shipped for a new one, but you can easily find them out of old computers and the like)
1x Paper Clip
2x Alligator Clips
1x Wire stripper/crimper
1x Ballast and Bulb
Picture of the ballast and bulb that I used:
Step One: Get a paper clip. Trim and cut some of the insulation off on each side, leaving bare wire.
Step Two: Identify the green and black wires on the 20 plug ATX. Insert your paper clip into the two holes on each end. There are several black ground wires- For simplicity's sake I just chose the one next to the green.
Step Three: Identify the 12V wire on the ATX connector. This will be denoted by a yellow color. Cut the wire and affix your alligator clip (or other tool) to that wire. I simply crimped it together. Do the same for another black wire (this will be the ground)
Step Four: Attach the positive yellow wire to the positive of the ballast, and the ground black wire to the negative of the ballast.
Step Five: Turn on the Power supply switch. (You can also put a switch between the black wire and green wire from step two and use that as the switch)
That's how I did it. Others surely have better ways, but I'm a DIY noob, and I like to keep my projects simple.


Great write up! I saw this thread at the university at HIDplanet.com but I never tried to do it. I've been using my car battery the whole time to test the projectors out. But now I am going to do this since I will be working on my next project, retrofit foglights!!


Trending Topics
Tchan
Look for the 20 pin ATX connector. There should only be a single yellow +12v wire on it. My 20 pin ATX came connected with a separate 4 pin wire, of which there were two more yellows. However, you can slide those four right of, leaving only the single yellow on the 20 pin.
My yellow +12 was right near the edge. As for ground (black), you can use any of them (except the one that you are attaching to the green)
I would just like to add that it is oftentimes difficult to get a good connection off those high gauge wires, resulting in multiple attempts. I had to recrimp my ground wire to a smaller gauge (thicker) wire, which I then restuffed into the alligator clip. In retrospect, I should have used smaller clips to get a better connection to my ballast wiring.


Thread
Thread Starter
Forum
Replies
Last Post