Lighting mods
 07-18-06, 08:14 AM
#31
Lead Lap

Join Date: Jun 2006
Location: ca
Posts: 523
Likes: 0
Received 0 Likes
on
0 Posts
The scuffs are on sale right now at lexus-parts.com./ Check the marketplace for info.
Can someone please tell me which type of LED bulbs to get for each of the mods above? Is this info anywhere else? Where are you purchasing these LED's from?
Can someone please tell me which type of LED bulbs to get for each of the mods above? Is this info anywhere else? Where are you purchasing these LED's from?
 07-18-06, 08:56 AM
#32
Lead Lap
Join Date: Jun 2006
Location: ca
Posts: 523
Likes: 0
Received 0 Likes
on
0 Posts
2006 LEXUS IS250, IS350 (With replaceable halogen capsules)
Low beam headlamp
H11-55W
High beam headlamp
9005
9005ST Silverstar High Performance Lighting: The Whiter and Brighter Halogen
9005CB Cool Blue Halogen Upgrade: White Hot; Super Cool; 100% Street Legal
Parking light
168
Front turn signal
992 (7440A)
Rear turn signal
7440
Tail light
LED
Stop light
LED
High mount stop light
LED
Fog/Driving light
9006
9006ST Silverstar High Performance Lighting: The Whiter and Brighter Halogen
9006XV XtraVision Halogen Upgrade: Up to 20% Brighter
9006CB Cool Blue Halogen Upgrade: White Hot; Super Cool; 100% Street Legal
9006LL Long Life Halogen Upgrade: Lasts one and a half times longer
License plate
168
Back up light
921
921LL Long Life Upgrade: Up to twice the life of the standard lamp
Front sidemarker
194
194LL Long Life Upgrade: Up to twice the life of the standard lamp
Rear sidemarker
194
194LL Long Life Upgrade: Up to twice the life of the standard lamp
Glove box
37
Dome light
DE3175
Step/Courtesy light
194
194LL Long Life Upgrade: Up to twice the life of the standard lamp
2825
Trunk/Cargo area
DE3022
Check out
http://www.superbrightleds.com/mini-wedge.html
http://www.v-leds.com/
Correct me if i'm wrong:
I'll need 7 * 194 (2 for puddle, 3 for front dome, 2 for side housing )
2* de3175 31mm for the back dome
Should i get the single large led, or the multi led ones or what?
Fromg v-leds.com:

2*HID WHITE 9 LED DOME LIGHT 3022 3021 3175 6428 6430*** $13.98

2*PAIR SUPER HID WHITE REFRACTOR 5 LED $19.98

2*2 VELOCITY LEDS HID WHITE HIGH POWER LED BULBS 194 $19.98
Sub-Total: $53.94 + 9.00 for shipping
Low beam headlamp
H11-55W
High beam headlamp
9005
9005ST Silverstar High Performance Lighting: The Whiter and Brighter Halogen
9005CB Cool Blue Halogen Upgrade: White Hot; Super Cool; 100% Street Legal
Parking light
168
Front turn signal
992 (7440A)
Rear turn signal
7440
Tail light
LED
Stop light
LED
High mount stop light
LED
Fog/Driving light
9006
9006ST Silverstar High Performance Lighting: The Whiter and Brighter Halogen
9006XV XtraVision Halogen Upgrade: Up to 20% Brighter
9006CB Cool Blue Halogen Upgrade: White Hot; Super Cool; 100% Street Legal
9006LL Long Life Halogen Upgrade: Lasts one and a half times longer
License plate
168
Back up light
921
921LL Long Life Upgrade: Up to twice the life of the standard lamp
Front sidemarker
194
194LL Long Life Upgrade: Up to twice the life of the standard lamp
Rear sidemarker
194
194LL Long Life Upgrade: Up to twice the life of the standard lamp
Glove box
37
Dome light
DE3175
Step/Courtesy light
194
194LL Long Life Upgrade: Up to twice the life of the standard lamp
2825
Trunk/Cargo area
DE3022
Check out
http://www.superbrightleds.com/mini-wedge.html
http://www.v-leds.com/
Correct me if i'm wrong:
I'll need 7 * 194 (2 for puddle, 3 for front dome, 2 for side housing )
2* de3175 31mm for the back dome
Should i get the single large led, or the multi led ones or what?
Fromg v-leds.com:
2*HID WHITE 9 LED DOME LIGHT 3022 3021 3175 6428 6430*** $13.98
2*PAIR SUPER HID WHITE REFRACTOR 5 LED $19.98
2*2 VELOCITY LEDS HID WHITE HIGH POWER LED BULBS 194 $19.98
Sub-Total: $53.94 + 9.00 for shipping
Last edited by jewel; 07-18-06 at 09:27 AM.
 07-18-06, 10:15 AM
#35

Originally Posted by deuce2
it's a pain to get those screws out of the puddle lamps..anyone else found an easier way? i don't wanna break the mirror or strip the screws.
I have NOT done this yet, this is just from looking at the service manual. If you break it, it's not my fault.
07-18-06, 10:32 AM
#36
Pit Crew
iTrader: (1)
Join Date: Mar 2006
Location: LA
Posts: 232
Likes: 0
Received 0 Likes
on
0 Posts
I tried to take it out yesterday and couldnt get to the screw. I'll just wait for more of an indepth instruction. I don't want to break anything, so if anyone has a better way to get those damn puddle lamps out, let us know!
07-18-06, 11:30 AM
#38
Pole Position

Join Date: May 2006
Location: Fl
Posts: 239
Likes: 0
Received 0 Likes
on
0 Posts
looks cool but i heard from previous posts (mainly guys from the GS forum) that if you change out the lights inside the dome, not only do you get less amounts of light, but they also dont fade in/out very well
07-18-06, 11:44 AM
#39
Originally Posted by Nicelex13
looks cool but i heard from previous posts (mainly guys from the GS forum) that if you change out the lights inside the dome, not only do you get less amounts of light, but they also dont fade in/out very well
 ). I decided to stick some LED's in there to give me some cool mood lighting.
The fade out is not as "smooth" per say as a regular incandescent light. But it still fades.
Besides, I actually like the LED's moreso, since it fades out right away the minute I close the door.
07-18-06, 12:18 PM
#40
Pit Crew
iTrader: (1)
Join Date: Mar 2006
Location: LA
Posts: 232
Likes: 0
Received 0 Likes
on
0 Posts
Originally Posted by pocky
The amount of light is true. These are LED's. They are not natural light, it's just bright. I did not put LED's in there so I can use it as a source of light. In fact, I drove for almost a month without any lights in there, I took out all the bulbs (I'm a vampire ). I decided to stick some LED's in there to give me some cool mood lighting.
The fade out is not as "smooth" per say as a regular incandescent light. But it still fades. Besides, I actually like the LED's moreso, since it fades out right away the minute I close the door.
). I decided to stick some LED's in there to give me some cool mood lighting.The fade out is not as "smooth" per say as a regular incandescent light. But it still fades.
Besides, I actually like the LED's moreso, since it fades out right away the minute I close the door. 07-18-06, 01:24 PM
#41
Pole Position
Thread Starter
ok i hope this helps...the screws for the mirror are at a slight angle, use a rubber stopper, or something around the house to wedge btween the mirror. move it so that you have a good amount of room to put your phillips head in. now that one hand is free b/c of the wedge, you can use it to grab the back of the mirror assembly AND at the same time push in with the screwdriver. this will give you more pressure on the screw itself. I did try different phillips head screws, the middle one worked best b/c it was a little fatter and it gripped better. You could also try just doing the two outer screws and seeing if theres enough room to pull the lamp housing down. i thought of that when i was having trouble with the third inner screw; but i never did it so i dont know. the reason i suggest the screw method is b/c when my parts guy showed be a blow-up pic of the assebly it did not show the mirror being able to pop off.(but then again it didnt show where the screws were either).. i just remember looking at it after popping off the back and thinkining, wow im glad i didnt try to pop the mirror out.
as for the lighting difference, it is very noticable to me..true, its not going be like The LORD has descended upon your car , but with my tinted windows in da garage, i can def see a lot more. especially in the rear dome light
the bulbs i got off of ebay from "ushomedirect*com" i used him b/c he had 100% feedback.
as for the lighting difference, it is very noticable to me..true, its not going be like The LORD has descended upon your car
, but with my tinted windows in da garage, i can def see a lot more. especially in the rear dome lightthe bulbs i got off of ebay from "ushomedirect*com" i used him b/c he had 100% feedback.
07-18-06, 03:49 PM
#43
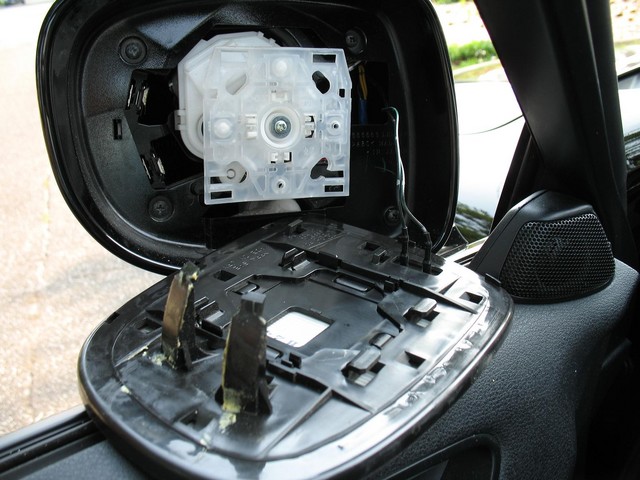
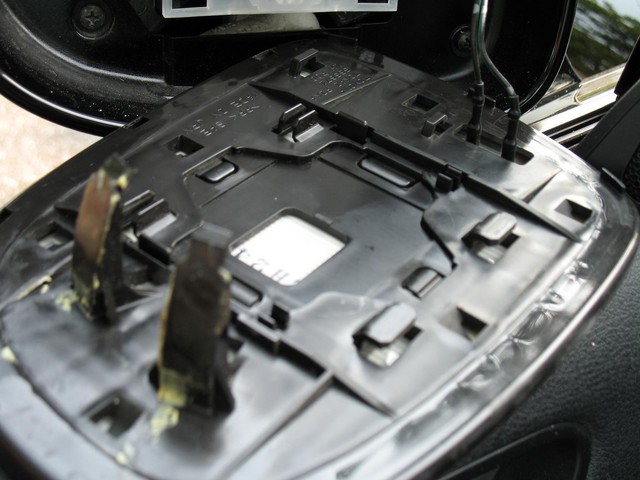
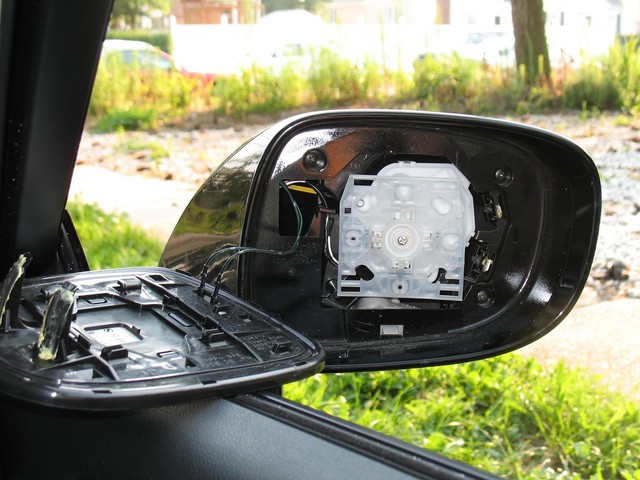
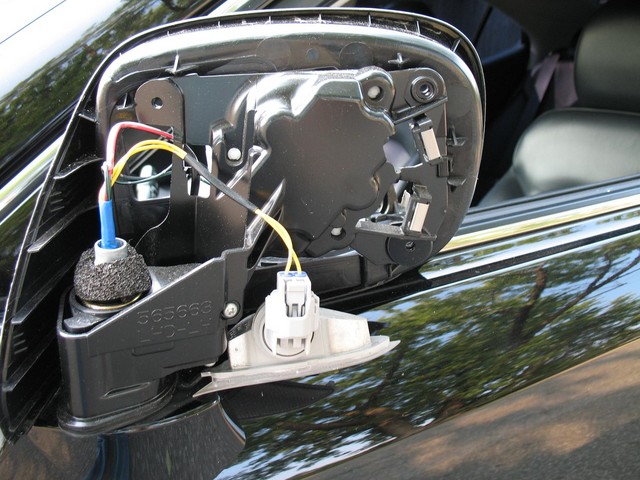
ok this was very easy to do..like pocky said move the mirror so it is all the way up..then i just put my hand in between the bottom of the mirror and the housing and i pryed it out..there are a couple of clips that come undone and then you pull it out and up to undo the hooks at the top...take out the screws...then slide the back of the housing off..twist the bulb out of the lense and then remove the bulb (its a wedge just pull it out) then put your new led wedge bulb in..(one thing i suggest is make sure the bulbs work before replacing anything..i had to do the drivers side twice because the bulb wasnt wedged in all the way) then replace the lense and the back of the mirror housing..replace the 3 screws...then hook the top of the mirror back in (its easiest if you look from underneath to make sure the hooks are lining up) then push the mirror in all around..its gonna move a bit but keep pushing one side at a time until it locks in
i dont know if i just made any sense at all..but it was very easy to do
i'll post pics of it lit up when it gets dark later
here are a few pics with the mirror off

i dont know if i just made any sense at all..but it was very easy to do
i'll post pics of it lit up when it gets dark later
here are a few pics with the mirror off
07-18-06, 04:04 PM
#44

Originally Posted by waynetech2
ok i hope this helps...the screws for the mirror are at a slight angle, use a rubber stopper, or something around the house to wedge btween the mirror. move it so that you have a good amount of room to put your phillips head in. now that one hand is free b/c of the wedge, you can use it to grab the back of the mirror assembly AND at the same time push in with the screwdriver. this will give you more pressure on the screw itself. I did try different phillips head screws, the middle one worked best b/c it was a little fatter and it gripped better. You could also try just doing the two outer screws and seeing if theres enough room to pull the lamp housing down. i thought of that when i was having trouble with the third inner screw; but i never did it so i dont know. the reason i suggest the screw method is b/c when my parts guy showed be a blow-up pic of the assebly it did not show the mirror being able to pop off.(but then again it didnt show where the screws were either).. i just remember looking at it after popping off the back and thinkining, wow im glad i didnt try to pop the mirror out.
as for the lighting difference, it is very noticable to me..true, its not going be like The LORD has descended upon your car , but with my tinted windows in da garage, i can def see a lot more. especially in the rear dome light
the bulbs i got off of ebay from "ushomedirect*com" i used him b/c he had 100% feedback.
as for the lighting difference, it is very noticable to me..true, its not going be like The LORD has descended upon your car
, but with my tinted windows in da garage, i can def see a lot more. especially in the rear dome lightthe bulbs i got off of ebay from "ushomedirect*com" i used him b/c he had 100% feedback.
Then these bulbs will probably last longer.
07-18-06, 04:18 PM
#45
Originally Posted by CaThaFeR
ok this was very easy to do..like pocky said move the mirror so it is all the way up..then i just put my hand in between the bottom of the mirror and the housing and i pryed it out..there are a couple of clips that come undone and then you pull it out and up to undo the hooks at the top...take out the screws...then slide the back of the housing off..twist the bulb out of the lense and then remove the bulb (its a wedge just pull it out) then put your new led wedge bulb in..(one thing i suggest is make sure the bulbs work before replacing anything..i had to do the drivers side twice because the bulb wasnt wedged in all the way) then replace the lense and the back of the mirror housing..replace the 3 screws...then hook the top of the mirror back in (its easiest if you look from underneath to make sure the hooks are lining up) then push the mirror in all around..its gonna move a bit but keep pushing one side at a time until it locks in
i dont know if i just made any sense at all..but it was very easy to do
i'll post pics of it lit up when it gets dark later
here are a few pics with the mirror off
i dont know if i just made any sense at all..but it was very easy to do
i'll post pics of it lit up when it gets dark later
here are a few pics with the mirror off
Great pics. Removing Mirror Method it is!