HowTo: Hardwired Valentine 1 or other radar detectors (merged threads-read full post)
 04-10-06, 10:27 AM
#31
Pole Position

Join Date: Jan 2006
Location: CA
Posts: 322
Likes: 0
Received 0 Likes
on
0 Posts
First off, I must apologize, I didn't take pictures of this while I did it, but this should help. If anyone does this and takes pictures, feel free to post it in this thread.
Also, before I get started, I'll give the standard disclaimer. This information is provided as-is, without express warranties of any kind, expressed or implied.
Basically, you are responsible for performing this install, but if you mess it up based on information that I provide, it's not my fault that you didn't double check.
Okay, with that out of the way:
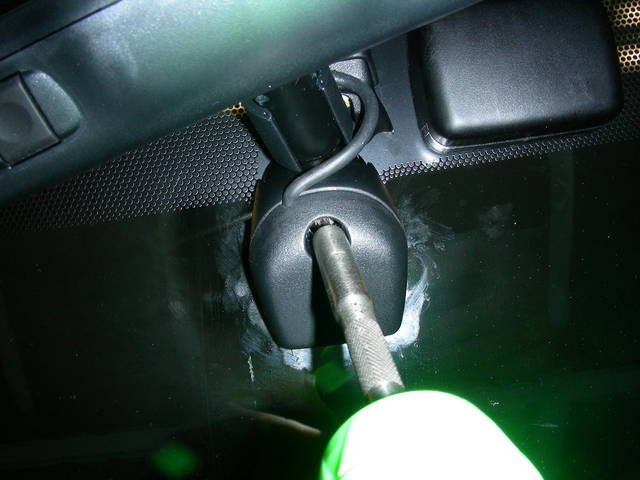
1. Pry out "Overhead J/B". This is the integrated control console that has the sunglass case, two map lights, overhead dome light, and sunroof control. I started by grabbing on the edge towards the back of the car with my fingers, however you may wish to use a PLASTIC pry tool, such as a PLASTIC putty knife or edging tool that you can get at Home Depot. There are two clips at the very back, and two clips at the very front. There are also two plastic edge tabs at the front that will require you to start with the back edge first.

Helpful hint: Ensure that there are 4 white plastic clips attached to the overhead J/B. If not, check the vehicle chassis for the clips and remove them. They must be attached to the overhead J/B before reinstallation. Personally, I tend to use the pry side of a small hammer to remove these (when stuck). You may wish to use a small screwdriver or perhaps pliers.
2. Disconnect the Overhead J/B connector. All the power that you require is in this connector, however, since there are so many wires, I opted to go for a cleaner connection on the Sunroof connector. Important note: If you disconnect the Overhead J/B connector, the Sunroof and Auto Dimming Rear View Mirror /w Home Link will lose power as well. This means that if you are going to double check for power in step 4, you might need to leave the Overhead J/B attached and dangling.
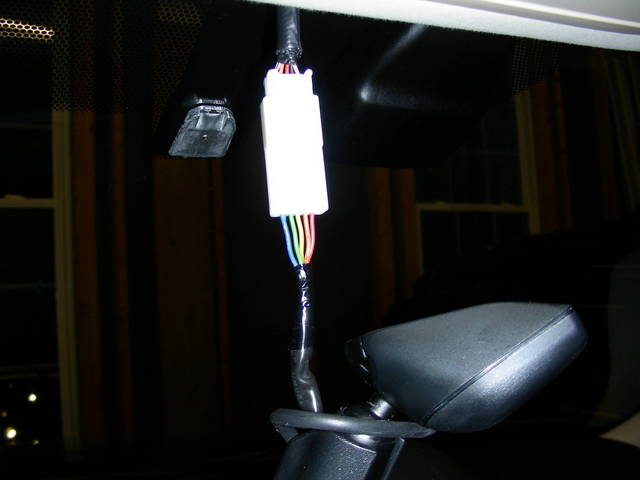
3. Disconnect the Sunroof connector. This is a smaller connector directly behind the Overhead J/B.
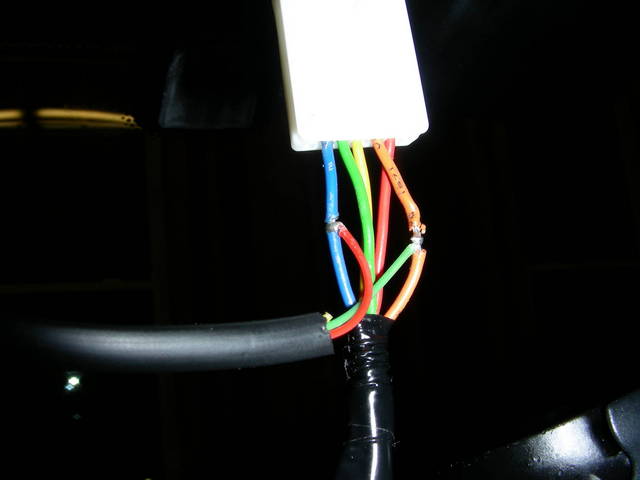
4. Connect your radar detector hardwire connection to the (Violet - +12v Ignition) and (White with Black Stripe - Negative Ground) wires. Personally, I soldered my connections. I also cut the fuse off of the Valetine 1 kit because the Sunroof is fused at the central fuse box. (Basically, if the fuse for the Valentine 1 blows, I'd rather not have to take everything apart again - these plastic clips only take so much abuse before needing to be replaced). If anything ever occured where the V1 would have blown the fuse, it would take out the fuse for the Sunroof.
Helpful hint (when soldering): Solder is hot, and can burn you, and pieces of your interior. Please take proper precautions when soldering overhead wires. Be aware of the angle of your soldering iron, and cover your interior with a cloth blanket or piece of carpet. (Do not use tarp - plastic will melt)
If you choose to use the Valentine 1 kit "as-is", you will crimp the red wire on to the purple, and then find a ground point for the grounding eyelet. I'd recommend one of the bolts that are clearly visible above the Overhead J/B.
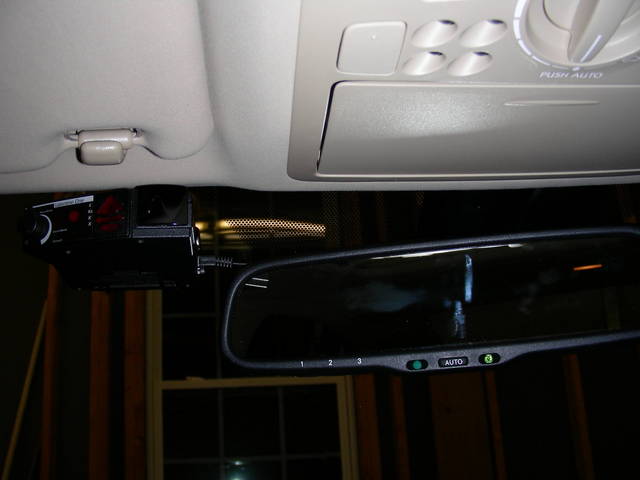
5. Route your power connection to the radar detector. This can be as simple as pushing the wire through the gap where the headliner meets the windshield, or as complicated as what I did, which was remove the rearview mirror using a Torx bit. The mirror slides towards the top of the windshield, and the plastic wire cover will come off. I routed the wire down to the radar detector, put the mirror back on the windshield, and finally, put the cover back over both wires for a nice clean looking install.
6. Cleaning up is the same, reconnect all connectors. Place overhead J/B into the factory location with the front tabs in first, them firmly press it into position, locking all clips down.
Any other radar detector will connect the same way. Also, I wanted to note. I wanted to pick up a radar detector for my second car (Scion tC), so that I would not be moving the V1 between vehicles constantly. I found a Beltronics Express 795 at Radioshack, on clearance for $59.00. Radar review websites show this one to have excellent range. An interesting side note for that detector. It uses the exact same power connector as the Valentine 1, so if you were to purchase a hardwire kit from Valentine research, you could use it to plug into the Beltronics 795.
In that case, you'd have hardwired Radar for about $99.
-Brian
Edit: Small corrections and additions (2006/May/16)
Also, before I get started, I'll give the standard disclaimer. This information is provided as-is, without express warranties of any kind, expressed or implied.
Basically, you are responsible for performing this install, but if you mess it up based on information that I provide, it's not my fault that you didn't double check.
Okay, with that out of the way:
1. Pry out "Overhead J/B". This is the integrated control console that has the sunglass case, two map lights, overhead dome light, and sunroof control. I started by grabbing on the edge towards the back of the car with my fingers, however you may wish to use a PLASTIC pry tool, such as a PLASTIC putty knife or edging tool that you can get at Home Depot. There are two clips at the very back, and two clips at the very front. There are also two plastic edge tabs at the front that will require you to start with the back edge first.
Helpful hint: Ensure that there are 4 white plastic clips attached to the overhead J/B. If not, check the vehicle chassis for the clips and remove them. They must be attached to the overhead J/B before reinstallation. Personally, I tend to use the pry side of a small hammer to remove these (when stuck). You may wish to use a small screwdriver or perhaps pliers.
2. Disconnect the Overhead J/B connector. All the power that you require is in this connector, however, since there are so many wires, I opted to go for a cleaner connection on the Sunroof connector. Important note: If you disconnect the Overhead J/B connector, the Sunroof and Auto Dimming Rear View Mirror /w Home Link will lose power as well. This means that if you are going to double check for power in step 4, you might need to leave the Overhead J/B attached and dangling.
3. Disconnect the Sunroof connector. This is a smaller connector directly behind the Overhead J/B.
4. Connect your radar detector hardwire connection to the (Violet - +12v Ignition) and (White with Black Stripe - Negative Ground) wires. Personally, I soldered my connections. I also cut the fuse off of the Valetine 1 kit because the Sunroof is fused at the central fuse box. (Basically, if the fuse for the Valentine 1 blows, I'd rather not have to take everything apart again - these plastic clips only take so much abuse before needing to be replaced). If anything ever occured where the V1 would have blown the fuse, it would take out the fuse for the Sunroof.
Helpful hint (when soldering): Solder is hot, and can burn you, and pieces of your interior. Please take proper precautions when soldering overhead wires. Be aware of the angle of your soldering iron, and cover your interior with a cloth blanket or piece of carpet. (Do not use tarp - plastic will melt)
If you choose to use the Valentine 1 kit "as-is", you will crimp the red wire on to the purple, and then find a ground point for the grounding eyelet. I'd recommend one of the bolts that are clearly visible above the Overhead J/B.
5. Route your power connection to the radar detector. This can be as simple as pushing the wire through the gap where the headliner meets the windshield, or as complicated as what I did, which was remove the rearview mirror using a Torx bit. The mirror slides towards the top of the windshield, and the plastic wire cover will come off. I routed the wire down to the radar detector, put the mirror back on the windshield, and finally, put the cover back over both wires for a nice clean looking install.
6. Cleaning up is the same, reconnect all connectors. Place overhead J/B into the factory location with the front tabs in first, them firmly press it into position, locking all clips down.
Any other radar detector will connect the same way. Also, I wanted to note. I wanted to pick up a radar detector for my second car (Scion tC), so that I would not be moving the V1 between vehicles constantly. I found a Beltronics Express 795 at Radioshack, on clearance for $59.00. Radar review websites show this one to have excellent range. An interesting side note for that detector. It uses the exact same power connector as the Valentine 1, so if you were to purchase a hardwire kit from Valentine research, you could use it to plug into the Beltronics 795.
In that case, you'd have hardwired Radar for about $99.
-Brian
Edit: Small corrections and additions (2006/May/16)
Last edited by rys; 05-16-06 at 02:11 PM.
 04-14-06, 08:03 PM
#32
Driver

Join Date: Jan 2006
Location: PA
Posts: 132
Likes: 0
Received 0 Likes
on
0 Posts
There is no need to remove the overhead J/B and risk breaking
the plastic clips or introducing rattles. The ignition power is
also available going to the rear view mirror.
The rear view mirror is easily removed by loosening the T-20
torx screw securing it to the metal shoe glued to the windshield.
Lift up on the mirror and it will just lift off. There will be a connector
revealed behind the wire cover. The blue wire going to the mirror
is the negative and the orange wire is the positive ignition switched
wire. Carefully strip a small section of the mirror wires and
then wrap your Valentine One power wires around it. Soldering
the connection is recommended for a good reliable connection.
To finish the job, wrap each wire that you attached to with a
piece of electrical tape.
This is a real easy installation. You don't even have to worry about
getting the wires connected backwards because the Valentine
One unit is built to withstand reverse polarity in case of a misswire.
05-16-06, 10:10 AM
#33
Lead Lap
Join Date: May 2006
Location: CT
Posts: 406
Likes: 0
Received 0 Likes
on
0 Posts
Thanks for the write-up, ken...I used it to wire up my V1 today. Getting the cord in between the A-pillar cover and the left side of the dash was the most difficult part since those two panels are so tightly wedged against each other; for anyone else attempting this I recommend picking up a pair of nylon bicycle tire levers...I keep them in my toolbox for running wire behind auto interior panels like this.

05-16-06, 10:24 AM
#34
Pole Position
Join Date: Jan 2006
Location: CA
Posts: 322
Likes: 0
Received 0 Likes
on
0 Posts
Two additional tips.
First, I would highly recommend either using my method, or Tulex's method for installation. The factory service manual makes note that when removing the cover on the A pillar, the upper clips are _supposed_ to be throw away. That is, once removed, you're supposed to get new ones because of the curtain airbag. My method does not require removal of the column, but it does require removal of the Overhead J/B. Tulex's method does not require removal of any trim except the possibly the wiring cover between the headliner and the rearview mirror.
Second tip, for a cheap alternative to a panel tool, visit your local Home Depot and check the paint section. You can find a PLASTIC Putty Knife set for about $3.00. Looks like this one, although the one I got from Home Depot comes in black.
-Brian
05-16-06, 10:36 AM
#35
Lead Lap
Join Date: May 2006
Location: CT
Posts: 406
Likes: 0
Received 0 Likes
on
0 Posts
Originally Posted by rys
Two additional tips.
First, I would highly recommend either using my method, or Tulex's method for installation. The factory service manual makes note that when removing the cover on the A pillar, the upper clips are _supposed_ to be throw away. That is, once removed, you're supposed to get new ones because of the curtain airbag. My method does not require removal of the column, but it does require removal of the Overhead J/B. Tulex's method does not require removal of any trim except the possibly the wiring cover between the headliner and the rearview mirror.
Second tip, for a cheap alternative to a panel tool, visit your local Home Depot and check the paint section. You can find a PLASTIC Putty Knife set for about $3.00. Looks like this one, although the one I got from Home Depot comes in black.
-Brian
First, I would highly recommend either using my method, or Tulex's method for installation. The factory service manual makes note that when removing the cover on the A pillar, the upper clips are _supposed_ to be throw away. That is, once removed, you're supposed to get new ones because of the curtain airbag. My method does not require removal of the column, but it does require removal of the Overhead J/B. Tulex's method does not require removal of any trim except the possibly the wiring cover between the headliner and the rearview mirror.
Second tip, for a cheap alternative to a panel tool, visit your local Home Depot and check the paint section. You can find a PLASTIC Putty Knife set for about $3.00. Looks like this one, although the one I got from Home Depot comes in black.
-Brian
05-16-06, 10:54 AM
#36
Lead Lap
Join Date: Nov 2005
Location: Florida
Posts: 576
Likes: 0
Received 0 Likes
on
0 Posts
Thanks TuxLex. That looks like the way I'm going to go. Can't stand that cord hanging down to the lighter.
Does everyone keep their radar detector up all the time? I heard the heat is bad for them to be up there constantly. I use a sunshield in front of it. Do I need to take it down while it is out in the sun all day at work? I'm in Florida too.
Does everyone keep their radar detector up all the time? I heard the heat is bad for them to be up there constantly. I use a sunshield in front of it. Do I need to take it down while it is out in the sun all day at work? I'm in Florida too.
05-16-06, 10:59 AM
#37
Pole Position
Join Date: Jan 2006
Location: CA
Posts: 322
Likes: 0
Received 0 Likes
on
0 Posts
Originally Posted by is4me2
Thanks TuxLex. That looks like the way I'm going to go. Can't stand that cord hanging down to the lighter.
Does everyone keep their radar detector up all the time? I heard the heat is bad for them to be up there constantly. I use a sunshield in front of it. Do I need to take it down while it is out in the sun all day at work? I'm in Florida too.
Does everyone keep their radar detector up all the time? I heard the heat is bad for them to be up there constantly. I use a sunshield in front of it. Do I need to take it down while it is out in the sun all day at work? I'm in Florida too.
I've had my V1 for about 3 years so far and have had no problems, I'm here in Sunny Southern California.
-Brian
05-16-06, 11:02 AM
#38
Lead Lap
Join Date: May 2006
Location: CT
Posts: 406
Likes: 0
Received 0 Likes
on
0 Posts
Originally Posted by is4me2
Thanks TuxLex. That looks like the way I'm going to go. Can't stand that cord hanging down to the lighter.
Does everyone keep their radar detector up all the time? I heard the heat is bad for them to be up there constantly. I use a sunshield in front of it. Do I need to take it down while it is out in the sun all day at work? I'm in Florida too.
Does everyone keep their radar detector up all the time? I heard the heat is bad for them to be up there constantly. I use a sunshield in front of it. Do I need to take it down while it is out in the sun all day at work? I'm in Florida too.
05-16-06, 01:04 PM
#43
Lead Lap
Join Date: May 2006
Location: CT
Posts: 406
Likes: 0
Received 0 Likes
on
0 Posts
Originally Posted by foofighter
perfect, exactly what i was looking for. I wired my GS running it across the headliner and down the A pillar not so fun and clean. I prefer the overhead console.
I wired my V1 in the 350 today...headliner and down the A-pillar. I had it done in about 30 minutes and had no problems getting the cable hidden. Just like with my A4, I used a nylon bike tire lever to push the cable into place. Everything is neat and tidy and the only portion of the cable that's visible is the 2" of it coming out of the headliner to plug into the V1.
05-16-06, 01:25 PM
#44
Pole Position
Join Date: Jan 2006
Location: CA
Posts: 322
Likes: 0
Received 0 Likes
on
0 Posts
Originally Posted by conekiller
I wired my V1 in the 350 today...headliner and down the A-pillar. I had it done in about 30 minutes and had no problems getting the cable hidden. Just like with my A4, I used a nylon bike tire lever to push the cable into place. Everything is neat and tidy and the only portion of the cable that's visible is the 2" of it coming out of the headliner to plug into the V1.

Since the connector is an RJ11 (standard telephone connector), I even went so far as to cut the wire between the hardwire kit and the V1 and recrimp the wire (so I would not have 6ft of excess wire tied up behind the overhead).
-Brian
05-16-06, 01:30 PM
#45
Lead Lap
Join Date: May 2006
Location: CT
Posts: 406
Likes: 0
Received 0 Likes
on
0 Posts
Originally Posted by rys
....or you could be **** like me and have no cable showing.
Since the connector is an RJ11 (standard telephone connector), I even went so far as to cut the wire between the hardwire kit and the V1 and recrimp the wire (so I would not have 6ft of excess wire tied up behind the overhead).
-Brian
Since the connector is an RJ11 (standard telephone connector), I even went so far as to cut the wire between the hardwire kit and the V1 and recrimp the wire (so I would not have 6ft of excess wire tied up behind the overhead).
-Brian

