Coilover DIY?


 08-20-13, 04:12 PM
#17
I've worked on suspensions for years doing installs on various cars and if there's one tip that I have to give out when you try to install any coilover/springs, is that do it from the front to the back.. not side to side.
Lots of people install the suspension from the side because its easier to jack up one side and work on it then jack up the other side. The problem with this is the sway bar puts a load when one end is on the ground and one isn't and it makes it incredibly difficult to get the shock off.
Lots of people install the suspension from the side because its easier to jack up one side and work on it then jack up the other side. The problem with this is the sway bar puts a load when one end is on the ground and one isn't and it makes it incredibly difficult to get the shock off.
08-20-13, 08:25 PM
#18
Can anyone give a detailed description of how to height adjust the BC coils?
08-20-13, 09:28 PM
#19

Hack mechanics, every one of them. If you fail to loosen the bushing bolts and reset the bushings to the new neutral setting, you're just a flat rate mechanic trying to cut corners.
IT IS IMPERATIVE you loosen the bushings and reset them for the new neutral position. Why do guys say "it took two weeks for my suspension to 'settle in'"? Because the guys doing the work didn't loosen the bolts on the bushings, preload the suspension properly, and retighten the bolts with the bushings at their new neutral settings.
WHY IS THIS IMPORTANT? Because failing to do this means your bushing are getting hammered 24x7x365 and they'll be crap in short order - EVEN IF YOU DON'T DRIVE THE CAR.
Any instructions saying "You'll need to push hard on the LCA to get the shock in/out" means they're idiots and have no understanding of what they're doing beyond "we need to get this installed in the shortest time possible."
LEXUS says in the Field Service Manual:
Why does the factory service manual tell you to go to all this trouble? TO BE SURE THE BUSHING IS NOT UNDER CONSTANT STRESS WITH THE CAR AT NORMAL RIDE HEIGHT.
The number of shops missing this critical point is staggering. I would never return to a shop where they failed to recognize the importance of this step because it clearly indicates they are not doing quality work, only collecting money from people who don't know the difference.
08-20-13, 11:20 PM
#20
Yeah I looked over everything today to get a feel for it, looks like it won't be too difficult. Getting the new coils back in might be a doozy tho. The part that is still confusing me tho is the adjustment once they are on; the manual is confusing the hell out of me.
Can anyone give a detailed description of how to height adjust the BC coils?
Can anyone give a detailed description of how to height adjust the BC coils?
https://www.google.com/url?sa=t&rct=...50952593,d.b2I
08-21-13, 06:44 AM
#21
Pole Position

Join Date: Jan 2013
Location: GA
Posts: 331
Likes: 0
Received 0 Likes
on
0 Posts
Here's a great video, saves a lot of explaining
https://www.google.com/url?sa=t&rct=...50952593,d.b2I
https://www.google.com/url?sa=t&rct=...50952593,d.b2I
Loosen the bottom ring.
Only touch the top ring to shorten. Turn right to left.
Only touch the 2nd ring to lengthen. Turn left to right.
End is always the same. Tighten the bottom ring. Turn right to left.
Yes do front to back installing the coils. You do need to undo the roll bar end links to get more travel. It will allow you to take out and put in coils. 2nd person would be helpful to step on the suspension to get things in and out.
08-21-13, 04:21 PM
#22
Thanks for the help guys! Just a couple more questions...
This might be dumb, but I just noticed today that the rear BC coils are "opposite" of the stock suspension. The BC ones have the spring at the top, and on the stock suspension the spring is on the bottom. Should this be like this?
Also, for you guys who have done the install, what should I torque the bolts to when done?? Specifically the larger bolts on control arms.
Thanks!
08-22-13, 06:48 AM
#24
Pole Position
Join Date: Jan 2013
Location: GA
Posts: 331
Likes: 0
Received 0 Likes
on
0 Posts
Thanks for the help guys! Just a couple more questions...
This might be dumb, but I just noticed today that the rear BC coils are "opposite" of the stock suspension. The BC ones have the spring at the top, and on the stock suspension the spring is on the bottom. Should this be like this?
Also, for you guys who have done the install, what should I torque the bolts to when done?? Specifically the larger bolts on control arms.
Thanks!
This might be dumb, but I just noticed today that the rear BC coils are "opposite" of the stock suspension. The BC ones have the spring at the top, and on the stock suspension the spring is on the bottom. Should this be like this?
Also, for you guys who have done the install, what should I torque the bolts to when done?? Specifically the larger bolts on control arms.
Thanks!
08-22-13, 09:30 AM
#25
The vid is pretty clear - but here are instructions from my BC coilover setup on my Legacy Spec B.
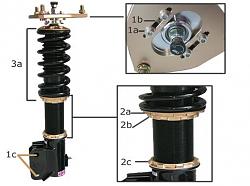
NOTE: All springs come preloaded from the factory (3a). If for any reason the spring becomes loose, tighten the seat (2a) until the spring sits snug and lock (2a and 2b) in place. Do not over tighten spring as this will compress spring and cause rate shifting. Maximum compression of springs should be 5mm.
For all height adjustments, always adjust from the lower lock ring (2c), not from the lower spring seat (2a,b). By doing this, you will not alter the suspension travel. At any drop, 3a should always remain the same.
Height adjustments:
Height adjustments can be made after you install the system on the car.
1. Make sure both 2a and 2b are tight. These are locked against each other.
2. Loosen lower lock ring (2c).
3. Using the spanner wrenches that comes with the kit, turn the upper spring seat (2a) counter clock-wise (right to left) to lower or the lower lock ring (2b) clock-wise (left to right) to raise the vehicle.
4. After you achieve your desired height, make sure you tighten the lower lock ring (2c) before you drop the vehicle to the ground.
NOTE: You may need to repeat steps 2-4 a few times until you achieve the desired height. It is suggested you do one side front and rear first and then measure from 2b to 2c and copy to other side. This will save time on install.
Last edited by Vervish; 08-22-13 at 12:55 PM.
08-22-13, 11:31 AM
#26
Height adjustments:
Height adjustments can be made after you install the system on the car.
1. Make sure both 2a and 2b are tight. These are locked against each other.
2. Loosen lower lock ring (2c).
3. Using the spanner wrenches that comes with the kit, turn the upper spring seat (2a) counter clock-wise (right to left) to lower or the lower lock ring (2b) clock-wise (left to right) to raise the vehicle.
Also where is the 5mm being measured?
I feel so clueless right now haha
 08-22-13, 11:40 AM
#27
Alternatively, you can just loosen the bottom ring then grab the threaded shaft with your hands (use gloves) and turn the shaft up and down.. which IMO is faster.
08-22-13, 12:26 PM
#29
Not sure if this helps but another way to visualize it is to imagine the lower ring (2c) loosened so that is spins up the shaft near 2b. At that point, the ride height has not changed at all - the lower ring is the only thing that moved. Now imagine 1c spinning up and down the shaft, that is what changes your ride height. The distance between 1c and 2b is your ride height adjustment, 3a is your suspension travel (which should not change).
08-22-13, 12:49 PM
#30
Tech Info Resource

iTrader: (2)
Wow. Pretty confused about those adjustments.
It's impossible to affect the spring rate with any adjustment. The spring's rate is entirely dependent on the spring's dimensions and material.
The two rings locked together set the spring preload. Changing their position does not change travel (travel is the full stroke of the shock) it changes sag which is the installed height of the shock with the full weight of the corner applied.
The ring at the bottom affects the installed length of the shock and is used to adjust ride height AFTER you've got the proper preload on the spring with the two locked rings.
There are a few ways to figure out preload - the easiest is to measure the installed length of the spring with no load on it at all. Unless I'm mistaken, BC has a published spec for this. If not, call the manufacturer and ask what the installed spring length should be and set it to that value, lock the rings, and leave them alone. If you want to do a lot of homework and model the suspension so you can calculate where this should be, you should start at this website.
Completely ignore any reference to changing camber with a shock on the IS-F. We have a double wishbone suspension, not struts, so it is impossible to change camber with adjustable top hats.
Last edited by lobuxracer; 08-22-13 at 01:02 PM.