
Steering Wheel Swap Detailed Walk-Through
 03-16-14, 01:41 PM
#1
I know the video by Sewell is a very helpful when replacing your steering wheel, but I thought it was not very detailed on how to deal with all disassembly required to the steering wheel itself.
I tried to take some detailed photos on the removal of all the associated electronics.
Hope this might help someone who is a little hesitant to DIY.
Here is the Sewell Vid:
Next few posts will cover some detailed photos with regard to the wheel gutting.
I tried to take some detailed photos on the removal of all the associated electronics.
Hope this might help someone who is a little hesitant to DIY.
Here is the Sewell Vid:
Next few posts will cover some detailed photos with regard to the wheel gutting.
 03-16-14, 01:42 PM
#2
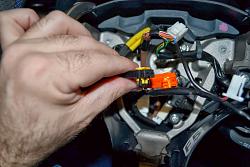
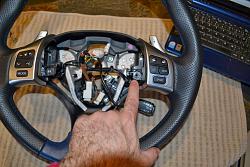
I should noted that to remove the airbag clips you need to lightly pry this tab up and then pull on connector:
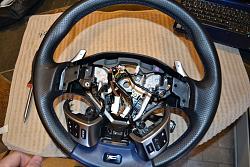
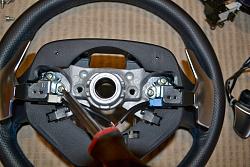
So after the Airbag is off, you will be looking at this:
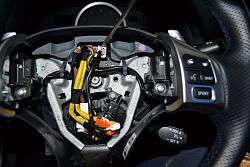
You will need to unplug the ground and the 2 plugs on top, also make sure the wires are off the 2 black retaining clips:
Pull the wheel off and take it somewhere comfortable, you will only need a philips screw driver. It should look like this:

So after the Airbag is off, you will be looking at this:

You will need to unplug the ground and the 2 plugs on top, also make sure the wires are off the 2 black retaining clips:

Pull the wheel off and take it somewhere comfortable, you will only need a philips screw driver. It should look like this:

Last edited by Vervish; 03-16-14 at 02:25 PM.
03-16-14, 01:57 PM
#3
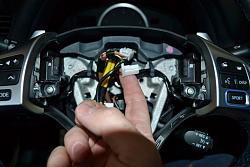
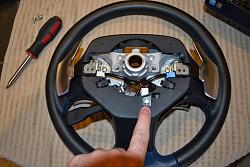
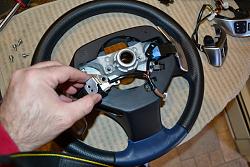
Next step is to remove the radio controls:
The control is held by one screw and 2 plunger tabs. Simply unscrew and pull off slowly.
Next, flip the wheel and carefully push out the tab holding the connector.

The control is held by one screw and 2 plunger tabs. Simply unscrew and pull off slowly.

Next, flip the wheel and carefully push out the tab holding the connector.

Last edited by Vervish; 03-16-14 at 02:20 PM.


 03-16-14, 02:05 PM
#5
Once removed it should look like this:
I should note, that to this point all the screws and washers were exactly the same. However, the screws holing the shifters, looked the same but had some kind of anti-sieze looking green oil on the threading.
Flip over the wheel and unscrew the paddles. Take careful note of which one is right/left. Straight forward, 2 screws each. I set these "special" screws aside and made sure to reuse them on the paddles during install.
Also - note that there is a separate clip attached to the mounting points, make sure you note the orienattion.

I should note, that to this point all the screws and washers were exactly the same. However, the screws holing the shifters, looked the same but had some kind of anti-sieze looking green oil on the threading.
Flip over the wheel and unscrew the paddles. Take careful note of which one is right/left. Straight forward, 2 screws each. I set these "special" screws aside and made sure to reuse them on the paddles during install.

Also - note that there is a separate clip attached to the mounting points, make sure you note the orienattion.

Last edited by Vervish; 03-16-14 at 02:21 PM.
03-16-14, 02:11 PM
#6
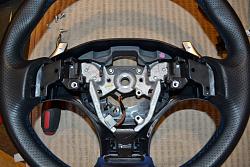
Now, remove the paddles and flip the wheel around:
Remove this metal bracket, 2 screws.
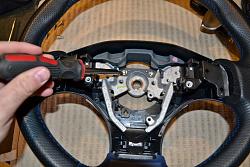

Next, remove the 2 screws holding the plastic surround. Note that these screws are different from the others. Make sure to reuse them in the same place on install.
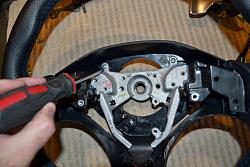
Finally, unclip the plastic here and remove the plastic cover:

Remove this metal bracket, 2 screws.


Next, remove the 2 screws holding the plastic surround. Note that these screws are different from the others. Make sure to reuse them in the same place on install.

Finally, unclip the plastic here and remove the plastic cover:

Last edited by Vervish; 03-16-14 at 02:18 PM.
03-16-14, 02:17 PM
#7
Thats it - install is just like the disassembly in reverse.
Hope this helps clear stuff up for those who are hesitant to do this themselves. It took me 1 hour, start to finish..including the time for the photos. Super easy.
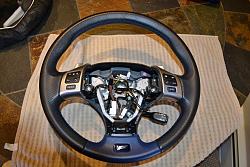
Here is a side by side or the aftermarket wheel and the stocker. Please ignore my 6 year old's juice (and the fact that I am standing on a chair to take the photo).

Hope this helps clear stuff up for those who are hesitant to do this themselves. It took me 1 hour, start to finish..including the time for the photos. Super easy.
Here is a side by side or the aftermarket wheel and the stocker. Please ignore my 6 year old's juice (and the fact that I am standing on a chair to take the photo).

Last edited by Vervish; 03-16-14 at 02:32 PM.
Trending Topics
03-16-14, 04:04 PM
#8
Driver School Candidate

Join Date: Feb 2013
Location: MD
Posts: 26
Likes: 0
Received 0 Likes
on
0 Posts
Nicely done  This was my first and only mod on that car. I have the same flat bottom steering wheel from Sewell Lexus. It should've came standard with that steering wheel IMO.
This was my first and only mod on that car. I have the same flat bottom steering wheel from Sewell Lexus. It should've came standard with that steering wheel IMO.

 03-17-14, 02:06 AM
#11
Great DIY post and pics quick question regarding new steering wheel. From side by side pic the bottom portion of new wheel looks thicker which is great but top portion looks to be same thickness as stock wheel or is it slightly larger diameter hard to tell in pic.


 03-17-14, 07:02 AM
#15
I had the Prova D shaped in my STI, this install looks pretty similar.
Is there anything like the Clockspring in the Subaru that you don't want to disturb when you're removing the OEM wheel?
Is there anything like the Clockspring in the Subaru that you don't want to disturb when you're removing the OEM wheel?