
how do you remove blank panels left of steering wheel?
 02-22-17, 07:16 PM
#1
Driver School Candidate
Thread Starter

Join Date: Nov 2015
Location: BC
Posts: 35
Likes: 0
Received 0 Likes
on
0 Posts
I'm planning on adding a bass **** there but I don't want to break or scratch up the plastic panel and surrounding area. What is the process to remove the little blank panels?
Thanks!!
Thanks!!
 02-22-17, 09:00 PM
#2
Lexus Test Driver
Join Date: Feb 2017
Location: Richmond Hill, Ontario, Canada
Posts: 6,260
Received 1,738 Likes
on
1,371 Posts
Hey DerekGordo...see if this helps. Once you have the panel off you can usually release the blanks from the back.
8. REMOVE INSTRUMENT SIDE PANEL LH(a) Disengage the claw and 4 clips as shown in the illustration.
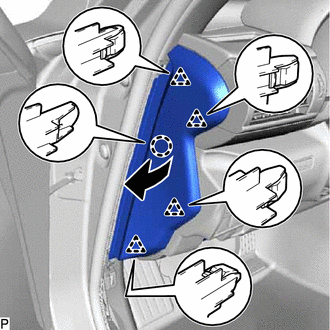 (b) Disengage the 2 guides to remove the instrument side panel LH as shown in the illustration.
 9. REMOVE NO. 1 INSTRUMENT PANEL UNDER COVER SUB-ASSEMBLY(a) Remove the 2 screws<C>.
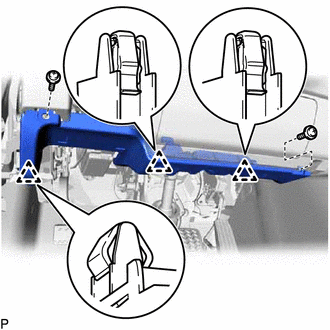 (b) Disengage the 3 clips.
(c) Disengage the connector clamp.
(d) Disconnect each connector to remove the No. 1 instrument panel under cover sub-assembly.
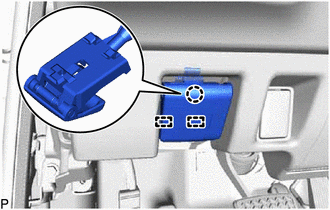
10. DISCONNECT HOOD LOCK CONTROL LEVER SUB-ASSEMBLY(a) Disengage the claw and 2 guides to disconnect the hood lock control lever sub-assembly.
 11. REMOVE LOWER INSTRUMENT PANEL FINISH PANEL SUB-ASSEMBLY(a) Disengage the 6 claws, 6 clips and guide.
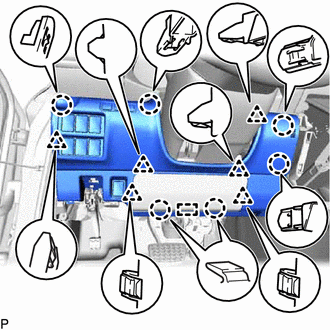 (b) Disconnect each connector to remove the lower instrument panel finish panel sub-assembly.
8. REMOVE INSTRUMENT SIDE PANEL LH(a) Disengage the claw and 4 clips as shown in the illustration.
(b) Disengage the 2 guides to remove the instrument side panel LH as shown in the illustration.9. REMOVE NO. 1 INSTRUMENT PANEL UNDER COVER SUB-ASSEMBLY(a) Remove the 2 screws<C>.(b) Disengage the 3 clips.(c) Disengage the connector clamp.
(d) Disconnect each connector to remove the No. 1 instrument panel under cover sub-assembly.
10. DISCONNECT HOOD LOCK CONTROL LEVER SUB-ASSEMBLY(a) Disengage the claw and 2 guides to disconnect the hood lock control lever sub-assembly.
11. REMOVE LOWER INSTRUMENT PANEL FINISH PANEL SUB-ASSEMBLY(a) Disengage the 6 claws, 6 clips and guide.(b) Disconnect each connector to remove the lower instrument panel finish panel sub-assembly.
02-22-17, 11:09 PM
#3
Driver School Candidate
Thread Starter
Join Date: Nov 2015
Location: BC
Posts: 35
Likes: 0
Received 0 Likes
on
0 Posts
Thanks for the info. I guess I just need to gently pry the panels off to get to the buttons. I was really hoping the buttons would pop out using some special technique and not take apart that whole side.
02-23-17, 09:34 PM
#4
Lexus Test Driver
Join Date: Feb 2017
Location: Richmond Hill, Ontario, Canada
Posts: 6,260
Received 1,738 Likes
on
1,371 Posts
You can probably skip Step 10 and leave the hood release handle attached to the panel.
02-25-17, 08:45 AM
#5
Lexus Test Driver
To add to what Sasnuke has said, I strongly recommend using masking tapes in some areas to avoid marring of the surface. For example, I would put thin masking tapes on the edge of the side panel where you need to insert your prying tool to reach one of the tabs and the pivoting action could mar the surface, depending on the material of your prying tool. You can mask the prying tool tip as well. Also wear disposable gloves help reducing marring as well.
One more caution, the prying action should be progressive. You don't need to completely remove one tab and go to the next one, Instead, you have to sort of go round robin for prying each tab until you know it's time to completely remove the panel. I hope you know what I mean what you work on it.
There is also some clips near the weatherstrip and the weatherstrip somewhat hinders the removal. For IS, I don't recall the need to pull out that section of weatherstrip in order to remove the panel, though. For some other cars, pulling section of weather strip gently help. Example is the NX.
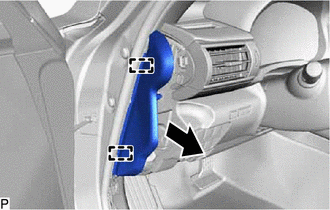
Here is the picture of the inside of the driver's panel that I took a few years ago... to give you an idea of where the tabs are.
One more caution, the prying action should be progressive. You don't need to completely remove one tab and go to the next one, Instead, you have to sort of go round robin for prying each tab until you know it's time to completely remove the panel. I hope you know what I mean what you work on it.
There is also some clips near the weatherstrip and the weatherstrip somewhat hinders the removal. For IS, I don't recall the need to pull out that section of weatherstrip in order to remove the panel, though. For some other cars, pulling section of weather strip gently help. Example is the NX.
Here is the picture of the inside of the driver's panel that I took a few years ago... to give you an idea of where the tabs are.
Last edited by AndyL; 02-25-17 at 08:51 AM.
The following users liked this post:
Soljarag (03-12-20)

Thread
Thread Starter
Forum
Replies
Last Post
2014IS250
IS - 3rd Gen (2014-present)
2
01-29-14 10:30 AM
Stereoca
IS - 2nd Gen (2006-2013)
5
04-09-10 05:43 AM