When you click on links to various merchants on this site and make a purchase, this can result in this site earning a commission. Affiliate programs and affiliations include, but are not limited to, the eBay Partner Network.
Discreet, mirror-powered dash cam. My install & DIY guide.
Hey Club,
Thought you would like to see my discreet and simple dashcam install. Only the mirror wire cover needed removal, and no permanent modifications to the car were made. Pretty much what I will show you is how you make and install a removable 12V-to-USB cable that will allow you to connect a dashcam to run from your car's mirror harness. I hope this guide is helpful for anyone installing their own. The goal:
Materials used
-Mobius cam (http://tinyurl.com/om9pema)
-breadboard wires: http://tinyurl.com/pzhcubd... the pins of these fit perfectly into the back of the mirror harness. If you don't own a breadboard, I'd highly recommend one for testing. You can find breadboard&wire kits for $7 on amazon.
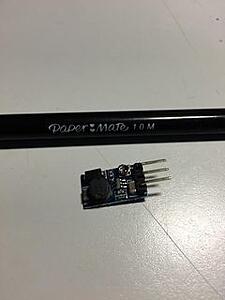
-DC voltage regulator: http://tinyurl.com/oqoecbf
-mini-usb cable included with camera.. (would recommend buying one w/ 90-degree plug)
-Shrink wrap, solder, double-sided tape
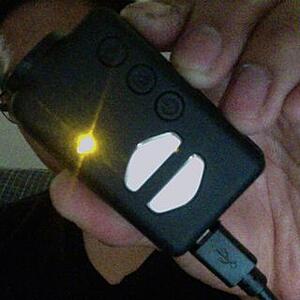
The camera: I choose the Mobius V3 for a number of reasons:
-very discreet: no screen, black, tiny form factor
-tons of user support: very popular cam in the drone and r/c aircraft scene with custom software written for it etc.
-settings: has auto-record on power and lots and lots of other settings to play with, made easy with the homebrew software.
Power & Wiring
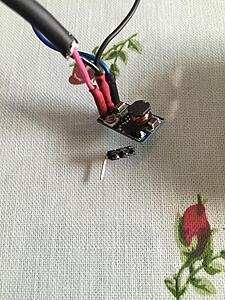
The camera is powered via the ignition-on 12V source connected to the mirror. Because the camera charges on 5V (mini USB port), you will need a voltage regulator. I used a simple 3-pin one, so pretty basic stuff.... one pin is your input voltage (12V from the car), one is the output (to the mini-usb cable), one is ground. Turn the little screw on the board to adjust the output:
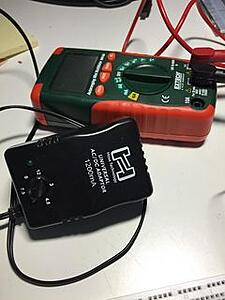
To adjust the regulator, you will need to first hook up a 12V source to the input pin... In theory you could use batteries wired in series, or if you have a 12V AC adapter, use that.. you may have one connected to a router or alarm clock, etc (read the label). In my case, I have a few of these adjustable guitar pedal power supplies:
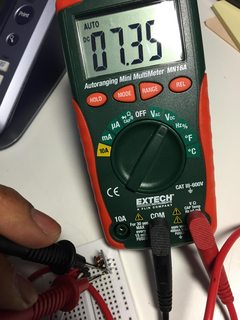
I put my regulator on a breadboard, and hooked up the 12V source.... (+ is the 'tip' / 'inside' of the plug connected to the input pin and the 'sleeve' / outside is ground, connected to the ground pin.) I measured the output voltage (the third pin) and measured 7.3V:
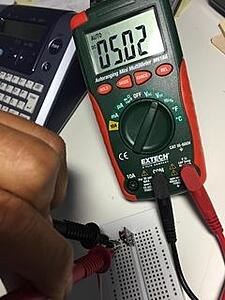
We need 5V, so slightly turn the screw on the regulator until you measure 5V on your multimeter:
Now take the usb cable provided with the camera and cut it so that it is about 7" in length... splice it apart and expose the wires inside. You should see four colors:
Go ahead and cut the ends of the white and green wires off, and strip the red and black. Connect the cable's red wire to the OUTPUT pin on the regulator, and the black to the GROUND pin. If you did this correctly you just made your own 12V to 5V usb plug and your camera will charge :
Now solder this all up together... I desoldered the pins on the regulator, and soldered the breadboard pins and the usb wires directly to the board:
Shrinkwrap... ziptie, etc... make it look decent (see top pic for ideas). On one end you should have two prongs that will connect to the mirror harness and a male-USB on the other. Hook it back up to your 12V source and recheck that you're still getting 5V (the adjustment screw is very sensitive).
Mounting & install
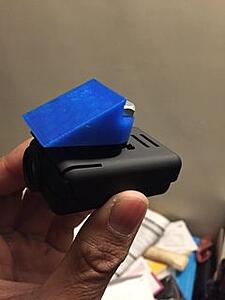
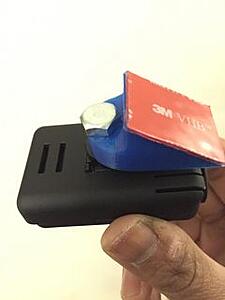
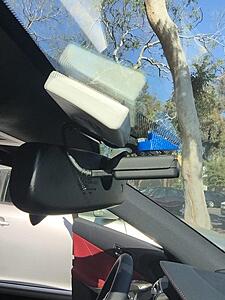
I cheated and simply 3d-printed a small windshield mount to attach to the provided one.:
You could use a small piece of ductile metal and drill a hole large enough for the bolt and attach to your windshield with double-sided tape. Or buy a gopro mount adapter, or a camera mount. Be as creative as you want to be. I was going for footprint at the expense of adjustability.
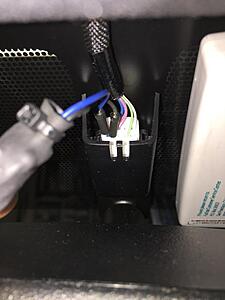
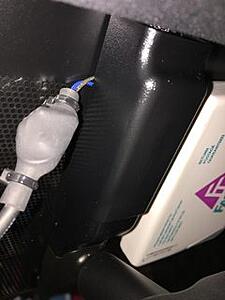
You do not, infact, need to remove the mirror in order to reach the harness, contrary to what I've seen on this board (it would def. give you move room to work though). Remove the upper wire cover on the mirror.... Gently spread both the left and right sides of the piece, while lifting towards you and away from the headliner at the same time. The back of the harness should now be exposed!
Now, if you used the breadboard wires, you will be happy to see that you can insert them straight into back of the mirror harness! You should feel a bit of friction, but that's how you know they're definitely in . Insert the GROUND wire to the PURPLE on the mirror harness, and the 12V wire to the BLUE on the mirror harness.
Put the cover back on and let the wires run out the side. The cover will snap right over the mirror assembly. Slide it upwards towards the headliner:
Hook up the cam, stick it to the windshield, and you're done! If you're using the Mobius Cam, follow these instructions to configure your camera (You need to configure to power on when a external source is connected and to flip the image 180 degrees.
): http://www.rcgroups.com/forums/showthread.php?t=2085613
Screen cap of daytime footage.... set the cam to 720p / 30fps / wide angle view. Not bad. I'm thinking of moving the camera back towards the passengers about an inch or two to capture more:
I simply wired mine in the fuse box with some add-a-fuse after routing the wire along the windshield and pillar. I also added a switch to enable me to run the cam 24/7 or only with ignition on. Mine is an Itronics ITB-100HD that I bought couple years ago.
I simply wired mine in the fuse box with some add-a-fuse after routing the wire along the windshield and pillar. I also added a switch to enable me to run the cam 24/7 or only with ignition on. Mine is an Itronics ITB-100HD that I bought couple years ago.
I did something similar -- routing the wire along with the windshield behind the A-pillar (behind the side airbag by means of the existing plastic drain pipe) and then to the fuse box with some Mini LP add-a-fuse taps. Also a switch from Lukas which controls the on and off of the parking mode as well as a battery drain prevention device.
But this DIY is great as it doesn't involve taking off the panels. Also it inspires me to explore the possibility of creating a cover of the fusebox by 3D printing that would fit the add-a-fuse taps. Kudo to the DIY.
I simply wired mine in the fuse box with some add-a-fuse after routing the wire along the windshield and pillar. I also added a switch to enable me to run the cam 24/7 or only with ignition on. Mine is an Itronics ITB-100HD that I bought couple years ago.
Great idea with the switch! A parking-mode cam mode would be great for when I'm not parked in my garage. There is a constant 12V running through the mirror too, which I believe is the red wire.
Great idea with the switch! A parking-mode cam mode would be great for when I'm not parked in my garage. There is a constant 12V running through the mirror too, which I believe is the red wire.
I never thought of using the mirror as a power source at first. But my cam came with like 6+ feet of wire and I didn't want to cut it. So I ended up using a female cigarette lighter plug to plug the camera wire into.
If 3D printed fuse box cover are ever made, I want one!!
Thanks for this writeup, I'm going to do something similar. The converter you linked isn't on sale anymore, so I did some research and found this as a suitable substitute:
It's a 5V buck converter and it seems that it doesn't need any input filtering with caps as long as it's below 32V input, which in our case will be 12V. Once I get it I'm going to hook it up similar to what you've done and report my results.
This is great, thanks for posting! I just purchased everything including the converter and mount for a little under $110 shipped from amazon. Awesome deal for an almost plug-and-play dash cam.
This is great, thanks for posting! I just purchased everything including the converter and mount for a little under $110 shipped from amazon. Awesome deal for an almost plug-and-play dash cam.
Would you mind posting the links to what you bought? I am okay with tearing my other car apart, but don't want to mess around with this one so much.
Would you mind posting the links to what you bought? I am okay with tearing my other car apart, but don't want to mess around with this one so much.
Sure, just a disclaimer though - I haven't receive any of these as of today. But from what the OP and other have posted, this should be almost plug-and-play. I'll update once I get everything install.
Drhorrible's regulator find is an excellent choice. I am aware of the other options posted here but they're all much too bulky for me... The keyword here is discreet and while the other options aren't huge, I'll take my tiny in-line option any day! I'll post pics showing the discreetness in the next few days.
 06-06-15, 12:54 AM


 :
: