DIY Aftermarket License Plate Light Reverse Camera
 05-11-16, 05:03 PM
#1
Intermediate
Thread Starter
DISCLAIMER: Do this at your own risk.
I don't have a navigator in my base IS250 so I decided to add an ebay reverse camera that takes the place of the driver's side license plate light.
TOOLS REQUIRED: Plastic pry tool, 10mm socket wrench, plastic wire splicers, rearview camera, monitor.
STEP 1: Remove the inner trunk liner with the pry tool. Note the base of the emergency release hatch can be forced through the liner.
STEP 2: Remove the plate covering the license plate lights (one clip and two nuts).
STEP 3: Now you can see the backs of the license plate lights.
STEP 4: Unfortunately, the license plate light is removed from the outside. To do that you have to remove the outside trunk panel. First remove the 2 outer brake lights. Each are held by two plastic nuts on the outside and one black nut near the centre of the car. After removal, you can see the plastic tab of the outside trunk panel.
STEP 5: Remove the 3 nuts holding the top of the outside trunk panel, and use the pry tool to pry off the bottom 5 clips.
STEP 6: Remove the license plate light by squeezing the large tab and pushing the light towards the exterior. Install the camera.
STEP 7: The actual camera is held by two screws into the clear plastic base. I had to remove the camera in order to fit the outside trunk panel back on. Note the clear plastic base doesn't have any gasket. It would be a good time to use some clear silicone. The panel will go back on but it is a tight fit due to the clear plastic base protruding around where the camera fits.
STEP 8: Screw the camera back on (PITA). Note the camera is a bit rotated a few degrees. This was the best I could do. The clear base is tight against the outside panel and caused the plastic base to rotate.
STEP 9: Use the wire splicers to hook up the original license plate light power wires to the the LED light built into the clear plastic base. The positive is green or blue. I can't remember.
STEP 10: Hook up the power to the camera by splicing into the rear light harness after reinstalling the rear lights. EDIT: blue is positive

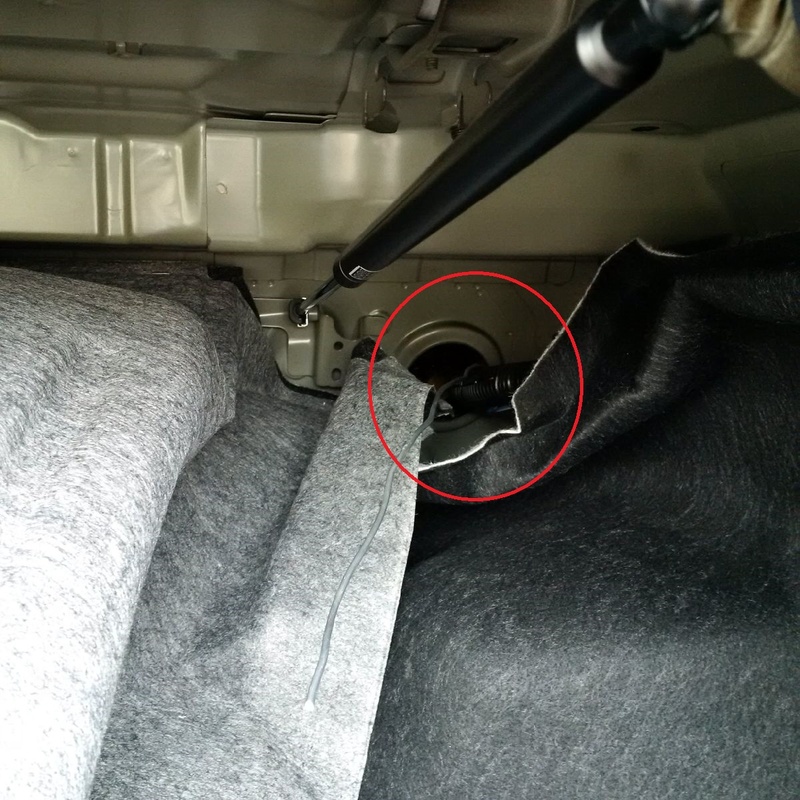
STEP 11: Run the video cable through the passenger side seat using a fish wire. Push the fish wire into the large hole of the back seat and then push it more towards the outside of the car. You should be able to squeeze your hand at the side of the rear passenger seat to grab the wire.
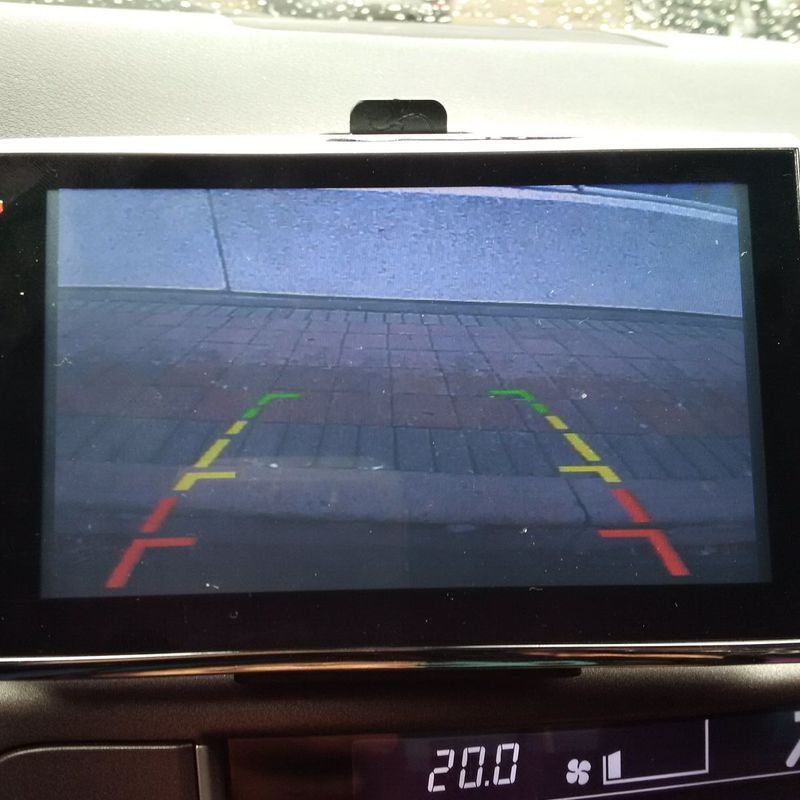
STEP 12: Run the video cable under the doors sills. Hook the video cable to the camera and to the monitor and voila!
I don't have a navigator in my base IS250 so I decided to add an ebay reverse camera that takes the place of the driver's side license plate light.
TOOLS REQUIRED: Plastic pry tool, 10mm socket wrench, plastic wire splicers, rearview camera, monitor.
STEP 1: Remove the inner trunk liner with the pry tool. Note the base of the emergency release hatch can be forced through the liner.
STEP 2: Remove the plate covering the license plate lights (one clip and two nuts).

STEP 3: Now you can see the backs of the license plate lights.

STEP 4: Unfortunately, the license plate light is removed from the outside. To do that you have to remove the outside trunk panel. First remove the 2 outer brake lights. Each are held by two plastic nuts on the outside and one black nut near the centre of the car. After removal, you can see the plastic tab of the outside trunk panel.

STEP 5: Remove the 3 nuts holding the top of the outside trunk panel, and use the pry tool to pry off the bottom 5 clips.


STEP 6: Remove the license plate light by squeezing the large tab and pushing the light towards the exterior. Install the camera.
STEP 7: The actual camera is held by two screws into the clear plastic base. I had to remove the camera in order to fit the outside trunk panel back on. Note the clear plastic base doesn't have any gasket. It would be a good time to use some clear silicone. The panel will go back on but it is a tight fit due to the clear plastic base protruding around where the camera fits.

STEP 8: Screw the camera back on (PITA). Note the camera is a bit rotated a few degrees. This was the best I could do. The clear base is tight against the outside panel and caused the plastic base to rotate.

STEP 9: Use the wire splicers to hook up the original license plate light power wires to the the LED light built into the clear plastic base. The positive is green or blue. I can't remember.

STEP 10: Hook up the power to the camera by splicing into the rear light harness after reinstalling the rear lights. EDIT: blue is positive

STEP 11: Run the video cable through the passenger side seat using a fish wire. Push the fish wire into the large hole of the back seat and then push it more towards the outside of the car. You should be able to squeeze your hand at the side of the rear passenger seat to grab the wire.

STEP 12: Run the video cable under the doors sills. Hook the video cable to the camera and to the monitor and voila!

Last edited by valeoray; 05-11-16 at 06:30 PM.

The following users liked this post:
nosurprise (12-21-20)
 02-01-19, 05:27 AM
#3
Driver School Candidate

Does anybody know where I can find replacement plastic retaining clips for the outer trunk panel? I had to remove the panel to fix a license plate light assembly in the cold (5 degrees F) yesterday and 4 of the 5 clips broke. If needed I can probably use double sided tape but I'd rather make it like OEM.
02-08-19, 11:46 AM
#4
Driver School Candidate
think I may have found them: part number: 6472630080 the description on the Lexus parts site says "FOR REAR COMBINATION LAMP; LUGGAGE COMPARTMENT DOOR MOULDING; LUGGAGE TRIM, REAR"
The following users liked this post:
PressF (01-24-20)
09-09-22, 11:32 AM
#5
2nd gear

Join Date: Sep 2022
Location: Surrey
Posts: 2
Likes: 0
Received 0 Likes
on
0 Posts
DISCLAIMER: Do this at your own risk.
I don't have a navigator in my base IS250 so I decided to add an ebay reverse camera that takes the place of the driver's side license plate light.
TOOLS REQUIRED: Plastic pry tool, 10mm socket wrench, plastic wire splicers, rearview camera, monitor.
STEP 1: Remove the inner trunk liner with the pry tool. Note the base of the emergency release hatch can be forced through the liner.
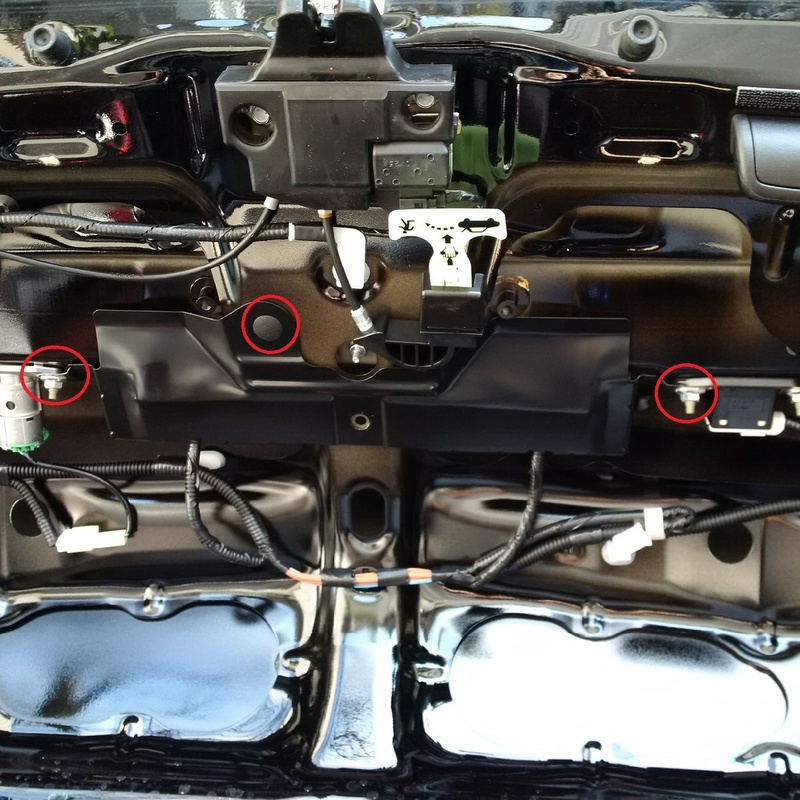
STEP 2: Remove the plate covering the license plate lights (one clip and two nuts).
Attachment 421397
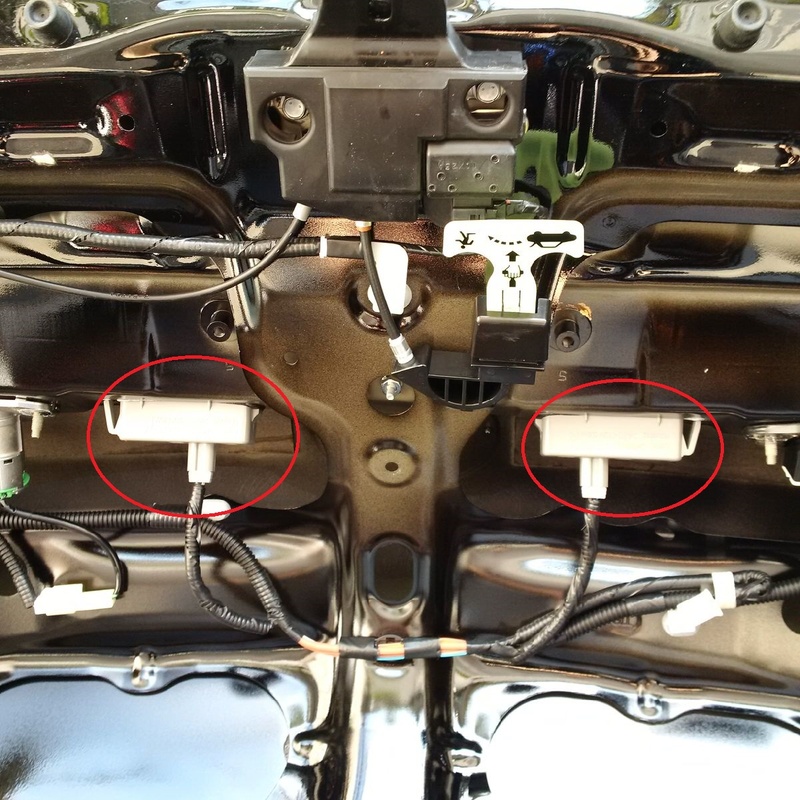
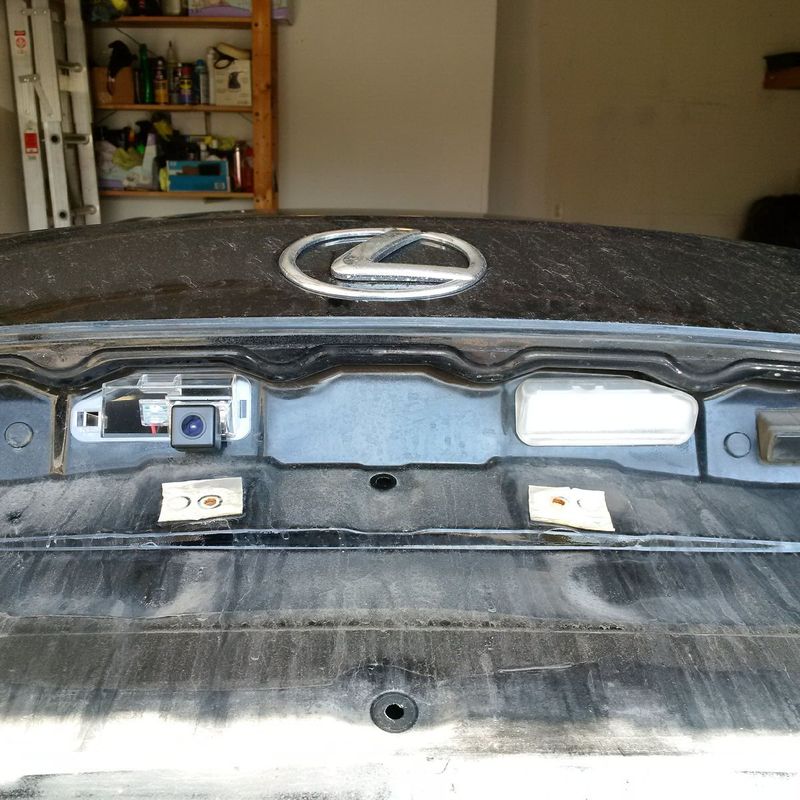
STEP 3: Now you can see the backs of the license plate lights.
Attachment 421398
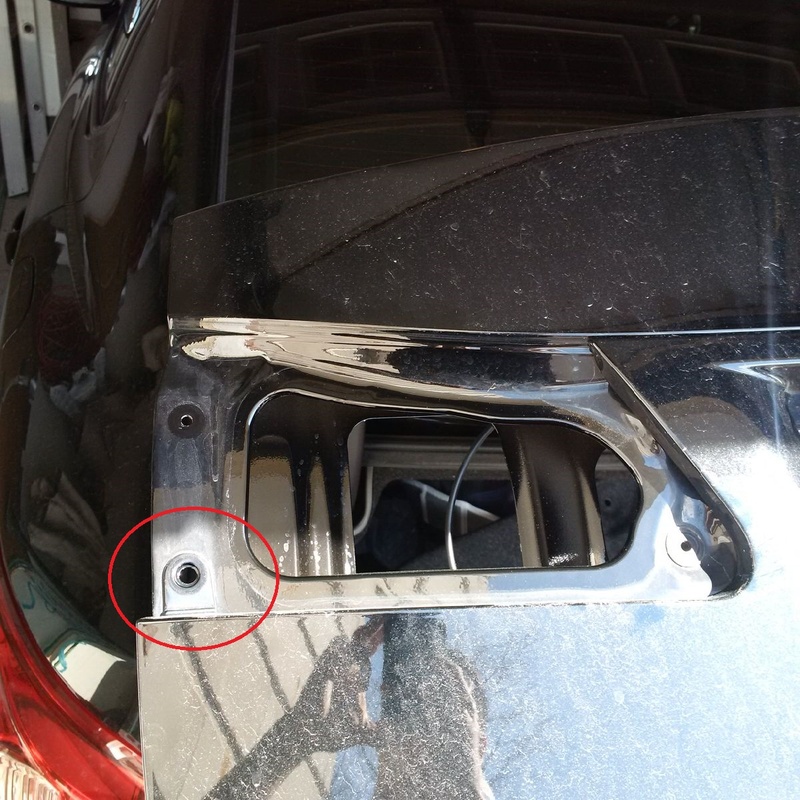
STEP 4: Unfortunately, the license plate light is removed from the outside. To do that you have to remove the outside trunk panel. First remove the 2 outer brake lights. Each are held by two plastic nuts on the outside and one black nut near the centre of the car. After removal, you can see the plastic tab of the outside trunk panel.
Attachment 421399
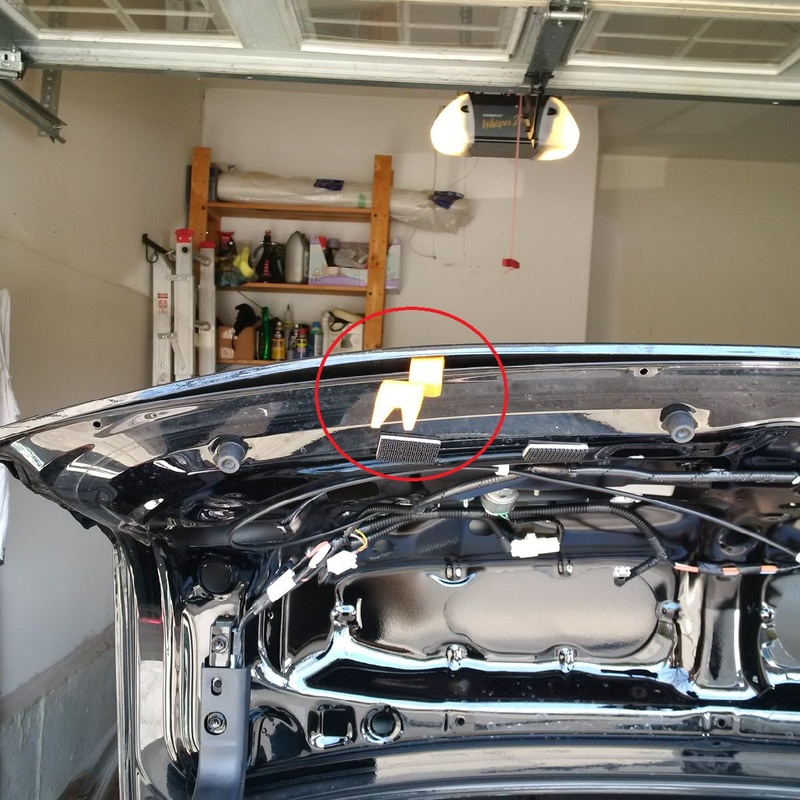
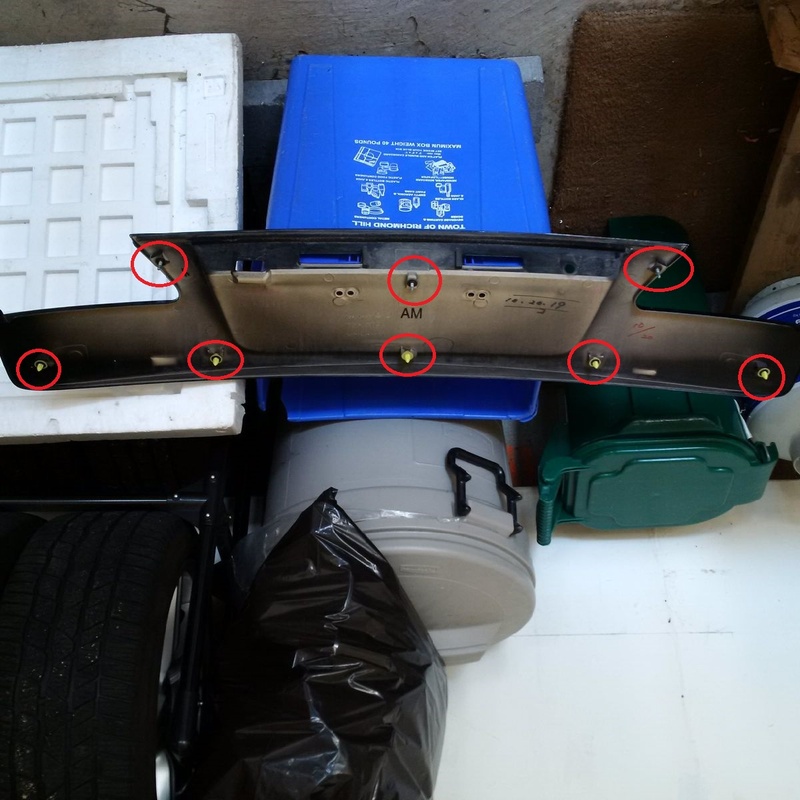
STEP 5: Remove the 3 nuts holding the top of the outside trunk panel, and use the pry tool to pry off the bottom 5 clips.
Attachment 421400
Attachment 421401
STEP 6: Remove the license plate light by squeezing the large tab and pushing the light towards the exterior. Install the camera.
STEP 7: The actual camera is held by two screws into the clear plastic base. I had to remove the camera in order to fit the outside trunk panel back on. Note the clear plastic base doesn't have any gasket. It would be a good time to use some clear silicone. The panel will go back on but it is a tight fit due to the clear plastic base protruding around where the camera fits.
Attachment 421402
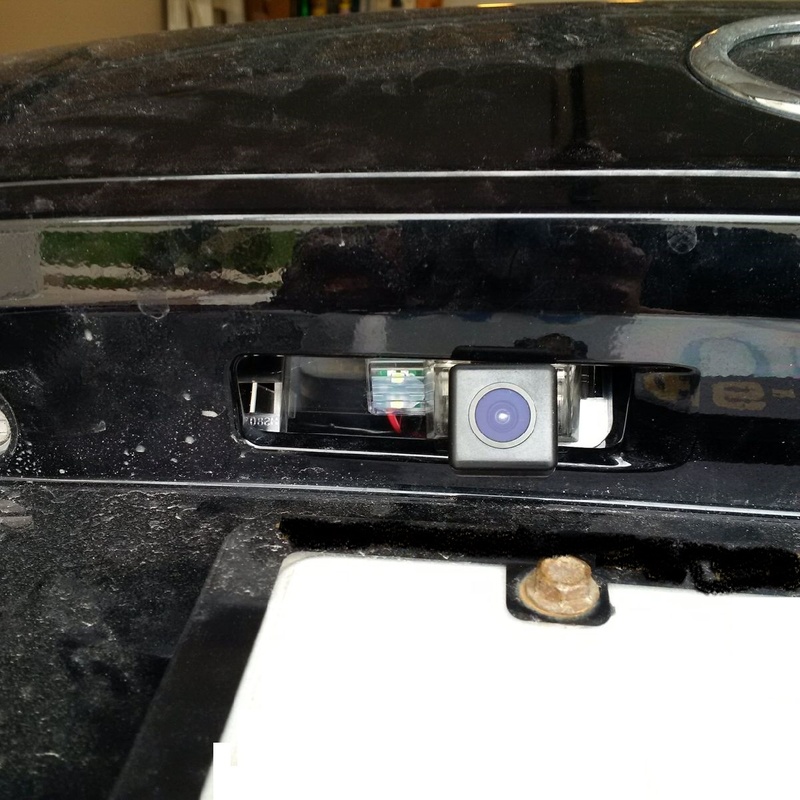
STEP 8: Screw the camera back on (PITA). Note the camera is a bit rotated a few degrees. This was the best I could do. The clear base is tight against the outside panel and caused the plastic base to rotate.
Attachment 421403
STEP 9: Use the wire splicers to hook up the original license plate light power wires to the the LED light built into the clear plastic base. The positive is green or blue. I can't remember.
Attachment 421404
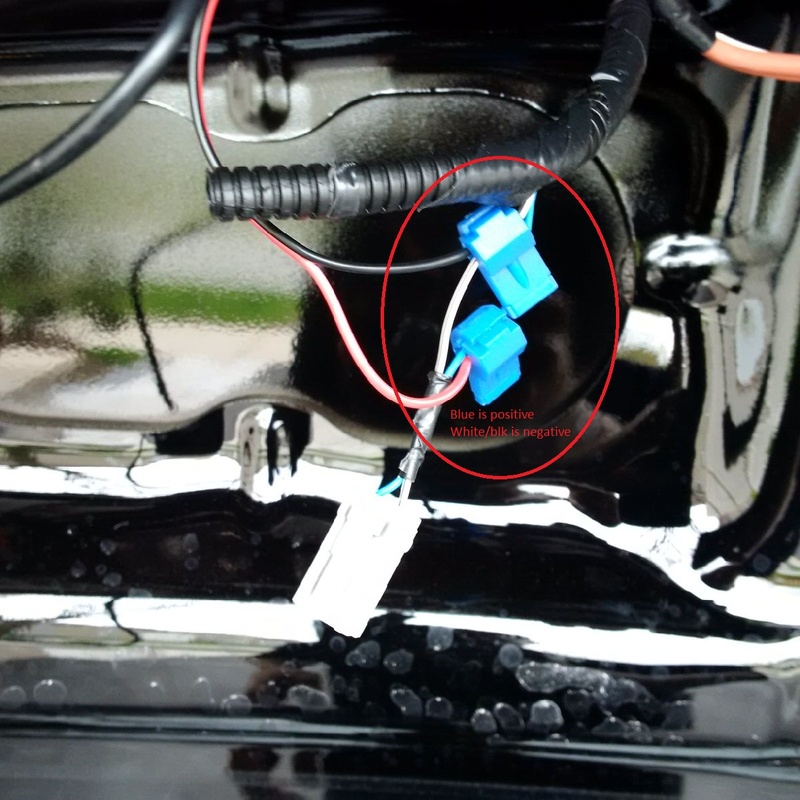
STEP 10: Hook up the power to the camera by splicing into the rear light harness after reinstalling the rear lights. EDIT: blue is positive
Attachment 421405
STEP 11: Run the video cable through the passenger side seat using a fish wire. Push the fish wire into the large hole of the back seat and then push it more towards the outside of the car. You should be able to squeeze your hand at the side of the rear passenger seat to grab the wire.
Attachment 421406
STEP 12: Run the video cable under the doors sills. Hook the video cable to the camera and to the monitor and voila!
Attachment 421407
I don't have a navigator in my base IS250 so I decided to add an ebay reverse camera that takes the place of the driver's side license plate light.
TOOLS REQUIRED: Plastic pry tool, 10mm socket wrench, plastic wire splicers, rearview camera, monitor.
STEP 1: Remove the inner trunk liner with the pry tool. Note the base of the emergency release hatch can be forced through the liner.
STEP 2: Remove the plate covering the license plate lights (one clip and two nuts).
Attachment 421397
STEP 3: Now you can see the backs of the license plate lights.
Attachment 421398
STEP 4: Unfortunately, the license plate light is removed from the outside. To do that you have to remove the outside trunk panel. First remove the 2 outer brake lights. Each are held by two plastic nuts on the outside and one black nut near the centre of the car. After removal, you can see the plastic tab of the outside trunk panel.
Attachment 421399
STEP 5: Remove the 3 nuts holding the top of the outside trunk panel, and use the pry tool to pry off the bottom 5 clips.
Attachment 421400
Attachment 421401
STEP 6: Remove the license plate light by squeezing the large tab and pushing the light towards the exterior. Install the camera.
STEP 7: The actual camera is held by two screws into the clear plastic base. I had to remove the camera in order to fit the outside trunk panel back on. Note the clear plastic base doesn't have any gasket. It would be a good time to use some clear silicone. The panel will go back on but it is a tight fit due to the clear plastic base protruding around where the camera fits.
Attachment 421402
STEP 8: Screw the camera back on (PITA). Note the camera is a bit rotated a few degrees. This was the best I could do. The clear base is tight against the outside panel and caused the plastic base to rotate.
Attachment 421403
STEP 9: Use the wire splicers to hook up the original license plate light power wires to the the LED light built into the clear plastic base. The positive is green or blue. I can't remember.
Attachment 421404
STEP 10: Hook up the power to the camera by splicing into the rear light harness after reinstalling the rear lights. EDIT: blue is positive
Attachment 421405
STEP 11: Run the video cable through the passenger side seat using a fish wire. Push the fish wire into the large hole of the back seat and then push it more towards the outside of the car. You should be able to squeeze your hand at the side of the rear passenger seat to grab the wire.
Attachment 421406
STEP 12: Run the video cable under the doors sills. Hook the video cable to the camera and to the monitor and voila!
Attachment 421407
Trending Topics

Thread
Thread Starter
Forum
Replies
Last Post
logix1229
IS - 3rd Gen (2014-present)
4
05-04-19 12:07 PM