3M wrap around window control buttons?
 12-27-15, 06:39 PM
#1
Driver School Candidate
Thread Starter

Join Date: Aug 2014
Location: Wellington
Posts: 35
Likes: 0
Received 0 Likes
on
0 Posts
Hi CL,
To anyone who has put a 3m wrap on their panels where the window controls are - how did you deal with the curves in where the button sits? Any close up photos? Just trying to figure out the cleanest way to do those, since the wrap doesn't stretch enough for it to be seamless so either the walls or the curve has to be missed.
Thanks!
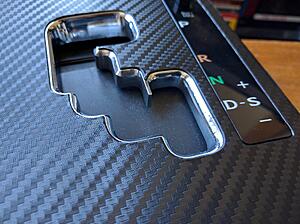
edit: this is what i have done so far, going to have to go back to the cup holder tomorrow.
To anyone who has put a 3m wrap on their panels where the window controls are - how did you deal with the curves in where the button sits? Any close up photos? Just trying to figure out the cleanest way to do those, since the wrap doesn't stretch enough for it to be seamless so either the walls or the curve has to be missed.
Thanks!
edit: this is what i have done so far, going to have to go back to the cup holder tomorrow.


Last edited by jaynz; 12-27-15 at 10:16 PM. Reason: added pics
 12-28-15, 12:45 AM
#2

Hi CL,
To anyone who has put a 3m wrap on their panels where the window controls are - how did you deal with the curves in where the button sits? Any close up photos? Just trying to figure out the cleanest way to do those, since the wrap doesn't stretch enough for it to be seamless so either the walls or the curve has to be missed.
Thanks!
edit: this is what i have done so far, going to have to go back to the cup holder tomorrow.
not sure if you saw this thread yet:
https://www.clublexus.com/forums/is-...m-removal.html
but it looks like he took the whole center console off before applying the 3m vinyl. your wrap looks good though! how long did it take to do that?
12-28-15, 01:14 AM
#3
Driver School Candidate
Thread Starter
Join Date: Aug 2014
Location: Wellington
Posts: 35
Likes: 0
Received 0 Likes
on
0 Posts
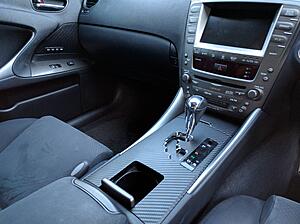
Yeah, have seen that and the other threads too. I took it completely apart including removing the chrome trim. Took around about an hour to wrap, but I think I could do it better and quicker a second time (which I probably will).
Having a lot of trouble on corners and curves, the 3m wrap isn't nearly as pliable as the practise wrap I have, but it is much stronger.
Having a lot of trouble on corners and curves, the 3m wrap isn't nearly as pliable as the practise wrap I have, but it is much stronger.
12-28-15, 02:05 AM
#4
Yeah, have seen that and the other threads too. I took it completely apart including removing the chrome trim. Took around about an hour to wrap, but I think I could do it better and quicker a second time (which I probably will).
Having a lot of trouble on corners and curves, the 3m wrap isn't nearly as pliable as the practise wrap I have, but it is much stronger.
Having a lot of trouble on corners and curves, the 3m wrap isn't nearly as pliable as the practise wrap I have, but it is much stronger.

 12-29-15, 12:59 PM
#7
Driver School Candidate
Thread Starter
Join Date: Aug 2014
Location: Wellington
Posts: 35
Likes: 0
Received 0 Likes
on
0 Posts
Ktran1039 - from new zealand, .jp models are very common here. I've only even seen a couple of IS with a sunroof!
MWIS350 i just used a hair dryer with an attachment to direct heat a bit more precisely.
MWIS350 i just used a hair dryer with an attachment to direct heat a bit more precisely.
Trending Topics
01-03-16, 02:37 PM
#9
Driver School Candidate
Thread Starter
Join Date: Aug 2014
Location: Wellington
Posts: 35
Likes: 0
Received 0 Likes
on
0 Posts
Around the shifter you mean? I took out the silver bit, then reattached it afterwards. That was definitely that hardest part to do!
The hair dryer helped a lot too, it makes the wrap very pliable. I used 3M di-noc.
The hair dryer helped a lot too, it makes the wrap very pliable. I used 3M di-noc.
01-04-16, 01:49 AM
#11
Driver School Candidate
Thread Starter
Join Date: Aug 2014
Location: Wellington
Posts: 35
Likes: 0
Received 0 Likes
on
0 Posts
If you unscrew everything, all that is left is the silver plate which is secured with little pegs. i just clipped the ends off the pegs since the whole assembly is held in with screws once it is put back together.
Fitting the silver bit back on over the wrap took a bit of patience, its probably better to have excess wrap than too little around that bit.
I'll be taking it out of the car again this weekend to do the cup holder and ashtray again since the grain doesn't quite line up, so i'll take more photos then.
I don't think I am going to do the doors, unless i can figure out the curves around the buttons...


Thread
Thread Starter
Forum
Replies
Last Post
UDel
GS - 2nd Gen (1998-2005)
3
09-03-16 02:07 PM