
The Oil Catch Can Experiment
 03-19-13, 10:35 AM
#16
Pole Position
iTrader: (1)
Join Date: Jan 2010
Location: WA
Posts: 202
Likes: 0
Received 0 Likes
on
0 Posts
Impressive amount of oil! I wonder why car manufacturers are not going his route? I realize they would need to recertify emissions on older cars to add this as a fix. But on new models if its a good fix it seems very inexpensive for them to do going forward.
 03-19-13, 01:26 PM
#18
Now for future cars, thats a different scenario, the CARB process is not done and paid for already- and you'll find things such as BMW making a type of catch can, VW put in a patent for a special valve coating, and Ford seems to be working on some kind of filter. Proof is in the pudding, IMO, as to the cause, and the 'cure', for this issue.
So with that amount of oil your going to have to watch your oil level while it collects in the can.
All that gunk would have otherwise been ingested into the cylinders and burned off, so its not like the can accelerates evaporation or loss of fluid in the crank case, it just prevents said stuff that otherwise was getting sucked up anyhow from depositing in the intake runners and intake valves.
If one really wants to route it back, the design of the can facilitates that it still catches the gunk and maintains proper PCV flow path while one could use the included drain extension kit to route the drain back to the pan- though like a turbo setup, the upper or lower pan will need to get tapped and a bung installed for the return. But IMO if you are catching all these contaminants, might as well keep them and drain it at normal intervals than cycle the bad stuff back into the oil.
Last edited by Token1; 03-19-13 at 03:45 PM.


 03-24-13, 03:09 PM
#23
Driver School Candidate
iTrader: (1)

Join Date: Aug 2011
Location: IL
Posts: 22
Likes: 0
Received 0 Likes
on
0 Posts
Hey Optik did you ever ran the optional supplied lines for this kit? So far I have about 1k miles on my catch can since install 3 weeks ago. I was debating on where to route mine for easier drainage.
Install tip, don't be scared to cut some of the hose as mine was about 3 inches too long causing a bit of binding. I routed mine above the brake booster line to provide a more smoother flow/reducing sharper bends. I also routed it so i can tuck it under my plastic cover so it doesn't get too close to my engine. If you have small hands there is no need to remove the fuel feed line or having tools is the key.
Pic of my setup
03-25-13, 07:13 AM
#25
Lead Lap
Thread Starter

Hey Optik did you ever ran the optional supplied lines for this kit? So far I have about 1k miles on my catch can since install 3 weeks ago. I was debating on where to route mine for easier drainage.
Install tip, don't be scared to cut some of the hose as mine was about 3 inches too long causing a bit of binding. I routed mine above the brake booster line to provide a more smoother flow/reducing sharper bends. I also routed it so i can tuck it under my plastic cover so it doesn't get too close to my engine. If you have small hands there is no need to remove the fuel feed line or having tools is the key.
Pic of my setup
I've been so busy I haven't even put my engine covers back on lol. I originally didn't put them back on to verify I wasn't leaking fuel. Now I might just wait until I get my car detailed once the weather warms up since I want them to clean my engine bay. I didn't have the tool to remove the clip so that why I removed the fuel line. I literally struggled with it for 30 mins and decided to just remove the line since it was way easier. Maybe my hands are too big

 04-06-13, 07:53 PM
#27
Driver School Candidate
iTrader: (1)
Join Date: Aug 2011
Location: IL
Posts: 22
Likes: 0
Received 0 Likes
on
0 Posts
I have 3k miles on my car w/oil catch can and just took it in for an oil change at the dealer. They didn't say anything about my setup so my guess is they either over looked because its pretty stealth or didn't care because they knew what it was. I doubt the latter though, lol. Here's a pic below of how much possible blow back oil my can caught after I drained it when I got back.


Last edited by f3nrir125; 04-16-13 at 04:20 PM.
06-28-13, 01:53 PM
#28
Driver
Join Date: Jun 2013
Location: Ontario
Posts: 134
Likes: 0
Received 0 Likes
on
0 Posts
Hi - the terminology probably has me confused so I'm hoping you can help clarify which hose goes where. Can you please tell me: does the hose that you first removed and then attached the white connector + new hose to, connect to the TOP or BOTTOM port on the catch can. Thanks!
So I have a 2009 Lexus IS250 AWD thats showing signs of the carbon buildup issue. My car started to shake more than usual at red lights arond 43,XXX miles. Took it to the dealership and they said they couldn't 'replicate' the issue so I couldn't get the top clean done. Looked on the forums and even the piston replacement TSB isn't a fix, just a band-aid. I figured I'd look into a solution and someone mentioned an oil catch can and it looks like a good solution! I did some research and the OCC will filter the oil and oil vapors that make their way through the PCV valve. The same vapors and gunk that attach themselves to the intake valves and cause the low idles and sluggishness that people have been seeing with their 06-10 250 (DI) engines.
So I started looking around for a quality OCC (oil catch can) and I came across Saikou Michi Co. I sent them an email, but they said they were at capacity so they referred me to Shaun at tokensolutions. When I looked up the OCC at tokensolutions I realized that its actually a collaboration between TS and SMC, so I was siked to pick one up! I have to say Shaun is awesome, he responds to emails in a timely fashion and really knows his stuff. You can pick that up from that fact that he's working with SMC to bring us a quality OCC, along with the knowledge that he shares on the carbon buildup issue. I installed it this past weekend and took a few pics of the install to better help people that are looking to do this mod.
The first pic shows all the covers that need to be removed off (dirty engine bay). The OCC from TS has a bracket that connects to the bolt that holds down the coolant container. It's actually a pretty good design because the TS is suspended in an open area so there's no issues. I want to note that I had to remove the fuel line above the 7th spark plug in order to get better access to the PCV valve location. I tried getting my hands in there but I go no where after half an hour. Taking the fuel line out helped a ton, just be careful because some gas will come out and there's a washer in there that I almost lost. Also, keep the metal piece higher than the hose to keep more gas from coming out (basic physics).

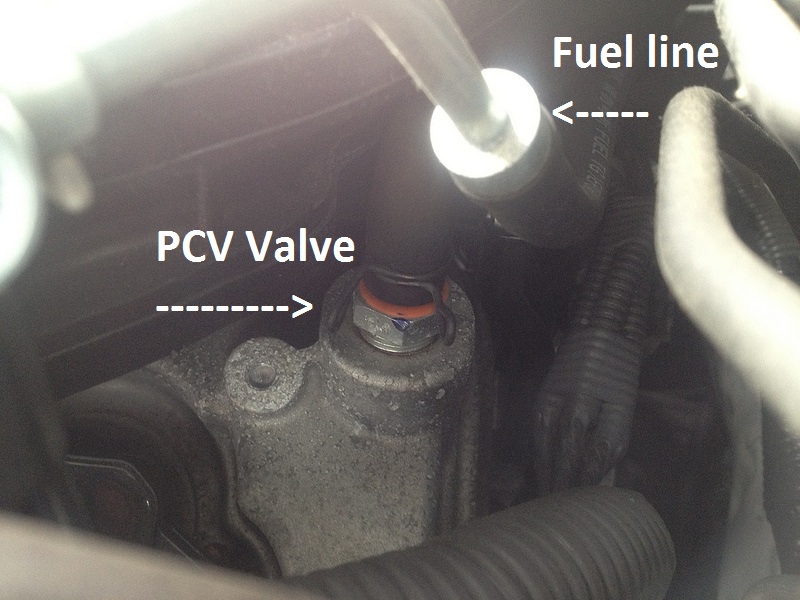
Here is a close up of the PCV valve location:
Here is the extended bolt that replaces the oem bolt, along with the bracket that connects to the OCC:

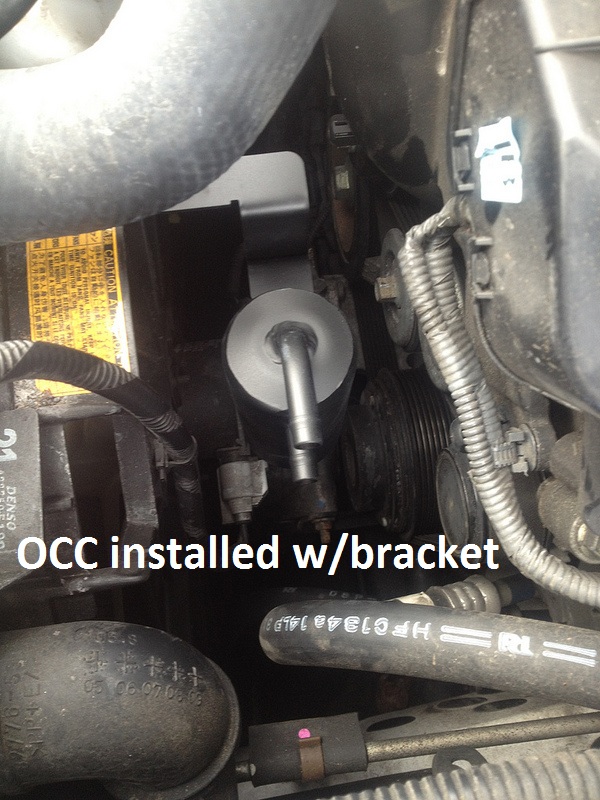
Here is the OCC installed w/o the hoses attached. I noticed that this area gets a good amount of air flow, which would make sense since you want oil vapor to condense.
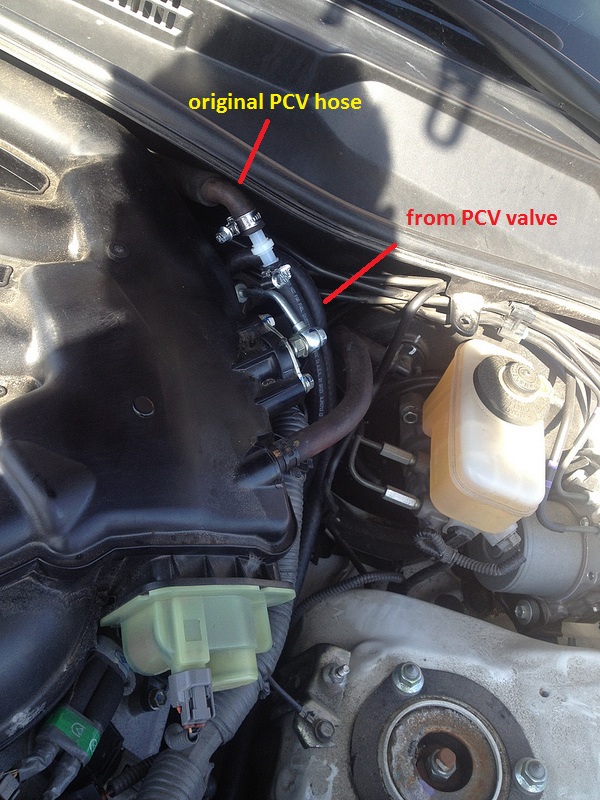
Here is everything all hooked up (note i moved the metal hose tightener closer to the OCC afterwards):

Here is everything that is going on around the PCV valve area. The original PCV hose is connected to an extension which goes to the output port of the OCC. Another hose is hooked up from the PCV valve to the intake of the OCC (picture was a little tough since the sun decided to come out). I want to note that I touched my finger to the opening of the PCV valve when I took it off and there was definitely oil that collected on my glove.
Pic of miles post install:

Overall the install was pretty easy (should take ~45 mins) and I want thank Shaun @ TS for creating an awesome kit. The kit literally comes with everything that you need and it even comes with a drain extension kit that I didn't install. Is this the carbon build up solution we've been looking for? After doing my research I want to say 'Yes', but the proof is in the pudding. I will be updating this thread with pics of what the OCC collects over the next 3 thousand miles. I will also be getting the BG GDI service done at some point soon as I find a shop that will do it.
So I started looking around for a quality OCC (oil catch can) and I came across Saikou Michi Co. I sent them an email, but they said they were at capacity so they referred me to Shaun at tokensolutions. When I looked up the OCC at tokensolutions I realized that its actually a collaboration between TS and SMC, so I was siked to pick one up! I have to say Shaun is awesome, he responds to emails in a timely fashion and really knows his stuff. You can pick that up from that fact that he's working with SMC to bring us a quality OCC, along with the knowledge that he shares on the carbon buildup issue. I installed it this past weekend and took a few pics of the install to better help people that are looking to do this mod.
The first pic shows all the covers that need to be removed off (dirty engine bay). The OCC from TS has a bracket that connects to the bolt that holds down the coolant container. It's actually a pretty good design because the TS is suspended in an open area so there's no issues. I want to note that I had to remove the fuel line above the 7th spark plug in order to get better access to the PCV valve location. I tried getting my hands in there but I go no where after half an hour. Taking the fuel line out helped a ton, just be careful because some gas will come out and there's a washer in there that I almost lost. Also, keep the metal piece higher than the hose to keep more gas from coming out (basic physics).
Here is a close up of the PCV valve location:
Here is the extended bolt that replaces the oem bolt, along with the bracket that connects to the OCC:
Here is the OCC installed w/o the hoses attached. I noticed that this area gets a good amount of air flow, which would make sense since you want oil vapor to condense.
Here is everything all hooked up (note i moved the metal hose tightener closer to the OCC afterwards):
Here is everything that is going on around the PCV valve area. The original PCV hose is connected to an extension which goes to the output port of the OCC. Another hose is hooked up from the PCV valve to the intake of the OCC (picture was a little tough since the sun decided to come out). I want to note that I touched my finger to the opening of the PCV valve when I took it off and there was definitely oil that collected on my glove.
Pic of miles post install:
Overall the install was pretty easy (should take ~45 mins) and I want thank Shaun @ TS for creating an awesome kit. The kit literally comes with everything that you need and it even comes with a drain extension kit that I didn't install. Is this the carbon build up solution we've been looking for? After doing my research I want to say 'Yes', but the proof is in the pudding. I will be updating this thread with pics of what the OCC collects over the next 3 thousand miles. I will also be getting the BG GDI service done at some point soon as I find a shop that will do it.
06-28-13, 05:41 PM
#29
Driver School Candidate
Okay so looks like it stops or reduces the carbon build up, but how exactly? I have a rough idea. How often do you have to drain it or is that based on how much you travel?
06-29-13, 06:38 PM
#30
Driver School Candidate
iTrader: (1)
Join Date: Aug 2011
Location: IL
Posts: 22
Likes: 0
Received 0 Likes
on
0 Posts
I drain it during the day of an oil change. It's suppose to minimize the amount of oil vapor that's fed into an engine's air intake tract. This oil vapor is the suspect to the cause of the carbon buildup. I may missing something so it's best to ask token solutions if you need further explanation.