HOW to RETROFIT: NON NAVIGATION TO NAVIGATION
 02-22-09, 01:07 AM
#1
Disclaimer:BEFORE attempting to work on your vehicle, I am not responsible for anything that happens to your car or you. Instructions may have mistakes, or they could cause damage to your car, please use and read at your own risk.
hey there pals and gals, here's what you've been waiting for. I just finished retrofitting my IS350 with non nav to a functional ML nav unit with DVD playback. I probably won't finish this tonight but I'll start and probably compile all the instructions when i get time, but for the time being here you go.
The goal of this thread is to give you a fully functional OEM Nav less than $2000.
TIME:
12 hours
SUPPLIES:
1. Patience
2. Subsribe to techinfo.toyota.com it'll help you get familiar with what you are about to do, go ahead and buy the month subscription, if not you'll be like me and buy three daily passes only to go ahead and buy it for a month a week later. ($75 starting May 5, 2009)
3.Nav Unit $1000 (Ebay)
4. Wire cutters ($0 hopefully you have a pair)
5. Electrical Tape ($3 Wal-Mart)
6. Needle Nose Pliers ($0 hopefully you have a pair)
7. Flat Head Screwdriver ($0 if you don't have one, then you should not be reading this thread)
8. 10m Wrench with Extender, NAV unit screws are far back behind the A/C vents. ($10 Wal-Mart)
9. Solder and Solder Gun ($10 Wal-Mart DO NOT SOLDER ANYTHING UNTIL YOU DOUBLE CHECK ALL OF YOUR WORK)
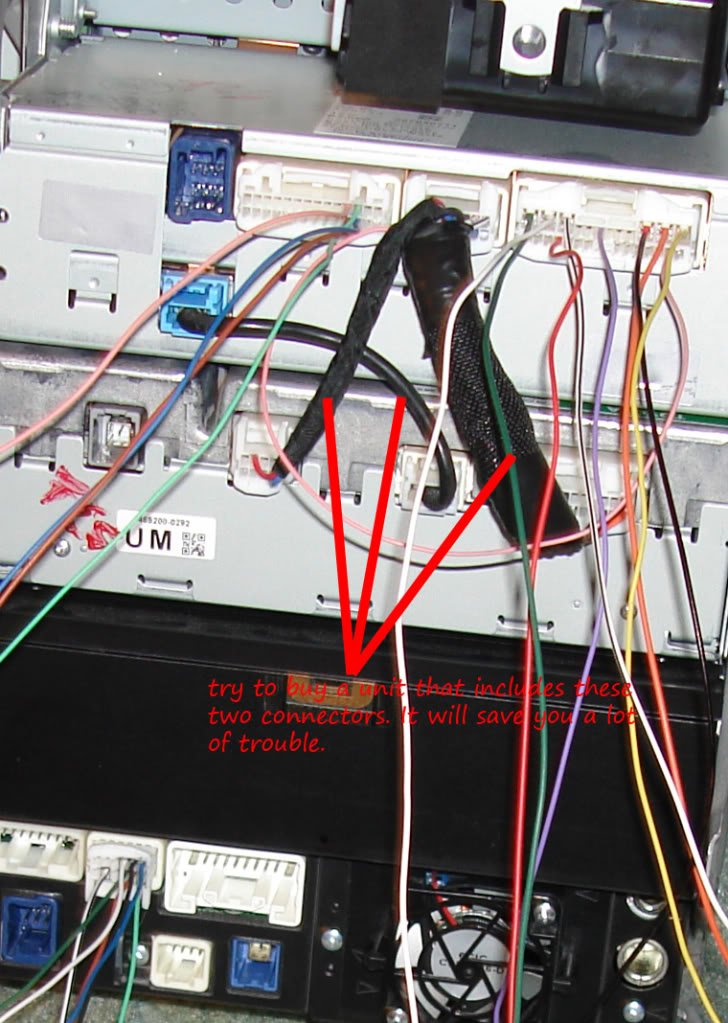
9 P1, J50, J53, and J51 custom harnesses (Buy a unit that comes with at least the P1 $80 connector and the other connector $50 illustrated in the pic. If not they can be purchased here http://www.trademotion.com/partlocat...=5&catalogid=2)
**The other harnesses can be custom made or I can sell you my extra harnesses J50, J53, J51**
ON THIS PICTURE THE J53 CONNECTOR IS IN THE WRONG LOCATION, PLEASE DISREGARD FOR CONNECTION PURPOSES.
10. Nav antenna ($25 Ebay)
Total: $1123 and worth every penny!
11. Optional: Camera and Mic.- This thread will not go through the installation of these parts.
Directions
1. Remove gear shift ****. Simply turn the shift **** counterclockwise and it will unscrew.
2. Remove woodgrain and center panel-how to:
With a flat head screwdriver slide the head of the screwdriver along the rear side of the silver pieces that surround the center piece. You may also use your finger nails, these pop off pretty easy. Once you have the screwdriver inserted, gently pry up and back and they should pop and slide right off.
Slide the arm rest back and gently pry and pull up on the center console piece, it is attached with clips, so it should pop right off and slide over the gear shift with no problem. Unplug the gear shift harness and seat warmer plug.
Next use a phillips screwdriver to unscrew the 10mm bolts on either side or the ash tray. Once that is done, the ash try will slide right off. Unplug cigarette lighter harness.
The center console is now complete!
3. Vents Removal
For some odd reason removing the vents are not as hard as people are saying.
Look inside the vents, there are two little rectangle slits that need to be pried down. Gently use a small screwdriver and stick it inside the vents and pry down. The clips should pop down, be careful because it does not require a lot of force to get the tabs to come down.
Next, using a plastic pry tool or a Flat Head screwdriver wrapped in electric tape, ply the Vents out of the dash. The dash is very forgiving, so gently slide the screwdriver between the dash and the vents and ply the vents out. Gently pry one side out about half an inch, remove the screwdriver and hold that side with your hand. Insert the screwdriver on the other side between the vent and dash and pry that side out. Depending on how you did this two things could happen, either way it is okay, do not panic.
I. If you did it the way I did mine, the whole vent assembly will come out, simply disconnect the two vent harnesses.
II. Option two only the vent fascia came off, which will still allow you access to the dash console 10mm bolts.
4. Remove bottom piece of Cd player, its the rounded trim that right above the ash tray it just pops right off. Save it in case your NAV unit doesn't come with it.
5. Place white towel over center console to stop debris from falling into the console and protect the edges during installation.
6. Unscrew the 4 10mm bolts holding the dash unit, there are two located at the top of the unit, by the vent adjusters. These are pretty far back so an extender may need to be used. Then there are two at the bottom on either side which are pretty far back as well. Once these are removed the dash should slide right out.
7. Remove all plugs and Connectors from the unit.
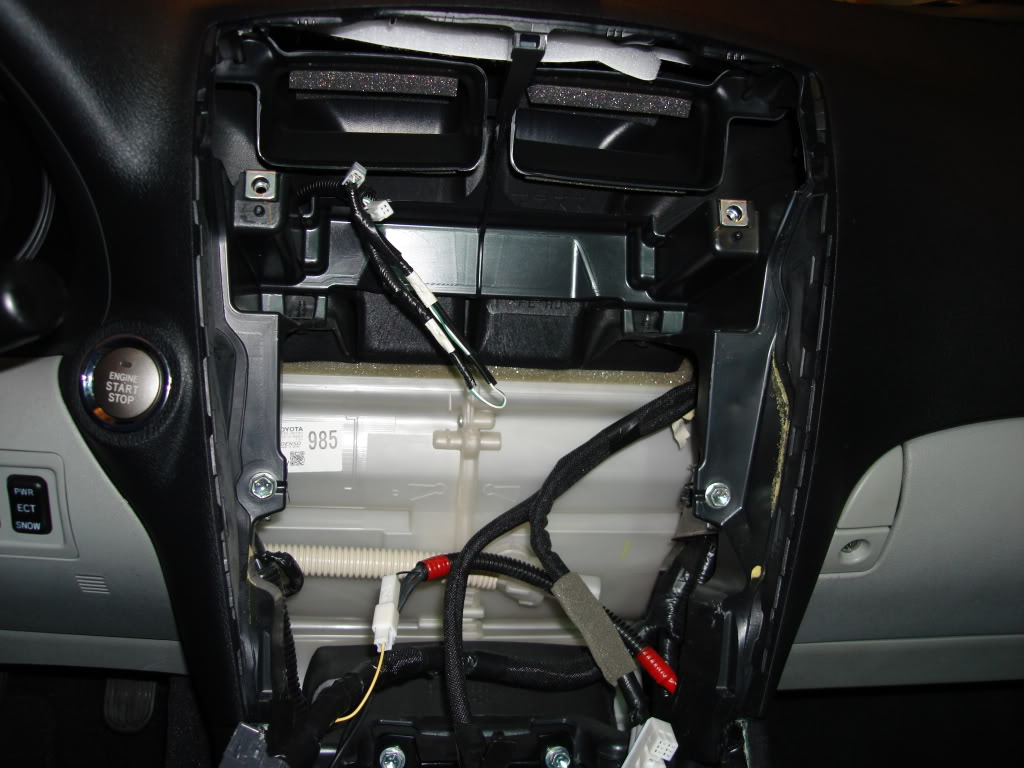
8. This is what should look like before the mods.
-Disclaimer: Doing the following steps for the first time scared the CRAP out of me!
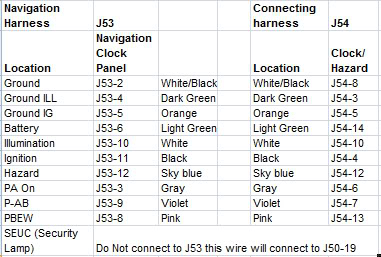
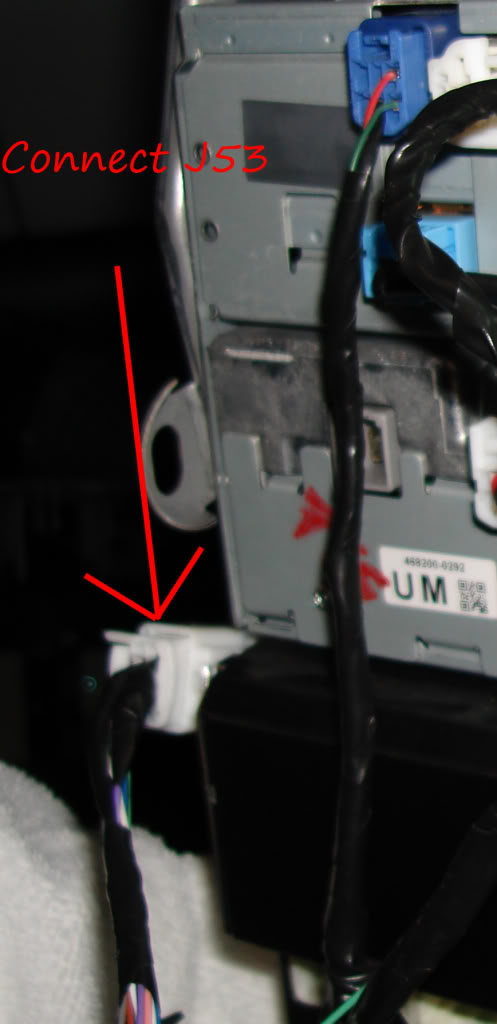
8. Completely cut the J54 connector. Look for Part number: 11911 on the connector. It has 14 terminal slots, 2 of those will NOT be used which is the RED and BROWN wire , there functions are unknown to me. Connect the NAV connector J53 by color to the existing wires. Here's the diagram to ensure that you are wiring properly and a pic.
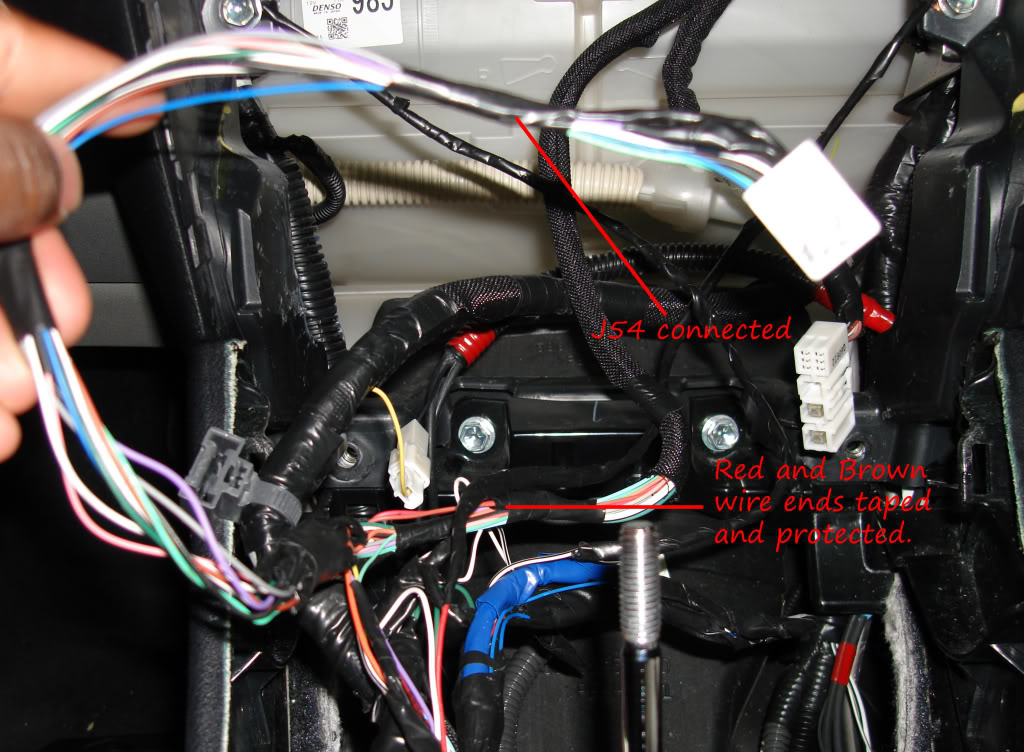
The J53 connector connects into the clock on the side of the unit. There is another plug that this connector can be easily confused with, if you swap them out you will immediately know something is wrong because your hazard lights will flash profusely.
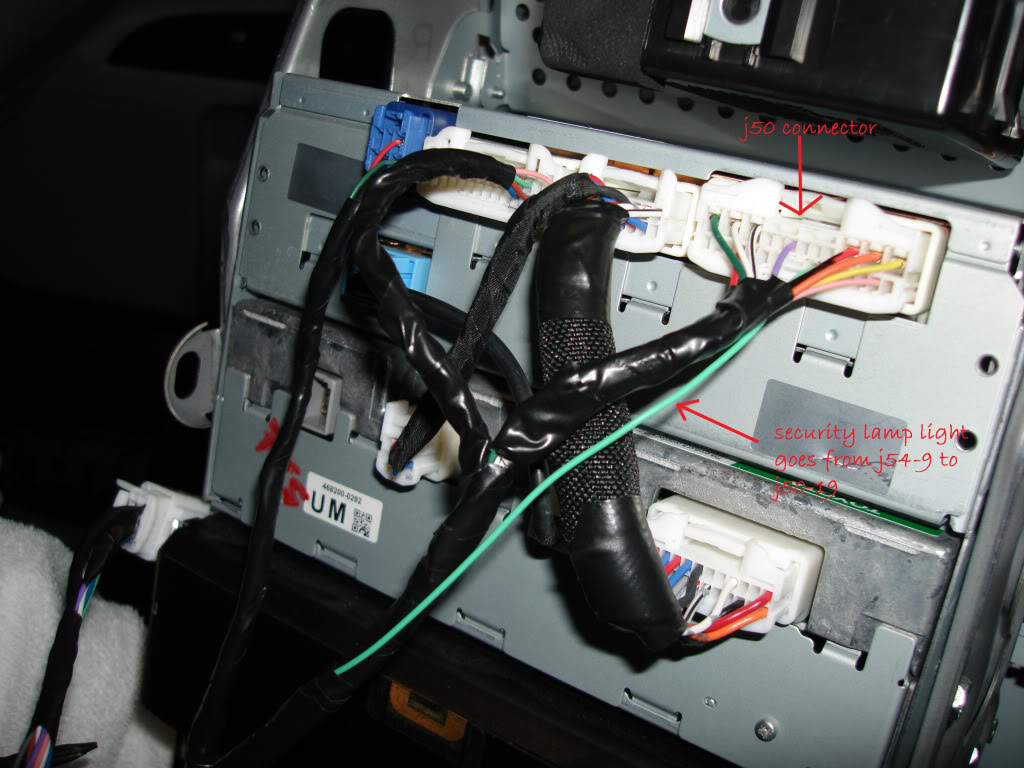
10. Here you can see J54-9 going into the J50-19. It’s the light green wire. Now we will connect the J50 connector which is located to the right of the P1 connector. Most of the connections will be made to the J54 connector. You can tap them into the same place you made the previous taps and then solder them all together. View the below Diagram, I am unsure about the last two connections, if you do not have a ML unit, I know you don't ground the parking brake or tap into the speed sensor on the P1 connector; however you will have to access these two terminals elsewhere which would cause you to tap into a different harness (I think somewhere on the J55).
hey there pals and gals, here's what you've been waiting for. I just finished retrofitting my IS350 with non nav to a functional ML nav unit with DVD playback. I probably won't finish this tonight but I'll start and probably compile all the instructions when i get time, but for the time being here you go.
The goal of this thread is to give you a fully functional OEM Nav less than $2000.
TIME:
12 hours
SUPPLIES:
1. Patience
2. Subsribe to techinfo.toyota.com it'll help you get familiar with what you are about to do, go ahead and buy the month subscription, if not you'll be like me and buy three daily passes only to go ahead and buy it for a month a week later. ($75 starting May 5, 2009)
3.Nav Unit $1000 (Ebay)
4. Wire cutters ($0 hopefully you have a pair)
5. Electrical Tape ($3 Wal-Mart)
6. Needle Nose Pliers ($0 hopefully you have a pair)
7. Flat Head Screwdriver ($0 if you don't have one, then you should not be reading this thread)
8. 10m Wrench with Extender, NAV unit screws are far back behind the A/C vents. ($10 Wal-Mart)
9. Solder and Solder Gun ($10 Wal-Mart DO NOT SOLDER ANYTHING UNTIL YOU DOUBLE CHECK ALL OF YOUR WORK)
9 P1, J50, J53, and J51 custom harnesses (Buy a unit that comes with at least the P1 $80 connector and the other connector $50 illustrated in the pic. If not they can be purchased here http://www.trademotion.com/partlocat...=5&catalogid=2)
**The other harnesses can be custom made or I can sell you my extra harnesses J50, J53, J51**
ON THIS PICTURE THE J53 CONNECTOR IS IN THE WRONG LOCATION, PLEASE DISREGARD FOR CONNECTION PURPOSES.
10. Nav antenna ($25 Ebay)
Total: $1123 and worth every penny!
11. Optional: Camera and Mic.- This thread will not go through the installation of these parts.
Directions
1. Remove gear shift ****. Simply turn the shift **** counterclockwise and it will unscrew.
2. Remove woodgrain and center panel-how to:
With a flat head screwdriver slide the head of the screwdriver along the rear side of the silver pieces that surround the center piece. You may also use your finger nails, these pop off pretty easy. Once you have the screwdriver inserted, gently pry up and back and they should pop and slide right off.
Slide the arm rest back and gently pry and pull up on the center console piece, it is attached with clips, so it should pop right off and slide over the gear shift with no problem. Unplug the gear shift harness and seat warmer plug.
Next use a phillips screwdriver to unscrew the 10mm bolts on either side or the ash tray. Once that is done, the ash try will slide right off. Unplug cigarette lighter harness.
The center console is now complete!
3. Vents Removal
For some odd reason removing the vents are not as hard as people are saying.
Look inside the vents, there are two little rectangle slits that need to be pried down. Gently use a small screwdriver and stick it inside the vents and pry down. The clips should pop down, be careful because it does not require a lot of force to get the tabs to come down.
Next, using a plastic pry tool or a Flat Head screwdriver wrapped in electric tape, ply the Vents out of the dash. The dash is very forgiving, so gently slide the screwdriver between the dash and the vents and ply the vents out. Gently pry one side out about half an inch, remove the screwdriver and hold that side with your hand. Insert the screwdriver on the other side between the vent and dash and pry that side out. Depending on how you did this two things could happen, either way it is okay, do not panic.
I. If you did it the way I did mine, the whole vent assembly will come out, simply disconnect the two vent harnesses.
II. Option two only the vent fascia came off, which will still allow you access to the dash console 10mm bolts.
4. Remove bottom piece of Cd player, its the rounded trim that right above the ash tray it just pops right off. Save it in case your NAV unit doesn't come with it.
5. Place white towel over center console to stop debris from falling into the console and protect the edges during installation.
6. Unscrew the 4 10mm bolts holding the dash unit, there are two located at the top of the unit, by the vent adjusters. These are pretty far back so an extender may need to be used. Then there are two at the bottom on either side which are pretty far back as well. Once these are removed the dash should slide right out.
7. Remove all plugs and Connectors from the unit.
8. This is what should look like before the mods.
-Disclaimer: Doing the following steps for the first time scared the CRAP out of me!
8. Completely cut the J54 connector. Look for Part number: 11911 on the connector. It has 14 terminal slots, 2 of those will NOT be used which is the RED and BROWN wire , there functions are unknown to me. Connect the NAV connector J53 by color to the existing wires. Here's the diagram to ensure that you are wiring properly and a pic.
The J53 connector connects into the clock on the side of the unit. There is another plug that this connector can be easily confused with, if you swap them out you will immediately know something is wrong because your hazard lights will flash profusely.
10. Here you can see J54-9 going into the J50-19. It’s the light green wire. Now we will connect the J50 connector which is located to the right of the P1 connector. Most of the connections will be made to the J54 connector. You can tap them into the same place you made the previous taps and then solder them all together. View the below Diagram, I am unsure about the last two connections, if you do not have a ML unit, I know you don't ground the parking brake or tap into the speed sensor on the P1 connector; however you will have to access these two terminals elsewhere which would cause you to tap into a different harness (I think somewhere on the J55).
Last edited by 350PsDMeuP; 07-17-09 at 04:08 PM.

The following users liked this post:
Davidli (12-07-21)


 04-11-09, 04:20 PM
#6
Continued.......
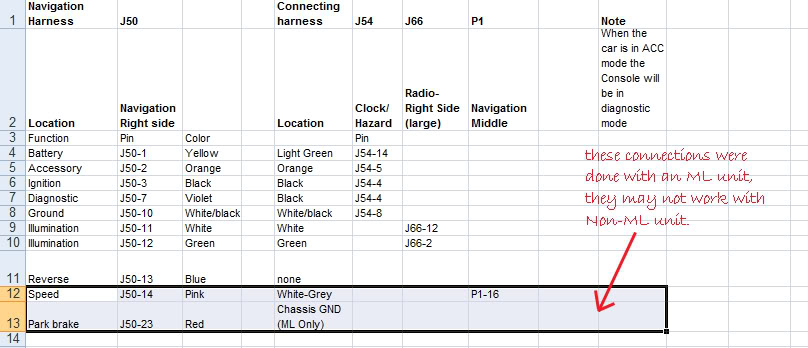
Disclaimer: This information was provided by Lohus another member that has successful done the swap without ML. According to him the J50-14 (pink speed sensor) should be tapped into the J55-19 and im unsure where the parking brake taps into but somewhere on the J55 as well according to the techinfo.
Sorry I'm not sure where these two wires go but I will update that information as soon as I know, I would do trial an error but my unit has ML.
YOU ARE ALMOST DONE! JUST 4 MORE TAPS AND NAV HERE YOU COME!
11. The last tap you will do will be for the HVA/C system.

Your system is now complete, enjoy!

OPTIONAL: Add ML to NON ML units with ML DVD Player
I know a lot of people out there wish they could watch DVD's on their nice NAV screen. So it is possible but some have tried and not received the perfect outcome with aftermarket DVD players and the custom install. This thread will tell you everything you need.
DISCLAIMER: I am not responsible for any damage you may cause to your car by reading this informative thread.
WARNING: IF your scared of doing the NAV hack well stop reading now. This involves a 3 wire tap and a custom harness.
MATERIALS:
1. Solder and Soldering Gun
2. Wire Cutters
3. Electrical Tape
4. ML DVD Player $300-400 (local junkyard or car-part.com)
5. Custom Harness $50, unless you want to hardwire the wires to the unit itself. If you're going this route have it done professionally. Bestbuy said they would charge $100, probably could get it cheaper.
6. 2 hrs.
Total: $350, best upgrade I have since I can put on a DVD while we take our trips from here to there and the quality is amazing.
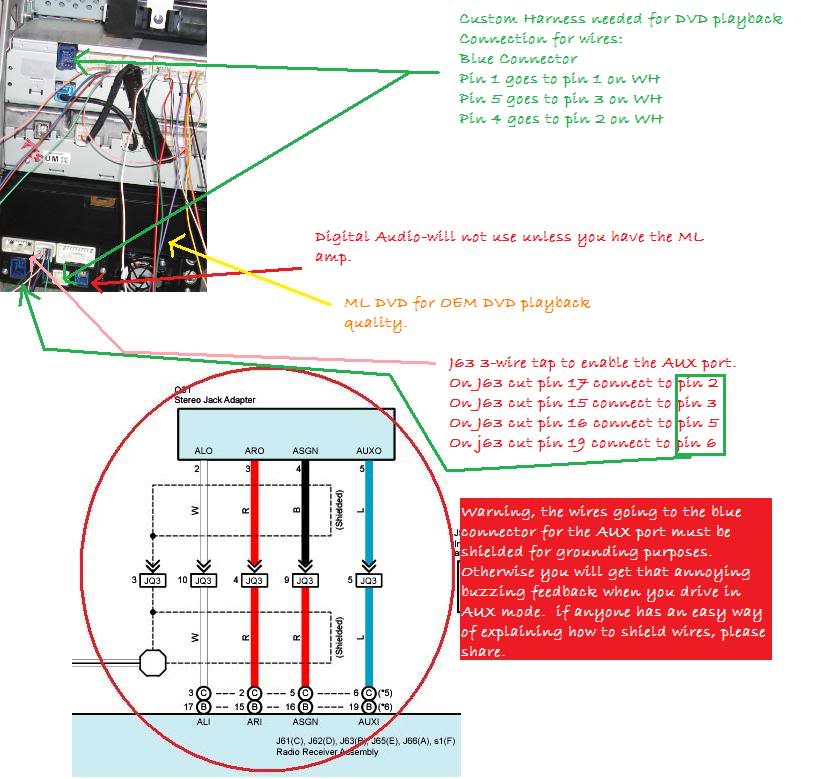
you're done, pop in a vid and enjoy!
If anything in the above diagram is unclear, please let me know. I will take detailed pics soon.
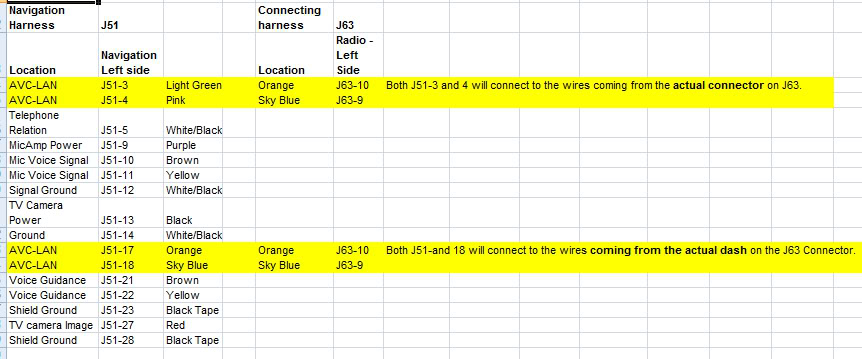
The next section will cover the Voice Recognition, Mic, and Camera. All require a few more taps into the existing J51 connector to the AMP, Mic, and rear of the Vehicle.
Connect everything and tape with black electrical, so if any tech takes a glance it will look OEM.
Disclaimer: This information was provided by Lohus another member that has successful done the swap without ML. According to him the J50-14 (pink speed sensor) should be tapped into the J55-19 and im unsure where the parking brake taps into but somewhere on the J55 as well according to the techinfo.
Sorry I'm not sure where these two wires go but I will update that information as soon as I know, I would do trial an error but my unit has ML.
YOU ARE ALMOST DONE! JUST 4 MORE TAPS AND NAV HERE YOU COME!
11. The last tap you will do will be for the HVA/C system.
Your system is now complete, enjoy!
OPTIONAL: Add ML to NON ML units with ML DVD Player
I know a lot of people out there wish they could watch DVD's on their nice NAV screen. So it is possible but some have tried and not received the perfect outcome with aftermarket DVD players and the custom install. This thread will tell you everything you need.
DISCLAIMER: I am not responsible for any damage you may cause to your car by reading this informative thread.
WARNING: IF your scared of doing the NAV hack well stop reading now. This involves a 3 wire tap and a custom harness.
MATERIALS:
1. Solder and Soldering Gun
2. Wire Cutters
3. Electrical Tape
4. ML DVD Player $300-400 (local junkyard or car-part.com)
5. Custom Harness $50, unless you want to hardwire the wires to the unit itself. If you're going this route have it done professionally. Bestbuy said they would charge $100, probably could get it cheaper.
6. 2 hrs.
Total: $350, best upgrade I have since I can put on a DVD while we take our trips from here to there and the quality is amazing.
you're done, pop in a vid and enjoy!If anything in the above diagram is unclear, please let me know. I will take detailed pics soon.
The next section will cover the Voice Recognition, Mic, and Camera. All require a few more taps into the existing J51 connector to the AMP, Mic, and rear of the Vehicle.
Connect everything and tape with black electrical, so if any tech takes a glance it will look OEM.
Last edited by 350PsDMeuP; 06-10-09 at 10:39 AM.
04-16-09, 05:51 AM
#7
Pole Position

Join Date: Mar 2009
Location: ZZ
Posts: 218
Likes: 0
Received 0 Likes
on
0 Posts
RED is TX- & BROWN is TX+, it is data communication bus, they can be connected to the J51 ORANGE (TX-) & SKY BLUE (TX+).
Trending Topics
04-25-09, 05:43 PM
#9
Disregard this post, if you're connecting your unit the way I did mine the RED and BROWN wire will not be connected the connections on the J51 are already occupied.
Last edited by 350PsDMeuP; 06-10-09 at 10:41 AM.
05-01-09, 09:26 PM
#10
Driver School Candidate

Join Date: Mar 2009
Location: CA
Posts: 23
Likes: 0
Received 0 Likes
on
0 Posts
Great write up, I had a question regarding the J50 and J51 harnesses. I have access to the J50 and J51 from a NAV IS and I would like to know what wiring I need to tap into in a non Nav IS. From the looks of it, between Lohus and 350Ps you have everything working on swap. If I could get in contact with either of you that would be great. Thanks again for this write up!

