DIY: IS-F Rear Spoiler without drilling holes
 08-30-08, 09:56 PM
#1
Lead Lap
Thread Starter
iTrader: (1)
Join Date: Jun 2008
Location: Ontario
Posts: 443
Likes: 0
Received 0 Likes
on
0 Posts
Hi all,
After many days of procrastinating, I’ve finally compiled a set of photos that will hopefully help you guys do this install. Before you start reading, I want to declare that, a) this DIY is brand new and has no track record of success yet, even though the spoiler feels rock solid and will not move, b) will not prevent theft, and c) follow this at your own risk, and d) feel free to add comments on how this install could have been better/easier as by no means is this the definitive DIY for this install. There are many other things that I could have done better but didn't think of it at the time.
The process was pretty much trial and error for me, but this write-up will iron out all the wrinkles that I went through. So, let’s get started!
For this install, you will need:
- 1 x IS-F rear spoiler (obviously)
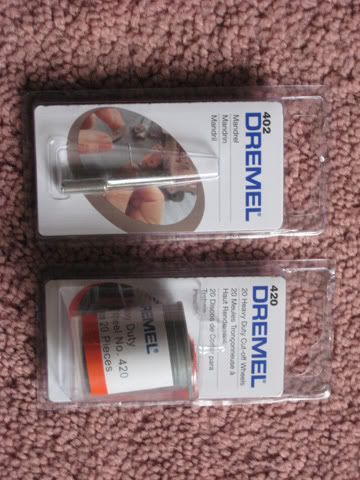
- 1 x Dremel
- 1 x Dremel mandrel #402 (adapter)
- 1 x Dremel heavy-duty cut-off wheel #420
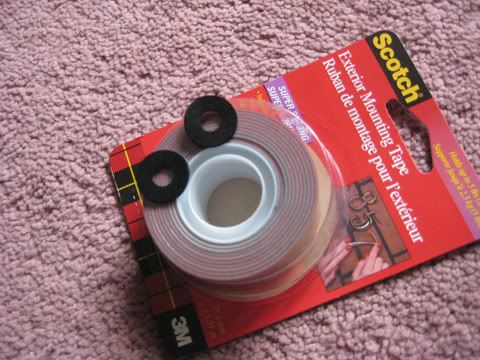
- 2 x 3M Scotch Exterior mounting tape (PLEASE buy 2 packs!!)
- Shop Eye-glasses
- Masking tape
- Scissors
- Alcohol swabs (or any equivalent de-greasing agent)
- Damp cloths
- Car wash
- Patience (lots of it, so please don’t rush!)
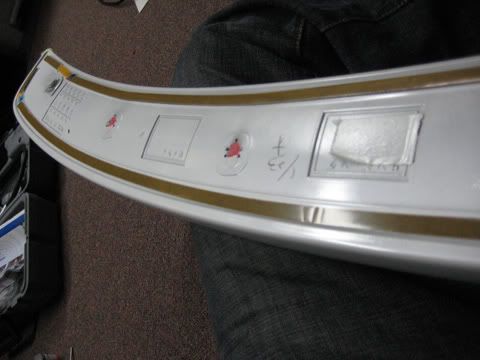
IS-F Rear Spoiler

Dremel Accessories
3M Scotch Exterior Mounting Tape (Please omit those 2 black rings, I can explain below)
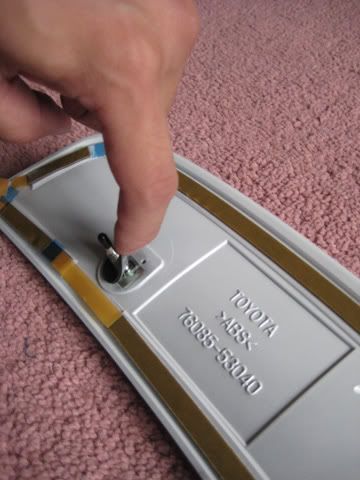
Under-side of the spoiler

After many days of procrastinating, I’ve finally compiled a set of photos that will hopefully help you guys do this install. Before you start reading, I want to declare that, a) this DIY is brand new and has no track record of success yet, even though the spoiler feels rock solid and will not move, b) will not prevent theft, and c) follow this at your own risk, and d) feel free to add comments on how this install could have been better/easier as by no means is this the definitive DIY for this install. There are many other things that I could have done better but didn't think of it at the time.
The process was pretty much trial and error for me, but this write-up will iron out all the wrinkles that I went through. So, let’s get started!
For this install, you will need:
- 1 x IS-F rear spoiler (obviously)
- 1 x Dremel
- 1 x Dremel mandrel #402 (adapter)
- 1 x Dremel heavy-duty cut-off wheel #420
- 2 x 3M Scotch Exterior mounting tape (PLEASE buy 2 packs!!)
- Shop Eye-glasses
- Masking tape
- Scissors
- Alcohol swabs (or any equivalent de-greasing agent)
- Damp cloths
- Car wash
- Patience (lots of it, so please don’t rush!)
IS-F Rear Spoiler
Dremel Accessories
3M Scotch Exterior Mounting Tape (Please omit those 2 black rings, I can explain below)
Under-side of the spoiler
Last edited by IS350JDM; 08-30-08 at 10:18 PM.
 08-30-08, 09:57 PM
#2
Lead Lap
Thread Starter
iTrader: (1)
Join Date: Jun 2008
Location: Ontario
Posts: 443
Likes: 0
Received 0 Likes
on
0 Posts
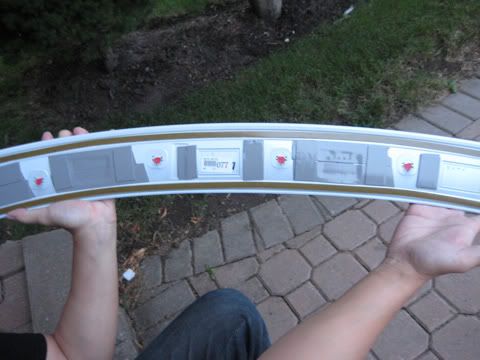
Step 1: Carefully remove the 2 sponge black rings away from the metal studs, to be re-used later on, so stick it to a clean surface. See pic above
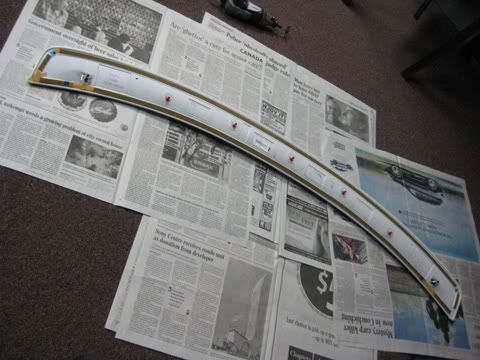
Step 2: Lay the spoiler down on some newspaper and observe the 5 red plastic studs, and the 2 metal studs on either end. Prepare the Dremel.

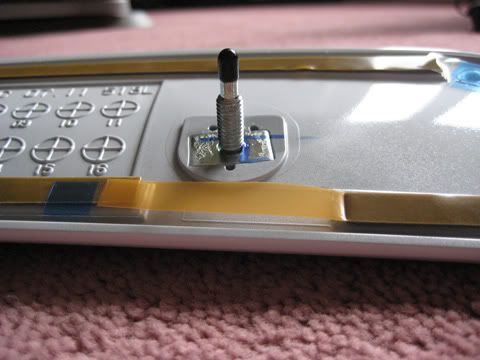
Step 3: Put on Safety glasses and start cutting off the red plastic studs. Since they are plastic, use half-speed and they should melt right off like butter.
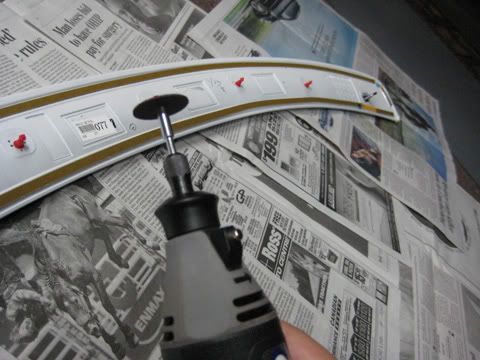
Step 4: PLEASE BE CAREFUL. Slowly begin to shave off the metal stud. Sparks will fly all over, and metal is less forgiving, so take your time and use full speed. Make sure spoiler is secured down in case it starts moving around. Once the stud is shaved off, inspect your work, and start sanding down excess metal until it looks flush with the spoiler surface. Proceed to shave off the second metal stud. UPDATE: BEFORE YOU CUT THE METAL STUD, OTHER CL MEMBERS HAVE REVEALED THAT THE METAL STUD PLATE CAN BE REMOVED USING A PAIR OF PLYERS. USE WHICHEVER WAY THAT YOU ARE MORE COMFORTABLE WITH.
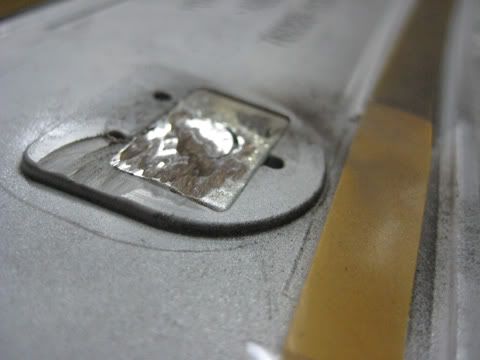
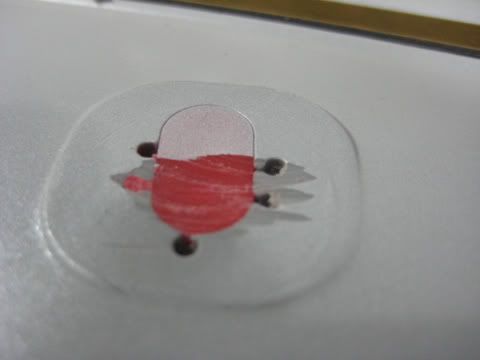
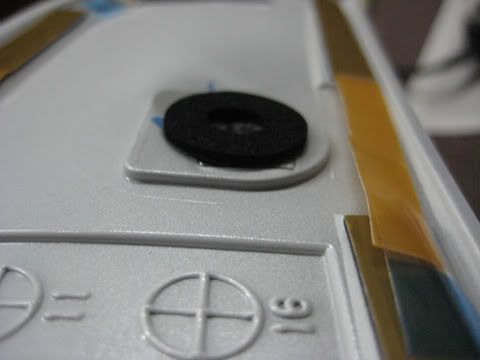
Step 5: Once all studs are cut off, the underside should be THOROUGHLY cleaned with a damp cloth, especially to clean off all the metal dust that accumulated during the cutting process (if not cleaned thoroughly, the metal dust may later rust onto the trunk lid from weathering).
Step 6: Place the 2 black sponge rings back over where the metal studs were just shaved off, to ensure that the metal part doesn’t touch the trunk lid, which may cause scratching or rusting in the future.
Step 6: Test-fitting. Once the spoiler is cleaned, gently place it on the trunk lid. Make sure your trunk lid/car is washed, and has no dirt or grease, and is dry.
Step 2: Lay the spoiler down on some newspaper and observe the 5 red plastic studs, and the 2 metal studs on either end. Prepare the Dremel.
Step 3: Put on Safety glasses and start cutting off the red plastic studs. Since they are plastic, use half-speed and they should melt right off like butter.
Step 4: PLEASE BE CAREFUL. Slowly begin to shave off the metal stud. Sparks will fly all over, and metal is less forgiving, so take your time and use full speed. Make sure spoiler is secured down in case it starts moving around. Once the stud is shaved off, inspect your work, and start sanding down excess metal until it looks flush with the spoiler surface. Proceed to shave off the second metal stud. UPDATE: BEFORE YOU CUT THE METAL STUD, OTHER CL MEMBERS HAVE REVEALED THAT THE METAL STUD PLATE CAN BE REMOVED USING A PAIR OF PLYERS. USE WHICHEVER WAY THAT YOU ARE MORE COMFORTABLE WITH.
Step 5: Once all studs are cut off, the underside should be THOROUGHLY cleaned with a damp cloth, especially to clean off all the metal dust that accumulated during the cutting process (if not cleaned thoroughly, the metal dust may later rust onto the trunk lid from weathering).
Step 6: Place the 2 black sponge rings back over where the metal studs were just shaved off, to ensure that the metal part doesn’t touch the trunk lid, which may cause scratching or rusting in the future.
Step 6: Test-fitting. Once the spoiler is cleaned, gently place it on the trunk lid. Make sure your trunk lid/car is washed, and has no dirt or grease, and is dry.
Last edited by IS350JDM; 08-31-08 at 09:53 AM.
08-30-08, 09:59 PM
#3
Lead Lap
Thread Starter
iTrader: (1)
Join Date: Jun 2008
Location: Ontario
Posts: 443
Likes: 0
Received 0 Likes
on
0 Posts
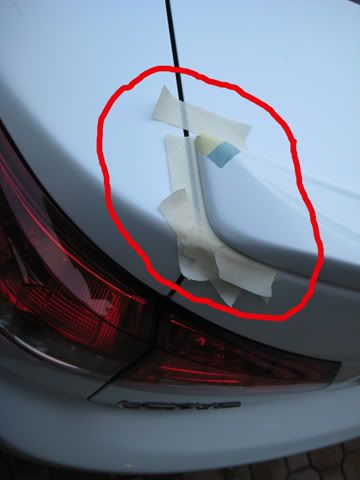
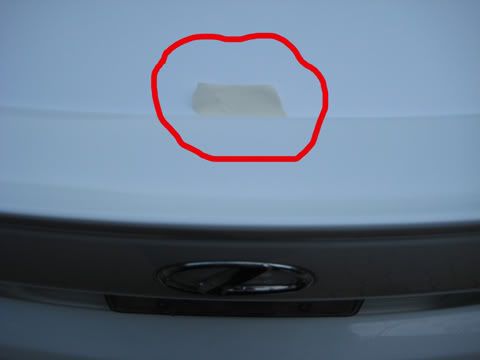
Step 7: After you finish admiring the way it looks on your trunk, you need to carefully measure exactly where the spoiler is supposed to sit. I didn�t have any tools, so I eye-balled it, and moved it around by the millimeters. You will find the �sweet-spot� when you see no light shining through between the trunk and the spoiler. Once it is in its sweet spot, use proper masking tape (which I didn�t have) to tape around the edges of the spoiler, and use some small pieces to mark the center part as well.
Step 8: Pick up the spoiler and use an alcohol swab to clean it one more time.


Step 9: Begin to apply the 3M Exterior mounting tape on to solid areas. There are going to be lots of indented areas where the tape will be useless, so no need to waste the tape. Trust me, I found out the hard way because I intended to tape the entire underside, but ran out of tape half way while I was doing it! (I had to drive to Home Depot in the middle, which is a huge drag.) Don�t tape over the places where the studs were located because those spots were meant to be as close to the trunk lid as possible.
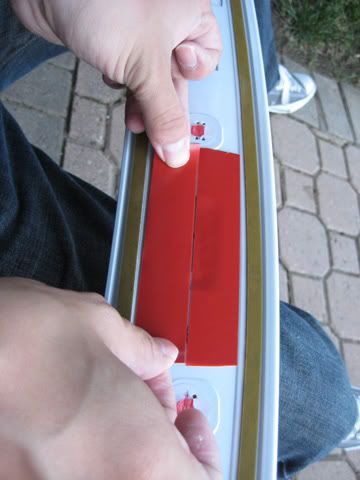

Step 10: Remove all the red tape coverings (at this point, the exterior mounting tape served no purposed because I test-fitted it after peeling all the red off, and the spoiler still moved around on the trunk lid, which meant it didn�t even touch the surface). Proceed to add a second layer on top of the first layer, and add it only to the solid areas that matter. Remove the red tape coverings for the second layer as well.
Step 11: Carefully remove the clear and blue squares that keep the outer OEM tape in place, but do not disturb the yellow tape coverings. Once all the little blue squares are removed, proceed to slightly raise the excess yellow tape and fold it over so that it is directed outwards. When you place the spoiler on the trunk lid this time, THE SPOILER WILL STICK TO THE TRUNK, so please make sure your placement is accurately and precisely placed at the final resting place. DO NOT START TO APPLY PRESSURE ON THE SURFACE AREA until the end of Step 12.

Step 12: Carefully begin peeling off the yellow OEM tape coverings WITHOUT applying pressure to the spoiler. This way, the yellow tape covering comes off much easier. Once all have been removed, hopefully the spoiler is at the perfect placement. If so, start applying pressure to the entire surface area thoroughly. Repeat applying pressure until your arms get tired.
Step 8: Pick up the spoiler and use an alcohol swab to clean it one more time.
Step 9: Begin to apply the 3M Exterior mounting tape on to solid areas. There are going to be lots of indented areas where the tape will be useless, so no need to waste the tape. Trust me, I found out the hard way because I intended to tape the entire underside, but ran out of tape half way while I was doing it! (I had to drive to Home Depot in the middle, which is a huge drag.) Don�t tape over the places where the studs were located because those spots were meant to be as close to the trunk lid as possible.
Step 10: Remove all the red tape coverings (at this point, the exterior mounting tape served no purposed because I test-fitted it after peeling all the red off, and the spoiler still moved around on the trunk lid, which meant it didn�t even touch the surface). Proceed to add a second layer on top of the first layer, and add it only to the solid areas that matter. Remove the red tape coverings for the second layer as well.
Step 11: Carefully remove the clear and blue squares that keep the outer OEM tape in place, but do not disturb the yellow tape coverings. Once all the little blue squares are removed, proceed to slightly raise the excess yellow tape and fold it over so that it is directed outwards. When you place the spoiler on the trunk lid this time, THE SPOILER WILL STICK TO THE TRUNK, so please make sure your placement is accurately and precisely placed at the final resting place. DO NOT START TO APPLY PRESSURE ON THE SURFACE AREA until the end of Step 12.
Step 12: Carefully begin peeling off the yellow OEM tape coverings WITHOUT applying pressure to the spoiler. This way, the yellow tape covering comes off much easier. Once all have been removed, hopefully the spoiler is at the perfect placement. If so, start applying pressure to the entire surface area thoroughly. Repeat applying pressure until your arms get tired.
08-30-08, 10:00 PM
#4
Lead Lap
Thread Starter
iTrader: (1)
Join Date: Jun 2008
Location: Ontario
Posts: 443
Likes: 0
Received 0 Likes
on
0 Posts
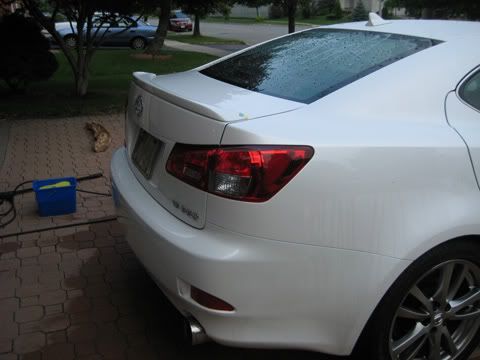
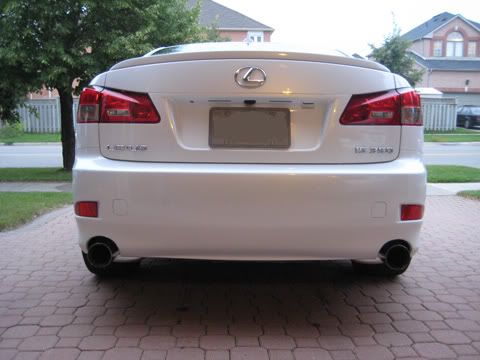
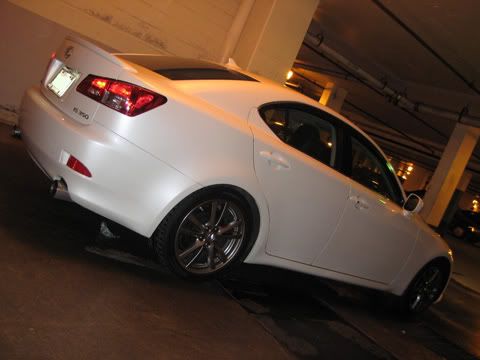
Step 13: Finished! Stand back and inspect your spoiler to make sure its as cool as you thought it would be!
Thank you for reading, I hope you enjoyed reading this DIY, and good luck with your own install should you decide to use this method. Feel free to comment and critique. If you have any questions, please post!
Happy modding!
IS350JDM
Thank you for reading, I hope you enjoyed reading this DIY, and good luck with your own install should you decide to use this method. Feel free to comment and critique. If you have any questions, please post!
Happy modding!
IS350JDM
08-30-08, 10:07 PM
#5
Lexus Champion
iTrader: (2)
Join Date: Feb 2008
Location: *661* CA
Posts: 2,502
Likes: 0
Received 0 Likes
on
0 Posts
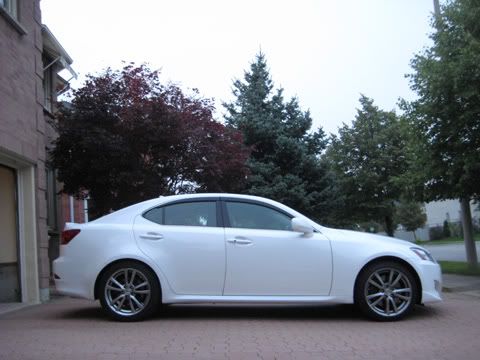
Oohhh how I love how the IS-F spoiler looks. I want to get one my 250, but I think I am gonna let the body shop drill holes in my trunk. Good job on the DIY post. I love your tail lights too. Thanks for sharing. 


Trending Topics
08-31-08, 09:45 AM
#12
Lead Lap
Thread Starter
iTrader: (1)
Join Date: Jun 2008
Location: Ontario
Posts: 443
Likes: 0
Received 0 Likes
on
0 Posts
 D'Oh! I was doing that with plyers at first, and it moved around a bit, but I didn't want to risk breaking anything. (You would think that it would be unremovable for security reasons, right?) Oh well, at least everybody else can remove it your way going forward. Thanks for the tip!
08-31-08, 09:49 AM
D'Oh! I was doing that with plyers at first, and it moved around a bit, but I didn't want to risk breaking anything. (You would think that it would be unremovable for security reasons, right?) Oh well, at least everybody else can remove it your way going forward. Thanks for the tip!
08-31-08, 09:49 AM
#13
Lead Lap
Thread Starter
iTrader: (1)
Join Date: Jun 2008
Location: Ontario
Posts: 443
Likes: 0
Received 0 Likes
on
0 Posts
Hmm, not exactly. Yes, the dealer used holes for sure, but I think the holes are located at the side of the trunk lid (where the "L" logo is), whereas the IS-F spoiler requires holes on the top. I'm afraid you will need to fill the factory holes and paint the lid if you want to swap.
 08-31-08, 10:40 AM
#15
Lexus Fanatic
What a great DIY, my props to you. I to, would have cut the bolts off and simply 3M taped it. The alcohol swab pad is a must to remove wax and debris. This is how I have installed spoilers in the past without any issue. I really like the IS-F look spoiler look.