
 12-15-14, 01:10 PM
Last edit by: IB Advertising
See related guides and technical advice from our community experts:
Browse all: Interior
- How do I Install Aftermarket Amplifier power wire
Step by step instructions for do-it-yourself repairs
Browse all: Interior

DIY aftermarket amp power wire install step by step with pictures
 12-01-11, 07:27 PM
#182

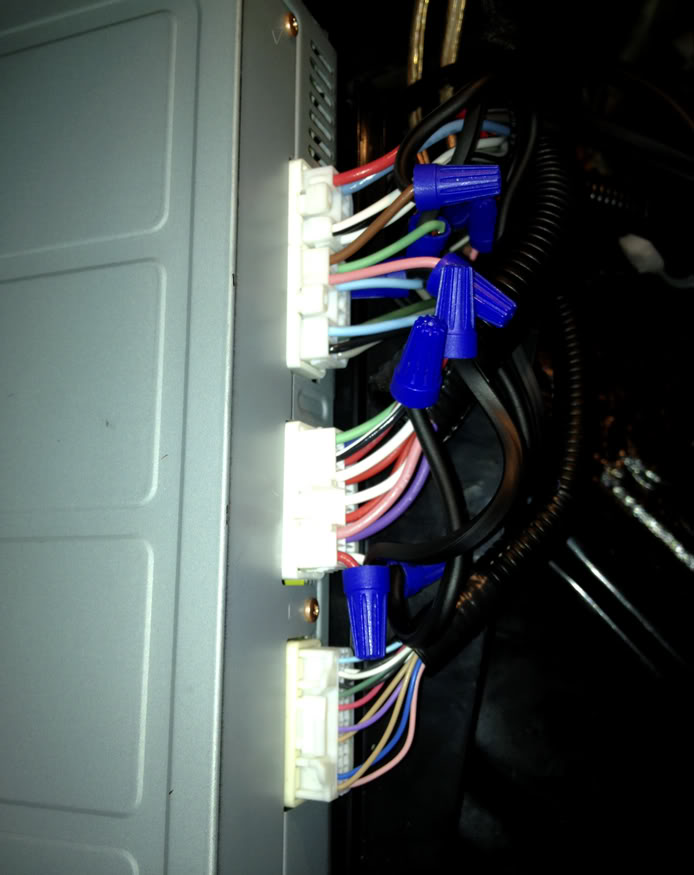
Alright I took some time and rechecked all my wiring and stuff. Sorry the picture provided is really blurry and crappy. This is what I found to be relevant to anyone wondering about wiring for a non-ML 2IS (OEM amplifier shown in picture is for a 2006 IS250 without ML).

A few things to note:
1. Not all wires are needed. Pick the set of wire of your choice to tap. I've drawn where all the relevant wires can be found. Subwoofer wires are on the 3rd connector from the back, front woofer connectors are from the 1st connector closest to the back of the car.
2. This is what I used for a remote wire. It's a thin orange wire on the 2nd connector. There are other options.
3. Use the front woofer wires only if you know what you're doing relevant to LPF (Low-pass filter). If your LPF isn't set properly, you can end up blowing your subwoofer.
4. I used a 22-18AWG tap splice to tap my wires.
5. The LOC I used is pictured. There are other options. I picked it because its dirt cheap and gets the job done. Make sure to set the switch on the left to "Line Out". Subwoofers are mono; left/right are irrelevant. Plug in 1-2 (doesn't really matter) RCA cables to the output, and plug that cable into your aftermarket amp. Again, whether left plugs into left doesn't make a difference.
Hope this answers some lingering questions still.
12-01-11, 09:27 PM
#183
Alright I took some time and rechecked all my wiring and stuff. Sorry the picture provided is really blurry and crappy. This is what I found to be relevant to anyone wondering about wiring for a non-ML 2IS (OEM amplifier shown in picture is for a 2006 IS250 without ML).

A few things to note:
1. Not all wires are needed. Pick the set of wire of your choice to tap. I've drawn where all the relevant wires can be found. Subwoofer wires are on the 3rd connector from the back, front woofer connectors are from the 1st connector closest to the back of the car.
2. This is what I used for a remote wire. It's a thin orange wire on the 2nd connector. There are other options.
3. Use the front woofer wires only if you know what you're doing relevant to LPF (Low-pass filter). If your LPF isn't set properly, you can end up blowing your subwoofer.
4. I used a 22-18AWG tap splice to tap my wires.
5. The LOC I used is pictured. There are other options. I picked it because its dirt cheap and gets the job done. Make sure to set the switch on the left to "Line Out". Subwoofers are mono; left/right are irrelevant. Plug in 1-2 (doesn't really matter) RCA cables to the output, and plug that cable into your aftermarket amp. Again, whether left plugs into left doesn't make a difference.
Hope this answers some lingering questions still.
A few things to note:
1. Not all wires are needed. Pick the set of wire of your choice to tap. I've drawn where all the relevant wires can be found. Subwoofer wires are on the 3rd connector from the back, front woofer connectors are from the 1st connector closest to the back of the car.
2. This is what I used for a remote wire. It's a thin orange wire on the 2nd connector. There are other options.
3. Use the front woofer wires only if you know what you're doing relevant to LPF (Low-pass filter). If your LPF isn't set properly, you can end up blowing your subwoofer.
4. I used a 22-18AWG tap splice to tap my wires.
5. The LOC I used is pictured. There are other options. I picked it because its dirt cheap and gets the job done. Make sure to set the switch on the left to "Line Out". Subwoofers are mono; left/right are irrelevant. Plug in 1-2 (doesn't really matter) RCA cables to the output, and plug that cable into your aftermarket amp. Again, whether left plugs into left doesn't make a difference.
Hope this answers some lingering questions still.

The following users liked this post:
WylerLexus (01-27-21)


 12-06-11, 12:08 AM
#187
Same here, I am still trying to figure out what sub to buy, but I plan on removing the actual wires out of the harness and adding my LOC wires at the terminal. All you need is a paperclip. Straighten out the paperclip and hammer one end until its thin, then it should be able to slip into the harness to release the terminals.
01-16-12, 10:54 AM
#188
Driver School Candidate

Join Date: Jan 2012
Location: CA
Posts: 11
Likes: 0
Received 0 Likes
on
0 Posts
I am using Scosche converter, Brutus mono amp with 10" Punch. I connected Brown to A1 and Green to A2 and It sounds good but I am not able to find the remote. I tried the orange on the 3rd connector but did not power the amp, plugged it in the first connector which is a thick orange and is on all the time. I have 4 connector on the stock ML Amp. Can some one send me a picture of the ML Remote cable and connector.
02-05-12, 02:36 PM
#190
Driver School Candidate

Join Date: Apr 2010
Location: CA
Posts: 1
Likes: 0
Received 0 Likes
on
0 Posts
The pink/blue and brown/green wires are coming from the stock non ML amp. The head unit sends the signal to the amp. Then the amp distribute the signals to the designated speakers. I believe the pink/blue and brown/green wires are located on the third connector
02-09-12, 05:40 PM
#191
Rookie
Join Date: Apr 2010
Location: GA
Posts: 63
Likes: 0
Received 0 Likes
on
0 Posts
For those of you who tapped into your fuse box for a remote turn on lead, which fuse slot did you tap? I would like to have something that is active only when the car is on of course.
02-18-12, 12:08 PM
#192
Rookie
Join Date: Apr 2010
Location: GA
Posts: 63
Likes: 0
Received 0 Likes
on
0 Posts
Could somebody circle the wires I need to tap in this picture to access the right and left front woofer? I have a 2011 IS 250 and my amp is a little different from the previous pictures in this thread. This is a non/navi non ML amp. Thank you for your help.
Last edited by ntech; 02-18-12 at 12:28 PM.
02-22-12, 07:05 AM
#193

Thank you for creating this thread and taking detailed pictures, they are very helpful. I have some experience with installing aftermarket subs, but its always good to have a reference. The information about the wires in the harnesses was awesome.
As I read through this thread, there were a few questions I saw asked but not answered... or not answered with pics. I installed all of my wiring yesterday and snapped a few pics as I went, hopefully they provide some value.
I have a 2008 IS350 with navigation but not ML. I tapped both sets of the subwoofer wires, and connected them to a scosche 2 channel LOC. I am still waiting for my sub to arrive, so i haven't actually tested how it sounds. All of the other wiring has been tested and is working.
Here is where I ran the wire into the trunk, there were already a bunch of wires there, so figured it was a good place (big red wire):

A few people asked about removing the stock sub. I wanted to do this, there are only three clips that need to be pulled up. Pull those up and you will see the stock sub sitting there. Prop up the rear deck with something and then reach in and undo the four bolts that hold the sub down. You will also need to unclip the wires that are running to the sub. Here are some pics of what is under the rear deck, the stock sub, and the hole left by removing the sub. It should provide a nice hole to allow sound from the trunk to pass through to the main cabin.


Someone had mentioned a spot where the stock electronics are grounded, then someone else asked for more details. I chose not to use this location as it would make the ground wire too long for where i placed the amp. I used one of the bolts that is under the little chrome clip things on the floor of the trunk. Sand down the paint and get to bare metal, then use the bolt that holds in the clip. Here is the stock ground location:
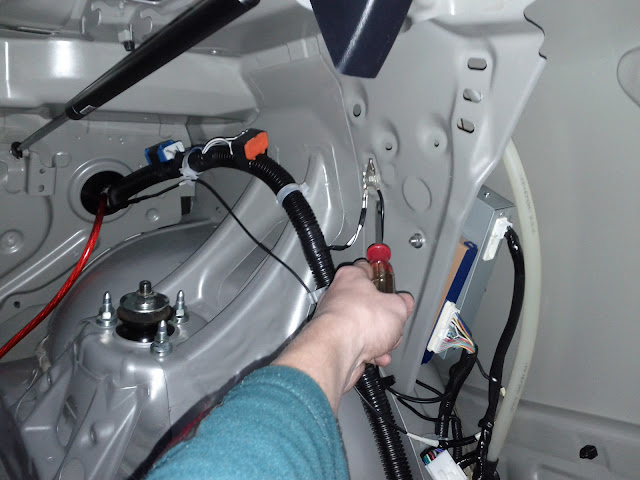
Lastly, there has been a lot of conversation about the remote wire. I did not have the mythical orange wire that everyone mentions, but I found one that works. In the second harness from the back, I had a red wire in the top rear most spot. This wire provided 12v when the car was on and no power when off, so ideal wire for a remote wire.

Car re-assembled, waiting for my sub to arrive:

As I read through this thread, there were a few questions I saw asked but not answered... or not answered with pics. I installed all of my wiring yesterday and snapped a few pics as I went, hopefully they provide some value.
I have a 2008 IS350 with navigation but not ML. I tapped both sets of the subwoofer wires, and connected them to a scosche 2 channel LOC. I am still waiting for my sub to arrive, so i haven't actually tested how it sounds. All of the other wiring has been tested and is working.
Here is where I ran the wire into the trunk, there were already a bunch of wires there, so figured it was a good place (big red wire):
A few people asked about removing the stock sub. I wanted to do this, there are only three clips that need to be pulled up. Pull those up and you will see the stock sub sitting there. Prop up the rear deck with something and then reach in and undo the four bolts that hold the sub down. You will also need to unclip the wires that are running to the sub. Here are some pics of what is under the rear deck, the stock sub, and the hole left by removing the sub. It should provide a nice hole to allow sound from the trunk to pass through to the main cabin.
Someone had mentioned a spot where the stock electronics are grounded, then someone else asked for more details. I chose not to use this location as it would make the ground wire too long for where i placed the amp. I used one of the bolts that is under the little chrome clip things on the floor of the trunk. Sand down the paint and get to bare metal, then use the bolt that holds in the clip. Here is the stock ground location:
Lastly, there has been a lot of conversation about the remote wire. I did not have the mythical orange wire that everyone mentions, but I found one that works. In the second harness from the back, I had a red wire in the top rear most spot. This wire provided 12v when the car was on and no power when off, so ideal wire for a remote wire.
Car re-assembled, waiting for my sub to arrive:
Last edited by ydnandy; 02-22-12 at 07:09 AM.
02-23-12, 10:57 AM
#194

https://www.clublexus.com/forums/is-...ade-build.html
