Navigation Hack DIY Part One - Enable DVD, Phonebook & MP3 Folder While Moving


 03-23-10, 09:55 AM
#782
Pole Position

Join Date: Feb 2010
Location: CA
Posts: 320
Likes: 0
Received 0 Likes
on
0 Posts
 This is my first DIY project on the IS350.. some little plastic covers (from Auto Zone) and touch paint (From the local Lexus dealer).. I"m taking pictures to post on another forum... but I'm really looking forward to the NAV Hack.. I'll post again when I get this completed... Thanks for the welcoming.. I'm going to love it here...
 03-25-10, 10:31 AM
#784
Pole Position
Join Date: Feb 2010
Location: CA
Posts: 320
Likes: 0
Received 0 Likes
on
0 Posts
Here we go.. another success story regarding the NAV HACK on my 07 IS350... I took some pics (taken from my IPHONE).. here you go enjoy..
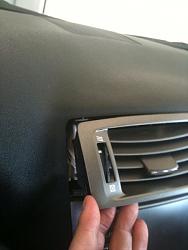
The first part was taking the vents off.. not as hard as I thought.. unlock the top clips, then pulled on the left side.. next was slowly jiggling the right side
Here is the right side...
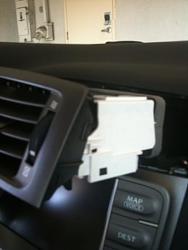
Here is the vent out.. I just left it on the dash as I worked on the NAV system.. it didn't get in the way and was easy to put back in
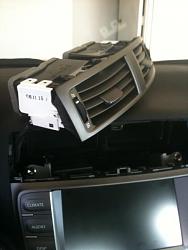
Here is grounding the NAV for the brake... This is for the DVD to work while moving.. l could have made it more factory, but still not bad...
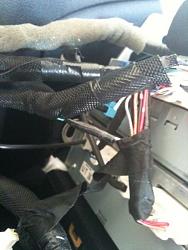
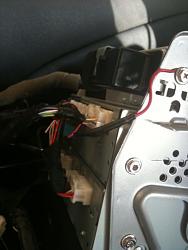
I cut and spliced the wires near the wireloom.. this so if i ever need to make it look factory, i can re-splice and tape it back up, tuck it into the wireloom and you can't tell it was ever cut...
The whole process took me a little over ONE hour.. This was with removing everything VERY carefully.. Double checking/Triple checking the wires.. The instructions on page one were great..
MY suggestion: Move up passenger seat all the way to place NAV on it.. have a towel on chair to keep from getting scratches on it. Have all your tools, tape, wire.. next to you..
Everything is perfect.. DVD movies while driving (for the passenger), the NAV is still as smooth as before the hack, i can place phone calls while driving (I suggest using the speed dial though)...
Thanks for the hard work on figuring this out.. the pictures helped.. so this is my contribution... If anyone needs any help or info.. Let me know.. I'll do what I can to help out..
Thanks!!

The first part was taking the vents off.. not as hard as I thought.. unlock the top clips, then pulled on the left side.. next was slowly jiggling the right side

Here is the right side...

Here is the vent out.. I just left it on the dash as I worked on the NAV system.. it didn't get in the way and was easy to put back in

Here is grounding the NAV for the brake... This is for the DVD to work while moving.. l could have made it more factory, but still not bad...

I cut and spliced the wires near the wireloom.. this so if i ever need to make it look factory, i can re-splice and tape it back up, tuck it into the wireloom and you can't tell it was ever cut...
The whole process took me a little over ONE hour.. This was with removing everything VERY carefully.. Double checking/Triple checking the wires.. The instructions on page one were great..
MY suggestion: Move up passenger seat all the way to place NAV on it.. have a towel on chair to keep from getting scratches on it. Have all your tools, tape, wire.. next to you..
Everything is perfect.. DVD movies while driving (for the passenger), the NAV is still as smooth as before the hack, i can place phone calls while driving (I suggest using the speed dial though)...
Thanks for the hard work on figuring this out.. the pictures helped.. so this is my contribution... If anyone needs any help or info.. Let me know.. I'll do what I can to help out..
Thanks!!
03-25-10, 04:03 PM
#785
Driver

Join Date: Jun 2007
Location: Denver, CO
Posts: 145
Likes: 0
Received 0 Likes
on
0 Posts

1 hour is awesome, it took me almost 3 hours to do, but that's only because I'm extraordinarily terrible at doing these sorts of things. Everything works beautifully though.
03-25-10, 04:09 PM
#786
Pole Position
Join Date: Feb 2010
Location: CA
Posts: 320
Likes: 0
Received 0 Likes
on
0 Posts
yeah, I thought it would take me longer, but it went pretty smooth.. I used to work on my 93 Integra all the time.. so I guess i have a little bit of experience.. I'll admit I was a scared at first, but it's done and totally worth it..
 06-21-10, 09:42 AM
#787
Driver School Candidate

Join Date: May 2010
Location: RUSSIA
Posts: 14
Likes: 0
Received 0 Likes
on
0 Posts
Guys help...... At me IS 2009 with ML......
Did as under the instruction.....
Cut off a pink wire on J50
Cut off a white with silver paint wire on P1
Has connected them together......
Has earthed a handbrake wire.....
Yes without a handbrake began to show..... But as soon as I begin movements a picture disappears.
Did as under the instruction.....
Cut off a pink wire on J50
Cut off a white with silver paint wire on P1
Has connected them together......
Has earthed a handbrake wire.....
Yes without a handbrake began to show..... But as soon as I begin movements a picture disappears.
 06-21-10, 10:41 PM
#790

Here we go.. another success story regarding the NAV HACK on my 07 IS350... I took some pics (taken from my IPHONE).. here you go enjoy..
Attachment 168667
The first part was taking the vents off.. not as hard as I thought.. unlock the top clips, then pulled on the left side.. next was slowly jiggling the right side
Attachment 168668
Here is the right side...
Attachment 168669
Here is the vent out.. I just left it on the dash as I worked on the NAV system.. it didn't get in the way and was easy to put back in
Attachment 168670
Here is grounding the NAV for the brake... This is for the DVD to work while moving.. l could have made it more factory, but still not bad...
Attachment 168671
I cut and spliced the wires near the wireloom.. this so if i ever need to make it look factory, i can re-splice and tape it back up, tuck it into the wireloom and you can't tell it was ever cut...
The whole process took me a little over ONE hour.. This was with removing everything VERY carefully.. Double checking/Triple checking the wires.. The instructions on page one were great..
MY suggestion: Move up passenger seat all the way to place NAV on it.. have a towel on chair to keep from getting scratches on it. Have all your tools, tape, wire.. next to you..
Everything is perfect.. DVD movies while driving (for the passenger), the NAV is still as smooth as before the hack, i can place phone calls while driving (I suggest using the speed dial though)...
Thanks for the hard work on figuring this out.. the pictures helped.. so this is my contribution... If anyone needs any help or info.. Let me know.. I'll do what I can to help out..
Thanks!!
06-21-10, 10:44 PM
#791
Thanks to Muzzman1 and Lexus_x_2 for the info to bypass the Nav system. I just have it done this morning and it's working great. Now i can Dial the phone number, change MP3 folder and access to a lot of functions on the Navigation when the car is moving. I didn't have ML so no DVD player in my car, shoulda had it. But if you have the ML this hack will enable the DVD screen to play when your car is moving.
Here's the DYI step by step:
Duration: 30 minutes
1.)Remove the sliver pieces to the right and left of the wood trim on either side ot the shifter....they are simply held in with clips, they come out up/back diagonally

2.) Re move the shift **** by turning it counterclockwise.
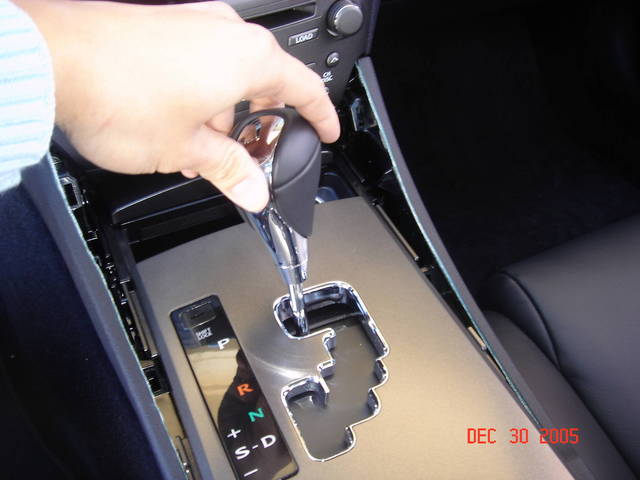
3.)Remove the shifter plate assembly by opening the ashtray door and pull up with your fingers (i slid the armrest back) it is also held in with simple clips.

4.)Remove ashtray assy (two phillips screws)

5.)If you look in the top of the air vents you will see four 1/4" holes in the two vents. If you gently insert a flat head scewdriver at about a 45 degree angle up into the holes and gently pry down you will see that a plastic clip will come down with the driver and clip into a down position....do this to all four...then with a "plastic" pry tool, pry the vents out ...the dash is very forgiving....it will not dent...(at least mine did not) and pull the vents out again they are held in with astandard clips....This was the hard part

6.)Remove the Nav unit . There are 4 10mm bols holding in the complete NAV assy....remove them and you are set

7.)Cut the PINK wire located on connector J50 and the WHITE (with silver paint) wire on connector P1.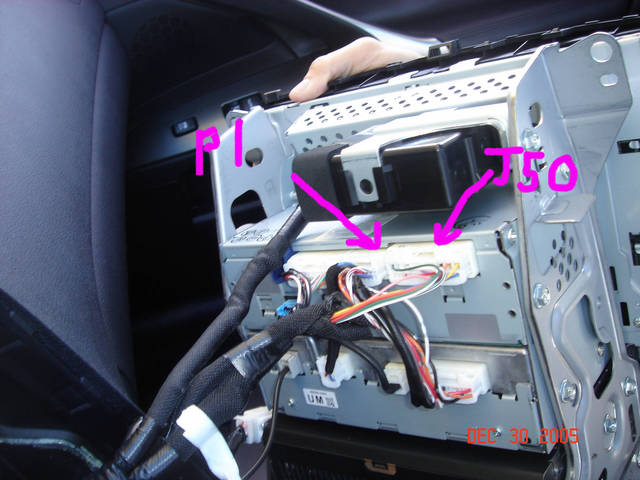
After cutting the Pink and White wires, you put a cap on the wires comming from the Navigation unit. You then connect the Pink (wireloom side) and White (wireloom side) wires together.

*** Note if you have ML and want it to play DVD when moving. You will need to GROUND the parking break wire also. It's the RED wire on the J50 connector.
Have a Happy New Year everyone
MOD NOTE: This hack will NOT enable destination entry while moving. If you wish to have destination entry while moving, you will also need to do a hybrid 5.1 Override DVD, or use a switch as shown in this thread: https://www.clublexus.com/forums/is-...witch-diy.html
Here's the DYI step by step:
Duration: 30 minutes
1.)Remove the sliver pieces to the right and left of the wood trim on either side ot the shifter....they are simply held in with clips, they come out up/back diagonally
2.) Re move the shift **** by turning it counterclockwise.
3.)Remove the shifter plate assembly by opening the ashtray door and pull up with your fingers (i slid the armrest back) it is also held in with simple clips.
4.)Remove ashtray assy (two phillips screws)
5.)If you look in the top of the air vents you will see four 1/4" holes in the two vents. If you gently insert a flat head scewdriver at about a 45 degree angle up into the holes and gently pry down you will see that a plastic clip will come down with the driver and clip into a down position....do this to all four...then with a "plastic" pry tool, pry the vents out ...the dash is very forgiving....it will not dent...(at least mine did not) and pull the vents out again they are held in with astandard clips....This was the hard part
6.)Remove the Nav unit . There are 4 10mm bols holding in the complete NAV assy....remove them and you are set
7.)Cut the PINK wire located on connector J50 and the WHITE (with silver paint) wire on connector P1.
After cutting the Pink and White wires, you put a cap on the wires comming from the Navigation unit. You then connect the Pink (wireloom side) and White (wireloom side) wires together.
*** Note if you have ML and want it to play DVD when moving. You will need to GROUND the parking break wire also. It's the RED wire on the J50 connector.
Have a Happy New Year everyone
MOD NOTE: This hack will NOT enable destination entry while moving. If you wish to have destination entry while moving, you will also need to do a hybrid 5.1 Override DVD, or use a switch as shown in this thread: https://www.clublexus.com/forums/is-...witch-diy.html
06-25-10, 03:28 PM
#793
I finally got it I was a little confuse which red wire to cut, I end up cut the RED wire from the same harness of the PINK wire was cut, and ground it to the side of the radio unit, and it work
 i will give thanks and credit to everyone was done successfully installed. I spend more time on which wires need to be cut correctly than take everything apart, it took me 10 minutes to take vent out which people have had hard time to take it off. it easy to full the whole vent unit off then just the trim. Iam so happy now
I was a little confuse which red wire to cut, I end up cut the RED wire from the same harness of the PINK wire was cut, and ground it to the side of the radio unit, and it work i will give thanks and credit to everyone was done successfully installed. I spend more time on which wires need to be cut correctly than take everything apart, it took me 10 minutes to take vent out which people have had hard time to take it off. it easy to full the whole vent unit off then just the trim. Iam so happy now
07-07-10, 04:49 PM
#794
Pole Position
iTrader: (2)

Join Date: Oct 2004
Location: California
Posts: 395
Likes: 0
Received 0 Likes
on
0 Posts
I am having a hard time removing the vent. It says in the diy that I am suppose to pull the 4 clips down. However I think I push the 4 clips up into the vent, is that possible? If I did is there a way to still pull the clips down?