When you click on links to various merchants on this site and make a purchase, this can result in this site earning a commission. Affiliate programs and affiliations include, but are not limited to, the eBay Partner Network.
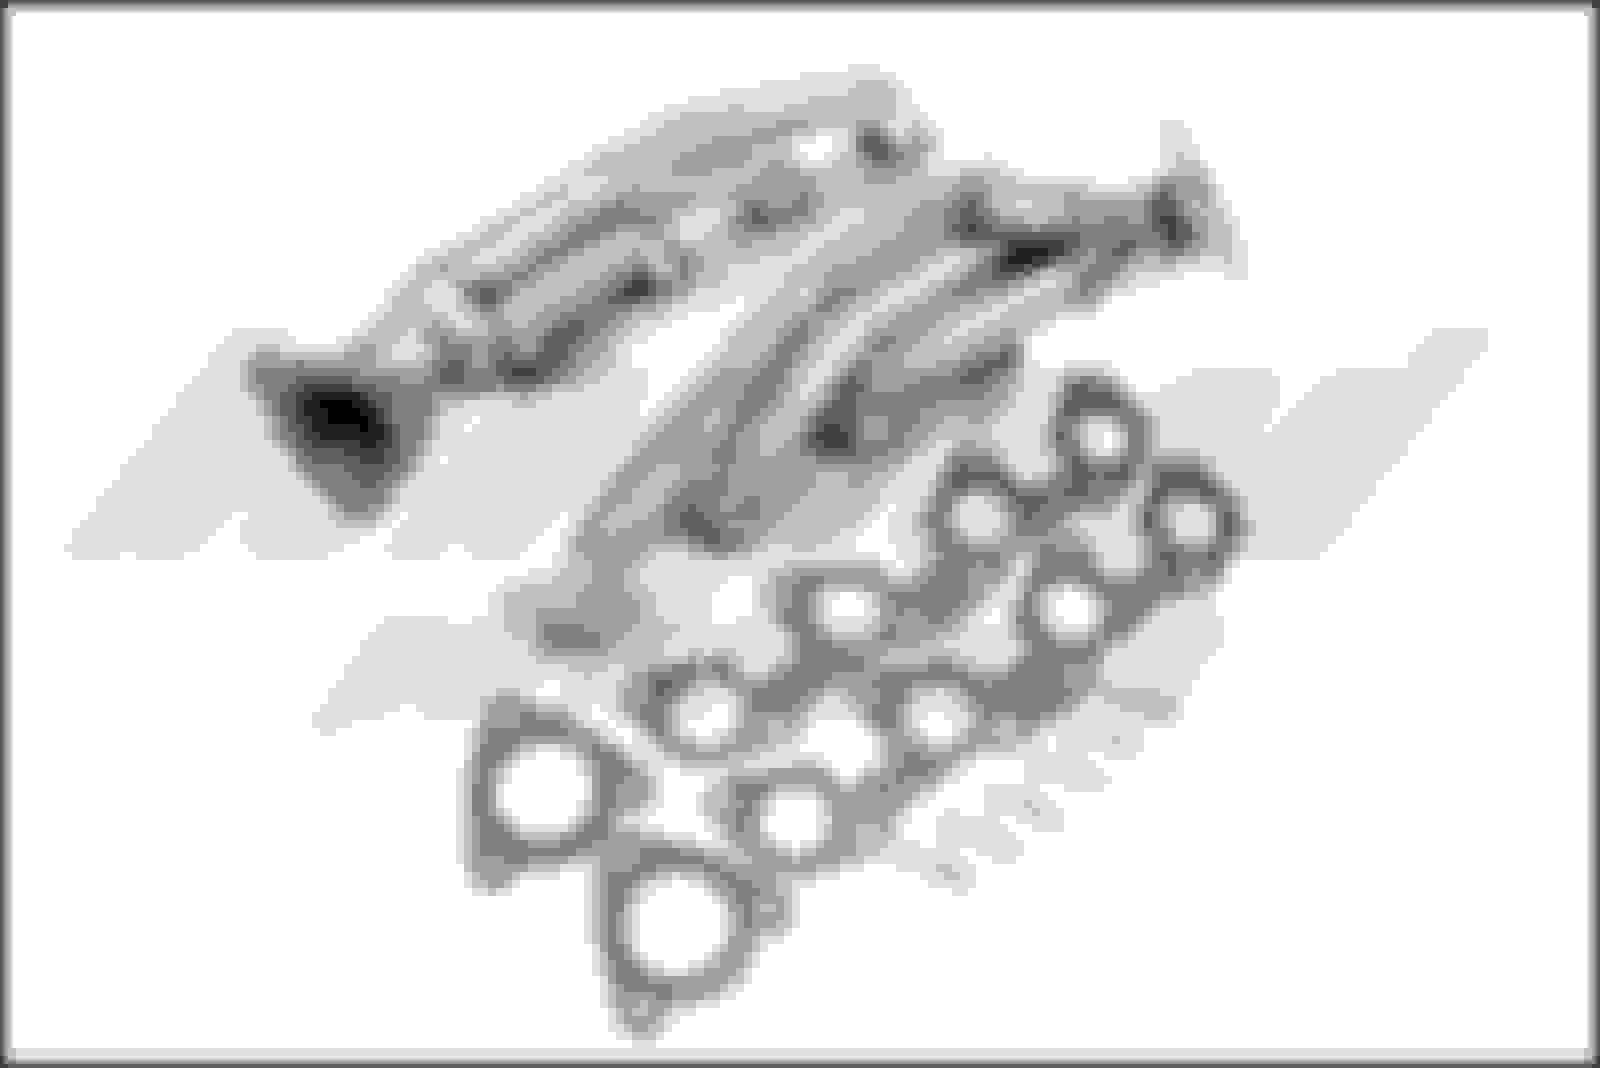
KiPod, Yota have either of you two used manzo parts before? I briefly researched the name of the brand made by megan racing??? (eGay brand headers, knock offs of flowtech I think). Found a set on ebay new for $140. I'm going to have to modify the headers regardless of what style I get, and I'd prefer stainless over pace setter's painted (you know, for longevity).
It's no secret the factory UZ headers flow like trash, so why not go with some aftermarket while I'm swapping to help get a couple extra ponies. IIRC Brad Bedell made his own driver side header (I'm not that skilled), and figured the manzo would be the most cost efficient setup to modify.
From what I can tell, I'm going to have to modify the no. 7 runner and possibly the no 5 to help clear the steering shaft, but only time will tell.
Ebay coupon codes work wonders, expires 9/23/16 and saves an additional $20. so $120 instead of $140 shipped, the xat flanges start at $199. Granted I'm sure XAT has a much higher quality in their product, but just seeing if anyone has ever run MANZO brand headers and what quality issues they were having if any.
The only manzo part I have used is a second hand axle back exhaust for my IS300. It's the typical chinese ebay quality. I didn't like the quality of the flange, so I cut it off and welded the oem flange on to ensure no leaks.
I've completed five 1uz swaps and have used the oem exhaust manifolds from the first gen SC400 in all of them. No other manifold has worked for me. The manifolds you show look just like the stainless manifolds I bought that are "designed" for the 4.7 tundra (paid $89.00 shipped on ebay). They would not fit for any of my swaps either.The first runner would either hit the frame or steering components. The SC400 manifolds probably flow poorly but they hug the block tighter than any other manifold to provide the best clearance in most swaps.
So the last 2 parts I need to bolt the trans to the engine came in yesterday. I didn't post because my daily had a flat, and the tire wouldn't hold air. Huge hole in the tread (tire place said it looked like a nail.) My response a nail for what? Jesus? Anyway, 100 for a tow 150 for a new tire with mount and balance I'm back on the road. Ever notice how flats only happen when it rains?
Anyway parts needing to order are motor mounts ( gs400/430 part 12361-50111) some other odds and ends mainly hoses. I'll get a mishimoto radiator soon to help combat the extra thermal load. For now I'll use the factory gs headers and I'll modify as needed to clear the steering rack.
Throwout bearing adapter on the left pilot bushing on the right. Pilot bushing includes a removable Nissan pilot bushing for future maintenance.
The throwout bearing is from an 89-94 Nissan, and I don't think my centerforce bearing will work with this because of the extra height the centerforce has....but I'm keeping it and ill make it work in the future. There's always a way.
Motor mounts come in tomorrow and hopefully I'll have this monster in the bay by the weekend.
Awesome Stuff! have you seen XHyaku's Thread? ( https://www.clublexus.com/forums/bui...attleship.html ) he was using a R154 he had some issues with CEL. I really want to swap something into my GS400. Hopefully you get everything to run smooth!
Sorry about the lack of updates, money is getting pretty tight (because car parts are expensive) and haven't had much time to document and take pictures.
I noticed when I pulled the intake to clean paint, change starter bolts I also removed the injectors. Something about them weren't right. Good thing too the o rings were falling apart. Every last injectors seals were shot. So I found this on ebay
Complete o ring kit for $36 shipped. Even included a machine screw for the mpi filters and instructions. Not that I needed them, because it's a straightforward service. It's money well spent for a little insurance.
Purchased oem gs400 motor mounts they finally came in yesterday (part 12361-50111). Wes with faith on wheels used gs mounts in his 3uz is, Bedell said he used jz mounts then uz mounts. Well now I have both to choose from. I'm getting so close to getting it ready.
I haven't had much time to work on my vehicle to get it prepped for the install because I work until 9pm and my car is outside right now so pulling the dash in the dark is a no go.
Ran into my first hurdle, not a big one but can be pretty catastrophic if not paid attention to.
Collins instructions states to "stack" the flywheel on the flex plate since the z32 splines start further down the input shaft. Ok no problem (I posted an image of a 2jz earlier). When I first installed the spacer, flexplate, then the black bolt guide, THEN the flywheel. After I torqued just a few bolts on the flywheel (4 to be exact), I noticed the flexplate ring gear was actually in contact with the starter gear.
Anyone have any suggestions? I mean I could mill the bell housing to the trans and input shaft so I would run just the flywheel but we're trying to avoid that here.
I've tried switching positions of the flexplate spacer and bolt guide but the xat (supra store) flywheel is still pressing on the flex plate. I'll contact collins tomorrow to see what flywheel he uses for his swaps I'm thinking it's from a VZ engine but I'll confirm tomorow. I'll also give supra store a call to confirm their flywheel as well (just so I can confirm if the flywheels are the same).
I theoretically could also shim the starter further away from the flexplate, but that doesn't solve the issue of it flexing towards the engine.
Anyway here's some pictures.
This was installed backwards in this pic, but was flipped prior to installing flywheel bolts.
ignore the water. It was from a tire the engine is resting on (it was outside during the hurricane).
Despite this small issue its coming together nicely.
As you can see in the second picture everything is aligned properly, without the bolts. Starter and ring gear have about 2mm clearance, there is zero clearance when torqued.
3rd Apr 2017 revision:
Here are some notes. To help all those doing this type of conversion uz to manual.
UZ flexplate and spacers = 10mm of thickness.
Ka input shaft tip to spline 1 5/8"
Z32 input shaft tip to spline 1 3/4 (+ 1/8" "3mm over KA trans)
CD00X input shaft tip to spline 2 1/8" ( + 3/8" "9.5mm" over Z32 Trans)
Keep this in mind when choosing your set up.
The ka trans doesn't need stacking in order to make the clutch disc spline properly (or so I've been told). but 1/8" is only 3mm and that's not much in my opinion. I would stack and use the 35mm arp bolts for the flywheel.
the z32 trans I used here and 35mm bolts where used. ARP of course.
cd00x same thing, in addition to the cd009 flywheel designed for this swap. Suprastore carries one, so does collins. I'm still learning this build hard to do with just images to go on, but it's recommended to stack as well. Using 45 mm bolts.
The gap is slightly larger (not even a half mm larger), and Starter will still engage just fine.
BTW stacking these spacers with flexplate and flywheel, I cannot use the 4age arp bolts that came with the fly wheel. I had to purchase (8) 12pt m10x1.25x35mm uhl bolts. Got these from ARP.
Now I could have taken the bell housing off and get it milled the exact depth the adapter plate adds, but I'm only using that as a last resort.
I did notice the passenger exhaust manifold and z32/ka/Sr adapter plate interfere with each other. No problem. I'll just use the eBay cheap 2uz headers and modify those as necessary to fit.
Just for reference so everyone can follow and save headache for future swaps, this is bad:
Starter gear hitting ring gear on flexplate.
Another angle as you can see there is zero clearance.
This is good:
Now you can see the gap between the bottom of starter gear and top of ring gear on flexplate. This gap allows proper engagment.
In retrospect: I could have shimmer the starter back a couple mm using some extra washers with the starter bolt mod. I'll make a mental note of that.
Still doesn't work: I forgot to update this back in October so I had to revise it 4/3/17. see post #24.
So I've been thinking about how I'm going to tackle this. I've got it narrowed down to 2 theories.
1). I've got the 2nd flexplate spacer (part 32116-50010). I can use this to stack between the flexplate and the flywheel to further shim the flywheel from the flexplate to prevent starter gear binding.
2) I can pull the bell housing and have it milled 5/8" (the exact thickness of the adapter plate).
Time to Measure!
I spoke with a friend that swapped his uz to an s13 and used the KA24DE trans (FSW571C). He did not have to mill his bellhousing nor shim his flywheel used the lightweight 3sgte flywheel that I"m using. I measured a KA24 trans input shaft, from the tip to where the splines begin it measures at 1 5/8" (41.275mm). The Z32 splines start at 1 3/4" (44.45mm). Approximately 1/8" of difference. Side note: These input shafts are not interchangeable. I called to confirm and the number of teeth on the ka input shaft base are 21 and the z32 input shaft has 20 teeth I'll let you guess as to how thick the flexplate spacer (32116-50010). Looks like this may work. The longer ARP bolts are actually too long for my previous set up and were bottoming out in the crank before, so lets hope this last spacer fixes that issue as well. flywheel stacking will be ordered like this:
crank ->32116 -> flexplate -> 32116 -> flywheel. No more 32117 bolt guide needed.
Found a company that makes a shortened shifter bracket for the z32 trans as well. but that'll come up in a few posts. I want to get this taken care of first and make sure I can fit the trans in the chassis without cutting.
Quick recap of everything needed so far:
uz to z32 adapter plate (well duh).
Clutch (use a sr20det disc with a 3sgte pressure plate).
flywheel (I used suprastores lightweight flywheel (modified 3sgte)
2x uz flexplate spacers (if you have a 2jz one you can just drill the holes larger to fit the uz bolt pattern)
pilot bushing adapter (use collins, it extends the crank to allow the flywheel to remain hubcentric), it presses in so you don't have to worry about it coming back out.
tob adapter (once again from collins, the throwout bearing is not from a 300zx, I honestly have no clue what nissan it's from, but probably a hardbody truck). You could also use a T56 hydraulic throwout bearing which would actually be easier in my opinion.
Anyone willing to give a helping hand? Beer provided.
revision 3rd Apr 2017: the sequence I used in my set up was [32116-50010] -> [flex plate] -> [32116-50010] -> [32117 installed backwards] -> [flywheel] -> arp bolts.
Success! Not only does every fit flawlessly, the starter has the correct gap, the flywheel sits 1 5/8" from the adapter plate and if my calculations are correct the clutch will spline perfectly to the input shaft.
The longer arp bolts have enough thread to almost bottom out to the base of the crank with about 1mm of clearance.
Here is how she sits now. Tomorrow the clutch and pressure plate go on and the trans gets installed.
Next hurdle trans fitment. Shouldn't be too bad, little hammering here and there.
Im using the 3s lightwieght flywheel and a spec stage 2 clutch kit.
Clutch kit shipped was probably the wrong one but can't confirm yet although I'm 95% positive the disc was not the correct one. Spoke with spec and I was sent a sr20det disc with a 3s pressure plate.
Let me save you the trouble of research. Sr20 disc 9 3/4" 3s pressure plate 9 1/2"........
I need a 3s disc with a Nissan hub, spec said they could do this, but I would need to contact the reseller of the disc first. Now I wait. I'm sure you can imagine me losing my motivation to finish this build but mistakes happen, so let's hope the resolution is quick.
Still looks cool though.
update 10/28 suprastore sent me an RMA for spec. I shipped the clutch out this morning and the suprastore staff has been very helpful not only with the clutch but but everything in general. I should have my new clutch some time next week and I can finally finish getting the trans bolted. for test fitment I used an old ka24 clutch (smaller than an sr and 3s clutch) and an old 3sgte pressure plate to ensure the splines on the trans will have enough penetration on the disc. everything looks good
I know this build thread is taking a while because this is all new ground here. I have yet to see anyone do a z32 trans and uz combination and document it.
I'm interested as well. my new clutch came in 11/3, I just now got some free time to install it. measured it in comparison to a 3sgte disc and its spot on so u know it'll fit the flywheel pressure plate combo, nissan alignment tool came with this disc (unlike my first disc). here is how she sits.
fitment is flawless. the pressure plate was a pita, the powder coating made for an extra tight tolerance around the flywheel dowel pins. nothing a little hammer and tapping couldn't fix.
off to modify the bellhousing for clearance of the starter gear. 1/2" cut and the trans will be ready to bolt up.
Starting to take shape. I didn't take pics of the small amount of grinding inside the bell housing but it's pretty easy. everyone said theyve done 1/2" cut I did 5/8" ( everything else on this build is 5/8" keep the momentum going).
here's how she sits now. I've got to work early tomorrow so I can't be out too late wrenching. although it would be nice
ordering a shifter shortening bracket, and short throw shifter tomorrow. I measured the 2jz from motor mount to rear of the engine.
I then measured the same points on my 1uz (including the adapter plate).
the 1uz is approximately 2" shorter which is great. because the z32 trans has a shifter length of 34.5" the 2jz has a shifter length of 30" from bell housing to middle of shifter. the shifter shortened bracket moves the shifter forward 2 3/8".
if I did my math correctly (34.5" - 2" - 2 3/8" = 30" + 1/8") I will have to modify the shifter by 1/8" (there's that damn number again).
once again I'm trying to avoid as much "custom" work as possible. not because I can't do it, but to see if this set up can be done with research and sourcing the right parts.
xcessive, loj, alpha omega, and I believe Megan racing all make the shortened shifter bracket.
I emailed collins a few months back regarding the z32 adapter and dowel pins. the adapter doesn't have pins. not sure if I like that idea so yay custom work. I used an old ka24de head bolt and ground it flush with the adapter. it was the only dowel pin that aligned. also only 5 bolts were able to be bolted to the adapter. fixed that real quick reamed a bolt hole in the lower part of bell housing with a drill bit. now I have 6 bolts and a dowel. I feel better about this.
painted it black, because I just did. I know why collins didn't include one (this adapter isn't just for a z trans but a ka trans as well, but hey this is new territory for many of us.
I bought oem z32 trans bolts from z1 but the bolts are too long as I expected, so I can either buy the correct bolts or grind the ones I have, looks like I'm busting out the grinder again. fingers crossed the trans goes on tonight.

 09-19-16, 03:03 PM


 Looks like this may work. The longer ARP bolts are actually too long for my previous set up and were bottoming out in the crank before, so lets hope this last spacer fixes that issue as well. flywheel stacking will be ordered like this: