Lexus GX470 H3 HID Kit Installation DIY
 11-29-11, 01:15 PM
#1

Hey guys,
Here is a great DIY for a Lexus GX470, thanks to Club Lexus forum member "Achent" who sent us the following step by step on how to properly install an HID kit in the GX470's H3 fog lights.
Here is an alternate method, for installation of the 4300K Volt HID Kit, H3 fog lamps on the Lexus GX 470.
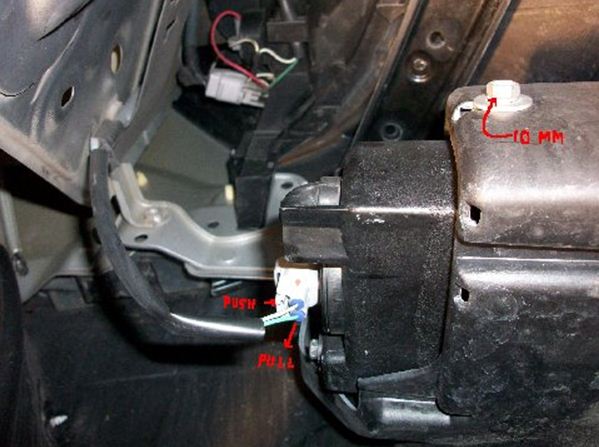
This installation will take some technical skills and a little patience. This is on the drivers side, looking upward. Remove the electrical connector to the fog light. The green wire on the factory harness is the hot wire. Push in on the tab hard (red arrow) and wiggle and pull downward. Remove the retaining bolt with a 10 mm wrench/ socket. Push the fog light housing forward to remove.
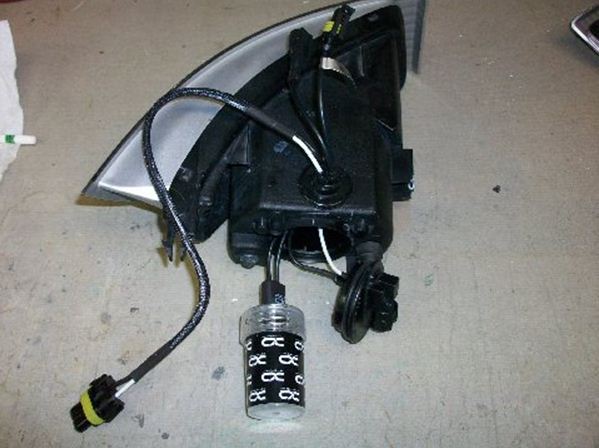
This picture shows the fog light housings and the assembled "Volt" harnesses for reference. The wires will need disconnected for the installation.

Twist and unlock the cover/ door.
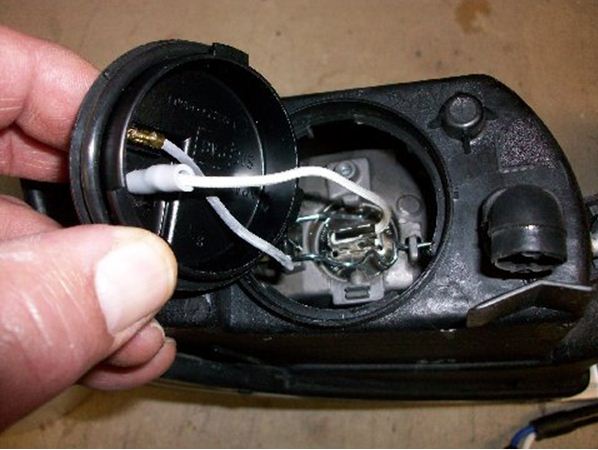
Connect the black/ ground wire from the Xenon harness into the connector on the cap/ door (where the white factor wire coming from the center of the bulb used to go).
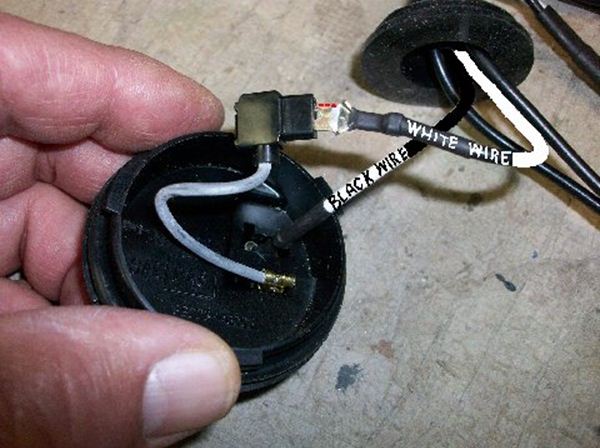
Disconnect the gray wire from the base of the light socket and connect this wire to the white wire on the Xenon harness. I trimmed the flat tab connector on the Xenon white harness wire, because it is too wide. I trimmed it down to 3/16 wide. It now fits into the hot gray factory wire connector, which is still attached on the cover/ door. I put a small piece of electrical tape around the part of the tab that sticks out.
Note the Lexus factory hot wire is green on the outside of the fog light housing and gray on the inside of the cover. No soldering or alteration is needed other than trimming the flat tab mentioned above.
Now comes the technical and patience part. This is the bottom of the drivers side fog light housing. On the top of this surface, I marked the center or centerline of the cover opening on the end. I marked it on top of the fog light housing with a grease pencil. I went to the right, or center of the car, 1/4 of an inch. From the back of the housing, going forward, I made another mark 3/4 of an inch. This is the center for the one inch hole to be drilled.
This is a fairly soft, ABS plastic housing. I used a one inch hole saw, with the center bit, barely sticking out from the hole saw. I didn't want to damage anything on the inner housing.
I drilled mostly through and finished the rest of the hole with a razor knife. I de burred the hole on the inside and out, with that same razor knife.


I unplugged the three wires from the relay and ballast, so I could pass the light bulb harness, through the end cover opening and up and through the new one inch hole. The double connector has a removable plastic wire retainer (white dots). I removed that plastic piece by gently pulling outward on one side (white arrow). It makes it is easier to pass this larger connector through the one inch hole. I inserted this larger double wire through the hole first. It will go through the hole, by slightly tilting it in the hole. Then I inserted the two single wires through the hole.
Now for the rubber grommet. Using my fingers in the back of the housing opening, I pushed one side of the larger flat portion of the grommet up and over the inner fog light housing, toward the new hole. Once you get the outer edge of the grommet over the inner housing, you can pull the grommet through the hole and lock it into position.
Next install the bulb under the hold down wire retainer in the bulb socket. You have to turn the bulb around and insert it into the socket. If you need a little more wire, to turn the bulb around, you can gently pull some extra wire through the grommet. Orientate the bulb, so that the retainer wire will go around the new bulb base. The bulb base is oval. Pull some of the excess wire for the light bulb, back through the grommet. Check the two connections again in the cover before inserting and locking the cover.

Connect the rest of the fog light harness (ballast and relay wiring). It may be easier to lay under the car and reach through the fog light opening and grab the wires when re installing the fog light. If you gently bend down the wires, the fog light will slip into the opening. I held tension on the wires, while pushing the fog light into the housing.
For some reason, there is more room in the front bumper, above the passenger fog light housing, than the drivers side. Once both fog lights are pushed all the way in and secured with the factory bolt, the grommet and wires clear any obstructions in the bumper.
Connect the Lexus factory harness to the rear original location in the rear cover/ door. Test the lights before securing the ballast, relay, and wires.
Note's
It may be easier to connect the entire harness to the fog light before installing the fog light back in the bumper. You can't really get two hands into the opening behind the bumper later.
If you feel on the bumper, above the fog light, there is a large flat surface on top of the fog light housing portion of the bumper. Clean off that surface and attached the ballast to the top with the double sided tape that came with the kit. There is enough flat surface on the top, to also connect the relay portion of the harness, with double sided tape.
Here is a great DIY for a Lexus GX470, thanks to Club Lexus forum member "Achent" who sent us the following step by step on how to properly install an HID kit in the GX470's H3 fog lights.
Here is an alternate method, for installation of the 4300K Volt HID Kit, H3 fog lamps on the Lexus GX 470.
This installation will take some technical skills and a little patience. This is on the drivers side, looking upward. Remove the electrical connector to the fog light. The green wire on the factory harness is the hot wire. Push in on the tab hard (red arrow) and wiggle and pull downward. Remove the retaining bolt with a 10 mm wrench/ socket. Push the fog light housing forward to remove.
This picture shows the fog light housings and the assembled "Volt" harnesses for reference. The wires will need disconnected for the installation.
Twist and unlock the cover/ door.
Connect the black/ ground wire from the Xenon harness into the connector on the cap/ door (where the white factor wire coming from the center of the bulb used to go).
Disconnect the gray wire from the base of the light socket and connect this wire to the white wire on the Xenon harness. I trimmed the flat tab connector on the Xenon white harness wire, because it is too wide. I trimmed it down to 3/16 wide. It now fits into the hot gray factory wire connector, which is still attached on the cover/ door. I put a small piece of electrical tape around the part of the tab that sticks out.
Note the Lexus factory hot wire is green on the outside of the fog light housing and gray on the inside of the cover. No soldering or alteration is needed other than trimming the flat tab mentioned above.
Now comes the technical and patience part. This is the bottom of the drivers side fog light housing. On the top of this surface, I marked the center or centerline of the cover opening on the end. I marked it on top of the fog light housing with a grease pencil. I went to the right, or center of the car, 1/4 of an inch. From the back of the housing, going forward, I made another mark 3/4 of an inch. This is the center for the one inch hole to be drilled.
This is a fairly soft, ABS plastic housing. I used a one inch hole saw, with the center bit, barely sticking out from the hole saw. I didn't want to damage anything on the inner housing.
I drilled mostly through and finished the rest of the hole with a razor knife. I de burred the hole on the inside and out, with that same razor knife.
I unplugged the three wires from the relay and ballast, so I could pass the light bulb harness, through the end cover opening and up and through the new one inch hole. The double connector has a removable plastic wire retainer (white dots). I removed that plastic piece by gently pulling outward on one side (white arrow). It makes it is easier to pass this larger connector through the one inch hole. I inserted this larger double wire through the hole first. It will go through the hole, by slightly tilting it in the hole. Then I inserted the two single wires through the hole.
Now for the rubber grommet. Using my fingers in the back of the housing opening, I pushed one side of the larger flat portion of the grommet up and over the inner fog light housing, toward the new hole. Once you get the outer edge of the grommet over the inner housing, you can pull the grommet through the hole and lock it into position.
Next install the bulb under the hold down wire retainer in the bulb socket. You have to turn the bulb around and insert it into the socket. If you need a little more wire, to turn the bulb around, you can gently pull some extra wire through the grommet. Orientate the bulb, so that the retainer wire will go around the new bulb base. The bulb base is oval. Pull some of the excess wire for the light bulb, back through the grommet. Check the two connections again in the cover before inserting and locking the cover.
Connect the rest of the fog light harness (ballast and relay wiring). It may be easier to lay under the car and reach through the fog light opening and grab the wires when re installing the fog light. If you gently bend down the wires, the fog light will slip into the opening. I held tension on the wires, while pushing the fog light into the housing.
For some reason, there is more room in the front bumper, above the passenger fog light housing, than the drivers side. Once both fog lights are pushed all the way in and secured with the factory bolt, the grommet and wires clear any obstructions in the bumper.
Connect the Lexus factory harness to the rear original location in the rear cover/ door. Test the lights before securing the ballast, relay, and wires.
Note's
It may be easier to connect the entire harness to the fog light before installing the fog light back in the bumper. You can't really get two hands into the opening behind the bumper later.
If you feel on the bumper, above the fog light, there is a large flat surface on top of the fog light housing portion of the bumper. Clean off that surface and attached the ballast to the top with the double sided tape that came with the kit. There is enough flat surface on the top, to also connect the relay portion of the harness, with double sided tape.
 11-29-11, 03:20 PM
#2

Thanks to Xenon Depot for making the post for me, as I am new to the forum and not sure how to post yet. This is an alternate method of installing. All of the other posted methods are very good as well. I just wanted to use the weather proof grommet that came with the harness and there seemed to be room on the top, for that grommet. Worse case, if you decide to go back to standard fogs, a one in plastic body plug will fit the grommet hole. Love my new lights.
11-29-11, 06:07 PM
#3
Lexus Test Driver

Thanks to Xenon Depot for making the post for me, as I am new to the forum and not sure how to post yet. This is an alternate method of installing. All of the other posted methods are very good as well. I just wanted to use the weather proof grommet that came with the harness and there seemed to be room on the top, for that grommet. Worse case, if you decide to go back to standard fogs, a one in plastic body plug will fit the grommet hole. Love my new lights.
NICE JOB!!

 12-06-11, 05:15 AM
#6
Kind of like "lipstick on a pig", our housing for the flood light and defuser is poor. I am happy with the 4300K, certainly with the quality of the kit, but might advise others to go for the higher wattage.
04-09-15, 11:28 PM
#7
Driver School Candidate

Join Date: Mar 2015
Location: NM
Posts: 38
Likes: 0
Received 0 Likes
on
0 Posts
Extremely helpful thread. My install was very clean. Only difference with mine was I zip tied the relays to hang from the bumper support as my own 3M didn't stick as well as the 3M supplied with the ballasts.
Trending Topics
04-10-15, 07:25 AM
#9
Rookie

Join Date: Mar 2015
Location: FL
Posts: 78
Likes: 0
Received 0 Likes
on
0 Posts
Completed my install last night, found it extremely helpful and whole install was about 50 minutes.
I found it easier to use a carpet knife, as the abs plastic is fairly easy to work with.
Is there a way to adjust the fog beam? I haven't searched yet.
I found it easier to use a carpet knife, as the abs plastic is fairly easy to work with.
Is there a way to adjust the fog beam? I haven't searched yet.
04-10-15, 11:49 PM
#10
Driver School Candidate
Join Date: Mar 2015
Location: NM
Posts: 38
Likes: 0
Received 0 Likes
on
0 Posts
No, theirs not. I looked as I saw my fogs were not level with each other.
09-25-15, 06:51 AM
#11
Instructor

Thread
Thread Starter
Forum
Replies
Last Post