
Trunk Release Button Cover Melting (includes DIY Replacement of Release Button Cover)
 09-25-13, 01:47 PM
#16
Advanced
Thread Starter
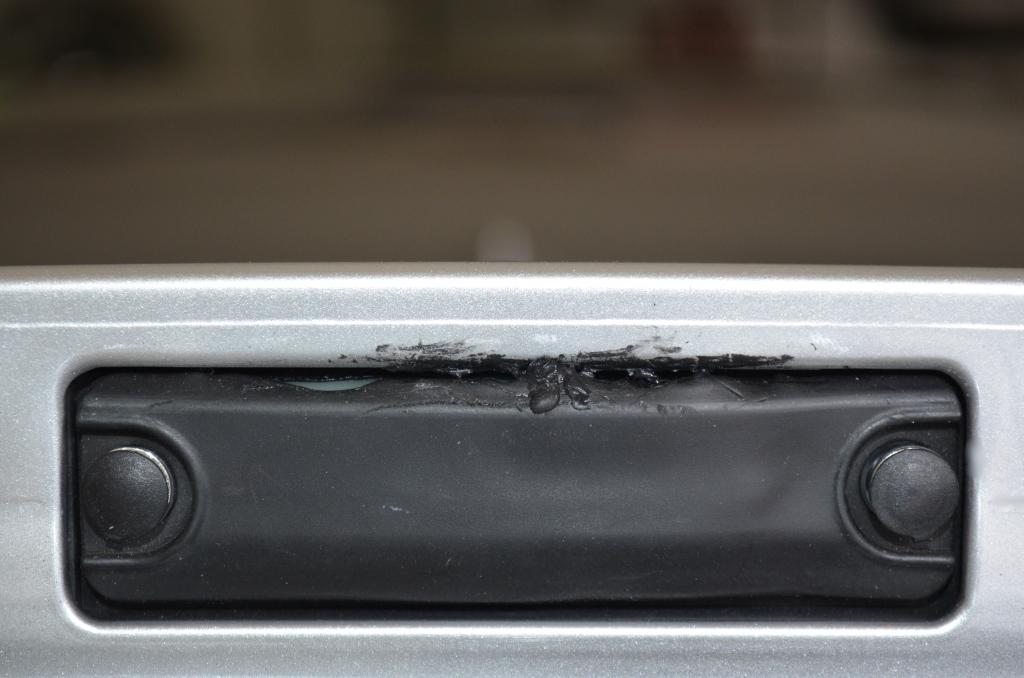
Here's mine.
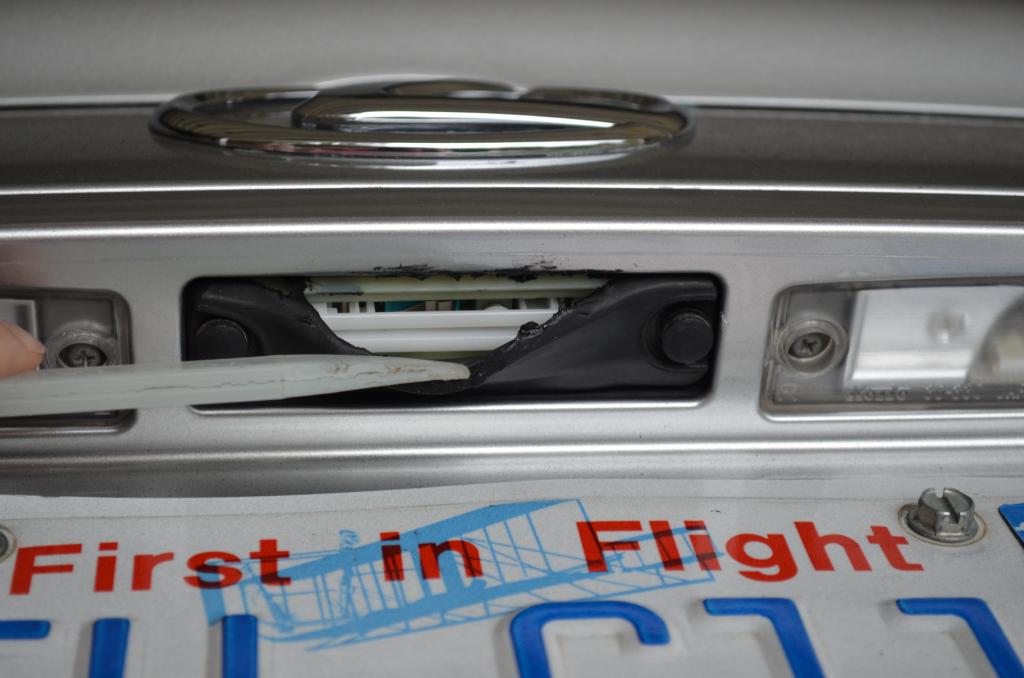
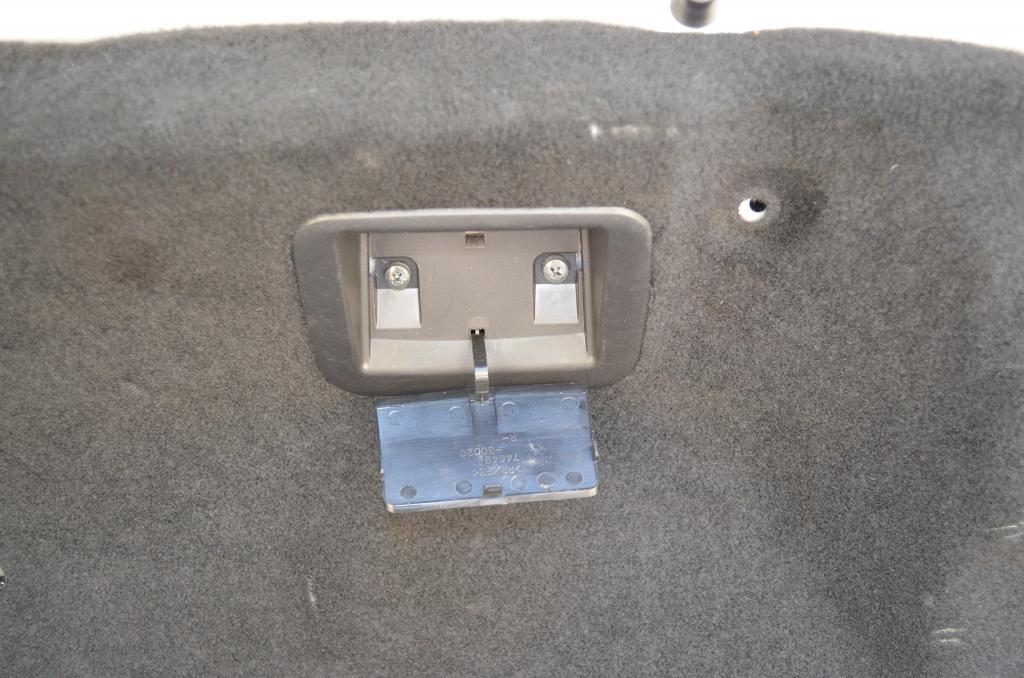
And here is the switch underneath.
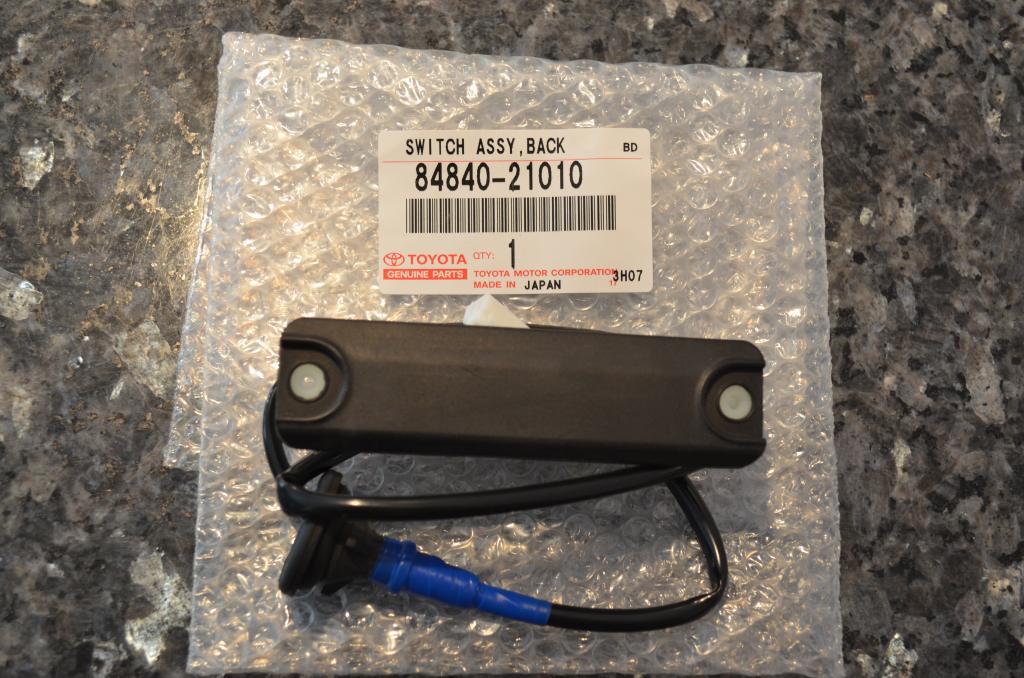
My replacement part is on it's way (thanks Sewell ). Will be interesting to take a closer look at what may have caused the melting.
And here is the switch underneath.
My replacement part is on it's way (thanks Sewell
). Will be interesting to take a closer look at what may have caused the melting.

 lol
09-27-13, 12:09 AM
lol
09-27-13, 12:09 AM
#23
mine is doing it too.. hawaii weather and its garage kept. its barely even hanging on anymore. Went to the dealership and was charging me $130 for the part. Declined and came here.. looking to DIY..
09-28-13, 09:01 PM
#24
Advanced
Thread Starter
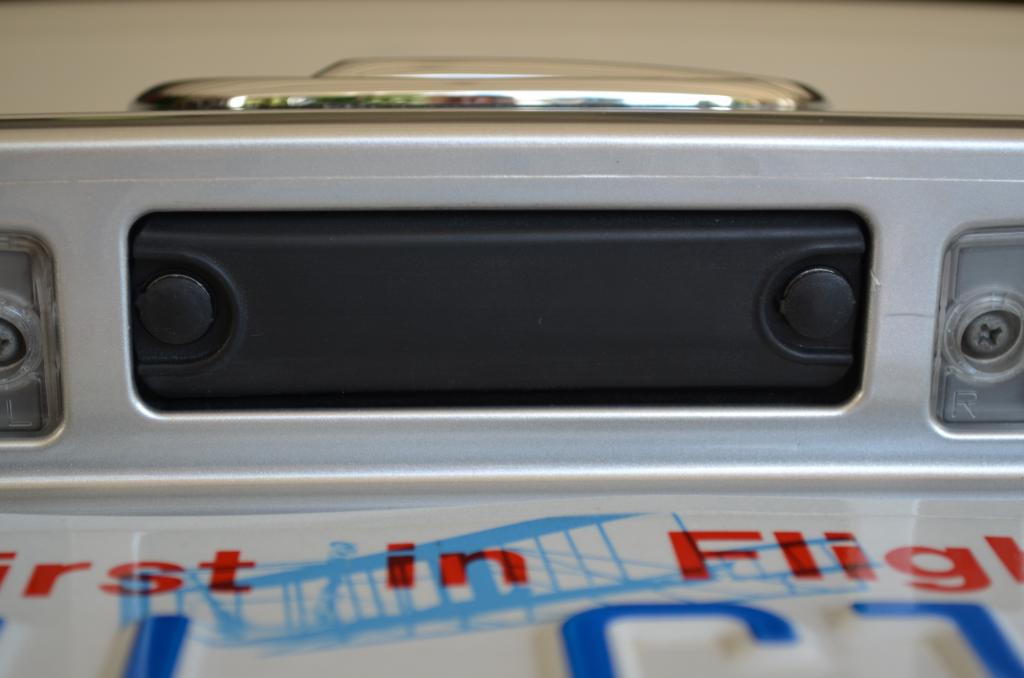
This is a DIY procedure to replace a faulty trunk lid switch. Like others, mine has melted/deteriorated to the point that it feels like gum leaves a tar-like residue on my fingers when I touch it. This is what it looked like before replacement:

Tools needed:
Plastic trim tool.
Phillips and Flat head screwdrivers. Tape for the flat head if you aren't using a plastic trim tool.
10 mm socket wrench
Paper towels/rags, spray cleaner (Windex works fine).
New Switch Assembly: 84840-21010
Procedure:
1. Remove your License plate and frame (if equipped)
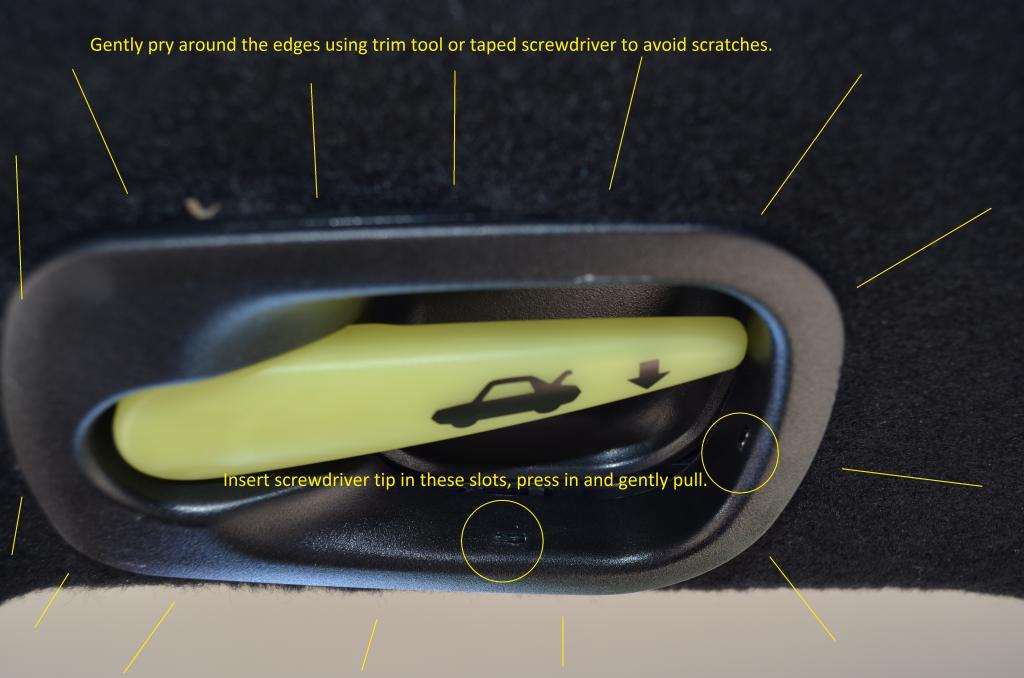
2. Open the trunk lid and pry open the cover in the center of the trunk handle. This will pop open easily. Be sure to use a plastic trim tool or taped screwdriver tip to avoid scratches.
3. Unscrew the 2 phillips head screws under the cover and remove the trunk handle.
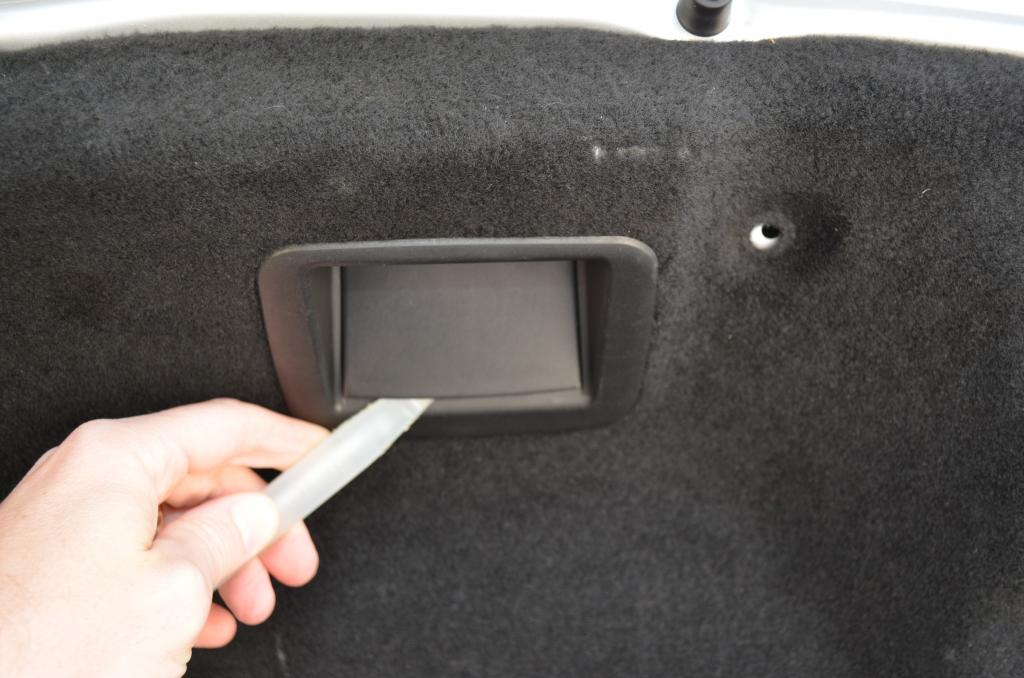
4. Remove the trim piece from the trunk release lever. Insert a small flat head screwdriver into the 2 slots on the inside of the trim, press in and gently pull. This trim piece is held in by several tabs, so gently pry around the edges (again using a plastic trim tool or taped screwdriver tip) and remove it.
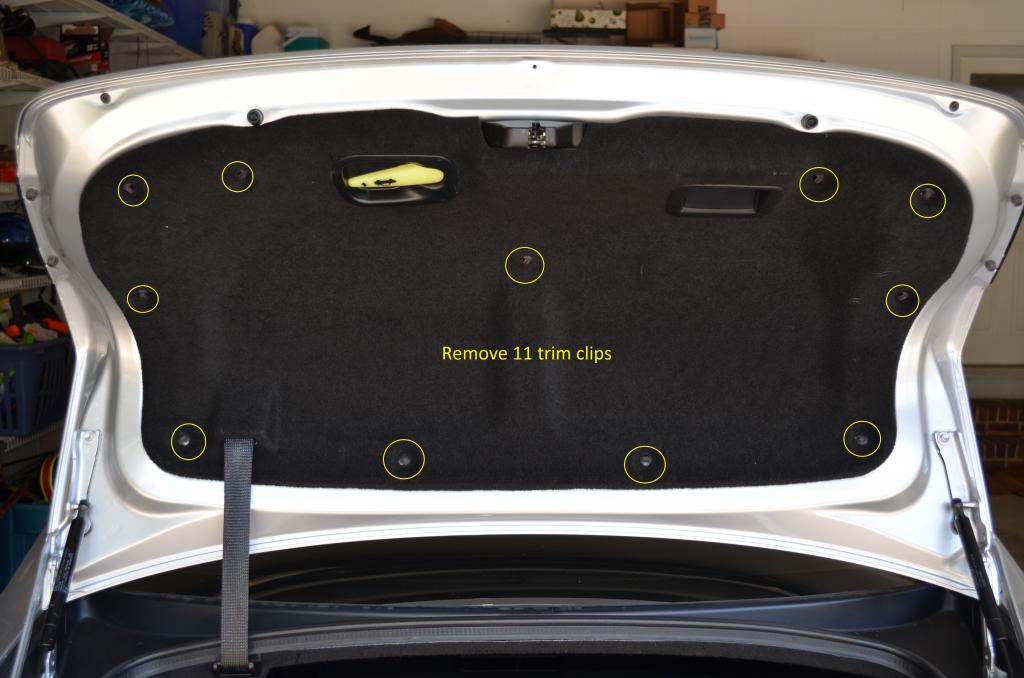
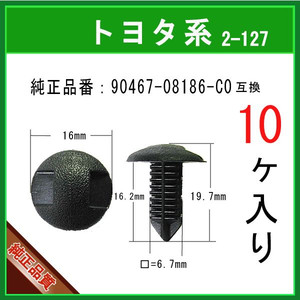
5. Open the trunk and remove the 11 clips holding the liner to the trunk lid. I'm sure there is a specialized tool to remove these, but I used a small vice grip to grasp the center part of the clip while gently wiggling and pulling. You could also use a small screwdriver through the center of the clip I suppose. Warning ... these clips are easily deformed, so be careful how you remove them. I you do manage to mangle one, replacements are $1.04 each (#9046708186C0).
Here is what the clip looks like
6. Remove the liner. Be careful to align the slot in the liner with the cable on the bottom left before you pull it away.
Trunk lid liner removed
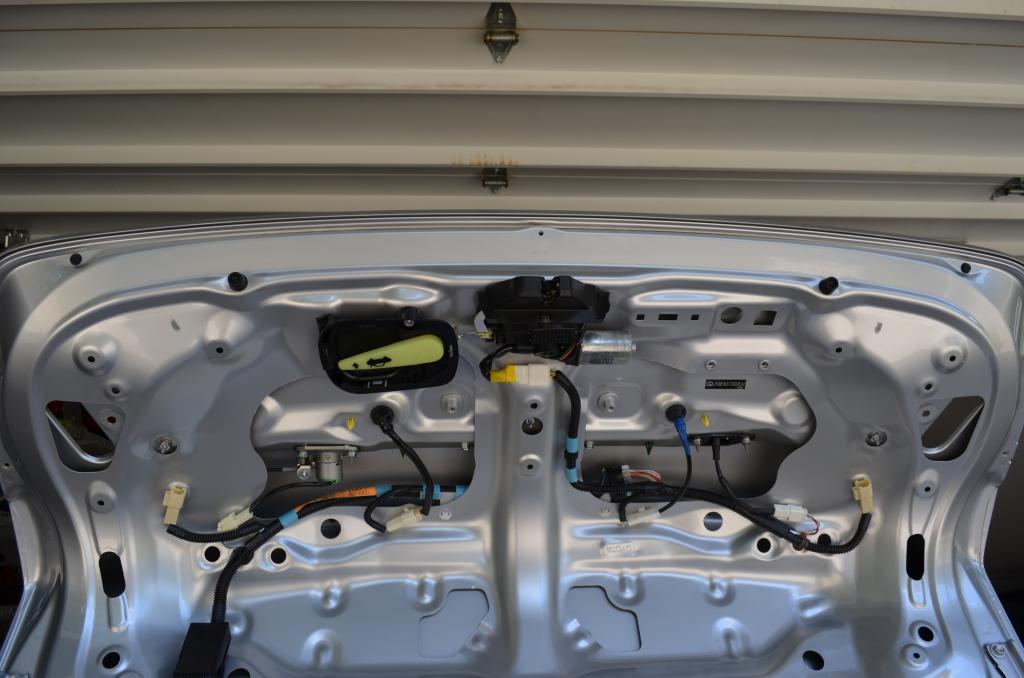
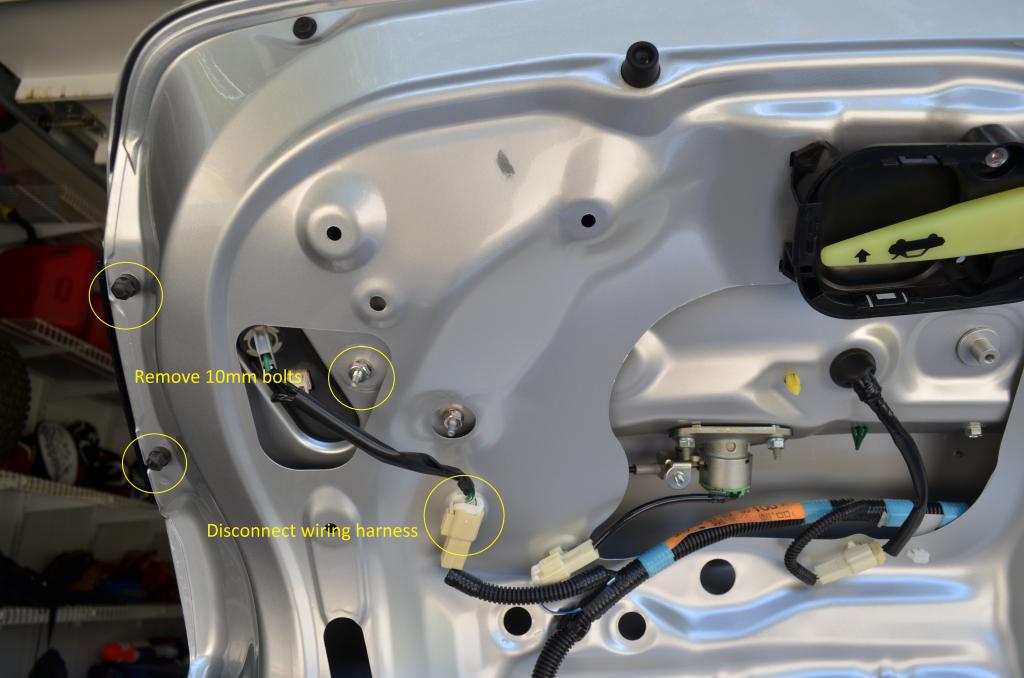
7. Remove the right and left combination lamps (brake/turn/reverse), one at a time, by unfastening the wiring harnesses and removing the 10mm bolts.
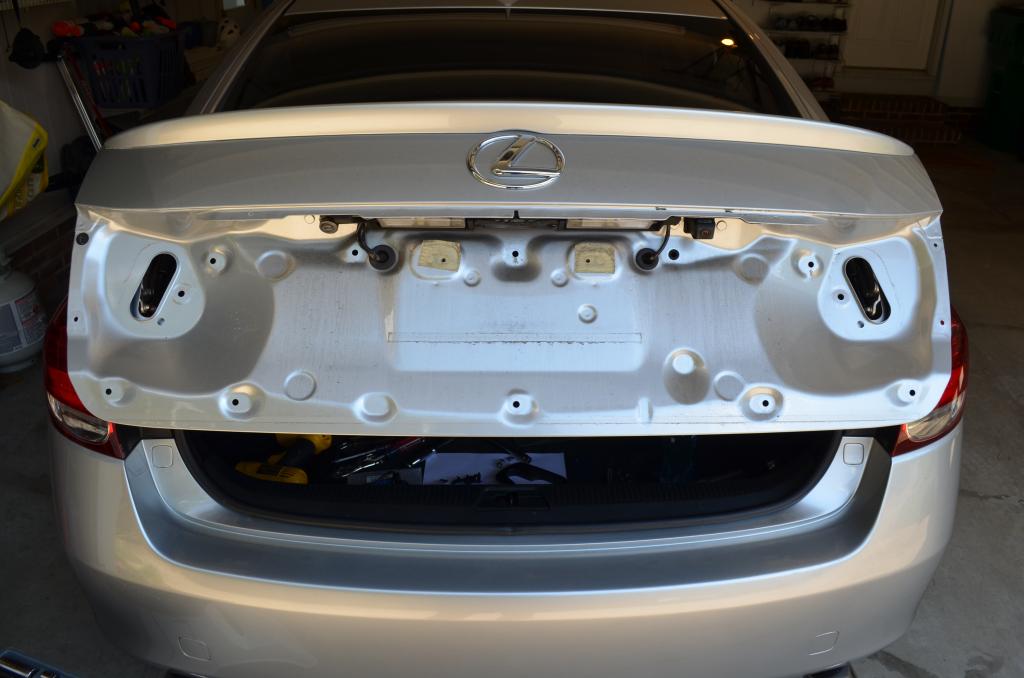
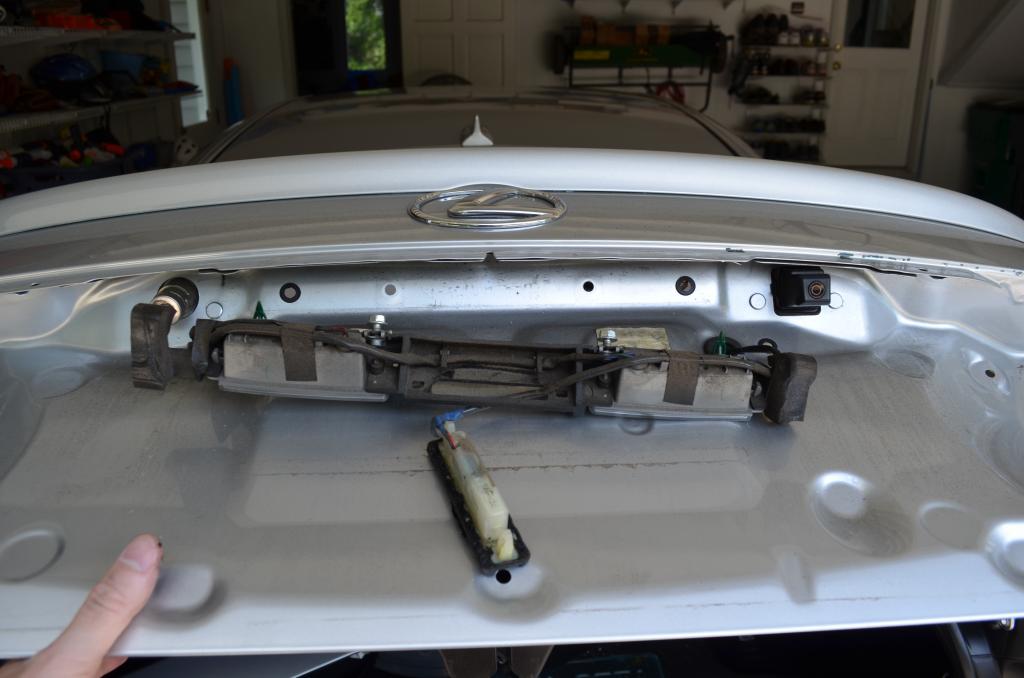
8. Remove exterior trunk lid panel/fascia. Remove 3 - 10mm nuts, and with your fingers, push the screws in and pull around the edges of the panel to carefully remove it.

Panel removed
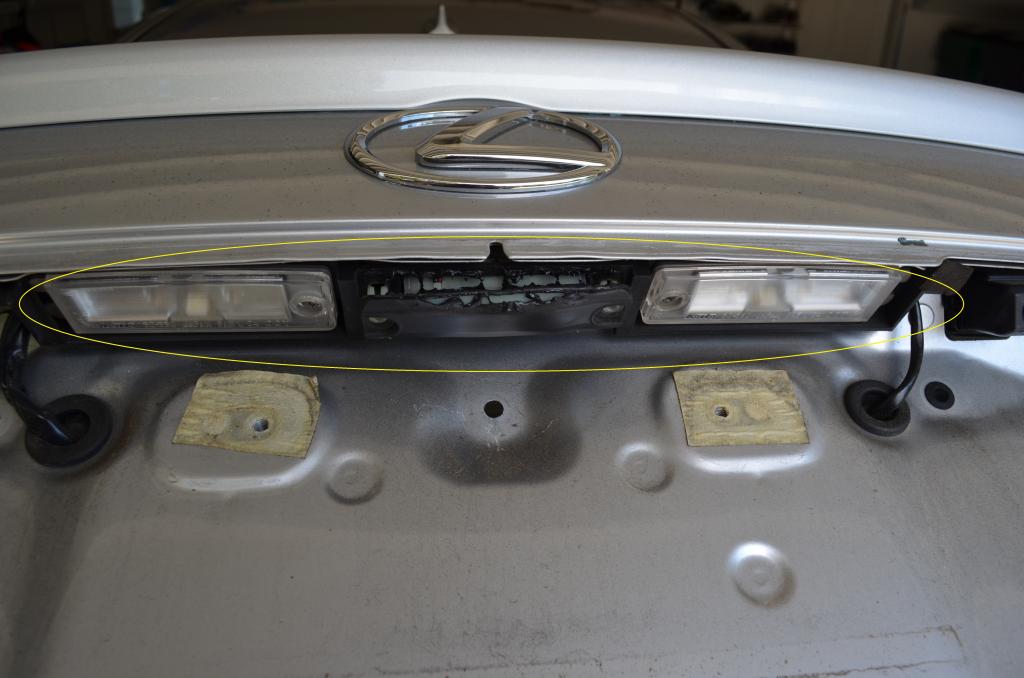
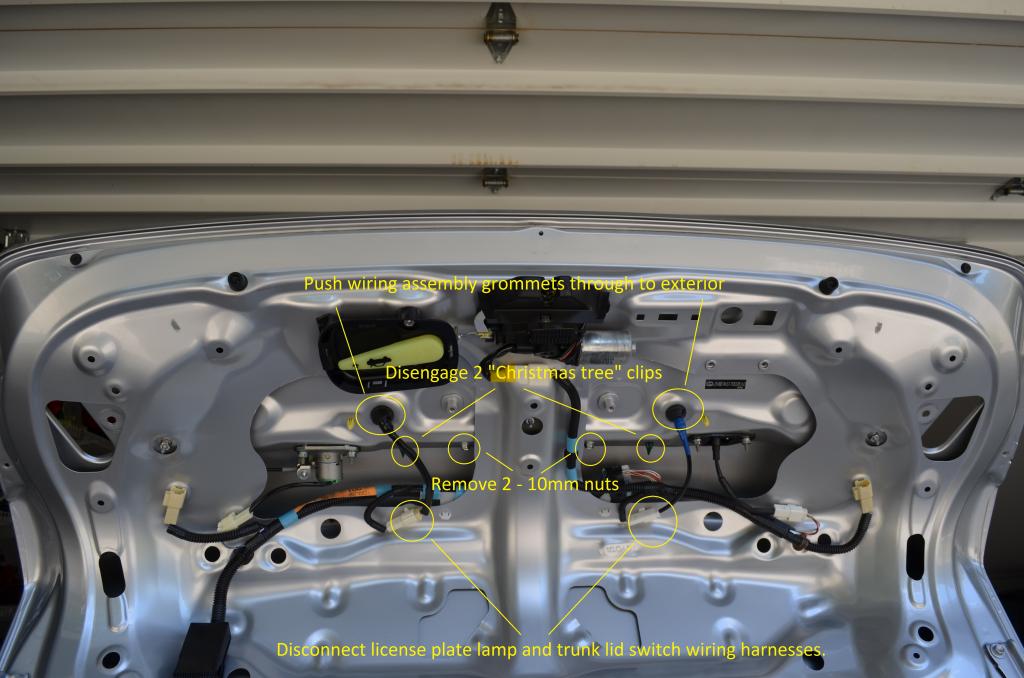
9. Remove the trunk release switch/license plate lamp assembly. Remove 2 - 10mm nuts and release 2 "christmas tree" clips from the interior of the lid by squeezing them and pushing them in. Unfasten the license plate lamp wiring harness. Unfasten the trunk lid switch harness.
Remove the assembly
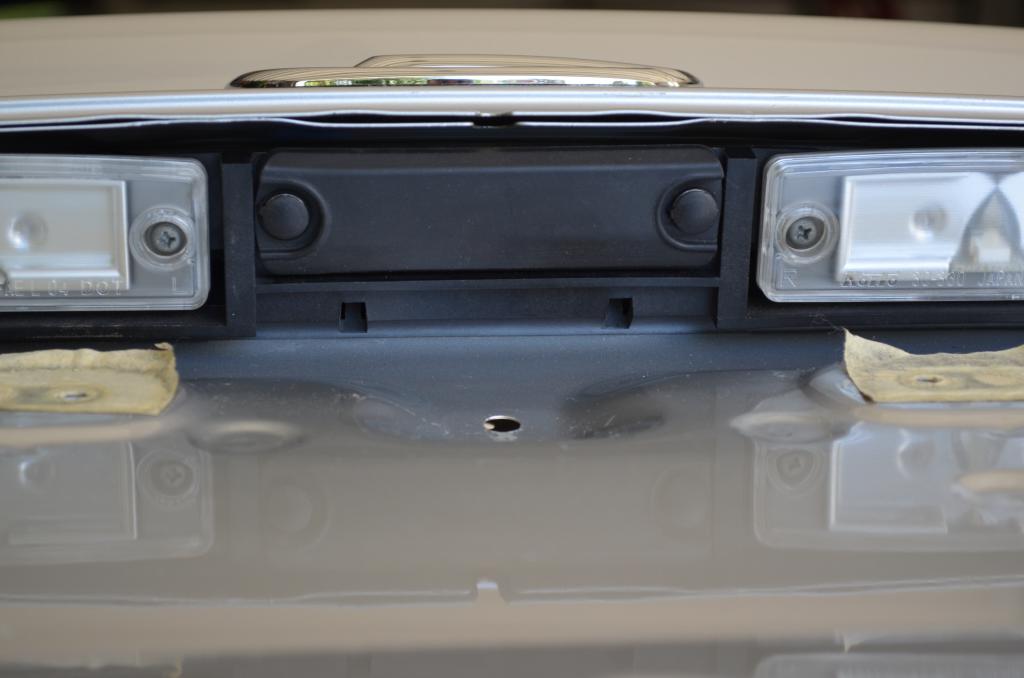
Remove the trunk lid switch and clean all of the melted rubber from the assembly and the trunk lid panel. This is a good time to clean all of the road dirt off of everything else as well.
10. Install the new trunk lid switch into the assembly. Thread the wiring harnesses back through the holes in the trunk lid. Reinstall the 2 - 10mm nuts. Refasten the 2 "Christmas tree" clips. Refasten the license plate and trunk lid switch wiring harnesses. Close the trunk lid and test the switch.
Assembly all cleaned up with new switch installed.
11. Reinstall the exterior trunk lid panel. Align the 3 bolts through the proper holes, and snap the piece down gently. Reinstall the 3 - 10mm bolts, being careful not to over-tighten.
12. Reinstall the right and left combination lamps, one at a time. Align the 3 bolts through the proper holes and reinstalling the 3 - 10mm nuts.
13. Reinstall the trunk lid liner. Align liner so that cable goes through slot in lower left corner, and all holes and openings are lined up. Reinstall all 11 trim fasteners.
14. Reinstall trunk release lever trim piece by snapping it back into place.
15. Reinstall trunk handle by putting it back in place and fastening 2 phillips head screws. Snap cover back into place.
End result!
Tools needed:
Plastic trim tool.
Phillips and Flat head screwdrivers. Tape for the flat head if you aren't using a plastic trim tool.
10 mm socket wrench
Paper towels/rags, spray cleaner (Windex works fine).
New Switch Assembly: 84840-21010
Procedure:
1. Remove your License plate and frame (if equipped)
2. Open the trunk lid and pry open the cover in the center of the trunk handle. This will pop open easily. Be sure to use a plastic trim tool or taped screwdriver tip to avoid scratches.
3. Unscrew the 2 phillips head screws under the cover and remove the trunk handle.
4. Remove the trim piece from the trunk release lever. Insert a small flat head screwdriver into the 2 slots on the inside of the trim, press in and gently pull. This trim piece is held in by several tabs, so gently pry around the edges (again using a plastic trim tool or taped screwdriver tip) and remove it.
5. Open the trunk and remove the 11 clips holding the liner to the trunk lid. I'm sure there is a specialized tool to remove these, but I used a small vice grip to grasp the center part of the clip while gently wiggling and pulling. You could also use a small screwdriver through the center of the clip I suppose. Warning ... these clips are easily deformed, so be careful how you remove them. I you do manage to mangle one, replacements are $1.04 each (#9046708186C0).
Here is what the clip looks like
6. Remove the liner. Be careful to align the slot in the liner with the cable on the bottom left before you pull it away.
Trunk lid liner removed
7. Remove the right and left combination lamps (brake/turn/reverse), one at a time, by unfastening the wiring harnesses and removing the 10mm bolts.
8. Remove exterior trunk lid panel/fascia. Remove 3 - 10mm nuts, and with your fingers, push the screws in and pull around the edges of the panel to carefully remove it.
Panel removed
9. Remove the trunk release switch/license plate lamp assembly. Remove 2 - 10mm nuts and release 2 "christmas tree" clips from the interior of the lid by squeezing them and pushing them in. Unfasten the license plate lamp wiring harness. Unfasten the trunk lid switch harness.
Remove the assembly
Remove the trunk lid switch and clean all of the melted rubber from the assembly and the trunk lid panel. This is a good time to clean all of the road dirt off of everything else as well.
10. Install the new trunk lid switch into the assembly. Thread the wiring harnesses back through the holes in the trunk lid. Reinstall the 2 - 10mm nuts. Refasten the 2 "Christmas tree" clips. Refasten the license plate and trunk lid switch wiring harnesses. Close the trunk lid and test the switch.
Assembly all cleaned up with new switch installed.
11. Reinstall the exterior trunk lid panel. Align the 3 bolts through the proper holes, and snap the piece down gently. Reinstall the 3 - 10mm bolts, being careful not to over-tighten.
12. Reinstall the right and left combination lamps, one at a time. Align the 3 bolts through the proper holes and reinstalling the 3 - 10mm nuts.
13. Reinstall the trunk lid liner. Align liner so that cable goes through slot in lower left corner, and all holes and openings are lined up. Reinstall all 11 trim fasteners.
14. Reinstall trunk release lever trim piece by snapping it back into place.
15. Reinstall trunk handle by putting it back in place and fastening 2 phillips head screws. Snap cover back into place.
End result!
The following users liked this post:
phoe6us (05-16-22)
09-29-13, 05:46 AM
#25

Nice write-up Chris! I am lucky that I don't have this issue with mine but mine is feeling its age as I pop the trunk numerous times a day. I will have to change it eventually. Thank you for taking the time to do such a fantastic DIY for everyone on here. Take care!
 09-30-13, 06:09 AM
#28
Advanced
Thread Starter
The whole procedure took me about 1.5 hours. The most time consuming step was cleaning up all of the melted rubber from the assembly and panel.
Thanks! Did you get yours done already, or are you DIYing?
Thanks! Definitely a minor repair compared to the stuff you tackle ... keep up the great work on your 200k+ maintenance thread. Without a doubt one of the best and most useful threads on CL.
 10-14-13, 10:31 AM
#30
Driver

Join Date: Sep 2004
Location: California
Posts: 168
Likes: 0
Received 0 Likes
on
0 Posts
Nice write up, mine wasn't ripped but looked all stretched out and mushy. What I did was placed some black duct tape over the button to keep it from getting worse. So far so good.