Build Log
 09-03-12, 10:44 AM
#1

After the loss of the 2001 GS300, I wanted a 2006 Lexus GS430 and after over a month of looking around I picked one up from Florida. Like with its predecessor a complete overhaul was planned. Usually the first things I change are the HIDs, leds, wiper blades and a JDM squash air freshener  . My wiper blade of choice are the PIAA blades and I would recommend them to anyone. Stock HIDs are replaced with 6k and the fog lights and high beams are changed to 6k HIDs too. I have a mini tech system now so was able to turn off my DRLs in order for the HIDs to work.
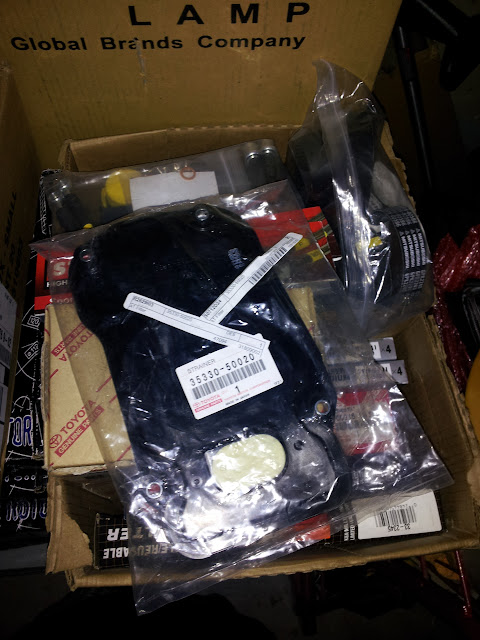
Prevention is better than cure, so with this mindset all maintenance parts were ordered.
MOTOR MAINTENANCE:
Toyota (90916-02586) Multi Rib Belt
Toyota (13540-50030) Timing Belt Tensioner
Toyota (13505-0F010) Timing Belt Idler
Toyota (13503-0F010) Timing Belt Idler
Toyota (13568-09070) Timing Belt
Toyota (16100-59275-83) Water Pump w/Housing
Toyota Water pump O ring (96761-35025)
Toyota Water pump gasket (16325-31010)
Toyota thermostat (90916-03100)
Toyota thermostat gasket (16346-50010)
Toyota Coolant (00272-SLLC2)
Toyota Valve Cover gaskets (11213-50031 & 11214-50011)
Toyota Spark Plug Gasket (11193-50010) x 8
Toyota Throttle Body Gasket (22271-500042)
OEM Front Main Seal (90311-A0001)
OEM Camshaft Seal (90311-A0004) (x2)
NGK Plugs IFR6T11
K&N Air Filter
Amsoil Performance improver APICN (x2)
Seafoam SF16
Seafoam Deep Creep
TRANSMISSION:
Amsoil transmission fluid (ATLQT) 12qt
Seafoam TT16
Toyota Transmission Filter
Toyota Transmission Pan Gasket (35168-60010)

All lubricants: engine, transmission, brake, differential and power steering fluids are going to be cleaned, flushed and replaced with Amsoil fluids. A seafoam treatment, throttle body cleaning, cabin filter and battery replacement are also in the plans.

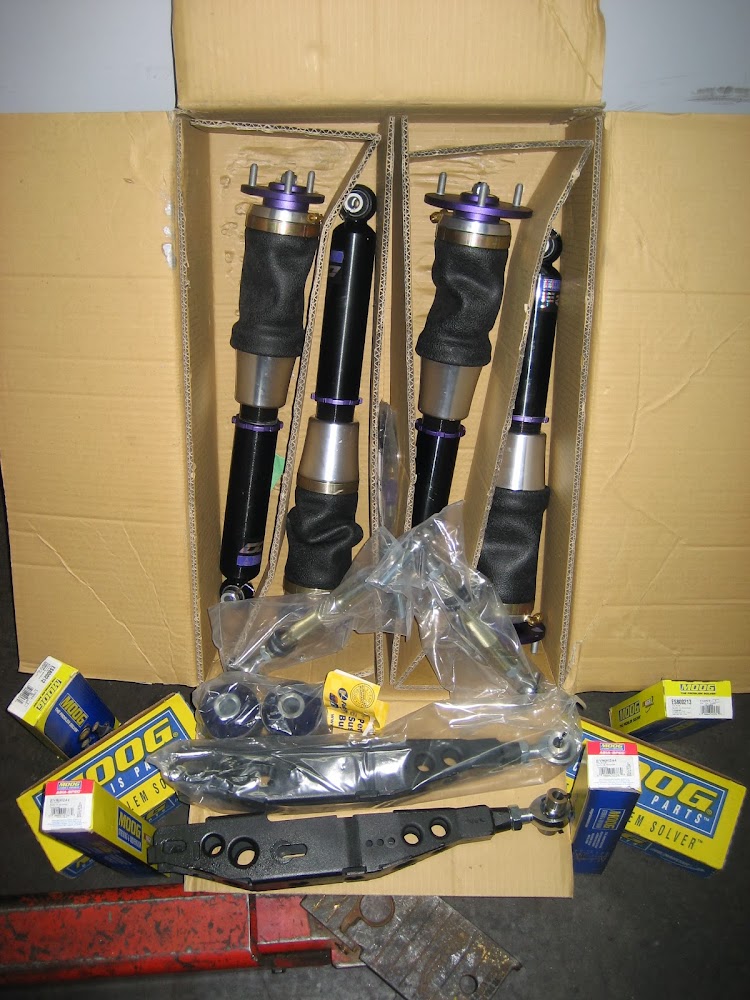
SUSPENSION MAINTENANCE:
Moog inner tie rods EV800244 (x2)
Moog Outter tie rod Left ES800212
Moog Outter tie rod Right ES800213
Moog Ball joint Left K500123
Moog Ball joint Right K500124


For brakes I chose to go with StopTech cryo treated drilled rotors. Decided to stick with Amsoil's brake fluid as well. On the GS300 I had got some Rotora rotors and got them cryo treated locally back in the day. That paired up with some HAWK HPS pads gave me all the braking force that I needed. Unfortunately Hawk does not make any brake pads for the 2006 GS430 and so I decided to give the EBC Red Stuff a shot. The cryo treatment removes all thermal and mechanical stresses within the rotor. With a more uniform metal structure, the rotor dissipates heat quickly, evenly and from past experience definitely enhances the life of the rotor. Definitely worth it. For more in depth reading on the cryogenic process you can goodle it or check this link out.
http://www.cryogenicsinternational.com/rotors.htm

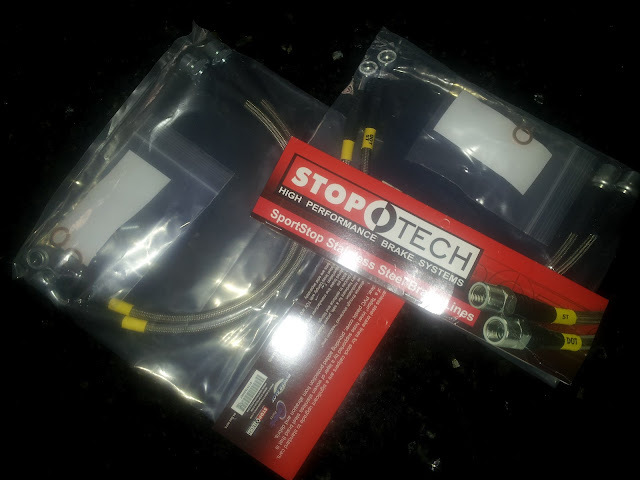
I also chose to go with the StopTech stainless steel lines which also has Teflon outer jackets. Previously I had Rotora lines but again Rotora doesn't make rotors or lines for the GS430.
StopTech Front SS lines - 950.44003
StopTech Rear SS lines - 950.44504
Updates on the install coming soon....
Write up: Flawless Fitment
UPDATE: 09/19/2012
With all my maintenance parts together and collecting dust, it was high time I started installing everything. Prior to installation I tried to clean out the engine, injectors etc as best I could. To achieve this I did it in steps and used a couple of products. First I used seafoam, 1/3rd in fuel tank, 1/3rd in crank case and 1/3rd through a vacuum source to the intake. Drove for about a 100miles or so and in another half tank of gas added some Amsoil Performance Improver. Drained and filled oil using some regular shell oil and added some more seafoam in crank case. After another 100 miles pulled it in for all the maintenance work.
Have known the guys at Turbo Time in Cary, NC for years and they were kind enough to let me use their facility to do all my maintenance work. Which with the weather we chose to do at night, even though their facility is air conditioned. Matthew Meadows offered to help me with this endeavor. When I mean help, I mean he ended up doing 70% of the work. LOL. It is an absolute pleasure to work with someone as picky as I am so everything went fairly smoothly. After running through a plan of action with Matt we got down to it.

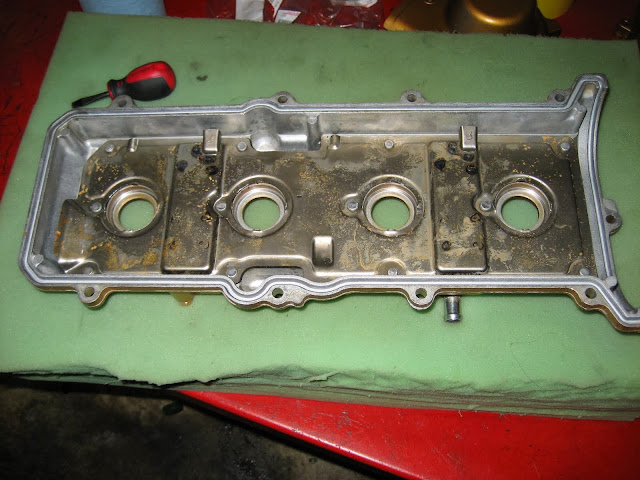
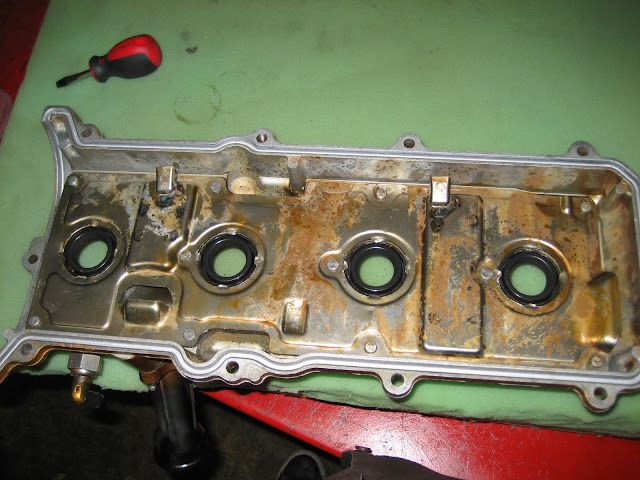
Tore out the valve covers, cam caps, throttle body etc to start changing gaskets, seals etc. While all the parts were out I wanted to accent the engine bay and make that part of the car look good as well. Had a vision in mind when I was doing this so hopefully it turns out as well as I picture it when I complete it. All the parts were media blasted and put through a parts cleaner, ready for paint. I used a high temp Gold and put a couple of coats of clear over it for some depth.


The throttle body was pulled out and was thoroughly cleaned out as well.

The spark plug gaskets were replaced as well from the valve cover.
So while I was tackling all the paint and cleaning I got back to the car to find that Matt was done with changing the water-pump, all my gaskets, seals, timing belt etc. Without me asking he showed me how all the timing marks etc were on point even after a full 360 rotation. Awesome.
Roman Valenta who worked at Turbo Time stopped by and we decided to take a break and grab some dinner. After dinner he helped clean up more stuff in the engine bay and pulled my radiator out and gave it a good cleaning. Continued with buttoning things up. Changed the spark plugs put all the cam covers, valve covers and throttle body back in and buttoned up all the connections. Filled the radiator with distilled water (I will explain this later). Filled the engine back up with some non synthetic oil (Will explain this later as well) and we were done with that.
What we initially planned on doing was to complete the drive train maintenance aspect on Friday night and tackle the brakes etc later on in the day on Saturday. Well 3 in the morning we decide brakes wont take long. So we start on that.
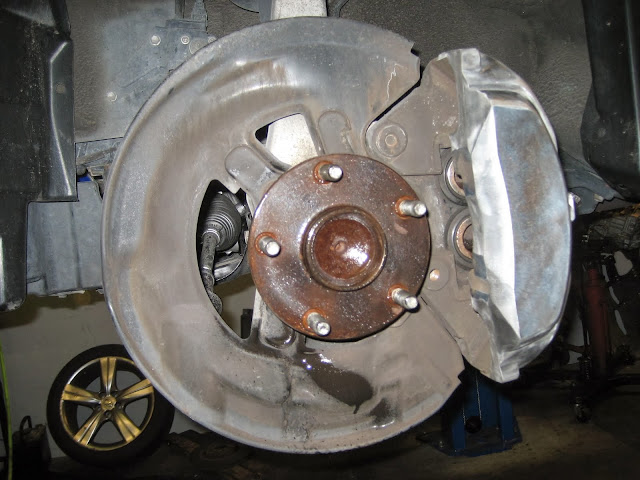
Pulled off all the rotors, cleaned out the rust on the hub and sprayed on a rust prevention coating before putting on rotors. Well also had to accent the calipers too.
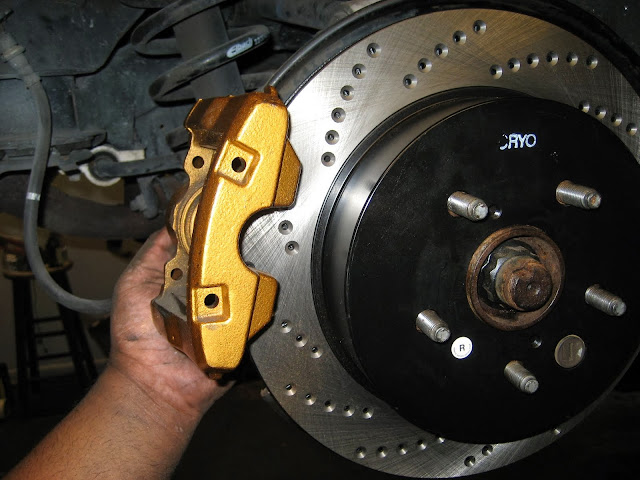

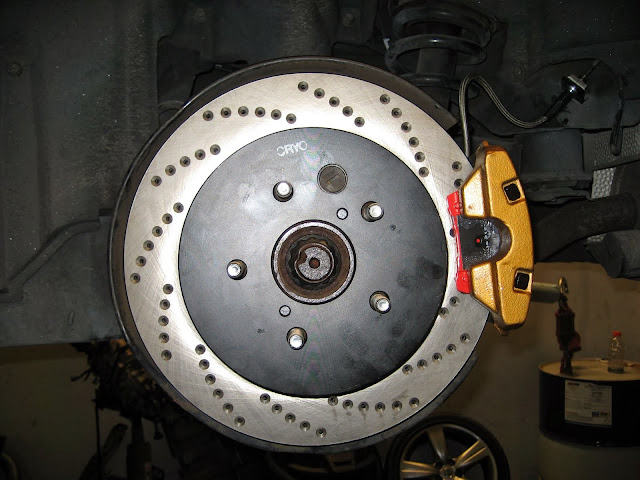
Notice how the pins for the calipers are black, that was Matt's idea. Can't emphasis how much easier it is to work with like minded individuals. Also in the pic you can see the stainless steel line installed as well.
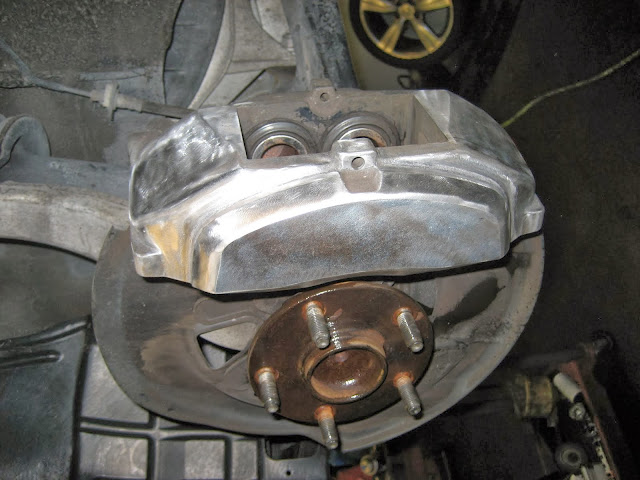
If you notice the calipers here it doesn't have a texture anymore. Matt smoothed it out before it got paint. Unfortunately with it being like 8 in the morning and exhausted at this point I forgot to take pictures of the finished product. Will do so at a later time but it looks clean.
Took another break for breakfast, where I was introduced to McGriddle. First time!! AMAZZINGGGG!!! Armed with McGriddle and some Mocha. ventured back into the shop to finish everything up. Thankfully Dustin Anderson stopped by to check on us in the morning and he stayed and helped finish things up.
With the brakes on, bled the system of all the old brake fluids and was replaced with Amsoil's brake fluid. Drained a little bit of the transmission fluid and put some seafoam transtune to help clean out the transmission.
I think every single warning light the car had came on when it was cranked. Yaw sensor, hee haw sensor, EVERY sensor threw a code. Thank fully I had the Lexus service manual and a mini tech system to plug in and diagnose issues. Matt double and triple checked all the connections. Verified that there were no issues, and all the codes were gone. Drove the car around the parking lot just to make sure everything was working, no codes came back up. Drove it around while doing a live monitoring of all sensors and there were no issues. Finally all that was done.
Next day, poured some radiator flush in the radiator that was filled with distilled water, drove it around for awhile and drained everything out. I pulled out the thermostat and the hoses and ran a water hose through the system to flush everything out. Installed a new thermostat and gasket, aired everything out, ran a vacuum to check for any leaks and refilled it with Toyota's Coolant. I had filled the engine with non synthetic oil the night before, the sole purpose was to just get rid of any residue of all the seafoam and cleaners etc. ****, yes I know. Refilled with Amsoil 0W30 and called it a day.
Drove the car around and was taking it easy primarily because there is still the seafoam transtune in the transmission. Pulled it in for a full transmission flush the next day. Dropped the pan to clean it out and change the filter etc on it.

The oil definitely needed changing at this point. It was a brown color and definitely not what it is supposed to be. Sprayed some seafoam deep creep on the visible underside of the transmission to clean it out a little more. Put in a new filter, oil pan gasket, filled the transmission pan back up with the same amount of oil that was drained from it and then was hooked up to the trans flush machine. Unloaded 13qts of Amsoil into it and it pulled out all the old oil out and pumped in fresh Amsoil ATF. Gear shifts are definitely smoother and it made a difference when I did this to the GS300 as well. Huge improvement. Went ahead and changed the differential fluid out as well, replaced it with Amsoil 75W-90 Synthetic Lubricant.
For now, all the maintenance stuff is done and will tackle all the suspension maintenance stuff at a later date once all my other parts come in. Stay tuned.
Special thanks to Phantasm Motorsports for helping me get all the parts, Ryan @ Turbo Time for letting me use their facility and Matt, Roman, Dustin and Mark for helping me complete this.
Write Up: Flawless Fitment
. My wiper blade of choice are the PIAA blades and I would recommend them to anyone. Stock HIDs are replaced with 6k and the fog lights and high beams are changed to 6k HIDs too. I have a mini tech system now so was able to turn off my DRLs in order for the HIDs to work. Prevention is better than cure, so with this mindset all maintenance parts were ordered.
MOTOR MAINTENANCE:
Toyota (90916-02586) Multi Rib Belt
Toyota (13540-50030) Timing Belt Tensioner
Toyota (13505-0F010) Timing Belt Idler
Toyota (13503-0F010) Timing Belt Idler
Toyota (13568-09070) Timing Belt
Toyota (16100-59275-83) Water Pump w/Housing
Toyota Water pump O ring (96761-35025)
Toyota Water pump gasket (16325-31010)
Toyota thermostat (90916-03100)
Toyota thermostat gasket (16346-50010)
Toyota Coolant (00272-SLLC2)
Toyota Valve Cover gaskets (11213-50031 & 11214-50011)
Toyota Spark Plug Gasket (11193-50010) x 8
Toyota Throttle Body Gasket (22271-500042)
OEM Front Main Seal (90311-A0001)
OEM Camshaft Seal (90311-A0004) (x2)
NGK Plugs IFR6T11
K&N Air Filter
Amsoil Performance improver APICN (x2)
Seafoam SF16
Seafoam Deep Creep
TRANSMISSION:
Amsoil transmission fluid (ATLQT) 12qt
Seafoam TT16
Toyota Transmission Filter
Toyota Transmission Pan Gasket (35168-60010)
All lubricants: engine, transmission, brake, differential and power steering fluids are going to be cleaned, flushed and replaced with Amsoil fluids. A seafoam treatment, throttle body cleaning, cabin filter and battery replacement are also in the plans.
SUSPENSION MAINTENANCE:
Moog inner tie rods EV800244 (x2)
Moog Outter tie rod Left ES800212
Moog Outter tie rod Right ES800213
Moog Ball joint Left K500123
Moog Ball joint Right K500124
For brakes I chose to go with StopTech cryo treated drilled rotors. Decided to stick with Amsoil's brake fluid as well. On the GS300 I had got some Rotora rotors and got them cryo treated locally back in the day. That paired up with some HAWK HPS pads gave me all the braking force that I needed. Unfortunately Hawk does not make any brake pads for the 2006 GS430 and so I decided to give the EBC Red Stuff a shot. The cryo treatment removes all thermal and mechanical stresses within the rotor. With a more uniform metal structure, the rotor dissipates heat quickly, evenly and from past experience definitely enhances the life of the rotor. Definitely worth it. For more in depth reading on the cryogenic process you can goodle it
or check this link out.http://www.cryogenicsinternational.com/rotors.htm
I also chose to go with the StopTech stainless steel lines which also has Teflon outer jackets. Previously I had Rotora lines but again Rotora doesn't make rotors or lines for the GS430.
StopTech Front SS lines - 950.44003
StopTech Rear SS lines - 950.44504
Updates on the install coming soon....
Write up: Flawless Fitment
UPDATE: 09/19/2012
With all my maintenance parts together and collecting dust, it was high time I started installing everything. Prior to installation I tried to clean out the engine, injectors etc as best I could. To achieve this I did it in steps and used a couple of products. First I used seafoam, 1/3rd in fuel tank, 1/3rd in crank case and 1/3rd through a vacuum source to the intake. Drove for about a 100miles or so and in another half tank of gas added some Amsoil Performance Improver. Drained and filled oil using some regular shell oil and added some more seafoam in crank case. After another 100 miles pulled it in for all the maintenance work.
Have known the guys at Turbo Time in Cary, NC for years and they were kind enough to let me use their facility to do all my maintenance work. Which with the weather we chose to do at night, even though their facility is air conditioned. Matthew Meadows offered to help me with this endeavor. When I mean help, I mean he ended up doing 70% of the work. LOL. It is an absolute pleasure to work with someone as picky as I am so everything went fairly smoothly. After running through a plan of action with Matt we got down to it.
Tore out the valve covers, cam caps, throttle body etc to start changing gaskets, seals etc. While all the parts were out I wanted to accent the engine bay and make that part of the car look good as well. Had a vision in mind when I was doing this so hopefully it turns out as well as I picture it when I complete it. All the parts were media blasted and put through a parts cleaner, ready for paint. I used a high temp Gold and put a couple of coats of clear over it for some depth.
The throttle body was pulled out and was thoroughly cleaned out as well.
The spark plug gaskets were replaced as well from the valve cover.
So while I was tackling all the paint and cleaning I got back to the car to find that Matt was done with changing the water-pump, all my gaskets, seals, timing belt etc. Without me asking he showed me how all the timing marks etc were on point even after a full 360 rotation. Awesome.
Roman Valenta who worked at Turbo Time stopped by and we decided to take a break and grab some dinner. After dinner he helped clean up more stuff in the engine bay and pulled my radiator out and gave it a good cleaning. Continued with buttoning things up. Changed the spark plugs put all the cam covers, valve covers and throttle body back in and buttoned up all the connections. Filled the radiator with distilled water (I will explain this later). Filled the engine back up with some non synthetic oil (Will explain this later as well) and we were done with that.
What we initially planned on doing was to complete the drive train maintenance aspect on Friday night and tackle the brakes etc later on in the day on Saturday. Well 3 in the morning we decide brakes wont take long. So we start on that.
Pulled off all the rotors, cleaned out the rust on the hub and sprayed on a rust prevention coating before putting on rotors. Well also had to accent the calipers too.
Notice how the pins for the calipers are black, that was Matt's idea. Can't emphasis how much easier it is to work with like minded individuals. Also in the pic you can see the stainless steel line installed as well.
If you notice the calipers here it doesn't have a texture anymore. Matt smoothed it out before it got paint. Unfortunately with it being like 8 in the morning and exhausted at this point I forgot to take pictures of the finished product. Will do so at a later time but it looks clean.
Took another break for breakfast, where I was introduced to McGriddle. First time!! AMAZZINGGGG!!! Armed with McGriddle and some Mocha. ventured back into the shop to finish everything up. Thankfully Dustin Anderson stopped by to check on us in the morning and he stayed and helped finish things up.
With the brakes on, bled the system of all the old brake fluids and was replaced with Amsoil's brake fluid. Drained a little bit of the transmission fluid and put some seafoam transtune to help clean out the transmission.
I think every single warning light the car had came on when it was cranked. Yaw sensor, hee haw sensor, EVERY sensor threw a code. Thank fully I had the Lexus service manual and a mini tech system to plug in and diagnose issues. Matt double and triple checked all the connections. Verified that there were no issues, and all the codes were gone. Drove the car around the parking lot just to make sure everything was working, no codes came back up. Drove it around while doing a live monitoring of all sensors and there were no issues. Finally all that was done.
Next day, poured some radiator flush in the radiator that was filled with distilled water, drove it around for awhile and drained everything out. I pulled out the thermostat and the hoses and ran a water hose through the system to flush everything out. Installed a new thermostat and gasket, aired everything out, ran a vacuum to check for any leaks and refilled it with Toyota's Coolant. I had filled the engine with non synthetic oil the night before, the sole purpose was to just get rid of any residue of all the seafoam and cleaners etc. ****, yes I know. Refilled with Amsoil 0W30 and called it a day.
Drove the car around and was taking it easy primarily because there is still the seafoam transtune in the transmission. Pulled it in for a full transmission flush the next day. Dropped the pan to clean it out and change the filter etc on it.
The oil definitely needed changing at this point. It was a brown color and definitely not what it is supposed to be. Sprayed some seafoam deep creep on the visible underside of the transmission to clean it out a little more. Put in a new filter, oil pan gasket, filled the transmission pan back up with the same amount of oil that was drained from it and then was hooked up to the trans flush machine. Unloaded 13qts of Amsoil into it and it pulled out all the old oil out and pumped in fresh Amsoil ATF. Gear shifts are definitely smoother and it made a difference when I did this to the GS300 as well. Huge improvement. Went ahead and changed the differential fluid out as well, replaced it with Amsoil 75W-90 Synthetic Lubricant.
For now, all the maintenance stuff is done and will tackle all the suspension maintenance stuff at a later date once all my other parts come in. Stay tuned.
Special thanks to Phantasm Motorsports for helping me get all the parts, Ryan @ Turbo Time for letting me use their facility and Matt, Roman, Dustin and Mark for helping me complete this.
Write Up: Flawless Fitment
Last edited by kuWuPt; 09-19-12 at 05:04 PM.
 09-03-12, 10:50 AM
#2
With all the maintenance addressed it was time to move on to suspension components. I was pretty set on getting a 3rd Gen GS after the accident. So set, that I had ordered my suspensions before I got the car. Like my previous setup, D2 and Ridetech was my choice this time as well. Only thing I did different was add ride height sensors and another compressor to speed up fill times on the tank.

Along with the coilovers and bags got some goods from Figs as well:
Figs Rear LCA,
Figs toe links
Caster bushings.
Also a good time to install all my other suspensions components:
SPC Upper Ball Joint (SPC part #67525 - IS300 upper ball joint)
UPDATE:
{Figs just informed me that SPC released the ball joint that is specific for the car..crap...lol.. guess I should have waited. New SPC part number is 67530. In order for the IS300 ball joint to fit the hole it had to be shimmed a little. Figs also informed me that the IS300 ball joint has an incorrect taper and can egg out the hole over time. So get the right part since it is available now. Figs also has the bushings for the Upper Control Arm now.}
Moog inner tie rods EV800244 (x2)
Moog Outter tie rod Left ES800212
Moog Outter tie rod Right ES800213
Moog Ball joint Left K500123
Moog Ball joint Right K500124

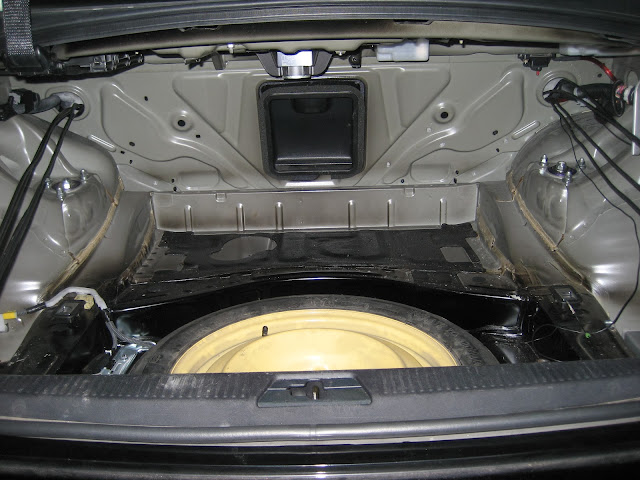
Before getting the suspension stuff installed I wanted to go ahead and make a pod setup for the trunk. Trying to keep the footprint small so tried a couple of ways to mount things and this is what I thought might work.
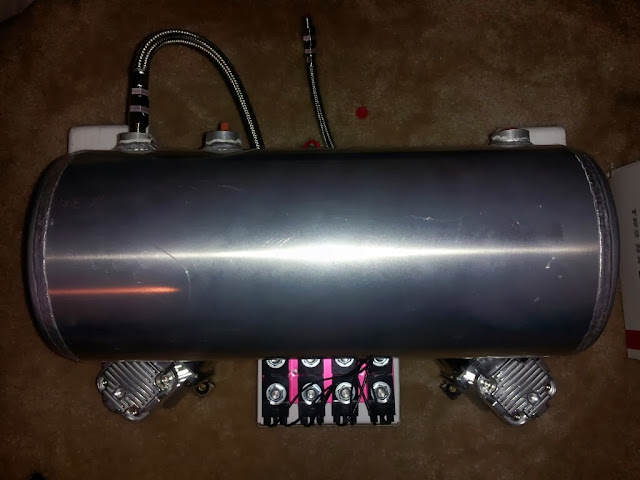
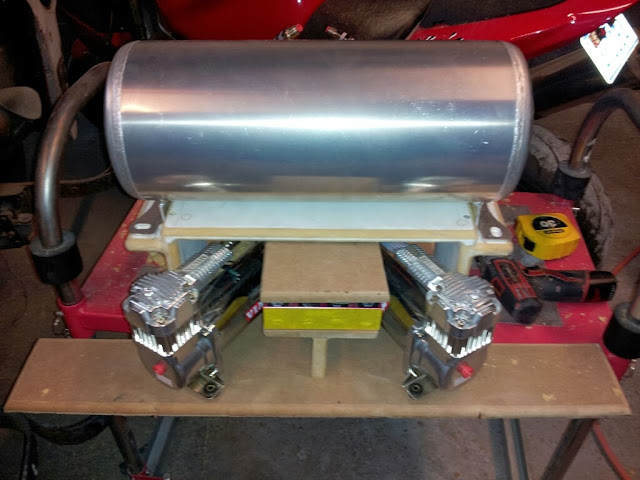
Built the structure out of mdf, made sure all the parts fit well on the mount and in the car.
While the tanks was out, decided to get the tank painted before it goes in.

Wrapped the bottom mount with suede and the top half was wrapped in high gloss black. Wired everything up, all wires were soldered and heat shrinked also used loctite 567 for all the air fittings to ensure a good seal.
All wired and mounted.
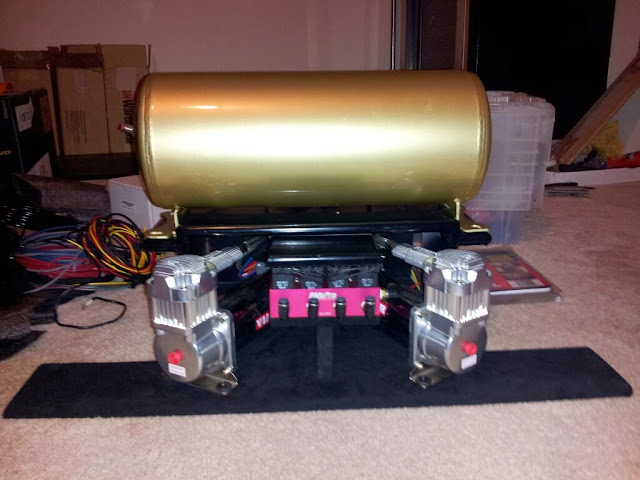
The tank looked a little bland so threw this design together and cut it out to spruce it up a bit.

Onto the fun stuff. Matt helped me again for this project and Turbo Time let me use their facility to do the install as well and again it was going to be a long night.
First task: Front upper ball joint.
SPC Front upper ball joints for an IS300. Slight simple modification to the control arm to make it fit.
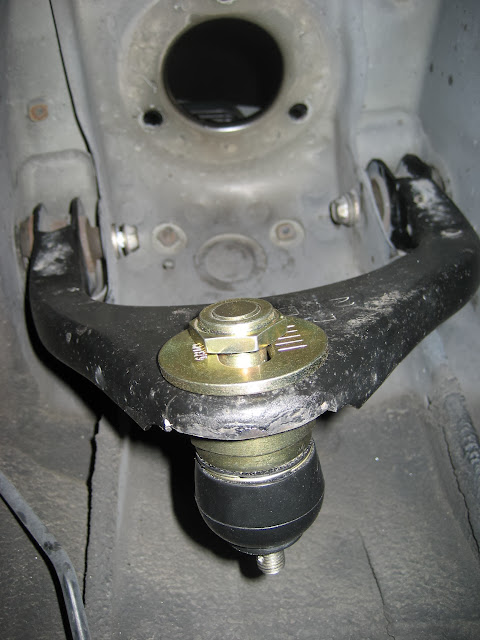
The outer ridge of the UCA was shaved down a bit to allow full range of motion for the adjustable ball joint.

The caster bushing from Figs Engineering slid in without any issues. Check out stock vs the polyurethane bushing video from
.
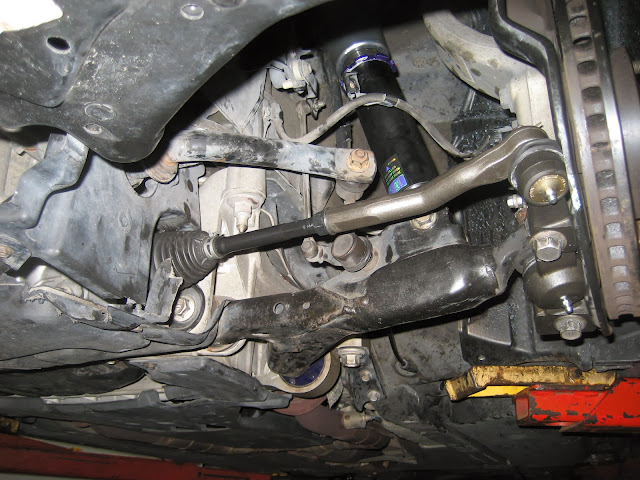
Removed and replaced inner, outer tie rods and ball joints.
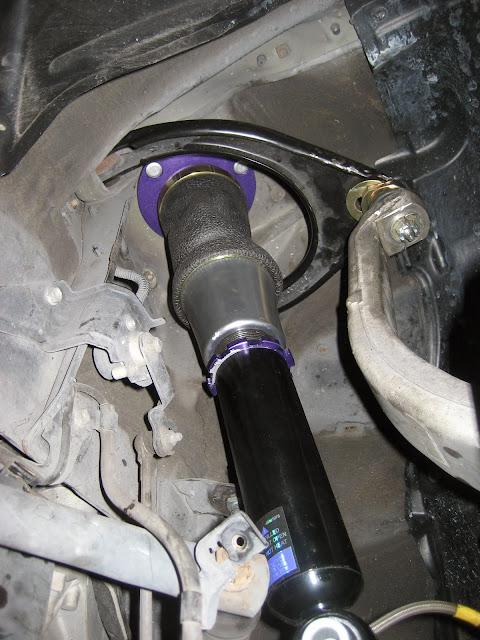
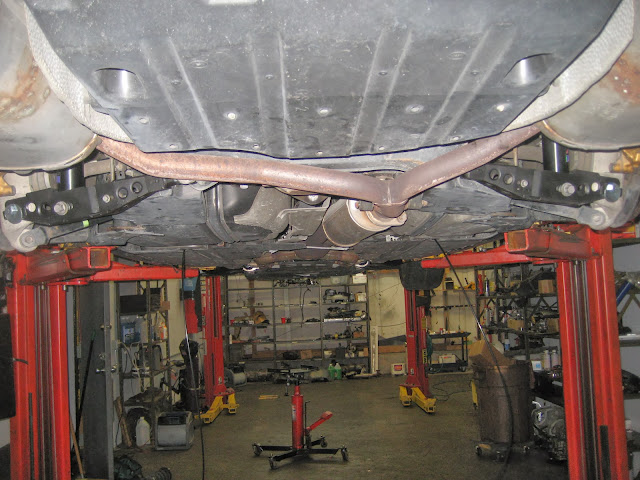
Installed coilovers. All the lines were ran through the frame rail underneath the car and tucked out of the way to avoid any issues.
Installed the Rear Figs LCA and the toe links.

The biggest hurdle in this whole ordeal was the installation of the ride height sensors. It might have been exhaustion kicking in but Matt and I had to take a break and walk away from setting up the ride height sensor.
The sensor wires were ran through the inside of the car and everything junctioned off in the trunk.
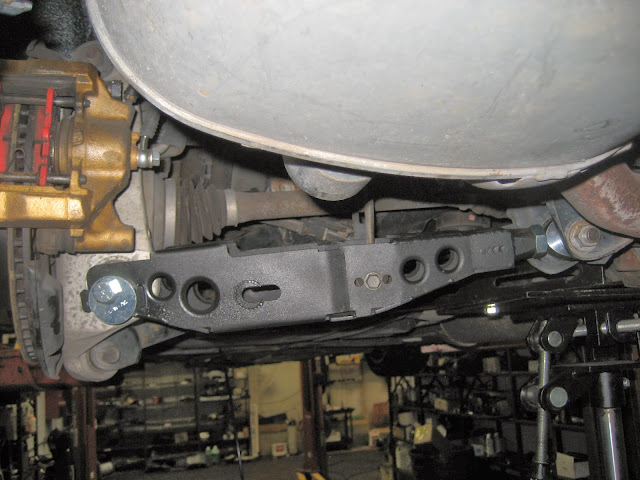
In the rear this is where we ended up mounting the ride height sensor. A bracket was welded to the arm so that the sensor can be functional.
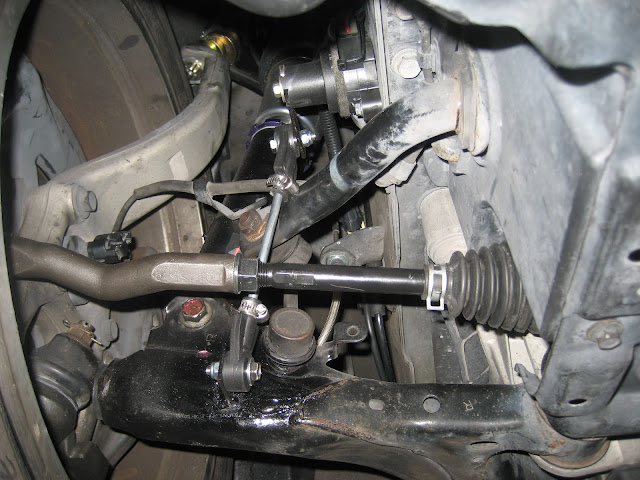
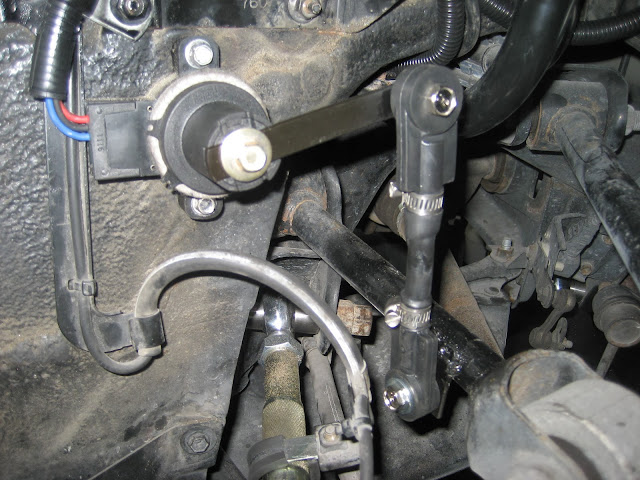
In the front a bracket was welded to the LCA for the sensor to be functional.
When mounting the sensors there were a lot of issues we had to think of.
1) The sensor not getting in the way of the wheels when wider wheels were put on.
2) The sensor being out of the way when the wheel is turned inwards
3) The rods attached to the pivoting arms not being in the way of any other moving components.
4) The range in which the sensor is functional.
For the range for the sensor to work it meant a lot of tweaking / cutting / re-drilling etc to get the sensor to read right.
After a break and a much needed snooze we wrapped things up and dropped off the car to get aligned.
Started at about 8:00pm on Saturday and got done about 10:00am on Sunday. A long weekend !!
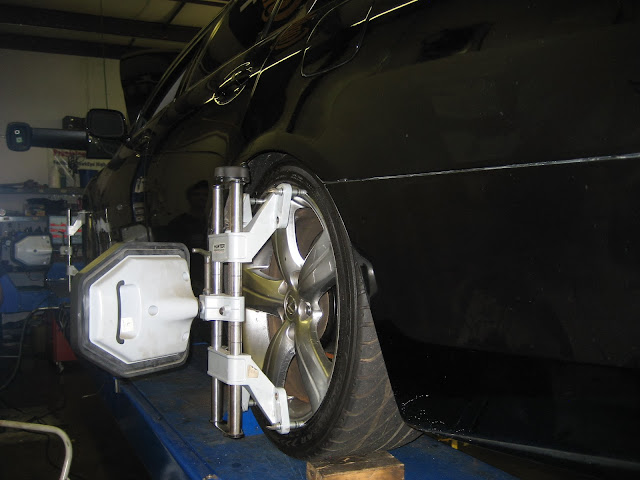
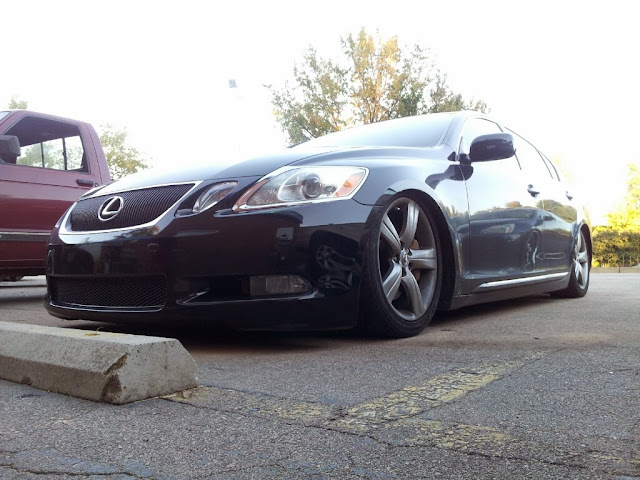
Got the car aligned and at the ride height in the picture I am at -0.3 degrees in the front and -1.2 degrees in the back.
A big thanks to Matt for helping me with this again and to Turbo Time for letting me use their facility. Also want to thank Phantasm for letting me cut my stickers for the tank, Import Motor Werks for getting my alignment done. Also a big thanks to D2 Racing and Figs Engineering for working with me to dial my suspensions in.
Write Up: Flawless Fitment
Along with the coilovers and bags got some goods from Figs as well:
Figs Rear LCA,
Figs toe links
Caster bushings.
Also a good time to install all my other suspensions components:
SPC Upper Ball Joint (SPC part #67525 - IS300 upper ball joint)
UPDATE:
{Figs just informed me that SPC released the ball joint that is specific for the car..crap...lol.. guess I should have waited. New SPC part number is 67530. In order for the IS300 ball joint to fit the hole it had to be shimmed a little. Figs also informed me that the IS300 ball joint has an incorrect taper and can egg out the hole over time. So get the right part since it is available now. Figs also has the bushings for the Upper Control Arm now.}
Moog inner tie rods EV800244 (x2)
Moog Outter tie rod Left ES800212
Moog Outter tie rod Right ES800213
Moog Ball joint Left K500123
Moog Ball joint Right K500124
Before getting the suspension stuff installed I wanted to go ahead and make a pod setup for the trunk. Trying to keep the footprint small so tried a couple of ways to mount things and this is what I thought might work.
Built the structure out of mdf, made sure all the parts fit well on the mount and in the car.
While the tanks was out, decided to get the tank painted before it goes in.
Wrapped the bottom mount with suede and the top half was wrapped in high gloss black. Wired everything up, all wires were soldered and heat shrinked also used loctite 567 for all the air fittings to ensure a good seal.
All wired and mounted.
The tank looked a little bland so threw this design together and cut it out to spruce it up a bit.
Onto the fun stuff. Matt helped me again for this project and Turbo Time let me use their facility to do the install as well and again it was going to be a long night.
First task: Front upper ball joint.
SPC Front upper ball joints for an IS300. Slight simple modification to the control arm to make it fit.
The outer ridge of the UCA was shaved down a bit to allow full range of motion for the adjustable ball joint.
The caster bushing from Figs Engineering slid in without any issues. Check out stock vs the polyurethane bushing video from
Removed and replaced inner, outer tie rods and ball joints.
Installed coilovers. All the lines were ran through the frame rail underneath the car and tucked out of the way to avoid any issues.
Installed the Rear Figs LCA and the toe links.
The biggest hurdle in this whole ordeal was the installation of the ride height sensors. It might have been exhaustion kicking in but Matt and I had to take a break and walk away from setting up the ride height sensor.
The sensor wires were ran through the inside of the car and everything junctioned off in the trunk.
In the rear this is where we ended up mounting the ride height sensor. A bracket was welded to the arm so that the sensor can be functional.
In the front a bracket was welded to the LCA for the sensor to be functional.
When mounting the sensors there were a lot of issues we had to think of.
1) The sensor not getting in the way of the wheels when wider wheels were put on.
2) The sensor being out of the way when the wheel is turned inwards
3) The rods attached to the pivoting arms not being in the way of any other moving components.
4) The range in which the sensor is functional.
For the range for the sensor to work it meant a lot of tweaking / cutting / re-drilling etc to get the sensor to read right.
After a break and a much needed snooze we wrapped things up and dropped off the car to get aligned.
Started at about 8:00pm on Saturday and got done about 10:00am on Sunday. A long weekend !!
Got the car aligned and at the ride height in the picture I am at -0.3 degrees in the front and -1.2 degrees in the back.
A big thanks to Matt for helping me with this again and to Turbo Time for letting me use their facility. Also want to thank Phantasm for letting me cut my stickers for the tank, Import Motor Werks for getting my alignment done. Also a big thanks to D2 Racing and Figs Engineering for working with me to dial my suspensions in.
Write Up: Flawless Fitment
Last edited by kuWuPt; 12-24-12 at 01:00 AM.

 09-03-12, 03:05 PM
#6

Look foward to seeing it done. I have always liked cryoed rotors also. When i bought my 430 the previous owner had just replaced all 4 rotors and pads with OEM. I plan on upgrading once they wear out. I always have also used hawk hps pads on my cars and would like to know how the EBC reds compare
Trending Topics
09-19-12, 06:00 PM
#8
Holy crap, next time I need to maintance my car I am coming to you , btw you should of never got the EBC red stuff pads, those things eat rotors like crazy. I had 2 rotors warped in less then 10k, and they leave some nasty burnt type of residue on the rotors. Anyways I then changed rotors again and put on akebono brake pads. They worked perfect with no dust, and then I replaced to OEM pads. I have used all type of pads before, probably 50% on the market and I have never dealt with anything like it. So might not be too late to change your mind.
, btw you should of never got the EBC red stuff pads, those things eat rotors like crazy. I had 2 rotors warped in less then 10k, and they leave some nasty burnt type of residue on the rotors. Anyways I then changed rotors again and put on akebono brake pads. They worked perfect with no dust, and then I replaced to OEM pads. I have used all type of pads before, probably 50% on the market and I have never dealt with anything like it. So might not be too late to change your mind.
09-19-12, 11:03 PM
#9
Holy crap, next time I need to maintance my car I am coming to you , btw you should of never got the EBC red stuff pads, those things eat rotors like crazy. I had 2 rotors warped in less then 10k, and they leave some nasty burnt type of residue on the rotors. Anyways I then changed rotors again and put on akebono brake pads. They worked perfect with no dust, and then I replaced to OEM pads. I have used all type of pads before, probably 50% on the market and I have never dealt with anything like it. So might not be too late to change your mind.
, btw you should of never got the EBC red stuff pads, those things eat rotors like crazy. I had 2 rotors warped in less then 10k, and they leave some nasty burnt type of residue on the rotors. Anyways I then changed rotors again and put on akebono brake pads. They worked perfect with no dust, and then I replaced to OEM pads. I have used all type of pads before, probably 50% on the market and I have never dealt with anything like it. So might not be too late to change your mind.
09-20-12, 07:37 PM
#10
Wow...I am impressed. You car must feel so loved! Irish I had that much mechanical know how. Preventive maintenance makes a big difference in longevity. Most of us just struggle through and hen the repairs seem to be too costly, move on to now other auto.