Change front brake pads, but...
 08-20-09, 12:11 PM
#1
Pole Position
Thread Starter

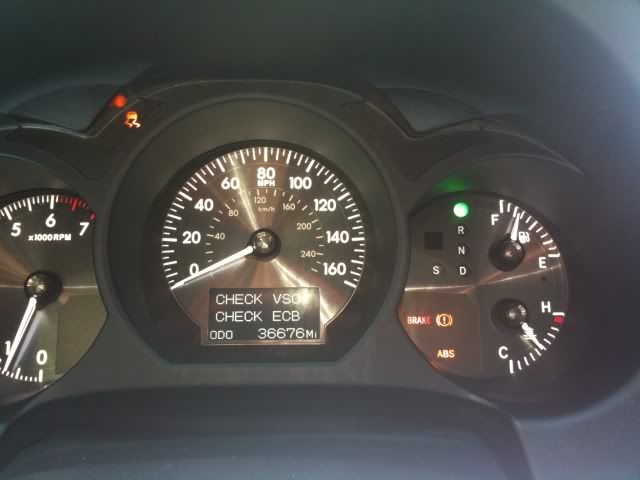
now i have all these lights on??? What gives??? How can i rid of these??? I did a simple pad replacement...Bleed the brakes..found out i that wasn't even necessary. But Bleed them because i had to. But now i have all these lights on. None were on before the brake job.
 08-20-09, 12:35 PM
#2


Aside from that... tell us what procedure you followed and maybe we can find out what happened. I changed my pads yesterday in 30 minutes. Remove the fluid reservoir cap, then once you take off the tire, it's literally *one* bolt on the caliper that you have to loosen to change the pads. Compress the piston(s) and install the pads. Not a whole lot to go wrong.
But... if you took the caliper off of the hub for some reason and then let it dangle, you may have damaged the sensor wires.
 08-20-09, 12:46 PM
#4

ummm you bled the brakes on your 06 gs430? did you disconnect the battery when doing so? i believe gs430 has ecb, if so then you can't just bleed it like normal otherwise you might get lights? on my ls460l when i installed my brembo i had to do special procedure to make sure no lights
gs350 are different, they don't have ecb
gs350 are different, they don't have ecb
08-20-09, 02:01 PM
#5
from what I recall from another member is just clearing the codes out. Do you have a scan tool that you can do this??
yes there is a process for bleeding the brakes:
NOTICE:
Move the shift lever to the P position and apply the parking brake before bleeding the brakes.
Add brake fluid to keep the level between MIN and MAX lines of the reservoir while bleeding the brakes.
If the pump motor operates while air remains inside the brake reservoir tube no.1 hose, the air will enter
the actuator, resulting in difficulty in bleeding. Keep the 2 ABS motor relays removed until instructed to
reinstall them to prevent air from entering the brake reservoir tube no.1 hose.
The actuator pump motor and solenoid can be operated by the driver even if the engine switch is off.
Although a buzzer may sound due to declined accumulator pressure during bleeding, keep on bleeding.
DTCs indicating a malfunction in the ABS motor relay or pressure sensor are stored after bleeding. Clear
the DTCs when instructed during or after bleeding.
08-20-09, 09:24 PM
#6
Pole Position
Thread Starter
i bleed them by "accident"....could not get the darn pistons back into the caliper. so i bleed them to do so...but i then learned that i didn't need to... thanx everyone!!!
and i did get the little diagnostics tool...everything checked out ok...guess i need to just bleed them the way you mentioned...argh....i got wheel lock up today ....so not cool during rush hour...
and i did get the little diagnostics tool...everything checked out ok...guess i need to just bleed them the way you mentioned...argh....i got wheel lock up today ....so not cool during rush hour...
Last edited by tunedis95; 08-20-09 at 09:57 PM.
Trending Topics
08-21-09, 06:28 AM
#8
i bleed them by "accident"....could not get the darn pistons back into the caliper. so i bleed them to do so...but i then learned that i didn't need to... thanx everyone!!!
and i did get the little diagnostics tool...everything checked out ok...guess i need to just bleed them the way you mentioned...argh....i got wheel lock up today ....so not cool during rush hour...
and i did get the little diagnostics tool...everything checked out ok...guess i need to just bleed them the way you mentioned...argh....i got wheel lock up today ....so not cool during rush hour...
 08-21-09, 08:24 AM
#9
Pole Position
Thread Starter
found this...but ...no resolution....
https://www.clublexus.com/forums/gs-...eck-ecb-2.html
waiting for the brake components to cool and i will attempt another bleed
THANX A LOT "passnu2"!!!! i'm stressin....
https://www.clublexus.com/forums/gs-...eck-ecb-2.html
waiting for the brake components to cool and i will attempt another bleed
THANX A LOT "passnu2"!!!! i'm stressin....
08-21-09, 09:12 AM
#10
your welcome. I think you are fine and dont have anything to worry about. If you clear the codes and there is truly something wrong then will come back My guess is since this is an easy thing to trip now the system is where it needs to be. I wouldn't bleed them again unless you feel there is a need. It cant hurt but I would personally clear the codes first if it was my car and then bleed again if it needed it.
My guess is since this is an easy thing to trip now the system is where it needs to be. I wouldn't bleed them again unless you feel there is a need. It cant hurt but I would personally clear the codes first if it was my car and then bleed again if it needed it.
08-21-09, 02:20 PM
#11

the thread linked by passnu2 is mine. i had the exact same issue. you probably also feel that your break isnt working as great.. its because the electronic brake assist isnt working because of the codes.. its no biggie.. just go to the dealer and have them reset the codes for you..
08-21-09, 03:34 PM
#12
Pole Position
Thread Starter
well.....i bleed the system again and again...."reset" the car/ecu....i believe i did....and still have all the lights on....and when i drive around the front drivers side brake does not function. thats the one i am having the problem with. I just don't get it. Has to be the code that needs to be cleared.
Well since my car was rear ended i had already mentioned that the lights came on "due to the accident" so the insurance adjuster already has it in her notes. I'm gonna see if i can just get away with it like that. minus well run with the idea since its already on record.
Well since my car was rear ended i had already mentioned that the lights came on "due to the accident" so the insurance adjuster already has it in her notes. I'm gonna see if i can just get away with it like that.
minus well run with the idea since its already on record.
08-23-09, 09:15 AM
#13
Pole Position
Thread Starter
found this....wow...thats a lot of crap...this is for electric brakes...like ours i believe...anybody have any comments about the following...yae...or nae???
"1) Make a 'jumper' wire by attaching appropriate ends on two 4 foot wires that will allow you to attach the wires to the + and - on the battery, and will also allow you to attach the other ends to the male prongs in the trac pump connector. The ends you'll need to attach to the jumper wire are female, and are in the shape of a slot. These can be purchased at an auto parts store, or radio shack The wires should slip onto the appropriate prongs inside the trac pump connector, and SHOULD NOT BE ALLOWED TO TOUCH EACH OTHER, or you will have a direct short and that will MELT your jumper wire and possibly cause a fire.
2) Identify the trac pump connector. It is directly in front of the brake master cylinder. Seperate the 1/2's of the connector by squeezing the retainer and pulling the 1/2 nearest the driver's fender toward the driver's fender. After you have pulled the driver's side 1/2 of the connector off, that side will hang free, while the side nearest the passenger will remain attached to a bracket. It is the side nearer the passenger that remains attached to a bracket that you will attach the jumper wires to. You will see three prongs inside the connector, and three wires exiting the back of the connector. The TOP wire is solid blue. The middle wire is yellow. The BOTTOM wire is black or dark green (I'm colorblind, sorry). The wire colors are DIFFERENT on the now free hanging connector nearer the driver's fender. The TOP wire is Blue with a yellow stripe, the middle wire is white with a green stripe and the BOTTOM wire is White with a black stripe.
3) Carefully attach one wire to the top prong in the connector that is attached to the bracket. This prong corresponds to the solid blue wire.
4) Carefully attach the other END of this same wire to the positive terminal of the battery.
5) Carefully attach one end of the OTHER wire to the bottom terminal of the connector attached to the bracket that corresponds to the solid BLACK wire. THE WIRES MUST NOT TOUCH EACH OTHER, AND THEY SHOULDN'T TOUCH THE MIDDLE TERMINAL. THEY SHOULD ONLY TOUCH THE APPROPRIATE POST IN THE CONNECTOR.
6) Briefly attach the other end of this last wire to a metal part of the chassis that is well grounded, like the nuts on the driver's shock tower. THE PUMP SHOULD OPERATE. Don't make this last connection to the negative terminal of the battery, as the spark created may cause an explosion. REMOVE the wire from the shock tower nut to stop the pump now, and hang it somewhere where it won't contact a ground point and operate the pump.
7) Locate the bleeder nipple for the Trac Actuator, located between the master cylinder and the driver's fender. Remove the little rubber cap on the nipple, and attach a hose to the nipple. Loosen the nipple so the fluid can escape, and be prepared to catch the fluid in a jar or cup and don't let it contact your paint.
8) The trac pump should NOT be operating right now.
9) Start the car's engine
10) Attach the last wire to the shock tower to start the pump operating.
11) LET THE PUMP OPERATE for 60 seconds before tightening the bleeder nipple. Don't open the nipple too far or the fluid will pump out too fast and you'll run out. There must be adequate fluid in the reservoir, and the reservoir can run dry in one of its three compartments while there is plenty of fluid in the other two. The reservoir is divided front to back into three compartments below the LOW Line, so WATCH CAREFULLY, and if it is draining too fast, close the bleeder nipple a little to slow the process. Fluid should be pumping through your attached hose and into the cup at the open end of the hose.
12) After you tighten the bleeder nipple all the way to stop the fluid from escaping, you must let the trac pump operate for an additional 30 seconds.
13) Remove your jumper wires and stop the pump.
14) Shut off the car. Clear the trouble codes by resetting the ECU. The procedure is supposed to trip a code.
The trac bleeding should be done AFTER all calipers are bled.
NOTE: If you look really closely on page BR-11 in the manual, you'll see a picture of a jumper wire connecting the battery and the trac pump connector. IT APPEARS IN THIS PICTURE THAT THE + TERMNIAL OF THE BATTERY IS CONNECTED TO THE BOTTOM TERMINAL ON THE TRAC PUMP. THIS IS INCORRECT. THIS IS BACKWARDS. DO NOT CONNECT THE WIRES THIS WAY. The positive voltage is applied to the TOP terminal in the connector.
Happy bleeding."
08-25-09, 03:15 PM
#14
Pole Position
Thread Starter
well...took my car to toyota...yes toyota....they actually bleed the whole system for less than 90 bucks! cant beat that i guess....Brakes like a "ferrari" again....lol
05-13-12, 11:14 AM
#15
Driver School Candidate

Join Date: May 2012
Location: CA
Posts: 1
Likes: 0
Received 0 Likes
on
0 Posts
2006 GS430. I replaced my front pads and rotors and bled it (the conventional way, with ign off, have someone pump the pedal while I bleed the brakes. A lot of fluids came out but i noticed the brake fluids did not diminished in the resevoir). After, I get the same lights warning as in this thread, in addition, my brakes is not working. I have to depress it (floor it) to get the car to stop. SO with a lot of googling I still have some question I am hoping someone here can help.
I'm sure there are quite a bit of air in my system now, not to mention my ABS is not working.
Can someone please give me step by step instruction on how to properly bleed my brakes.
The process below is what I am thinking I need to do, please comment.
1. remove my tires
2. open the brake fluid resevoir cap
3. with ign off, have someone pump the brakes approx. 40 times, then turn ign to on (engine still off), this will allow the master cylinder to push fluid through the system.
4. bleed the brakes
5. brake fluid in resevoir should lower
6. maintain fluid in resevoir between Min and Max line.
7. continue step 3 to 6 untill all air are out
Last edited by MightyQ; 05-13-12 at 11:18 AM.