Flasher Location
#16
Racer
iTrader: (1)
#17
Advanced
iTrader: (3)
UPDATE: I just received and installed this flasher (they were out of them for a while but now they stock them again). Everything works, including the lock/unlock flash confirmation.
Which LED bulbs did you go with for the turn signals? Any noticeable change in brightness over the standard bulbs?
#19
Advanced
iTrader: (3)
I used these bulbs. Anything less then 96-SMD is not bright enough, I tried. But these are as bright as the OEM lights.
#21
Advanced
iTrader: (3)
UPDATE:
finally got around to installing LED's and a replacement flasher today. I tried two different types of bulbs and used a VLED flasher which retains the lock/unlock flashes and prevents hyperflash with the LEDs.
I started with the ebay bulbs, which were plenty bright, but terrible fitment (would not secure in the sockets) and the bulb frame started to fall apart during installation. At this point, I trashed the ebay bulbs and bought some CREE Q5 + 12SMD from user RudeDoggy (he's currently selling more here).
Installing the bulbs:
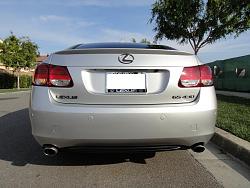
- rear bulbs are easy - drop the plastic piece in the trunk, twist bulb housing and swap bulbs. Test before installing housing back into lens.
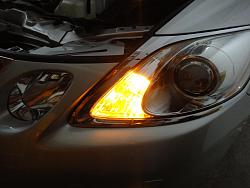
- front bulbs - remove engine covers. On the sides near the fender, you'll see a clear plastic dome ~ 4" in diameter. Twist to remove and you'll be able to get to the front turn signal bulbs. Twist to remove, swap bulbs, test, and reinstall housing into lens. Replace plastic dome and engine covers.
Installing the flasher:
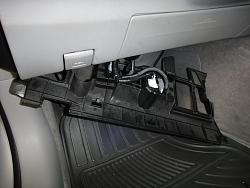
- remove the lower trim below the knee airbag. There are two screws (one at each end). Once the screws are removed, there are two pinch clips in the center of the panel near where it meets the airbag module. Pinch each of these and then slide the lower panel toward the front of the car to get it free of a metal tab just to the outside of the steering column. I did not remove any of the wiring for the tire pressure reset switch. I just moved the panel to get more room to the area above it.
- Once this panel is loose you will need to get on your back and under the dash. You will see a white plastic outlet for the HVAC. Remove this carefully. One of the tabs on mine was brittle and snapped. I sealed it back up with some 3M exterior foam tape which should hold as there is no real pressure on it. Worst case, it rattles and I open it back up for a different fix.
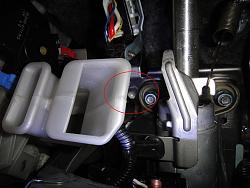
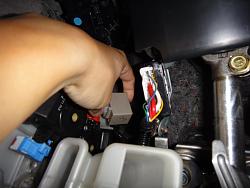
- Once you remove the HVAC duct extension, you'll see (turn your flashers on and feel for it as it will click and be obvious which one it is) the flasher directly above it. It has a black wiring clip going into it with 3 tabs (one on each short edge and one in the center of one of the longer sides). The two short side tabs are released by pulling the edges out, while the longside tab requires a press to release. All must be done simultaneously. You will also see that the flasher is fastened to the metal bracing with a white pinch post that passes through a hole in the metal framework. I used a very small leatherman and was able to pinch the tabs on the post that is holding the flasher bracket in place. Once it was free, I was able to maneuver the flasher unit down enough to more easily remove the wiring clip/post. Three tabs on it with only room enough for one hand was a PITA, but not impossible.
- Once the flasher and clip are free from the wiring, you can swap the clip onto the new flasher by lifting the tab with a small screwdriver and sliding it free from the old flasher.
- hook up wiring and test everything
- reverse above to button it back up.
Probably took me an hour and a half to do everything, but at least half that time was trying to figure out how to find and replace the flasher. Having done it once, it's a 15 min task now that I know what I'm doing. Bulbs would be 5 min each next time.
I tried to get pictures but my phone didn't want to focus under the dash.
Last edited by twylie; 03-31-13 at 03:26 PM.
The following users liked this post:
Propulsion (01-27-22)
#22
Driver School Candidate
Join Date: Jun 2007
Location: KY
Posts: 28
Likes: 0
Received 0 Likes
on
0 Posts
Thanks for the update! I do want to point out for those interested....
...my BMW had the 3-blink on one-tap of the turn signal for lane changes and I missed this on the GS. These guys now have flasher relay that mimics this. Now that I know the relay is easily replaceable (thanks to this thread), I will install and let you guys now how I like it. It, too, is LED compatible.
...my BMW had the 3-blink on one-tap of the turn signal for lane changes and I missed this on the GS. These guys now have flasher relay that mimics this. Now that I know the relay is easily replaceable (thanks to this thread), I will install and let you guys now how I like it. It, too, is LED compatible.
#23
UPDATE:
finally got around to installing LED's and a replacement flasher today. I tried two different types of bulbs and used a VLED flasher which retains the lock/unlock flashes and prevents hyperflash with the LEDs.
I started with the ebay bulbs, which were plenty bright, but terrible fitment (would not secure in the sockets) and the bulb frame started to fall apart during installation. At this point, I trashed the ebay bulbs and bought some CREE Q5 + 12SMD from user RudeDoggy (he's currently selling more here).
Installing the bulbs:
- rear bulbs are easy - drop the plastic piece in the trunk, twist bulb housing and swap bulbs. Test before installing housing back into lens.
- front bulbs - remove engine covers. On the sides near the fender, you'll see a clear plastic dome ~ 4" in diameter. Twist to remove and you'll be able to get to the front turn signal bulbs. Twist to remove, swap bulbs, test, and reinstall housing into lens. Replace plastic dome and engine covers.
Installing the flasher:
- remove the lower trim below the knee airbag. There are two screws (one at each end). Once the screws are removed, there are two pinch clips in the center of the panel near where it meets the airbag module. Pinch each of these and then slide the lower panel toward the front of the car to get it free of a metal tab just to the outside of the steering column. I did not remove any of the wiring for the tire pressure reset switch. I just moved the panel to get more room to the area above it.
- Once this panel is loose you will need to get on your back and under the dash. You will see a white plastic outlet for the HVAC. Remove this carefully. One of the tabs on mine was brittle and snapped. I sealed it back up with some 3M exterior foam tape which should hold as there is no real pressure on it. Worst case, it rattles and I open it back up for a different fix.
- Once you remove the HVAC duct extension, you'll see (turn your flashers on and feel for it as it will click and be obvious which one it is) the flasher directly above it. It has a black wiring clip going into it with 3 tabs (one on each short edge and one in the center of one of the longer sides). The two short side tabs are released by pulling the edges out, while the longside tab requires a press to release. All must be done simultaneously. You will also see that the flasher is fastened to the metal bracing with a white pinch post that passes through a hole in the metal framework. I used a very small leatherman and was able to pinch the tabs on the post that is holding the flasher bracket in place. Once it was free, I was able to maneuver the flasher unit down enough to more easily remove the wiring clip/post. Three tabs on it with only room enough for one hand was a PITA, but not impossible.
- Once the flasher and clip are free from the wiring, you can swap the clip onto the new flasher by lifting the tab with a small screwdriver and sliding it free from the old flasher.
- hook up wiring and test everything
- reverse above to button it back up.
Probably took me an hour and a half to do everything, but at least half that time was trying to figure out how to find and replace the flasher. Having done it once, it's a 15 min task now that I know what I'm doing. Bulbs would be 5 min each next time.
I tried to get pictures but my phone didn't want to focus under the dash.
finally got around to installing LED's and a replacement flasher today. I tried two different types of bulbs and used a VLED flasher which retains the lock/unlock flashes and prevents hyperflash with the LEDs.
I started with the ebay bulbs, which were plenty bright, but terrible fitment (would not secure in the sockets) and the bulb frame started to fall apart during installation. At this point, I trashed the ebay bulbs and bought some CREE Q5 + 12SMD from user RudeDoggy (he's currently selling more here).
Installing the bulbs:
- rear bulbs are easy - drop the plastic piece in the trunk, twist bulb housing and swap bulbs. Test before installing housing back into lens.
- front bulbs - remove engine covers. On the sides near the fender, you'll see a clear plastic dome ~ 4" in diameter. Twist to remove and you'll be able to get to the front turn signal bulbs. Twist to remove, swap bulbs, test, and reinstall housing into lens. Replace plastic dome and engine covers.
Installing the flasher:
- remove the lower trim below the knee airbag. There are two screws (one at each end). Once the screws are removed, there are two pinch clips in the center of the panel near where it meets the airbag module. Pinch each of these and then slide the lower panel toward the front of the car to get it free of a metal tab just to the outside of the steering column. I did not remove any of the wiring for the tire pressure reset switch. I just moved the panel to get more room to the area above it.
- Once this panel is loose you will need to get on your back and under the dash. You will see a white plastic outlet for the HVAC. Remove this carefully. One of the tabs on mine was brittle and snapped. I sealed it back up with some 3M exterior foam tape which should hold as there is no real pressure on it. Worst case, it rattles and I open it back up for a different fix.
- Once you remove the HVAC duct extension, you'll see (turn your flashers on and feel for it as it will click and be obvious which one it is) the flasher directly above it. It has a black wiring clip going into it with 3 tabs (one on each short edge and one in the center of one of the longer sides). The two short side tabs are released by pulling the edges out, while the longside tab requires a press to release. All must be done simultaneously. You will also see that the flasher is fastened to the metal bracing with a white pinch post that passes through a hole in the metal framework. I used a very small leatherman and was able to pinch the tabs on the post that is holding the flasher bracket in place. Once it was free, I was able to maneuver the flasher unit down enough to more easily remove the wiring clip/post. Three tabs on it with only room enough for one hand was a PITA, but not impossible.
- Once the flasher and clip are free from the wiring, you can swap the clip onto the new flasher by lifting the tab with a small screwdriver and sliding it free from the old flasher.
- hook up wiring and test everything
- reverse above to button it back up.
Probably took me an hour and a half to do everything, but at least half that time was trying to figure out how to find and replace the flasher. Having done it once, it's a 15 min task now that I know what I'm doing. Bulbs would be 5 min each next time.
I tried to get pictures but my phone didn't want to focus under the dash.
Think Design flasher + V-LEDs 7440 bulbs front and back....
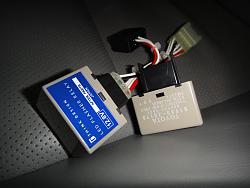
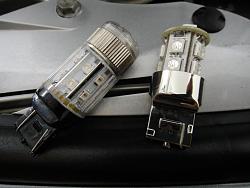
The following users liked this post:
Propulsion (02-11-22)
#25
Lead Lap
iTrader: (2)
Bump from the grave!
Anyone know if this will work as a replacement relay for the hyperflash?
http://www.vleds.com/products/flashe...ignal-fix.html
Also will this retain lock/unlock lights?
Anyone know if this will work as a replacement relay for the hyperflash?
http://www.vleds.com/products/flashe...ignal-fix.html
Also will this retain lock/unlock lights?
#27
Lead Lap
iTrader: (2)
Just a heads up, Found it on amazon its a CF18. I selected the adjustable one. It works. While removing the "white ac vent" dont push too hard on the tab or your snap the piece that holds the vent.. Instalation is easy and twist the **** for your desired speed. you will retain all lock/unluck features.
Last edited by tcr101; 03-06-17 at 01:57 PM.
The following users liked this post:
Propulsion (11-27-21)
#29
Yes, way up on top, took fuse box loose, which loosen bracket to flasher. Then I could lower it to work on plug and flasher. Had air vent out.. Real tight but it can be done. Oh and the new flasher box worked, set the adjustment about halfway and tried it finally normal turn signals. Of course it couldn't have been the lower flasher which was a lot easier to get to.
Thread
Thread Starter
Forum
Replies
Last Post
Lexusrhyno
ES - 6th Gen (2013-2018)
39
06-26-16 02:09 AM


