Tips, Tricks, DIY's, & How-To's
 05-10-06, 10:10 AM
#1
Lexus Test Driver

Thread Starter
To search for tips, use "search this thread" feature located above right...
Ok, I don't know why we have tried this b4 (or have we??, in that case, ignore my ignorance). I'm going to list a couple tips and tricks for our cars and hopefully more people will contribute to the thread. If we get enough, hopefully the Mods will make the a "sticky" and we can all share our little secrets and newbies (such as myself a month ago) won't bother asking questions that have already been answered too many times. I hope this works out and here goes....
Come on Forum Guru's... Contribute!!!
Last edited by Eternity3G; 05-12-06 at 05:57 PM.
 05-10-06, 10:20 AM
#2
Lexus Test Driver
Thread Starter
1) Press "Menu" button
2) Press "Volume" on the Nav Screen"
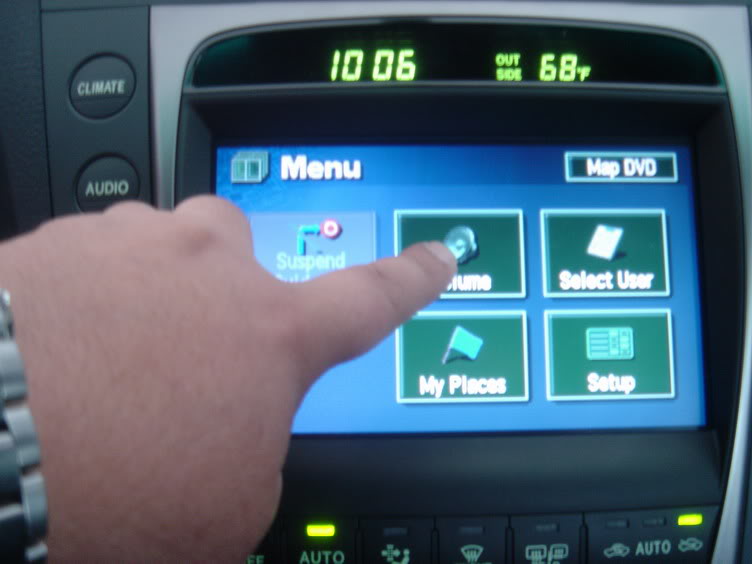
3) Press the "speaker" picture on the top left screen
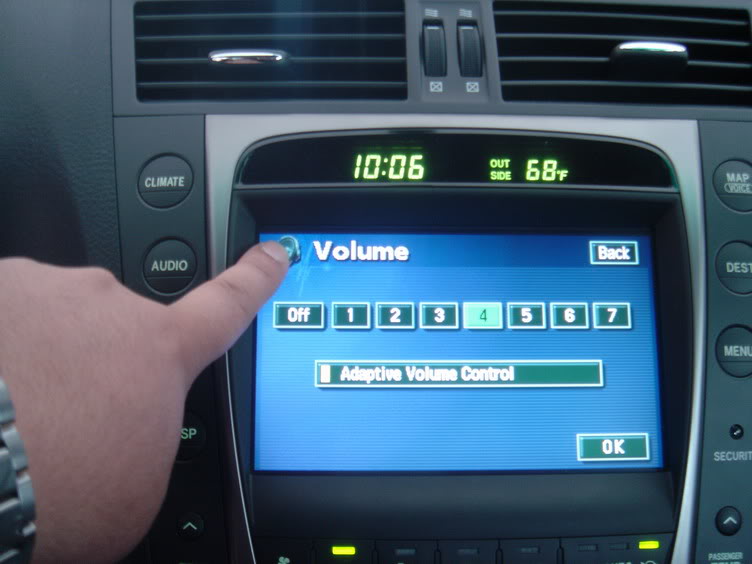
4) Press the bottom left corner of the screen (it's blank, nothing there)
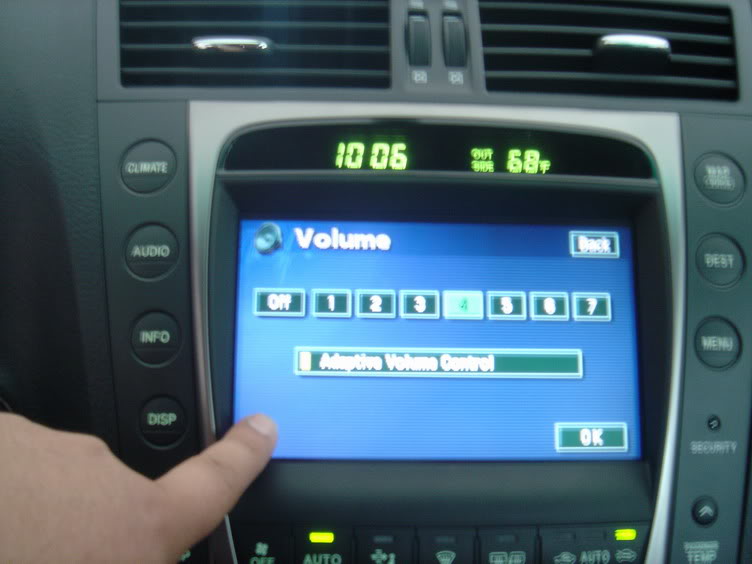
5) Repeat steps 3 & 4
6) A screen should now Appear w/ several functions
7) Find the "Override" button and hold until you hear a "beep"
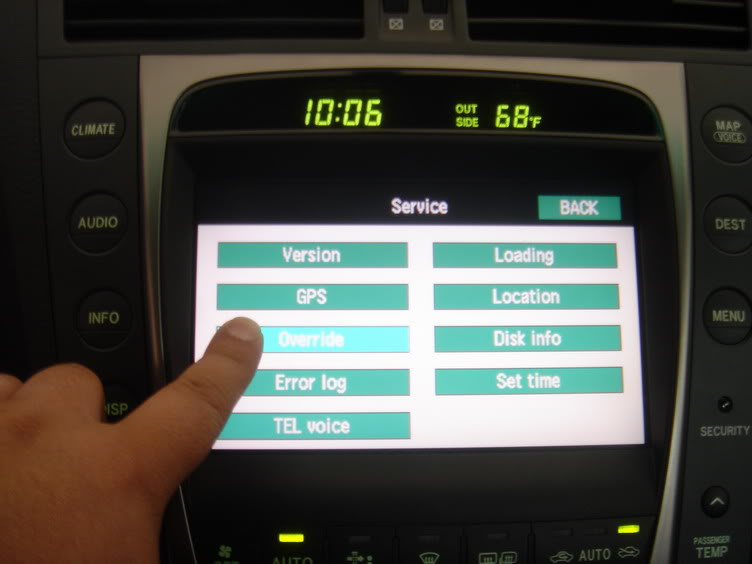
8) The Override button letters should now be in black as the others are white
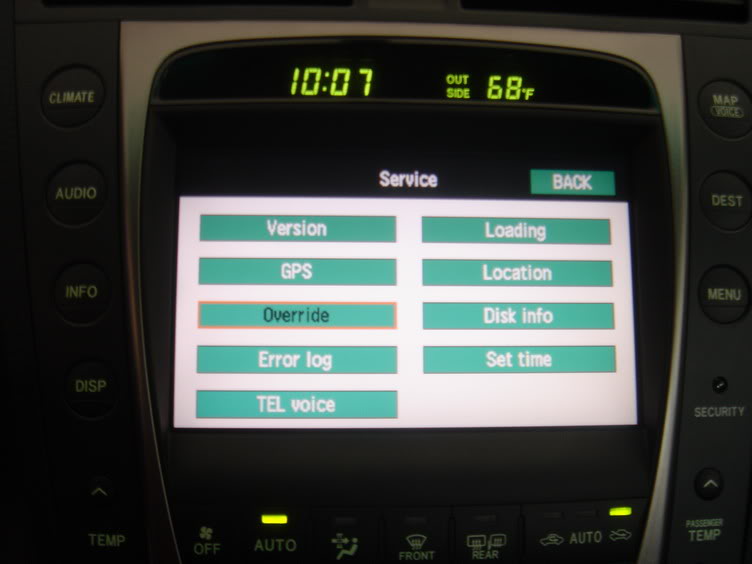
9) Press the Back button and you are ready to go!
*** Keep in mind this feature is required to be done everytime you start the vehicle. It will not retain this in memory ***
2) Press "Volume" on the Nav Screen"
3) Press the "speaker" picture on the top left screen
4) Press the bottom left corner of the screen (it's blank, nothing there)
5) Repeat steps 3 & 4
6) A screen should now Appear w/ several functions
7) Find the "Override" button and hold until you hear a "beep"
8) The Override button letters should now be in black as the others are white
9) Press the Back button and you are ready to go!
*** Keep in mind this feature is required to be done everytime you start the vehicle. It will not retain this in memory ***
Last edited by Eternity3G; 05-26-06 at 11:56 PM.
05-10-06, 10:45 AM
#3
Lexus Test Driver
Thread Starter
This will turn off your seat belt warning "beeping" for the driver and passenger side. This will only need to be done once in the lifetime of the car as it will retain in the vehicle memory.
*** According to Valet Park , you must have windows up... ***
1) Get into the car w/ ignition off and close the doors
2) Open the "flip console" to your left (mirror / gas lid console)
3) Start engine and set the LCD on the combination meter to the "ODO" display using the ODO/TRIP button. Turn off engine.
4) Now, W/O applying the brakes (don't actually start engine but turn on the electronics.), press the "Engine Start/Stop" button twice. You should see the check engine light and battery light on in the dash. (DO NOT START THE ENGINE)
5) Hold the ODO/TRIP button. Wait ten seconds, and while still holding the button, buckle the driver�s seat belt.
6) The LCD displays "Seat Belt Buzzer On/Off". Release the button. Pressing the ODO button toggles the On/Off
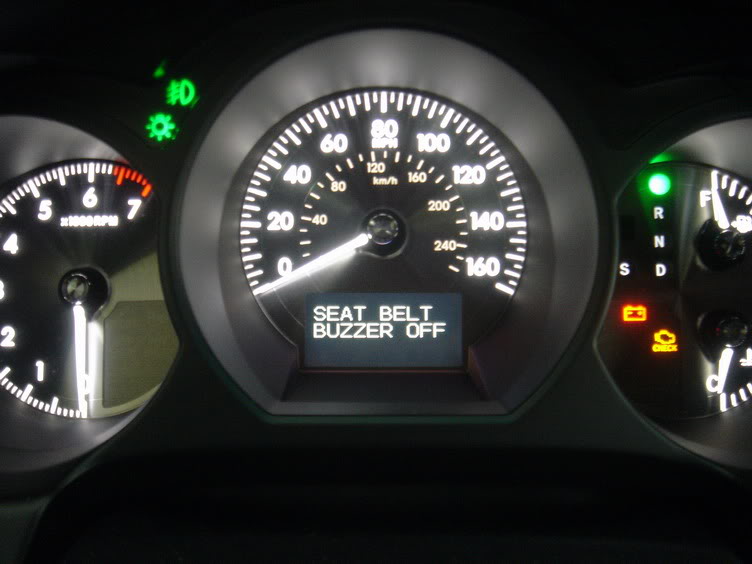
7) I believe you may need to repeat the process for the passenger side.
Drive safe!
*** According to Valet Park , you must have windows up... ***
1) Get into the car w/ ignition off and close the doors
2) Open the "flip console" to your left (mirror / gas lid console)
3) Start engine and set the LCD on the combination meter to the "ODO" display using the ODO/TRIP button. Turn off engine.
4) Now, W/O applying the brakes (don't actually start engine but turn on the electronics.), press the "Engine Start/Stop" button twice. You should see the check engine light and battery light on in the dash. (DO NOT START THE ENGINE)
5) Hold the ODO/TRIP button. Wait ten seconds, and while still holding the button, buckle the driver�s seat belt.
6) The LCD displays "Seat Belt Buzzer On/Off". Release the button. Pressing the ODO button toggles the On/Off
7) I believe you may need to repeat the process for the passenger side.
Drive safe!
Last edited by Eternity3G; 06-12-06 at 05:05 PM.
05-10-06, 11:19 AM
#4
Lexus Test Driver
Thread Starter
Last edited by Eternity3G; 05-10-06 at 02:39 PM.
05-10-06, 11:20 AM
#5
Lexus Test Driver
Thread Starter
Last edited by Eternity3G; 05-10-06 at 02:39 PM.
05-10-06, 11:35 AM
#6
Lexus Test Driver
Thread Starter
Ok, this one maybe stupid and just plain obvious, but here it is anyways:
Open Windows and Moonroof from outside vehicle: (2 Ways)
1) Hold down "unlock" button on the remote control for 5 seconds
2) Insert actual Metal key into driver door key hole and turn right & hold (also unlocks door)
Close Windows and Moonroof from outside vehicle: (I only know 1 way)
1) Insert actual Metal key into driver door key hole and turn left & hold (also locks door)
Last edited by Eternity3G; 05-11-06 at 09:45 AM.
05-10-06, 11:38 AM
#7
Lead Lap

Join Date: Apr 2002
Location: New York
Posts: 507
Likes: 0
Received 0 Likes
on
0 Posts
I know one you can change the smart access key to open all the doors instead of just drivers door! It's very simple it's on page 23 of the owners manual. All you do is have the car off and sit in the seat and hold down the unlock or lock button while pressing the trunk button and screen will show you a display of what doors will unlock. It's hard to explain but it's on page 23 of the manual. That was my best find besides shutting off the seat belt buzzer.
Trending Topics
 05-10-06, 02:29 PM
#9
Lexus Test Driver
Thread Starter
Ok, if you ever need to remove the engine cover for any reason (ie. bulb replacement) here's how.
1) remove pop clips from front center cover (5 rear clips and 3 front)
Heres how:
Press down on the center of the clip (the head) and it will click down. Then pull the entire clip out:
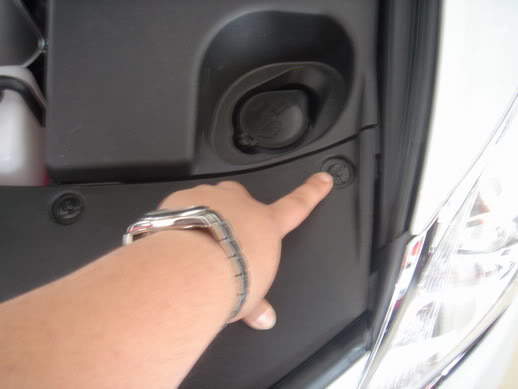
2) Repeat the same for drivers side cover (2 rear clips and 1 front)
3) Repeat the same for passenger side cover (1 rear clip and 1 front)
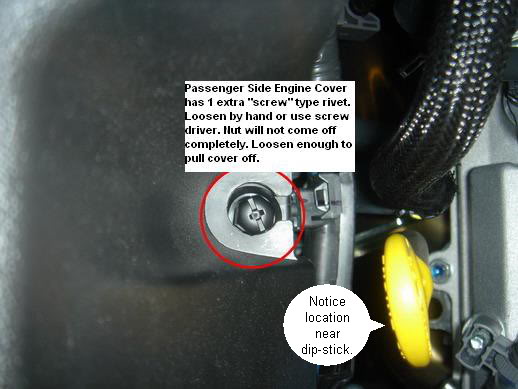
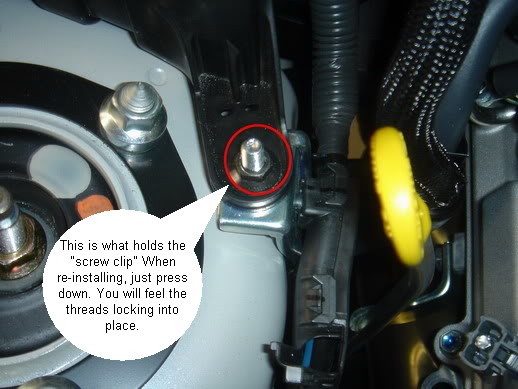
*** Passenger side has 1 extra screw clip located near the dipstick***
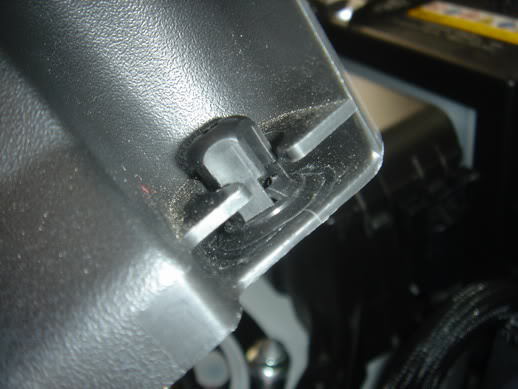
All three covers should come right off.
_________________________________________________________
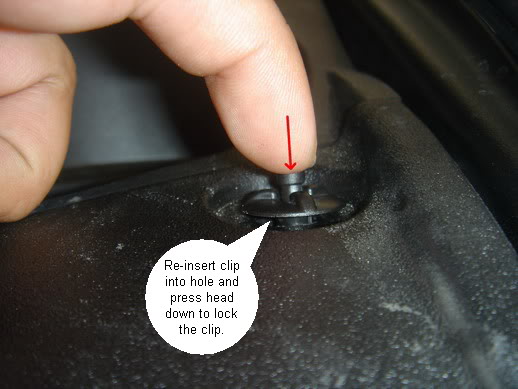
In order to re-install everything, you must re-prep all the pop clips to be inserted. Here's how:

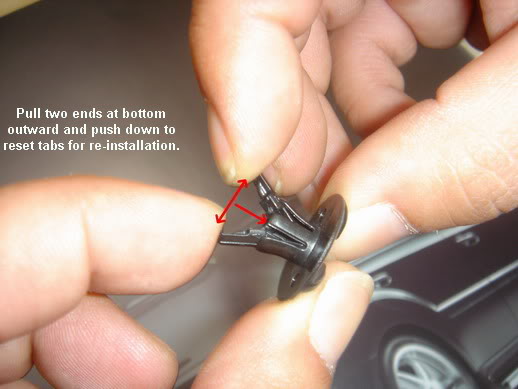

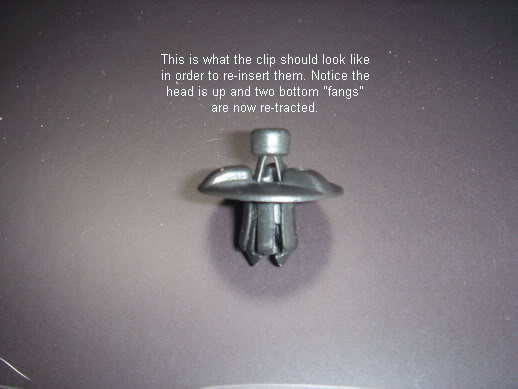
After prepping the rivets, re-install side covers first. Keep in mind passenger side has that screw rivet. (refer to pic above to install). Install front cover last. To insert the pop clip, insert them back into the hole and press down on the head until it clicks once. if it clicks twice, you have pressed too hard and need to pull them out and re-prep them.
1) remove pop clips from front center cover (5 rear clips and 3 front)
Heres how:
Press down on the center of the clip (the head) and it will click down. Then pull the entire clip out:
2) Repeat the same for drivers side cover (2 rear clips and 1 front)
3) Repeat the same for passenger side cover (1 rear clip and 1 front)
*** Passenger side has 1 extra screw clip located near the dipstick***
All three covers should come right off.
_________________________________________________________
In order to re-install everything, you must re-prep all the pop clips to be inserted. Here's how:
After prepping the rivets, re-install side covers first. Keep in mind passenger side has that screw rivet. (refer to pic above to install). Install front cover last. To insert the pop clip, insert them back into the hole and press down on the head until it clicks once. if it clicks twice, you have pressed too hard and need to pull them out and re-prep them.
05-11-06, 05:58 PM
#12

Originally Posted by Raptor.1
Just the Engine Cover & Pop Clip Removal post was totally worth it for me. This helps a ton, now I can go play.
Still, this is GREAT info! Thanks!
05-12-06, 06:52 AM
#13
Lead Lap
Join Date: Apr 2002
Location: New York
Posts: 507
Likes: 0
Received 0 Likes
on
0 Posts
Here is one if you put on the side light in the trunk on it will automatically turn off when you close your trunk. This way everytime you open the trunk you will have light.
05-12-06, 03:07 PM
#14
Driver School Candidate

Join Date: May 2006
Location: CA
Posts: 3
Likes: 0
Received 0 Likes
on
0 Posts
This is not really a "trick" but I had my oil changed and the dealer did not reset the oil maintence light so it is stuck on. Anyone know how to turn it off? I have been looking all over for this.
The rest of the info in this thread is sweet... can't wait until I can get in the car and override the motion sensing thing on the navagation!!!
The rest of the info in this thread is sweet... can't wait until I can get in the car and override the motion sensing thing on the navagation!!!
05-12-06, 03:29 PM
#15
Are you getting the OIL MAINT RESET message? If so, here's how to get rid of it:
- Push the �ODO TRIP� button in the switch box to change the display to current mileage (neither Trip A nor Trip B).
- Turn the engine off.
- Push engine-on button once (with foot off the gas pedal) to go to ACC mode. Press and hold �RESET� and "ODO TRIP" buttons down simultaneously.
- Hold both buttons down for 7-10 seconds after the ACC mode is on. After the above operation, the master warning light comes on, a warning tone sounds and the above message appears to inform you that the engine oil maintenance data has been reset.
Last edited by SGT; 10-19-07 at 09:36 AM.
The following users liked this post:
BeachBum7 (11-10-19)