DIY GS300 coil pack connectors

 12-20-13, 01:53 AM
#17
Rookie

Join Date: Apr 2013
Location: Ny
Posts: 73
Likes: 0
Received 0 Likes
on
0 Posts
thanks for this post. One question for cl users....do you think if water happens to get on these connectors that it will cause an idle problem? input appreciated pm me any answers
01-05-14, 02:07 AM
#18

I'm about to change the plugs on my '00 gs300. I think I'll change the connectors as a precautionary measure. I found some on eBay relatively cheap. In a separate but related issue, does the rest of the intake manifold have to come off to replace the valve cover gasket?


 04-01-14, 06:10 PM
#21
Driver School Candidate

Join Date: Apr 2014
Location: Fl
Posts: 1
Likes: 0
Received 0 Likes
on
0 Posts
[Q OTE=jasonb75;6297936]I was having random misfires on my 98 2GS300 and found that the coil pak connectors had disintegrated because of the heat.
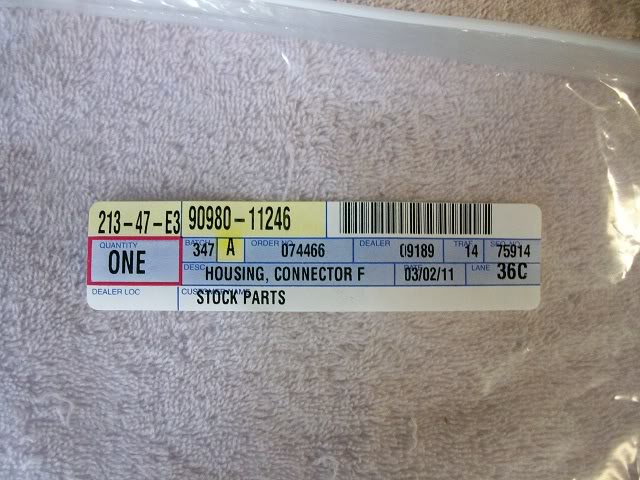
I did a quick search and didn't see a DIY for the coil pack connector replacement, so I thought I would post one up on here. I am new to this forum and want to be a contributing member here. here is a picture of the part number.
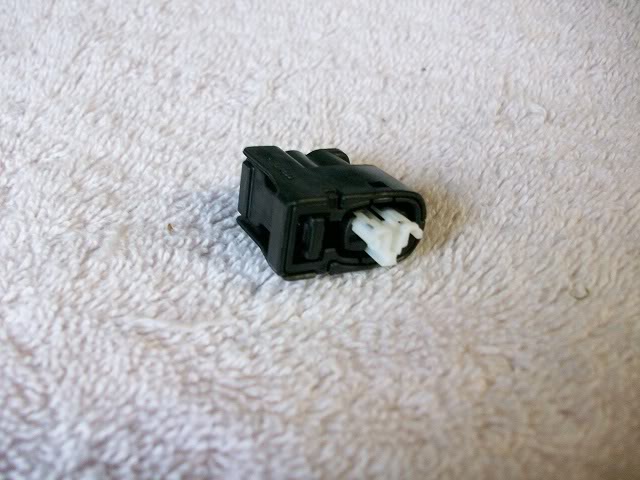
here is a picture of the new connector. Be sure not to push in the white portion of the connector, that is done last in the building of the connector.
I got all three connectors from my local Toyota dealership for 22 bucks total for all of them. That part number 90980-11246 is a Lexus or Toyota part number.
Without further ado, off to the work.
Tools needed are:
1. Metric allen wrench set
2. 12mm deep socket
3. 3 inch extension
4. Ratchet wrench
5. Pliers, regular and needle nose
6. 14mm Combination wrench
7. #3 phillips srewdriver
1. Remove the negative terminal from the battery. (no Picture needed)
2. Remove 4 allen bolts that hold on the timing gear cover
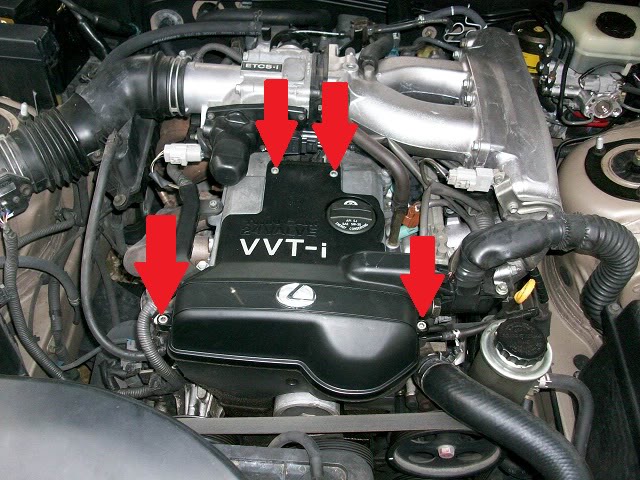
3. (optional) While the engine cover is off, you can take off this bolt and clean the OCV filter. This is not required though. The filter is behind the bolt with the arrow pointing to it.
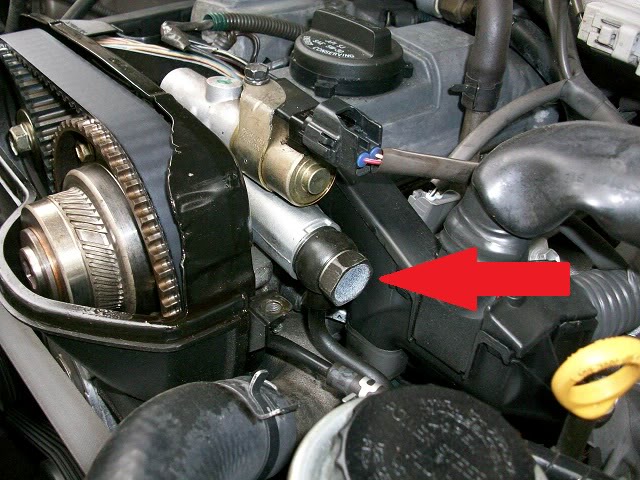
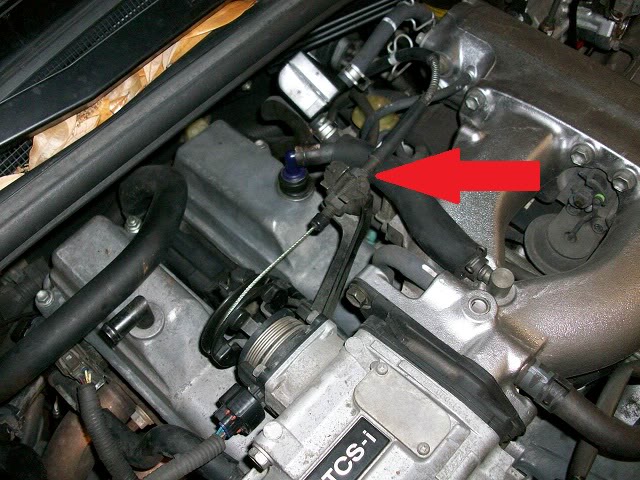
4. Pull this connector off the throttle body.
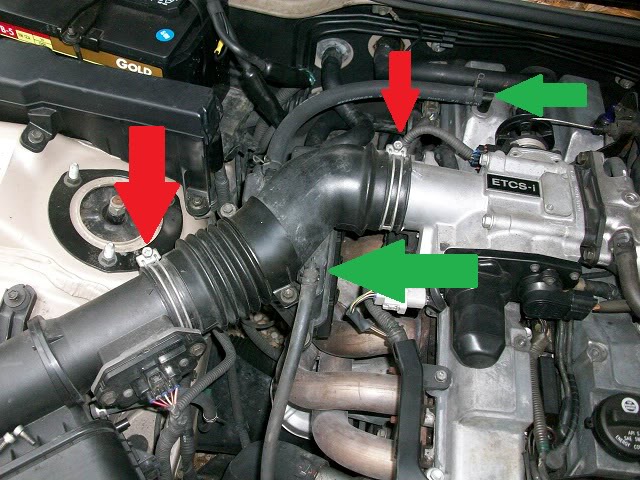
5. Loosen these 2 screws on the intake tube marked with red arrow, and remove the hoses indicated by the green arrows.
6. Loosen this nut on the throttle cable, and pull the throttle cable out of the bracket. Remove the throttle cable end out of the throttle body
7. Remove these 5 nuts that are indicated by the red arrows. The two on the bottom are hidden by the wiring harness in the picture, but can easily be seen.
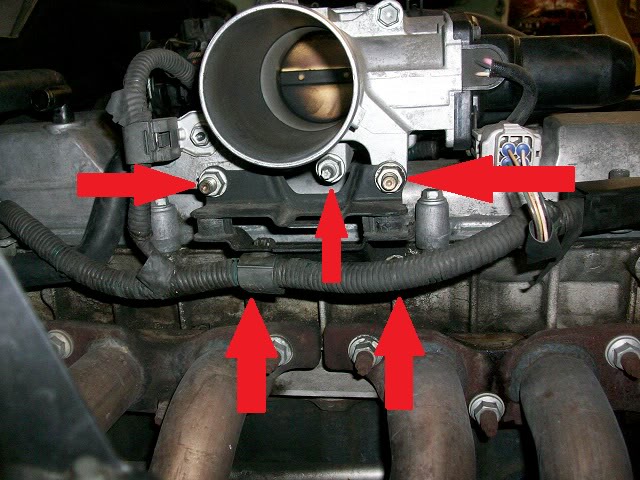
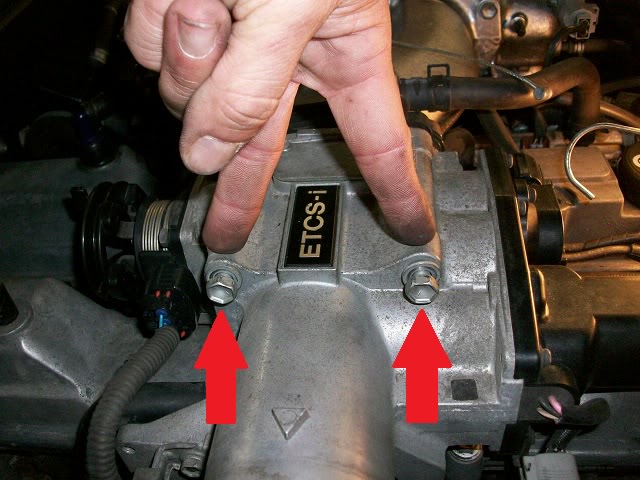
8. Remove the two bolts at the top of the throttle body.
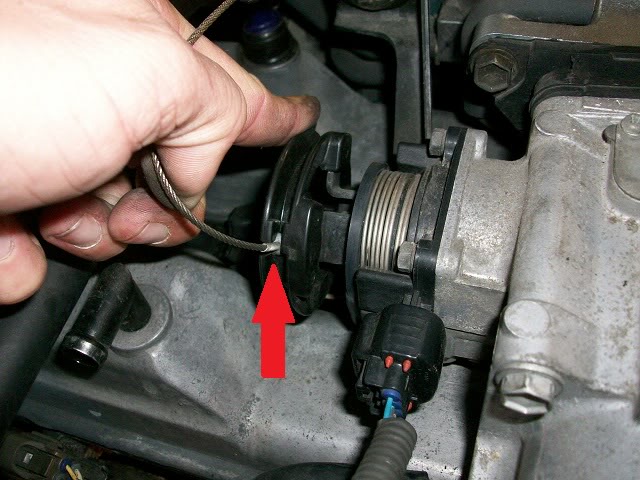
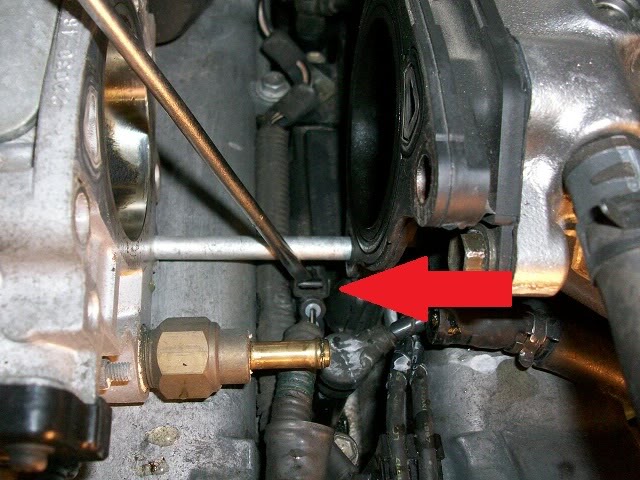
9. Remove this hose off the throttle body.

10. At this time, the throttle body can be moved. I just pulled it out far enough to where i could get to the connector.
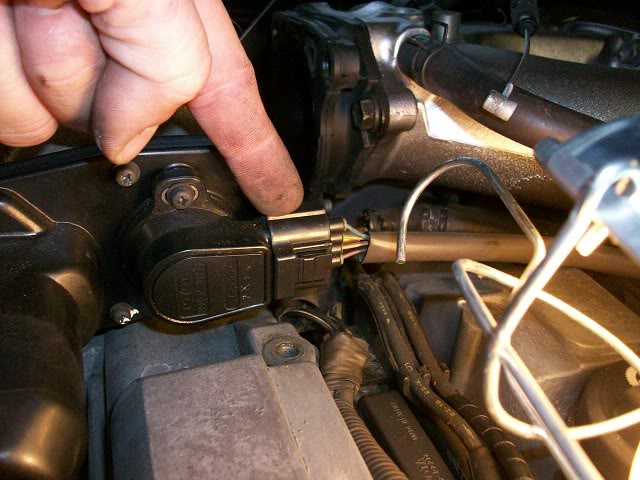
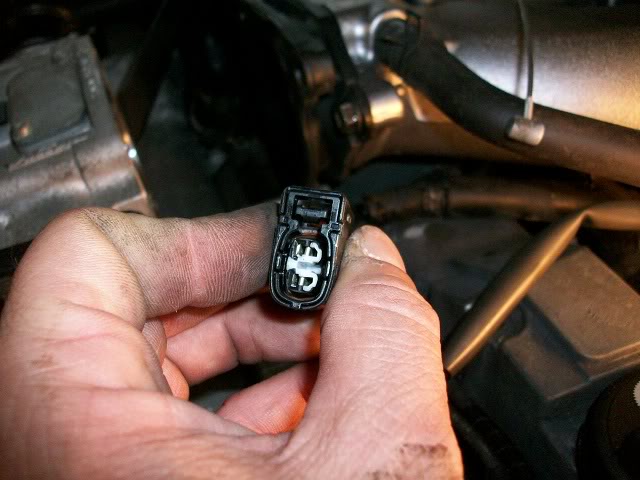
11. This is the connector that I am replacing at this time. you can see from the picture, that all that is inside the connector is two female pins. They were able to just float around.

12. I don't have any pics of this, but it is very easy. since there was nothing on the inside of my old connector, the wires just pulled right out. be sure to note which way the wires were placed in the connector, beause they will have to go back the same way. When I did my other ones, there was still some plastic still inside the connector, and all I had to do was take a small screwdriver, and break all the left over pieces out from around the pins.
13. To assemble the new connectors, push in the female pins from the back of the connector until they click into place. Be sure to put them back in the same orientation that they came out. once the pins are in the connector, push in the white piece until it clicks into place. your pins are now secure in the connector. This is what it will look like after.
14. I would suggest replacing the other two while you're in the process, if one broke, the others probably aren't far behind.
15. Installation is the reverse of disassembly.
Hope this DIY may help someone down the road.[/QUOTE]
the guy who was working on my car remove the wires from the coil connector and is nowhere to be found. I purchased new connectors. How do I find out the correct positioning of these wires?
I did a quick search and didn't see a DIY for the coil pack connector replacement, so I thought I would post one up on here. I am new to this forum and want to be a contributing member here. here is a picture of the part number.
here is a picture of the new connector. Be sure not to push in the white portion of the connector, that is done last in the building of the connector.
I got all three connectors from my local Toyota dealership for 22 bucks total for all of them. That part number 90980-11246 is a Lexus or Toyota part number.
Without further ado, off to the work.
Tools needed are:
1. Metric allen wrench set
2. 12mm deep socket
3. 3 inch extension
4. Ratchet wrench
5. Pliers, regular and needle nose
6. 14mm Combination wrench
7. #3 phillips srewdriver
1. Remove the negative terminal from the battery. (no Picture needed)
2. Remove 4 allen bolts that hold on the timing gear cover
3. (optional) While the engine cover is off, you can take off this bolt and clean the OCV filter. This is not required though. The filter is behind the bolt with the arrow pointing to it.
4. Pull this connector off the throttle body.
5. Loosen these 2 screws on the intake tube marked with red arrow, and remove the hoses indicated by the green arrows.
6. Loosen this nut on the throttle cable, and pull the throttle cable out of the bracket. Remove the throttle cable end out of the throttle body
7. Remove these 5 nuts that are indicated by the red arrows. The two on the bottom are hidden by the wiring harness in the picture, but can easily be seen.
8. Remove the two bolts at the top of the throttle body.
9. Remove this hose off the throttle body.
10. At this time, the throttle body can be moved. I just pulled it out far enough to where i could get to the connector.
11. This is the connector that I am replacing at this time. you can see from the picture, that all that is inside the connector is two female pins. They were able to just float around.
12. I don't have any pics of this, but it is very easy. since there was nothing on the inside of my old connector, the wires just pulled right out. be sure to note which way the wires were placed in the connector, beause they will have to go back the same way. When I did my other ones, there was still some plastic still inside the connector, and all I had to do was take a small screwdriver, and break all the left over pieces out from around the pins.
13. To assemble the new connectors, push in the female pins from the back of the connector until they click into place. Be sure to put them back in the same orientation that they came out. once the pins are in the connector, push in the white piece until it clicks into place. your pins are now secure in the connector. This is what it will look like after.
14. I would suggest replacing the other two while you're in the process, if one broke, the others probably aren't far behind.
15. Installation is the reverse of disassembly.
Hope this DIY may help someone down the road.[/QUOTE]
the guy who was working on my car remove the wires from the coil connector and is nowhere to be found. I purchased new connectors. How do I find out the correct positioning of these wires?
05-12-15, 10:17 PM
#22

Just did my spark plugs today and 2 of the 3 connector tabs broke when I removed them. Thanks for the part number, I'll be putting in an order for replacements tomorrow.
01-22-16, 07:40 AM
#23
Bump - why? because my 98 GS300, with 275K miles has been getting intermittent misses (causing backfiring) since last year...I found my rear connector was loose, and I "jimmied" it to work, but its come back.
In my case its Cyl #6, and happens after it rains, I believe moisture from condensation/spray is being allowed to enter into the connection and cause the misfires.
After driving 30 miles or so it goes away, and then only get the misfire once in a while, and almost always while cornering, which was perplexing me - why mostly around corners? (now makes sense - wires are getting pulled to one side due to centrifugal force during cornering)
Great write up and awesome pics! Thank you.
 01-22-16, 03:35 PM
#25
 2nd that!
Ive read countless posts where people have even had Lexus Dealers change Spark Plugs, Wires, TPS, Coils, ECU, Throttle Body, and still had the problem...
When it very well might have been the inside of these clips...its not something I would intuitively look for...
02-13-17, 12:11 AM
#27
Driver School Candidate

Join Date: Jan 2017
Location: california
Posts: 42
Likes: 0
Received 0 Likes
on
0 Posts
01-22-18, 10:42 AM
#28
Instructor
I know this is an older thread but I'm going to look at replacing these since I'm getting some misfire. I mostly wanted to double check the part number because the one listed here will sometimes come up as not for this car. I've been searching for part #90980-11246. When I look that up on https://www.toyotapartsdeal.com it says it will not fit a 2001 GS300. I also found this on eBay and even though post says they are for a Supra it says it looks to be compatible with the GS300. https://www.ebay.com/itm/4pcs-New-Se...595?rmvSB=true
01-22-18, 11:02 AM
#30
Instructor
@Letsride....Thanks again for all the help! I have a feeling replacing the connectors and switching to the better NGK plugs will more than likely fix my issue. I'll be cleaning the OCV filter while I'm at it just because.