
 01-06-15, 04:24 PM
Last edit by: IB Advertising
See related guides and technical advice from our community experts:
Browse all: Exterior Guides
- How to Replace Your Power Window Actuator
Step by step instructions for do-it-yourself repairs
Browse all: Exterior Guides

Step by Step - Replacing Window Regulator GS 1st Gen.
07-05-08, 11:38 AM
#1
Pit Crew
Thread Starter

This is how I replaced my Left Rear Window regulator only - using the existing motor.
When you get your new regulator in, the cables will be all set for you. MAKE SURE NOT TO LET IT GET UNWIND. There is a round pulley like mechanism near the center of the regulator, make sure this pulley does NOT move from the position it is in. If it moves your regulator will get unwind. You will spend hours trying to re-wrap it and in most cases will not be able to do it. Also you might get so frustrated you might just throw it away and re-buy a new one...
Ok, so to install the new regulator.
Take the door cover off � don�t forget there�s also a bolt underneath the ashtray/armrest cover. Remove the rear door speaker, too after you have the cover off .
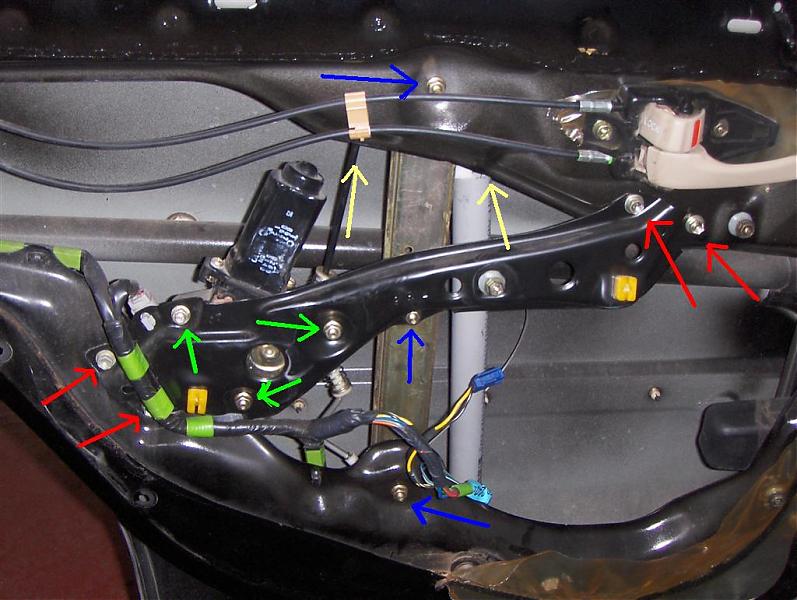
Roll the back window about 1/2 way down. Then use tape to tape it in this position. In my picture, the window is still being held up by the pvc pipe while waiting for the regulator to be shipped. (see pic 1)
Remove the 2 10mm nuts that hold the window to the regulator. (yellow)
Remove the 4 10mm nuts that hold the regulator to the door ( Blue)
Remove the 2 nuts that hold the motor to the cross bar (Green)
Remove the 4 bolts that hold the cross bar to the door (see pic 1)
Now it�s very easy to remove the entire regulator forward and out. You may have to push the upper part of the regulator (up by the window) towards the window to get the bolt section of the regulator out of the hole in the door.
Take the regulator and motor assy out onto a clean workplace.
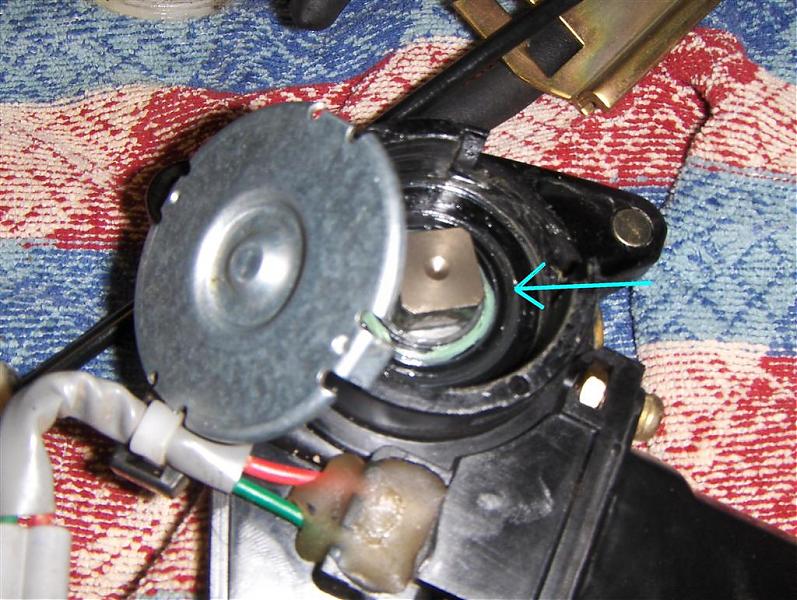
Pry open one side of the metal cover and remove the OLD plastic round piece (aka the pulley) from the motor assy (Pic 2)
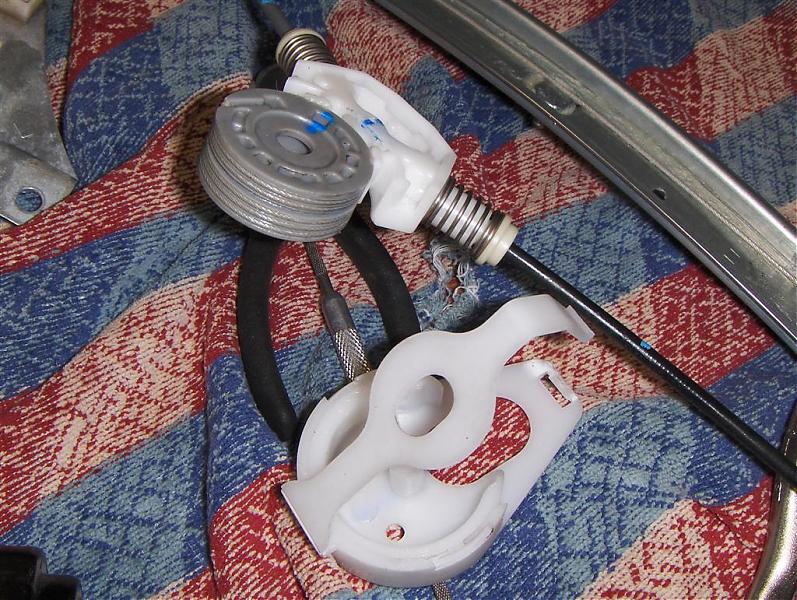
Remove the plastic �shipping� cover from my new piece. This is there so the pully won�t slip out and release the cables.(Pic 3)
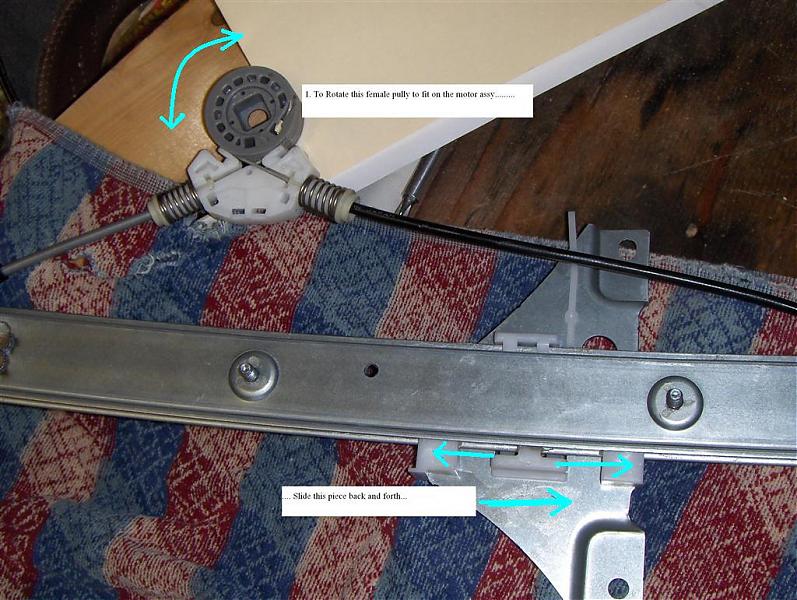
Now comes the most challenging part, but be patient � you can do it. You now have to slip the new (female) pully over the male �nut� section of the motor assy. I just moved the piece of the new regulator that attaches to the window up and down a put until the female part of the new pully lined up with the male end of the motor assy. (Pic 4)
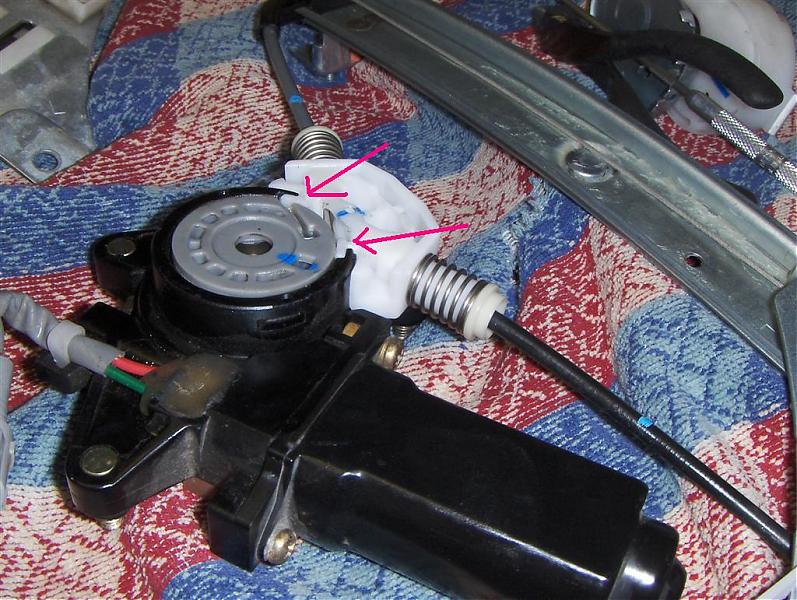
When sliding the pulley onto the motor assy, make sure the 2 notches line up so the entire plastic piece fits. BE CAREFUL not to push only the pulley into the motor assy without also sliding the plastic housing into the notches (see the notches on Pic5)
Put the metal cover back on to the motor assy which covers the pulley. I then took a wrench and gently tapped the tab back into place. (Pic 6) Make sure this is snug. If this metal tab falls off, the pulley will eventually fall out. Not good.
Now you�re mostly there � put the entire assy back into the car � with the crossbar removed you won�t have a problem at all fitting it into the door.
The only challenge I had at this point was getting the upper bolt of the regulator onto the hole of the door � you have to press it against the window (or maybe raise the window up a little).
If the window ends up being too high, just turn the ignition on (don�t do this until every nut/bolt except for the 2 holding the window to the regulator are snug), and move the regulator down a little so you get access to the 2 bolts holding the window. I had to reconnect the door switch for it to work, though. (i.e. I couldn�t use even the front door switch until the rear switch was connected.
Good luck. Thanks to Jmai22 for helping me with this�
When you get your new regulator in, the cables will be all set for you. MAKE SURE NOT TO LET IT GET UNWIND. There is a round pulley like mechanism near the center of the regulator, make sure this pulley does NOT move from the position it is in. If it moves your regulator will get unwind. You will spend hours trying to re-wrap it and in most cases will not be able to do it. Also you might get so frustrated you might just throw it away and re-buy a new one...
Ok, so to install the new regulator.
Take the door cover off � don�t forget there�s also a bolt underneath the ashtray/armrest cover. Remove the rear door speaker, too after you have the cover off .
Roll the back window about 1/2 way down. Then use tape to tape it in this position. In my picture, the window is still being held up by the pvc pipe while waiting for the regulator to be shipped. (see pic 1)
Remove the 2 10mm nuts that hold the window to the regulator. (yellow)
Remove the 4 10mm nuts that hold the regulator to the door ( Blue)
Remove the 2 nuts that hold the motor to the cross bar (Green)
Remove the 4 bolts that hold the cross bar to the door (see pic 1)
Now it�s very easy to remove the entire regulator forward and out. You may have to push the upper part of the regulator (up by the window) towards the window to get the bolt section of the regulator out of the hole in the door.
Take the regulator and motor assy out onto a clean workplace.
Pry open one side of the metal cover and remove the OLD plastic round piece (aka the pulley) from the motor assy (Pic 2)
Remove the plastic �shipping� cover from my new piece. This is there so the pully won�t slip out and release the cables.(Pic 3)
Now comes the most challenging part, but be patient � you can do it. You now have to slip the new (female) pully over the male �nut� section of the motor assy. I just moved the piece of the new regulator that attaches to the window up and down a put until the female part of the new pully lined up with the male end of the motor assy. (Pic 4)
When sliding the pulley onto the motor assy, make sure the 2 notches line up so the entire plastic piece fits. BE CAREFUL not to push only the pulley into the motor assy without also sliding the plastic housing into the notches (see the notches on Pic5)
Put the metal cover back on to the motor assy which covers the pulley. I then took a wrench and gently tapped the tab back into place. (Pic 6) Make sure this is snug. If this metal tab falls off, the pulley will eventually fall out. Not good.
Now you�re mostly there � put the entire assy back into the car � with the crossbar removed you won�t have a problem at all fitting it into the door.
The only challenge I had at this point was getting the upper bolt of the regulator onto the hole of the door � you have to press it against the window (or maybe raise the window up a little).
If the window ends up being too high, just turn the ignition on (don�t do this until every nut/bolt except for the 2 holding the window to the regulator are snug), and move the regulator down a little so you get access to the 2 bolts holding the window. I had to reconnect the door switch for it to work, though. (i.e. I couldn�t use even the front door switch until the rear switch was connected.
Good luck. Thanks to Jmai22 for helping me with this�


Trending Topics
07-05-08, 11:49 AM
#8
Pit Crew
Thread Starter
Sorry for the extra image - I had deleted it out of the first post but I guess it got stuck in there somehow... Hope this helps someone !
PS this can be used if you have to also replace the motor assy - it's actually easier to do it that way, but the part with the motor is over $500. I paid about $150 shipped from toyota world in Texas...
Also, there are 3 nuts (not 2) that hold the motor assy to the cross bar. sorry about that...
PS this can be used if you have to also replace the motor assy - it's actually easier to do it that way, but the part with the motor is over $500. I paid about $150 shipped from toyota world in Texas...
Also, there are 3 nuts (not 2) that hold the motor assy to the cross bar. sorry about that...
 07-06-08, 10:04 PM
#10
Pit Crew
Thread Starter
thanks Ping... I've received so much help from lots of people here I figured I'd take the Xtra time to write the procedure.
I've found it handy when taking things apart (especially in the engine) to take digital pics of things so if I 4get how/where to put things back I can just go back to the pic to see how it was b4 I started tearing things apart... so I had the camera out and said I have the pics anyway - I'll just document it..
Also, I did add a post w/a link to this from that procedure sticky thread...
07-11-08, 10:47 AM
#12
Driver School Candidate

Join Date: Jul 2008
Location: ca
Posts: 5
Likes: 0
Received 0 Likes
on
0 Posts
i got the regulators front and back. thanks so much for the write up. i hope it doesnt get unwound when i try and put them in
Last edited by lincoln; 07-30-08 at 12:46 PM.
10-09-08, 11:58 AM
#14
Driver

Join Date: Aug 2008
Location: IA
Posts: 102
Likes: 0
Received 0 Likes
on
0 Posts
Thanks for the post. I'm having problems with the rear drivers side window. The motor engages and moves the cable, but the cable doesn't pull on the window. I took the door panel off and there is a loose plastic piece that seems to be the culprit. It looks like a guide for the cable. There is an identical plastic piece that is intact, which is mounted on the lower left side of the vertical metal guide. I don't know where the loose one goes. Any help?
10-09-08, 03:03 PM
#15
Pit Crew
Thread Starter
I doubt there's a way to fix it without pulling it apart, which isn't a big deal. Take it apart and I'd bet a dollar to a donut you need to replace the regulator...