Official DIY / How To
 06-29-08, 06:35 AM
#46
Driver
Join Date: Feb 2006
Location: Texas
Posts: 152
Likes: 0
Received 0 Likes
on
0 Posts
Hey guys (and gals) it's been a while, good to be back. Any threads on starter replacement? Damn that's a tight squeeze! My wife bought me the online chilton manual and they only have text, it says "Loosen the two bolts and remove starter" I thought that was funny.
 07-05-08, 11:50 AM
#47

Hi All,
I just replaced my Left Rear window regulator and posted steps and pics..
https://www.clublexus.com/forums/sho...=1#post3656192
I just replaced my Left Rear window regulator and posted steps and pics..
https://www.clublexus.com/forums/sho...=1#post3656192
09-09-08, 08:32 PM
#48
Pole Position
Join Date: Jan 2008
Location: Michigan
Posts: 328
Likes: 0
Received 0 Likes
on
0 Posts
I think on the 1st post the guy brought up the spark plug thread but I need 2 change mine and I need 2 ask which performance spark plugs would u guys prefer or recommend?
09-13-08, 04:45 PM
#49
Lexus Test Driver
Join Date: Mar 2007
Location: MAUI,HAWAII
Posts: 1,217
Likes: 0
Received 0 Likes
on
0 Posts
02-21-09, 09:35 AM
#51
Rookie
Join Date: Jul 2007
Location: Connecticut
Posts: 53
Likes: 0
Received 0 Likes
on
0 Posts
Diagnostic/Check Engine Light question.
One of my friends contacted me about his CEL being on. He has a 94 GS300 which should be OBD1. Is there a service terminal that will allow the codes to be read on a scantool? I've worked on a 95 LS that did. If not, what is the procedure for checking the codes?
Thanks,
Lamar
edit: http://www.troublecodes.net/Lexus/
Found my answer.
Last edited by t0p_sh0tta; 02-21-09 at 01:07 PM.
04-02-09, 09:17 PM
#52
Pole Position
Join Date: Jan 2008
Location: Michigan
Posts: 328
Likes: 0
Received 0 Likes
on
0 Posts
I kno someone has a quick diy they can throw together on here for replacing the factory amp! I fried mine a couple weeks back and I really don't want 2 pay best buy 120 for something as simple as this! O and the control arm and bearings link is bad!

 06-19-09, 08:49 PM
#55
Lead Lap
iTrader: (1)
Join Date: May 2005
Location: FL
Posts: 524
Likes: 0
Received 0 Likes
on
0 Posts
 10-15-09, 05:30 AM
#58
Hey all I just picked up a 93 GS300 a few weeks ago so I am fairly new to the 1GS forum. I used to have a 93 SC300, but it was totalled a little over a month ago as explained in this thread: https://www.clublexus.com/forums/sc-...ibly-down.html
Anyways I just wanted to make a contribution to the 1GS forum by posting this DIY/Guide on upgrading to newer Lexus/Toyota steering wheels that are fully functional with OEM parts. It has probably been covered before, but I am trying to make this a definitive guide that answers all questions for those wanting to upgrade to newer OEM steering wheels. There may be mistakes so revisions will be probable and new info will be added when discovered or brought to my attention.
Disclaimer: I take no reponsibility for your actions or how the following information is used.
Let's begin shall we?
Which OEM steering wheels will fit the 1GS?
Any Lexus or Toyota steering should physically fit as they all use the same splines. This applies to other Lexus and Toyota vehicles as well. As a result, the main problem with retrofits lie in the airbags.
Which OEM airbags will fit the 1GS?
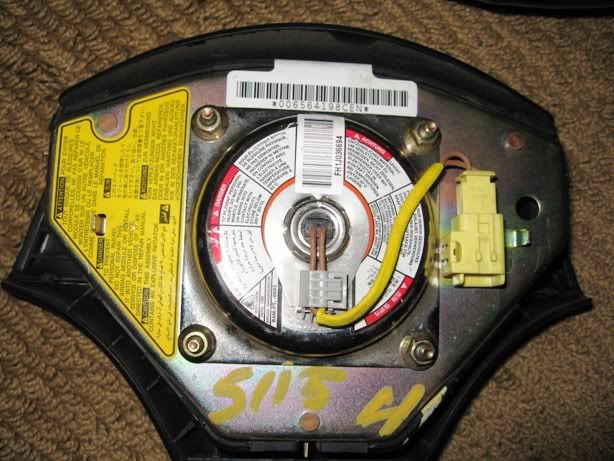
First of all, you need to find an airbag that fits the steering wheel you are trying to install. Any year airbag should fit, but I will go more in-depth about this later in the thread. Generally, all pre-99 Lexus and Toyota single stage airbags should be plug and play for the 1GS because the connectors are the same. Single stage airbags have yellow connectors that are either big or small. Pre-99 single stage use the bigger connector and 99-01 single stage use the smaller connector. 02+ use dual stage airbags with black and red connectors. Also, you may need to re-use your cruise control switch if the plugs are different, but it is fairly easy to do with some common sense.
Large single stage connector (Pre-99)
Small single stage connector (99-01)
So what about the 99-01 airbags?
The newer airbags are where it may get a bit tricky and slightly complicated. The 99-01 airbags and a few 01+ (such as IS300) should be single stage and have the smaller type connector. As a result, if you want to retrofit a 99-01 airbag into your 1GS you need the airbag adapter harness (part # 09082-00760). These harnesses are discontinued from US Toyota/Lexus dealers, but you can still get your hands on one from forum vendor Carson Toyota here http://www.l-tunedparts.com/product/?id=3097
or directly from the manufacturer here: http://toyota.spx.com/detail.aspx?id=407&p=173&g=21.
Be WARNED as they are usually on backorder so they may take a few weeks or months for stock to come in.
Airbag adapter harness

What about the 02+ steering wheels and airbags?
As far as I know the steering wheel splines have not changed up to the 2009 model years. So IS350, ES350, etc. retrofits are possible, but most likely expensive. Again, the main problem lies within the airbags as all 02+ have the dual stage airbags with the red and black connectors. Although, I believe the 01 RX300 Sport Edition came with rare airbags as they fit certain 02+ steering wheels and are single stage!
Dual stage airbag

How do we retrofit steering wheels with dual stage airbags?
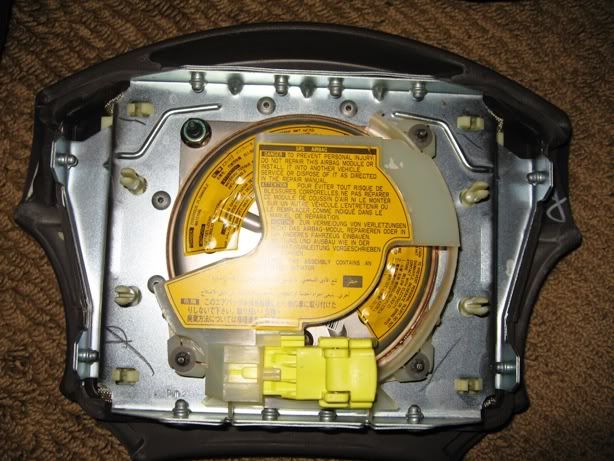
In addition to the dual stage airbag, you need to find any single stage airbag with the smaller yellow connector. Any 99-01 and a few 01+ Lexus OR Toyota airbags should have the proper connector. Toyota single stage airbags are generally cheaper so look for ones off a corolla, camry, etc. Many people may not know this so use it to your advantage. Once you have both, simply swap the round airbag modules behind the airbags. Both should be held on by four 8mm nuts. Again, you need the airbag adapter harness for oem fitment. There are other ways without using the adapter, but it will not be covered in this thread. This method may seem a bit pricey, but you can find good deals if you are patient.
Remove these 8mm nuts
General Summary of OEM Steering Wheel Options for 93-97 GS300
1) Pre-98 steering wheel and airbag = Plug and play.
2) 99-01 steering wheel + matching single stage airbag + airbag harness adapter + cruise control swap = Plug and play
3) 02+ steering wheel + matching dual stage airbag + single stage airbag w/ smaller connector + airbag adapter harness + swapping airbag modules + cruise control swap = Plug and play
4) There are a few others that do not apply to the rules above such as the 01-05 IS300 steering wheel. This works like option 2 above.
Anyways I just wanted to make a contribution to the 1GS forum by posting this DIY/Guide on upgrading to newer Lexus/Toyota steering wheels that are fully functional with OEM parts. It has probably been covered before, but I am trying to make this a definitive guide that answers all questions for those wanting to upgrade to newer OEM steering wheels. There may be mistakes so revisions will be probable and new info will be added when discovered or brought to my attention.
Disclaimer: I take no reponsibility for your actions or how the following information is used.
Let's begin shall we?
Which OEM steering wheels will fit the 1GS?
Any Lexus or Toyota steering should physically fit as they all use the same splines. This applies to other Lexus and Toyota vehicles as well. As a result, the main problem with retrofits lie in the airbags.
Which OEM airbags will fit the 1GS?
First of all, you need to find an airbag that fits the steering wheel you are trying to install. Any year airbag should fit, but I will go more in-depth about this later in the thread. Generally, all pre-99 Lexus and Toyota single stage airbags should be plug and play for the 1GS because the connectors are the same. Single stage airbags have yellow connectors that are either big or small. Pre-99 single stage use the bigger connector and 99-01 single stage use the smaller connector. 02+ use dual stage airbags with black and red connectors. Also, you may need to re-use your cruise control switch if the plugs are different, but it is fairly easy to do with some common sense.
Large single stage connector (Pre-99)
Small single stage connector (99-01)
So what about the 99-01 airbags?
The newer airbags are where it may get a bit tricky and slightly complicated. The 99-01 airbags and a few 01+ (such as IS300) should be single stage and have the smaller type connector. As a result, if you want to retrofit a 99-01 airbag into your 1GS you need the airbag adapter harness (part # 09082-00760). These harnesses are discontinued from US Toyota/Lexus dealers, but you can still get your hands on one from forum vendor Carson Toyota here http://www.l-tunedparts.com/product/?id=3097
or directly from the manufacturer here: http://toyota.spx.com/detail.aspx?id=407&p=173&g=21.
Be WARNED as they are usually on backorder so they may take a few weeks or months for stock to come in.
Airbag adapter harness
What about the 02+ steering wheels and airbags?
As far as I know the steering wheel splines have not changed up to the 2009 model years. So IS350, ES350, etc. retrofits are possible, but most likely expensive. Again, the main problem lies within the airbags as all 02+ have the dual stage airbags with the red and black connectors. Although, I believe the 01 RX300 Sport Edition came with rare airbags as they fit certain 02+ steering wheels and are single stage!
Dual stage airbag
How do we retrofit steering wheels with dual stage airbags?
In addition to the dual stage airbag, you need to find any single stage airbag with the smaller yellow connector. Any 99-01 and a few 01+ Lexus OR Toyota airbags should have the proper connector. Toyota single stage airbags are generally cheaper so look for ones off a corolla, camry, etc. Many people may not know this so use it to your advantage. Once you have both, simply swap the round airbag modules behind the airbags. Both should be held on by four 8mm nuts. Again, you need the airbag adapter harness for oem fitment. There are other ways without using the adapter, but it will not be covered in this thread. This method may seem a bit pricey, but you can find good deals if you are patient.
Remove these 8mm nuts
General Summary of OEM Steering Wheel Options for 93-97 GS300
1) Pre-98 steering wheel and airbag = Plug and play.
2) 99-01 steering wheel + matching single stage airbag + airbag harness adapter + cruise control swap = Plug and play
3) 02+ steering wheel + matching dual stage airbag + single stage airbag w/ smaller connector + airbag adapter harness + swapping airbag modules + cruise control swap = Plug and play
4) There are a few others that do not apply to the rules above such as the 01-05 IS300 steering wheel. This works like option 2 above.
Last edited by TheMole; 10-16-09 at 12:50 AM.
10-15-09, 05:30 AM
#59
Disclaimer: I take no reponsibility for your actions or how the following information is used. These steps were recorded after removal and installation so pics may not be of actual wheel installed.
Tools Needed
-Flathead screw driver (small)
-Phillips screw driver
-Torque wrench (37 ft/lb)
-T30 Torx bit
-19mm ratchet attachment (Or 21mm sorry I forgot lol)
-PB Blaster, WD40, or any penetrating oil
-Female wire plug (optional)
-Pen or marker (optional)
-Needle nose pliers (optional)
-Steering wheel puller (optional)
1. First of all make sure your steering wheel is straight. Then disconnect the negative terminal from the battery and then the positive. You can wait 20 minutes for all the electrical current to drain or simply depress the brake pedal a few times to get rid of any excess current.
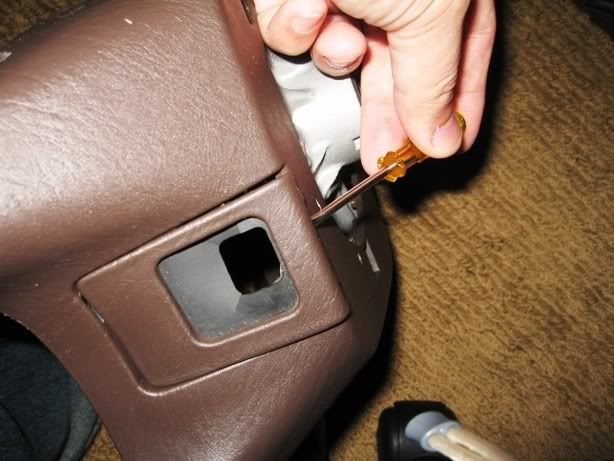
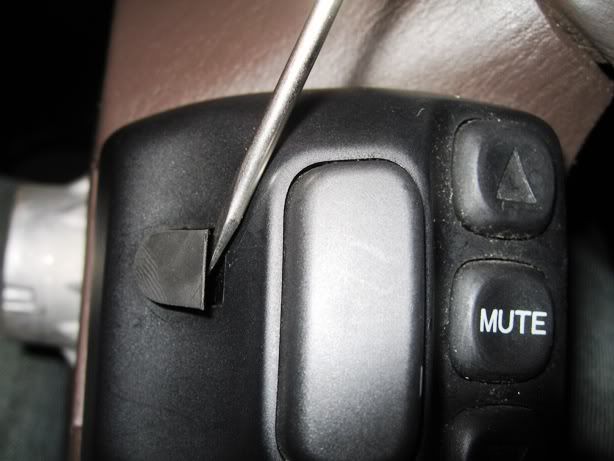
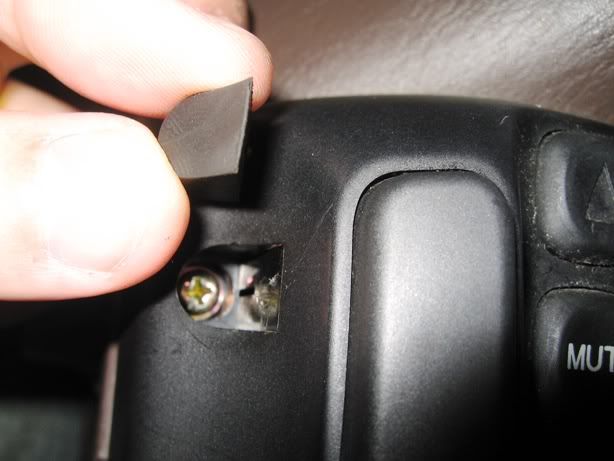
2. Pry off the small plastic covers on each side of the steering wheel as shown below. If you have carphone controls like I do, remove the rubber nub with a flathead and it will expose a phillips screw. Remove the screw and the console should slide forward and out to the left.
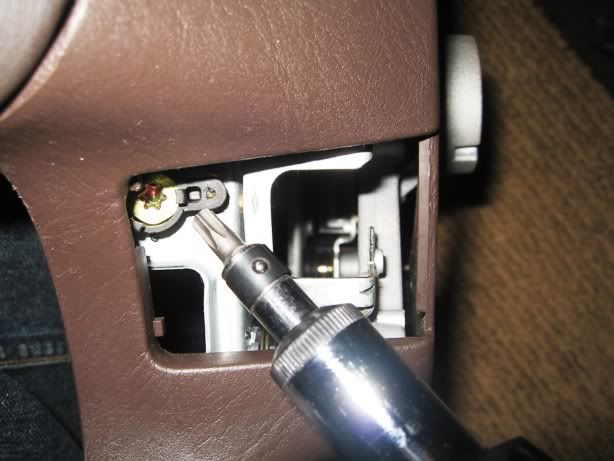
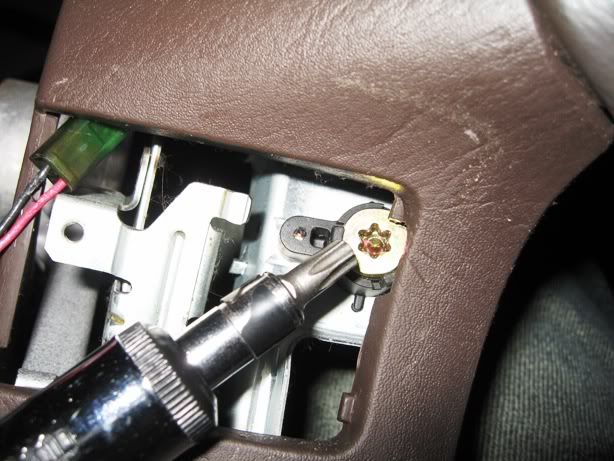
3. After the covers are off, 1 torx screw on each side should be exposed. These screws are what hold the airbag to the steering wheel. They may be pretty tight so I used the T30 torx bit on my ratchet for more leverage.
4. The airbag cover should now come off without much resistance, but it is still attached to the harness so becareful. If there is some resistance make sure the 2 torx screws are not pushed in. Needle nose pliers work well if they are stuck in there. Next, unplug the the yellow harness behind the airbag and put the airbag aside.
5. Unplug the cruise control switch from the clock spring and make sure the clock spring stays in the same relative position.
6. Now remove the 19mm nut in the center of the steering wheel. You can use a breaker bar or some penetrating oil if it is too hard to remove. Also, it is a good idea to have someone hold the steering for more resistance.
7. If you do not have a steering wheel puller soak the spline where the 19mm nut was with penetrating oil. This will give it some time to work its magic while you do other stuff.
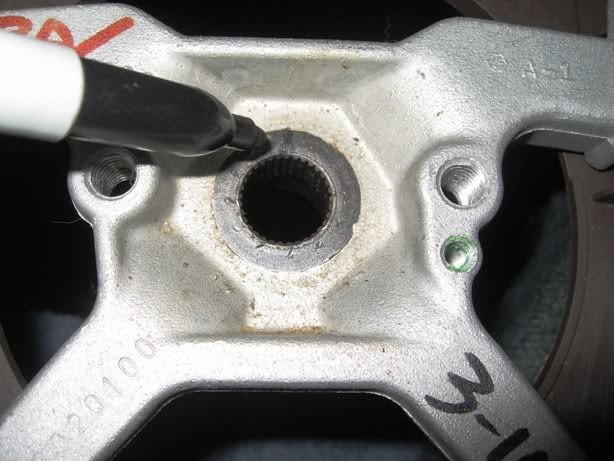
8. This step is optional, but you can dry some of the excess oil off and draw a vertical line from this part of the steering wheel to the spline. This can make it easier to line up the new wheel.
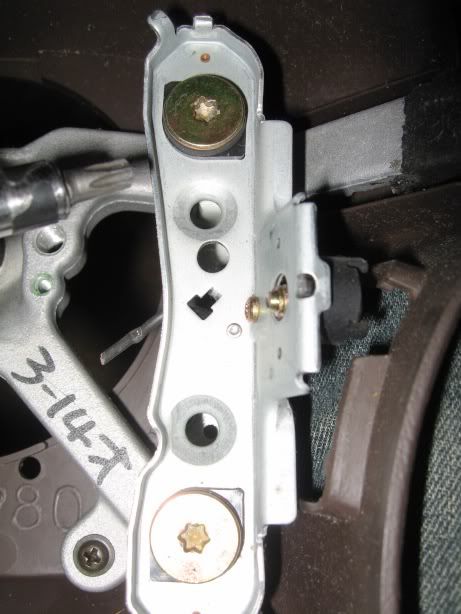
9. If the new steering wheel cruise control switch does not plug into your clock spring, you need to re-use your 1GS switch. Before you can remove the 1GS switch, you have to remove the top metal plate as shown in the pic. It is held on by 2 T30 torx screws. Becareful not to lose the springs or screws while disassembling.
10. Once the plate is removed, simply unscrew 3 phillips screws to release the cruise control switch. The switch will still be attached by a black wire.
Tools Needed
-Flathead screw driver (small)
-Phillips screw driver
-Torque wrench (37 ft/lb)
-T30 Torx bit
-19mm ratchet attachment (Or 21mm sorry I forgot lol)
-PB Blaster, WD40, or any penetrating oil
-Female wire plug (optional)
-Pen or marker (optional)
-Needle nose pliers (optional)
-Steering wheel puller (optional)
1. First of all make sure your steering wheel is straight. Then disconnect the negative terminal from the battery and then the positive. You can wait 20 minutes for all the electrical current to drain or simply depress the brake pedal a few times to get rid of any excess current.
2. Pry off the small plastic covers on each side of the steering wheel as shown below. If you have carphone controls like I do, remove the rubber nub with a flathead and it will expose a phillips screw. Remove the screw and the console should slide forward and out to the left.
3. After the covers are off, 1 torx screw on each side should be exposed. These screws are what hold the airbag to the steering wheel. They may be pretty tight so I used the T30 torx bit on my ratchet for more leverage.
4. The airbag cover should now come off without much resistance, but it is still attached to the harness so becareful. If there is some resistance make sure the 2 torx screws are not pushed in. Needle nose pliers work well if they are stuck in there. Next, unplug the the yellow harness behind the airbag and put the airbag aside.
5. Unplug the cruise control switch from the clock spring and make sure the clock spring stays in the same relative position.
6. Now remove the 19mm nut in the center of the steering wheel. You can use a breaker bar or some penetrating oil if it is too hard to remove. Also, it is a good idea to have someone hold the steering for more resistance.
7. If you do not have a steering wheel puller soak the spline where the 19mm nut was with penetrating oil. This will give it some time to work its magic while you do other stuff.
8. This step is optional, but you can dry some of the excess oil off and draw a vertical line from this part of the steering wheel to the spline. This can make it easier to line up the new wheel.
9. If the new steering wheel cruise control switch does not plug into your clock spring, you need to re-use your 1GS switch. Before you can remove the 1GS switch, you have to remove the top metal plate as shown in the pic. It is held on by 2 T30 torx screws. Becareful not to lose the springs or screws while disassembling.
10. Once the plate is removed, simply unscrew 3 phillips screws to release the cruise control switch. The switch will still be attached by a black wire.
Last edited by TheMole; 11-11-09 at 01:32 PM.
10-15-09, 05:31 AM
#60
Continued...
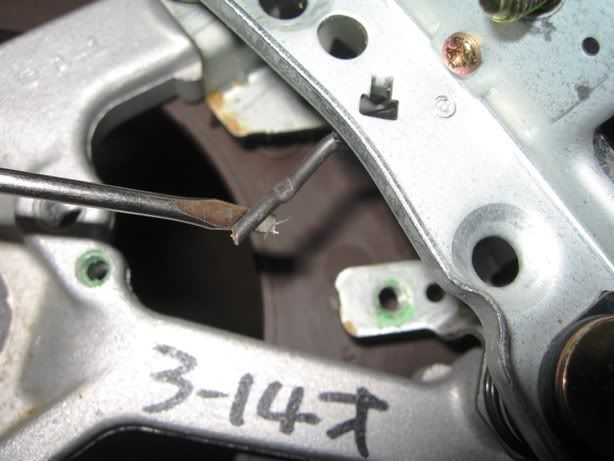
11. This black wire serves as a ground and is soldered to the steering wheel. I could not find a way to remove it so I just cut the wire at this point. Now you can fully remove the cruise control switch and put it aside for now. The top plate can also be reinstalled if you like.
12. At this time the penetrating oil should have had enough time to do it's thing so now the steering wheel can be removed. My preferred method is to rock the wheel back and forth with one hand at the 3 o' clock and the other at the 9 o' clock positions. I also alternate with one hand at the 12 o' clock and the other at the 6 o' clock position as well. This method is similar to as if you were shaking your wheel/rim to check for bad balljoints, tie rods, wheel bearings, etc. This should loosen up the steering wheel from the spline and it may pop off unexpenctedly so be prepared.
13. With the old wheel off, you can draw a matching vertical line on the new wheel so that it lines up with the spline.
14. If necessary uninstall the new cruise control switch and install your 1GS switch onto your new steering wheel via the 3 phillips screws. This particular steering wheel has the same mounting points so it is a straightfoward install. Also, do not forget to swap over the rubber boot from the new switch to your 1GS one.
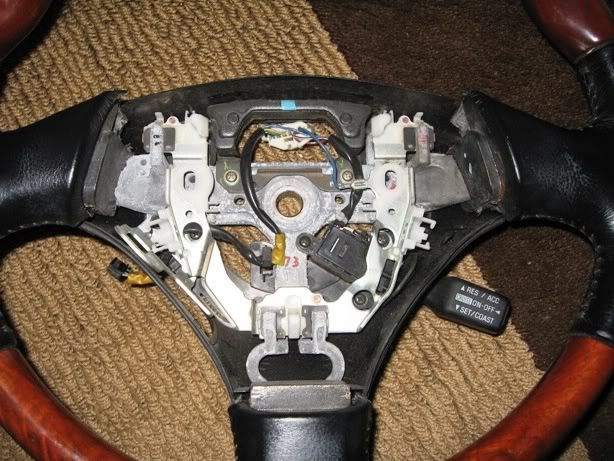
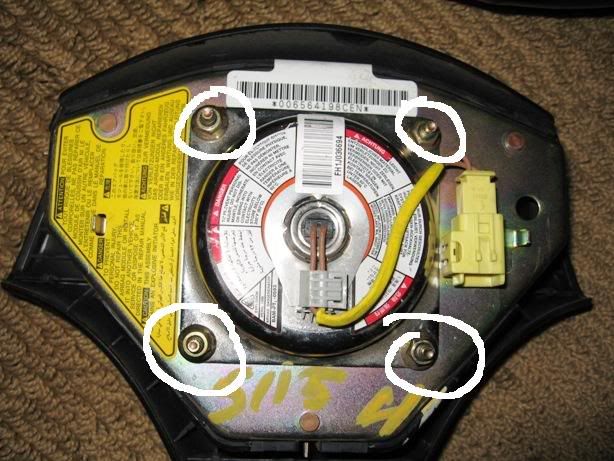
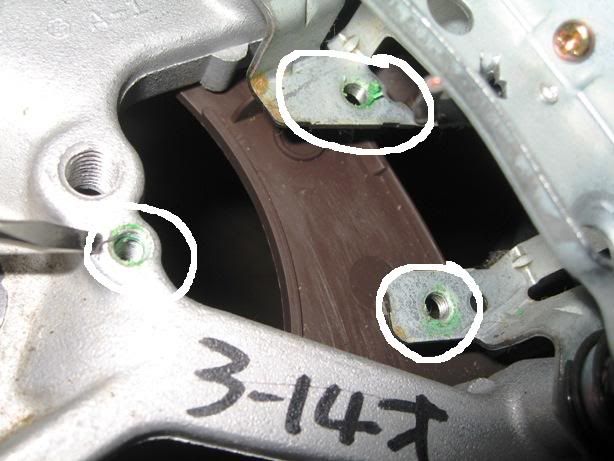
15. The 1Gs cruise control switch now needs to be grounded. This is important because it also serves as the ground for the horn as well. If you have any female adapters laying around you can wire it to the black wire that was cut earlier. If not, you can snip off the female end off the new switch and use that instead. After the wiring is completed, ground the female end onto the steering wheel as circled below. Be aware that different wheels may have different grounding points.
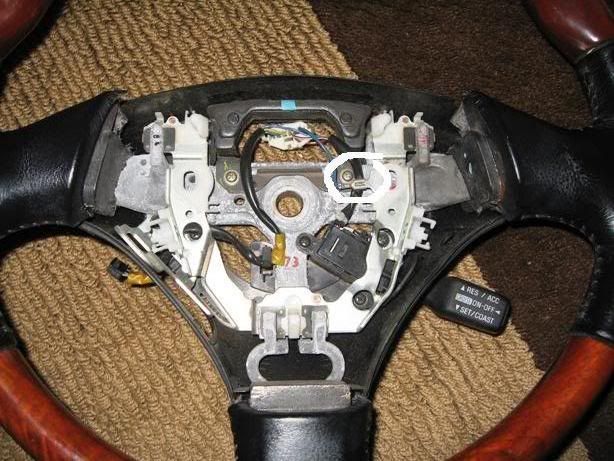
16. Next, attach the new steering wheel to the spline and make sure it is straight or match up the lines if you used the method mentioned earlier. Plug in the cruise control switch into the clock spring so that it does not move around too much. Then, screw on the 19mm nut that was removed before and tighten it to 37 ft/lbs with a torque wrench.
17. Double check your work before installing the new airbag. Make sure the new steering wheel has the torx screws on each side. If not, you should be able to use your 1GS screws. If necessary attach the airbag adapter harness to the new airbag assuming you have the proper parts as explained in the first post of this thread. The harness is a bit bulky so try to put it in a position where the wires are not clamped or where it does not get in the way of anything. Becareful with the wiring and make sure it does not get caught while the wheel is being turned.

18. Press down on the airbag to test if it moves freely. Doing so will ensure that the horn can be used without issues. Make sure the airbag is in the position that you want it to be and tighten the torx screws on each side of the steering wheel. Snap on the side covers if there are any.
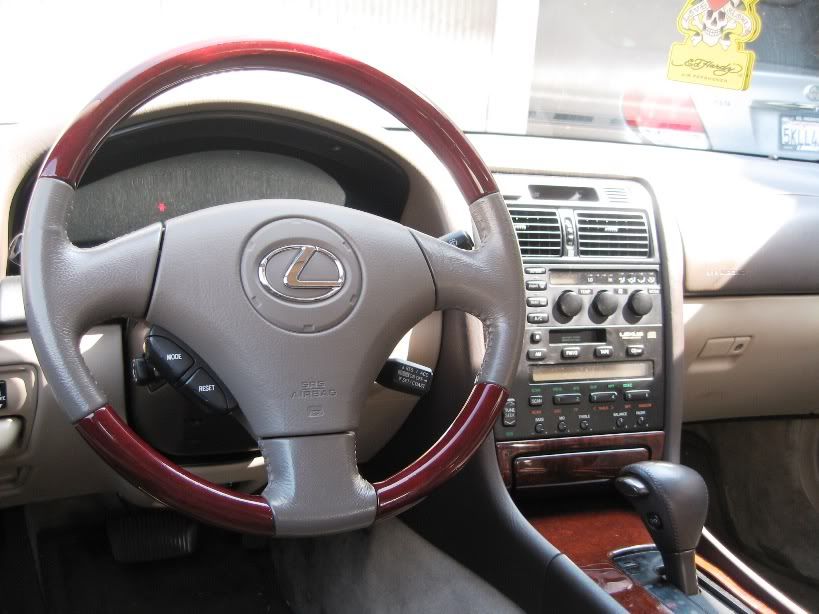
19. Again double check everything as the airbag is a sensitive component. Reinstall the positive battery terminal and then the negative. If the airbag does not blow (cross fingers lol!) it should look something like this:

If there are comments, questions, or wrong information please let me know.
11. This black wire serves as a ground and is soldered to the steering wheel. I could not find a way to remove it so I just cut the wire at this point. Now you can fully remove the cruise control switch and put it aside for now. The top plate can also be reinstalled if you like.
12. At this time the penetrating oil should have had enough time to do it's thing so now the steering wheel can be removed. My preferred method is to rock the wheel back and forth with one hand at the 3 o' clock and the other at the 9 o' clock positions. I also alternate with one hand at the 12 o' clock and the other at the 6 o' clock position as well. This method is similar to as if you were shaking your wheel/rim to check for bad balljoints, tie rods, wheel bearings, etc. This should loosen up the steering wheel from the spline and it may pop off unexpenctedly so be prepared.
13. With the old wheel off, you can draw a matching vertical line on the new wheel so that it lines up with the spline.
14. If necessary uninstall the new cruise control switch and install your 1GS switch onto your new steering wheel via the 3 phillips screws. This particular steering wheel has the same mounting points so it is a straightfoward install. Also, do not forget to swap over the rubber boot from the new switch to your 1GS one.
15. The 1Gs cruise control switch now needs to be grounded. This is important because it also serves as the ground for the horn as well. If you have any female adapters laying around you can wire it to the black wire that was cut earlier. If not, you can snip off the female end off the new switch and use that instead. After the wiring is completed, ground the female end onto the steering wheel as circled below. Be aware that different wheels may have different grounding points.
16. Next, attach the new steering wheel to the spline and make sure it is straight or match up the lines if you used the method mentioned earlier. Plug in the cruise control switch into the clock spring so that it does not move around too much. Then, screw on the 19mm nut that was removed before and tighten it to 37 ft/lbs with a torque wrench.
17. Double check your work before installing the new airbag. Make sure the new steering wheel has the torx screws on each side. If not, you should be able to use your 1GS screws. If necessary attach the airbag adapter harness to the new airbag assuming you have the proper parts as explained in the first post of this thread. The harness is a bit bulky so try to put it in a position where the wires are not clamped or where it does not get in the way of anything. Becareful with the wiring and make sure it does not get caught while the wheel is being turned.
18. Press down on the airbag to test if it moves freely. Doing so will ensure that the horn can be used without issues. Make sure the airbag is in the position that you want it to be and tighten the torx screws on each side of the steering wheel. Snap on the side covers if there are any.
19. Again double check everything as the airbag is a sensitive component. Reinstall the positive battery terminal and then the negative. If the airbag does not blow (cross fingers lol!) it should look something like this:
If there are comments, questions, or wrong information please let me know.
Last edited by TheMole; 10-16-09 at 12:57 AM.