
 01-09-15, 10:02 AM
Last edit by: IB Advertising
See related guides and technical advice from our community experts:
Browse all: Lexus IS Lighting Guides
- Lexus: How to install HID Headlights (on your non-HID equipped 2IS)
Step by step instructions for do-it-yourself repairs
Browse all: Lexus IS Lighting Guides

DIY: GS 350 F Sport Fog Lights Installation Guide, non-oem switch
09-10-13, 11:41 AM
#1
As requested by those who wants to install fog lights in their F Sports using a generic switch. This is a really fun weekend project and I think you'll enjoy it as well.
MATERIALS NEEDED:
1. Toyota fog lights (2) PN 81210-0D042* (R) and 81220-0D042* (L)
*Ok to use 41, and 40 (last 2 digits) part numbers. Toyota uses these same fog lights in many of their cars. They update their parts number every few years even though it's the same part.


2. Screws to secure fog lights to bumper PN 93567-A5014. You will need four (4).
3. F Sport JDM fog light bezels (2) I don't have the PN for these JDM (Lexus Japan) parts.
I got mine from Nigel JDM Parts.
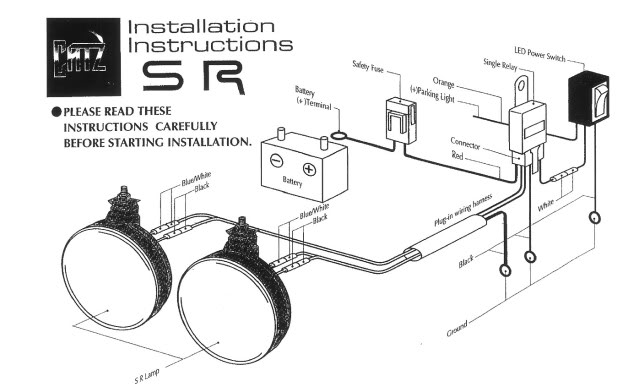
4. A high quality fog light harness and switch. I got these on fleabay (search title below). I like the harness but I ended up not using the switch. I liked the push button one better, just personal preference.
WIRING HARNESS 4 CATZ HELLA PIAA BOSCH KC FOG LIGHTS
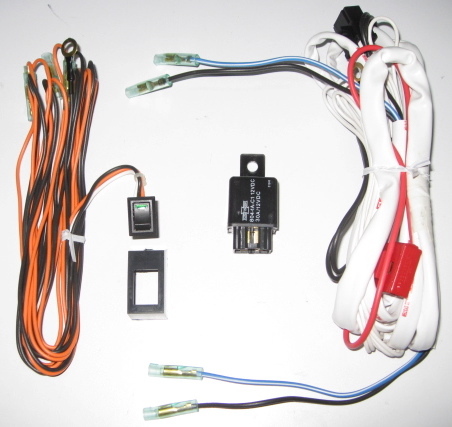
5. Optional switch. I didn't like the switch above so I purchased a PIAA push button switch. It is a push button and allows you to stick it any where you want without drilling a hole.
PIAA Single Push Button LED Switch, PN 30034

6. Putco 230008HD Premium Automotive Lighting Wiring Standard Harness (for H11 fog light bulbs)
I'll post the rest of the instructions later when I get a chance.
MATERIALS NEEDED:
1. Toyota fog lights (2) PN 81210-0D042* (R) and 81220-0D042* (L)
*Ok to use 41, and 40 (last 2 digits) part numbers. Toyota uses these same fog lights in many of their cars. They update their parts number every few years even though it's the same part.
2. Screws to secure fog lights to bumper PN 93567-A5014. You will need four (4).
3. F Sport JDM fog light bezels (2) I don't have the PN for these JDM (Lexus Japan) parts.
I got mine from Nigel JDM Parts.
4. A high quality fog light harness and switch. I got these on fleabay (search title below). I like the harness but I ended up not using the switch. I liked the push button one better, just personal preference.
WIRING HARNESS 4 CATZ HELLA PIAA BOSCH KC FOG LIGHTS
5. Optional switch. I didn't like the switch above so I purchased a PIAA push button switch. It is a push button and allows you to stick it any where you want without drilling a hole.
PIAA Single Push Button LED Switch, PN 30034
6. Putco 230008HD Premium Automotive Lighting Wiring Standard Harness (for H11 fog light bulbs)
I'll post the rest of the instructions later when I get a chance.
Last edited by mso4; 09-10-13 at 05:36 PM.
 09-10-13, 02:31 PM
#2
INSTRUCTIONS:
1. Disconnect the negative battery terminal.
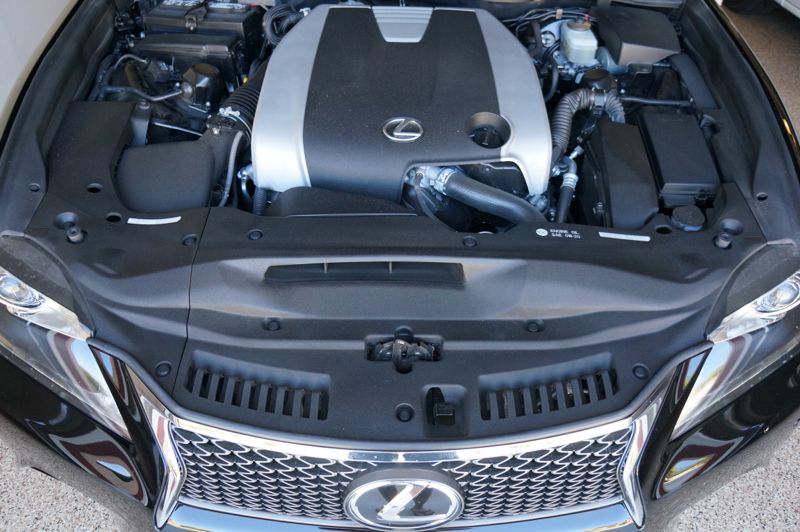
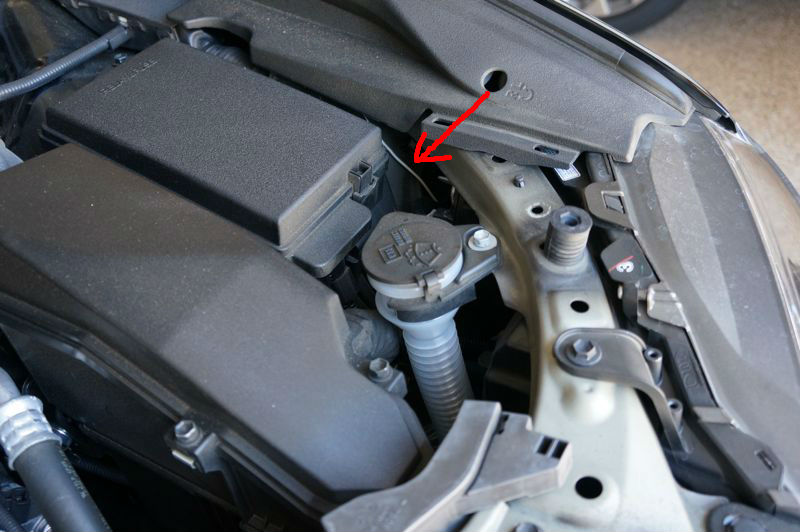
2. Locate and remove these plastic plugs (11) in order to expose the area on top of the headlights and radiator. Lift and remove the passenger headlight smaller plastic section. Then remove the larger plastic cover on top radiator.
Here the red lines indicate roughly where you will run your harness and a single trigger (parking light) wire into the cabin. Here's a quick summary don't worry I'll go more into details later:
Near the battery you will attach your harness Relay, Ground, and Positive power source. Route shorter end of harness toward front passenger fog area. Then continue the longer end of the harness across the bottom in front of the radiator toward the driver side fog. Then run the single long Trigger wire back toward the engine firewall and into the cabin to your switch. Then attach your switch ground. Finally tap the parking light power source in the cabin to your switch and you're set!
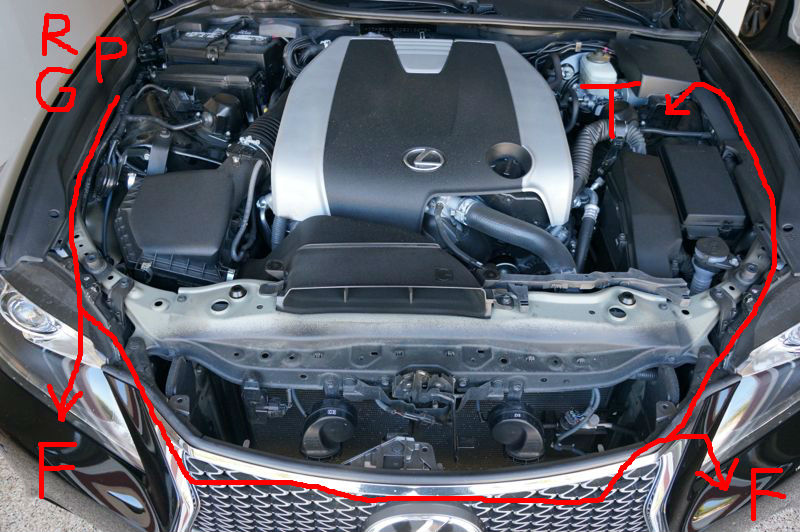
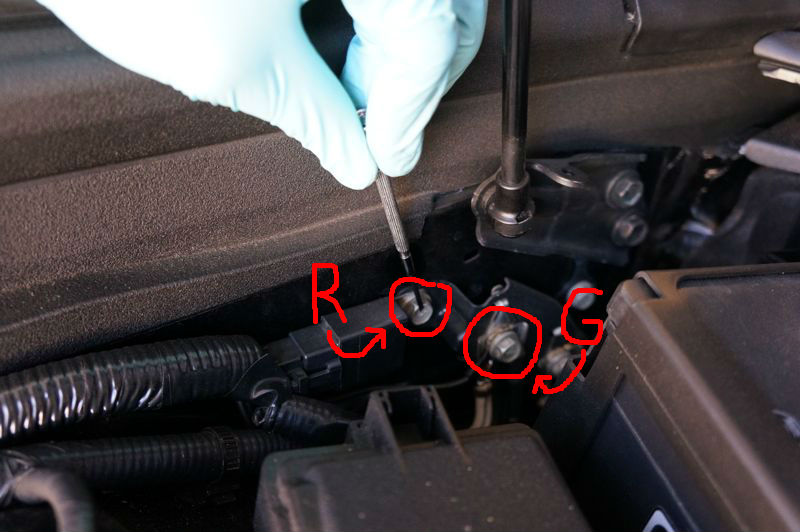
3. So here near the battery corner, unbolt a nut at R and mount your harness Relay. Below and to the right locate another bolt (G) with multiple ground wires attached. Use this to connect your harness Ground wire. At this point you can attach your harness Power wire (has an inline fuse) to the Positive battery terminal. I actually didn't do this until the last step of the fog install. Just don't forget to come back if you choose to do this.

4. Run harness down passenger side of fender. I actually wrapped the harness with black electric tape to keep an OEM look. Run shorter end of harness into passenger fog light area. I'll show you how to get access to the fog light later.
5. Now run longer part of harness in front of the radiator. You can secure the harness using double sided tape and zip tie. Continue running the longer part of the harness across the radiator to the driver fog light area. We'll come back to finish this part later.

6. At this point there should be a final single longer wire that needs to be routed into the cabin and connected to your switch. Run this Trigger wire (red arrow) up the driver side of fender toward the firewall of the engine.
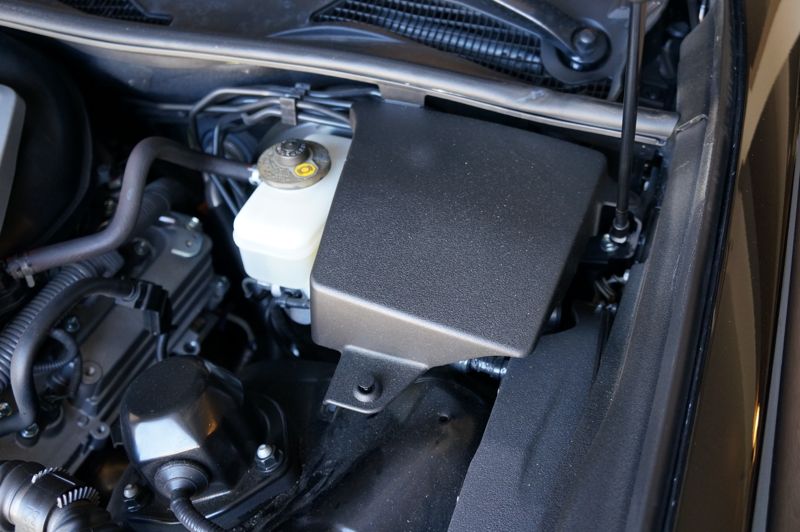
7. When you're at the engine firewall on the driver side. Remove this plastic cover. There are two different plastic clips. Remove the first one like the previous 11 clips in the beginning. The second clip in a plug in so just lift up. Finally release tab closest to firewall and lift cover out.
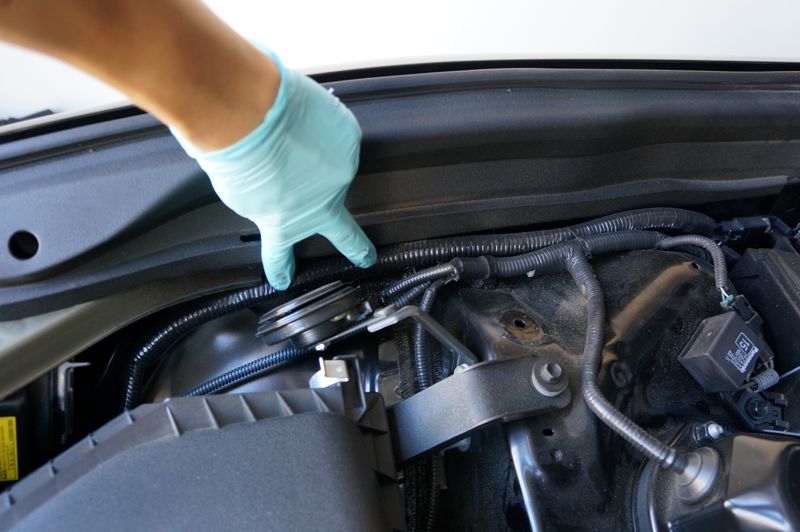
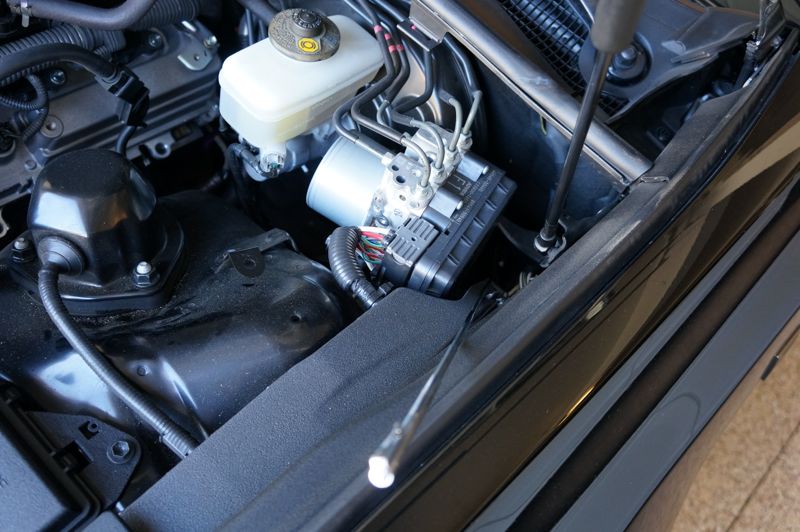
8. Now notice where this metal stick is pointing. That is where you will be looking for a rubber grommet. You want to run your Trigger wire through this and into the interior cabin. Since this is much easier if done from inside the car. The next step will show you how.

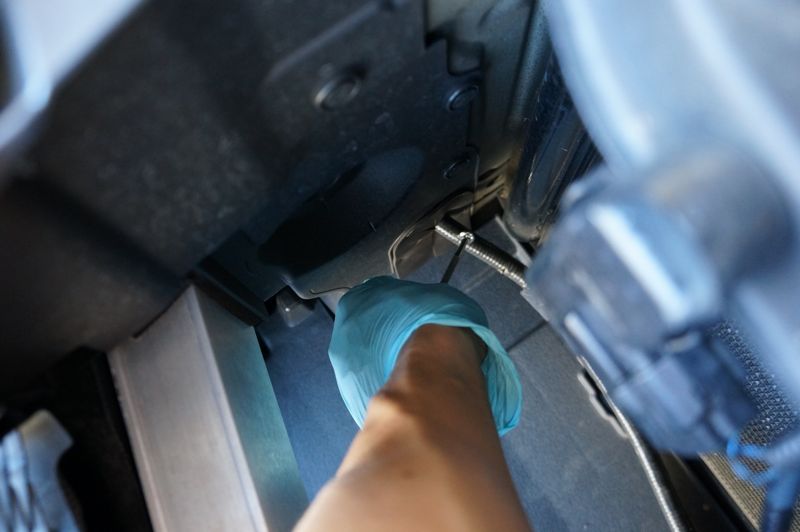
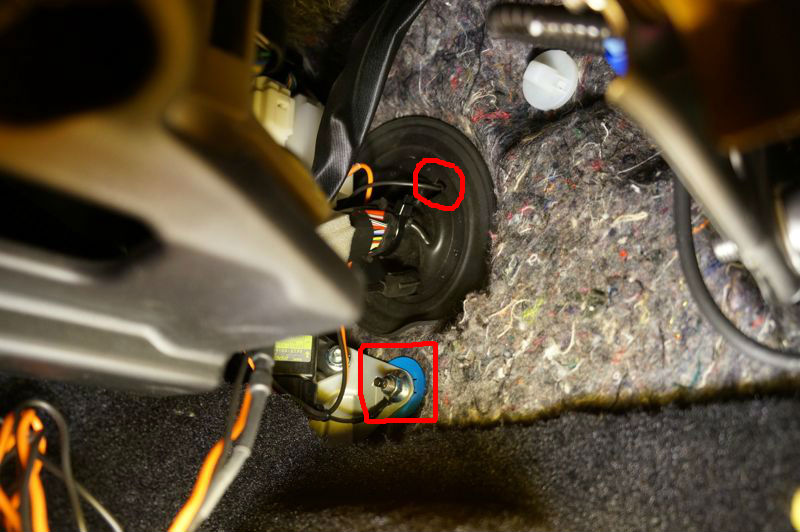
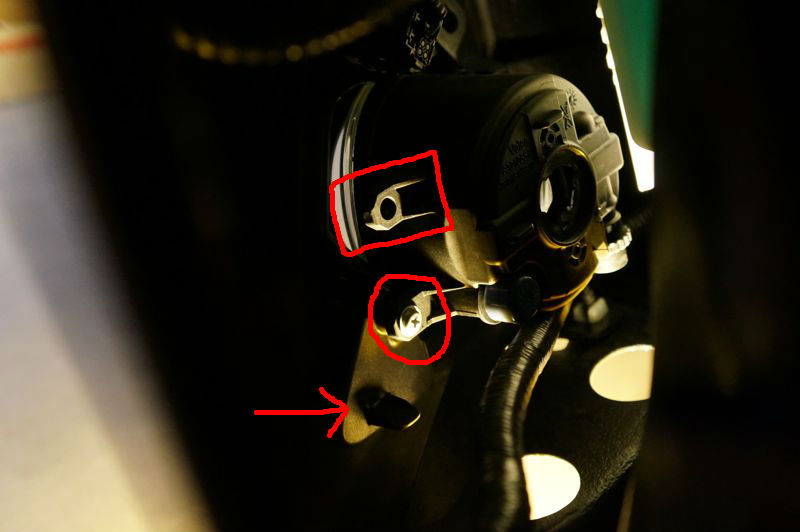
9. From inside your car on the driver side. Get down and look right above the dead pedal. You will see this black round grommet. Get something like a coat hanger and poke a hole through this area (red circle). Now go back to the engine side and try to secure your trigger wire to that hanger (probably the second most difficult part of the install). Then pull the coat hanger and Trigger wire through the rubber grommet into the cabin.
Now get your switch. It will have three connections. First is ground, second is parking light power, and we'll call the third "Trigger". Connect the Trigger wire you just pulled in from the engine to this wire.
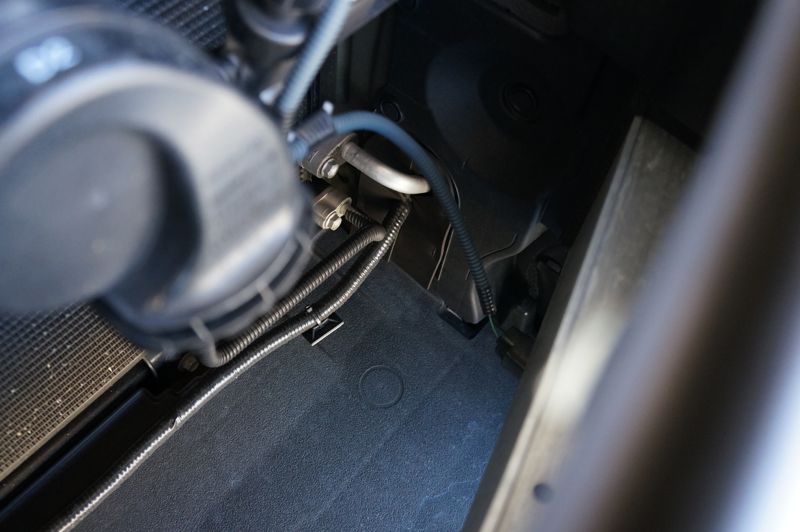
10. Under the big round grommet above you will find a good Ground point (red square). Attach your switch Ground wire here. Now you will have the last remaining parking light power source. We'll do that next.
11. To tap the parking light power source you first need to remove this plastic panel under the knee airbag sign (3 screws and 2 clips) on the driver side.
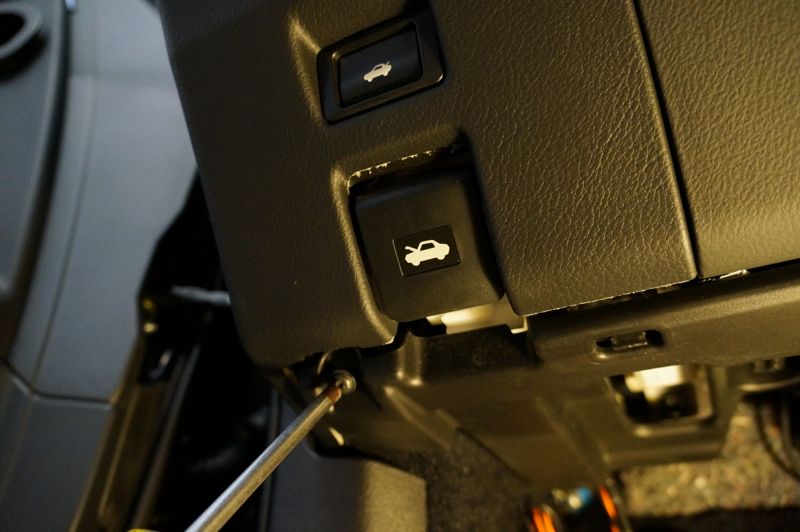
12. Locate this white harness on the driver side above dead pedal.

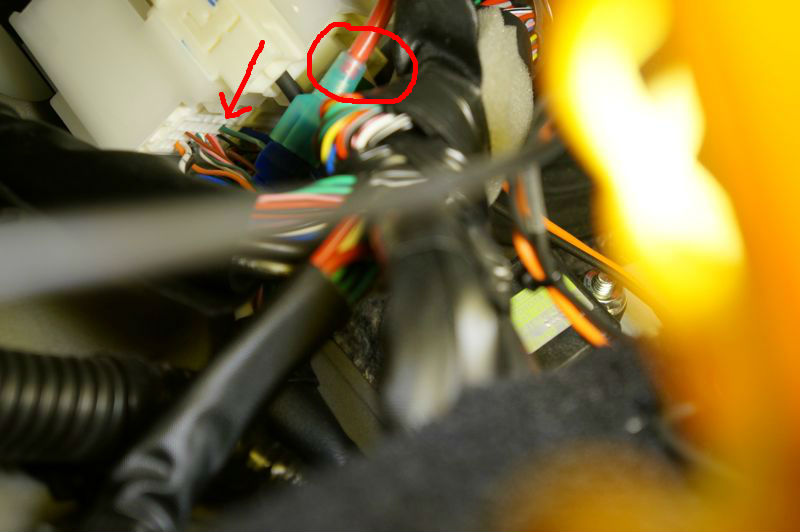
13. On the harness you need to locate this green wire (red arrow). This is the parking light power source that needs to be connected to your switch. The fog light only turns on when the parking lights are on. Here you can see the parking light wire already being tapped by red wire. This was the most difficult part of the install!
14. Now you can mount the switch where ever you like. I mounted my switch between the seat cooler buttons with double sided tapes. Some people mount them under the dash or on the dash somewhere.

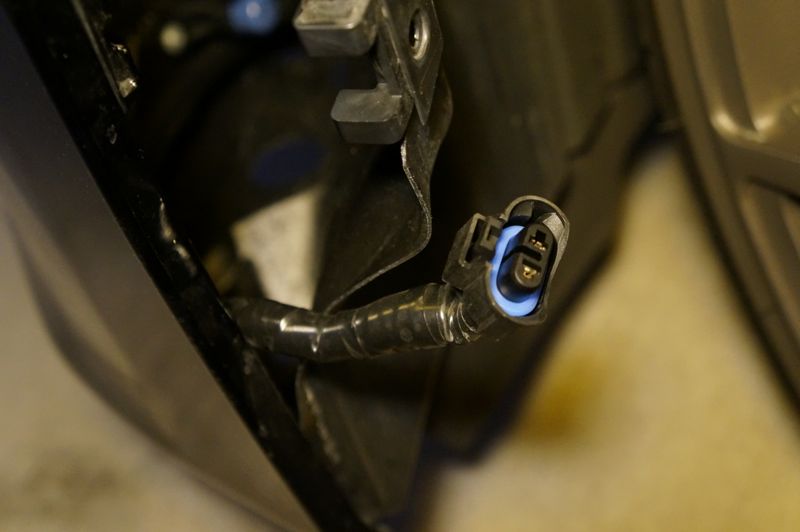
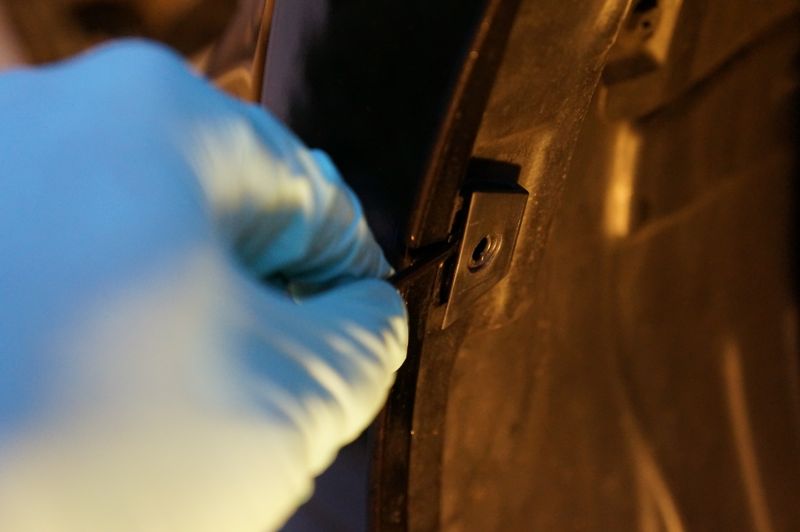
15. Now we turn your attention back to the fog light areas in the bumper. Turn the steering wheel toward one side for easier access to the wheel wells. Remove two plastic clips and one or two screws from under the bumper. Lift fender lining out of the way to route the harness/ plug and install the fog bezels and lights.

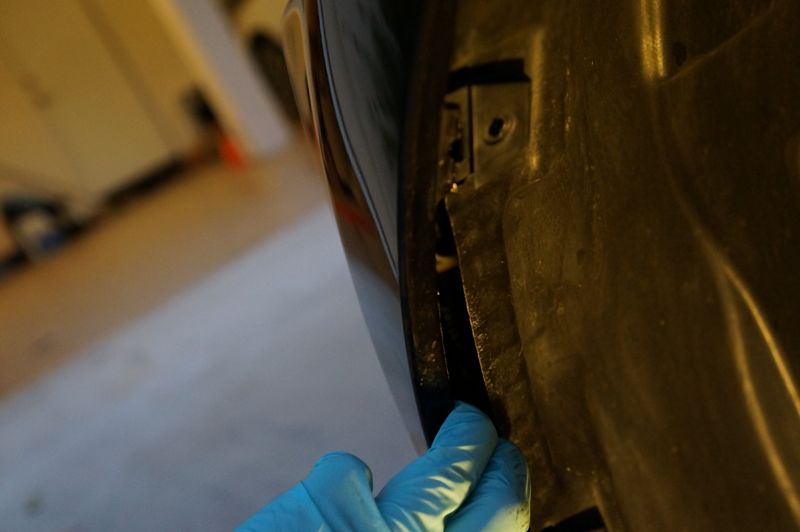
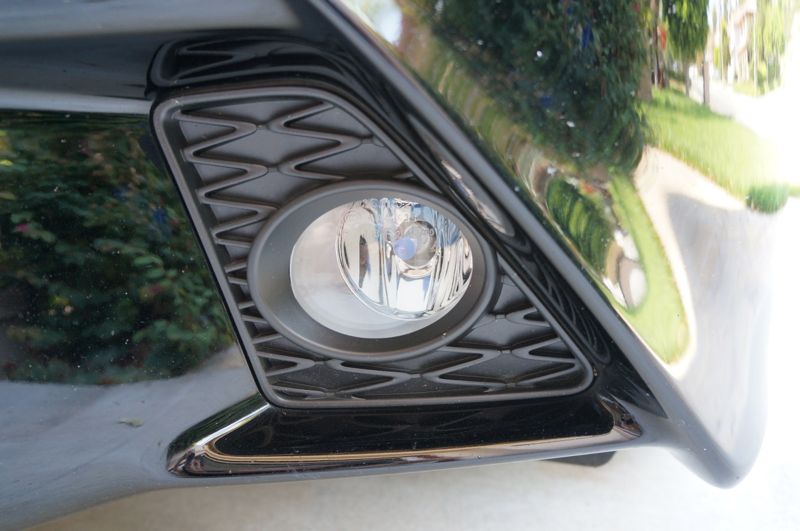
16. Here's what it should look like after removing the OEM F Sport bezel (4 clips) and install your JDM fog lights and bezels. Again you only need to screw the two bottom screws. Leave the top two taps unsecured, don't worry it's pretty tight.
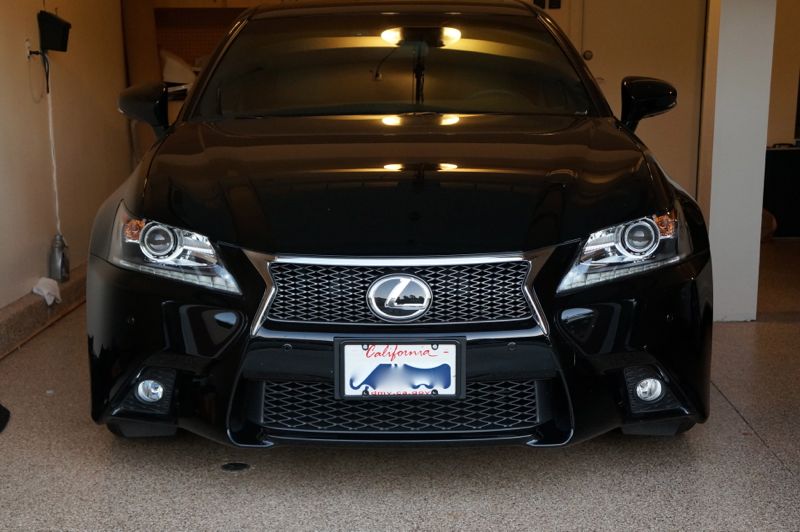
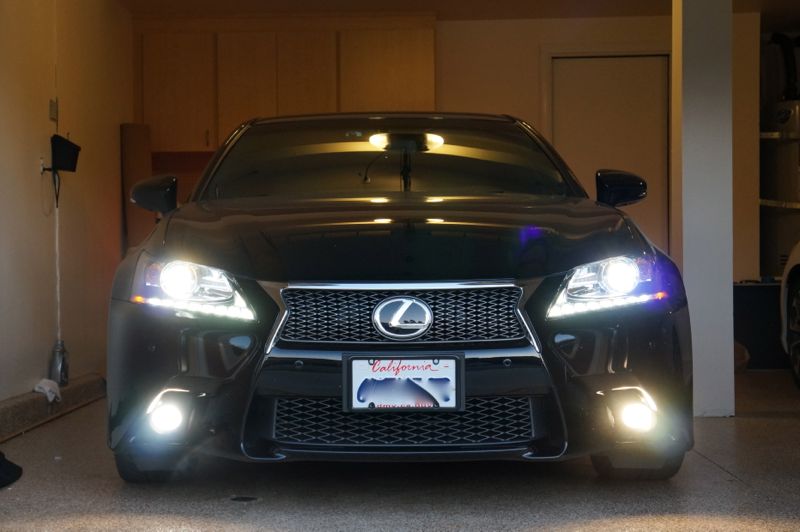
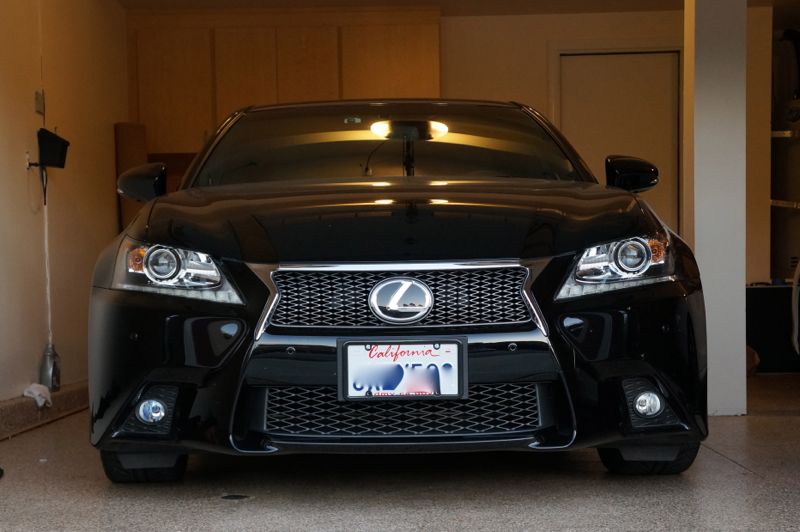
If you haven't done so attached your fused positive wire to the battery and test our your new fog lights!! They should look something like this. Don't worry I'm testing out two bulbs that's why the colors are different
1. Disconnect the negative battery terminal.
2. Locate and remove these plastic plugs (11) in order to expose the area on top of the headlights and radiator. Lift and remove the passenger headlight smaller plastic section. Then remove the larger plastic cover on top radiator.
Here the red lines indicate roughly where you will run your harness and a single trigger (parking light) wire into the cabin. Here's a quick summary don't worry I'll go more into details later:
Near the battery you will attach your harness Relay, Ground, and Positive power source. Route shorter end of harness toward front passenger fog area. Then continue the longer end of the harness across the bottom in front of the radiator toward the driver side fog. Then run the single long Trigger wire back toward the engine firewall and into the cabin to your switch. Then attach your switch ground. Finally tap the parking light power source in the cabin to your switch and you're set!
3. So here near the battery corner, unbolt a nut at R and mount your harness Relay. Below and to the right locate another bolt (G) with multiple ground wires attached. Use this to connect your harness Ground wire. At this point you can attach your harness Power wire (has an inline fuse) to the Positive battery terminal. I actually didn't do this until the last step of the fog install. Just don't forget to come back if you choose to do this.
4. Run harness down passenger side of fender. I actually wrapped the harness with black electric tape to keep an OEM look. Run shorter end of harness into passenger fog light area. I'll show you how to get access to the fog light later.
5. Now run longer part of harness in front of the radiator. You can secure the harness using double sided tape and zip tie. Continue running the longer part of the harness across the radiator to the driver fog light area. We'll come back to finish this part later.
6. At this point there should be a final single longer wire that needs to be routed into the cabin and connected to your switch. Run this Trigger wire (red arrow) up the driver side of fender toward the firewall of the engine.
7. When you're at the engine firewall on the driver side. Remove this plastic cover. There are two different plastic clips. Remove the first one like the previous 11 clips in the beginning. The second clip in a plug in so just lift up. Finally release tab closest to firewall and lift cover out.
8. Now notice where this metal stick is pointing. That is where you will be looking for a rubber grommet. You want to run your Trigger wire through this and into the interior cabin. Since this is much easier if done from inside the car. The next step will show you how.
9. From inside your car on the driver side. Get down and look right above the dead pedal. You will see this black round grommet. Get something like a coat hanger and poke a hole through this area (red circle). Now go back to the engine side and try to secure your trigger wire to that hanger (probably the second most difficult part of the install). Then pull the coat hanger and Trigger wire through the rubber grommet into the cabin.
Now get your switch. It will have three connections. First is ground, second is parking light power, and we'll call the third "Trigger". Connect the Trigger wire you just pulled in from the engine to this wire.
10. Under the big round grommet above you will find a good Ground point (red square). Attach your switch Ground wire here. Now you will have the last remaining parking light power source. We'll do that next.
11. To tap the parking light power source you first need to remove this plastic panel under the knee airbag sign (3 screws and 2 clips) on the driver side.
12. Locate this white harness on the driver side above dead pedal.
13. On the harness you need to locate this green wire (red arrow). This is the parking light power source that needs to be connected to your switch. The fog light only turns on when the parking lights are on. Here you can see the parking light wire already being tapped by red wire. This was the most difficult part of the install!
14. Now you can mount the switch where ever you like. I mounted my switch between the seat cooler buttons with double sided tapes. Some people mount them under the dash or on the dash somewhere.
15. Now we turn your attention back to the fog light areas in the bumper. Turn the steering wheel toward one side for easier access to the wheel wells. Remove two plastic clips and one or two screws from under the bumper. Lift fender lining out of the way to route the harness/ plug and install the fog bezels and lights.
16. Here's what it should look like after removing the OEM F Sport bezel (4 clips) and install your JDM fog lights and bezels. Again you only need to screw the two bottom screws. Leave the top two taps unsecured, don't worry it's pretty tight.
If you haven't done so attached your fused positive wire to the battery and test our your new fog lights!! They should look something like this. Don't worry I'm testing out two bulbs that's why the colors are different
Last edited by mso4; 09-10-13 at 05:25 PM.
The following 3 users liked this post by mso4:
09-10-13, 04:12 PM
#4
Lexus Fanatic
iTrader: (10)
Join Date: Nov 2004
Location: Under an IS F since 2008
Posts: 13,446
Received 1,058 Likes
on
586 Posts
Small correction for #3.. JDM F-Sport Covers come directly from Lexus Japan...
You will not find these on US soil in a Lexus Dealership... (well maybe in 2014)
Reference this thread for the install we did with OEM Stalk:
https://www.clublexus.com/forums/gs-...eo-inside.html
Great job on the install.. .thumbup:
~ Joe Z
You will not find these on US soil in a Lexus Dealership... (well maybe in 2014)
Reference this thread for the install we did with OEM Stalk:
https://www.clublexus.com/forums/gs-...eo-inside.html
Great job on the install.. .thumbup:
~ Joe Z
The following users liked this post:
mtucci3 (01-17-22)
09-10-13, 05:35 PM
#5
Small correction for #3.. JDM F-Sport Covers come directly from Lexus Japan...
You will not find these on US soil in a Lexus Dealership... (well maybe in 2014)
Reference this thread for the install we did with OEM Stalk:
https://www.clublexus.com/forums/gs-...eo-inside.html
Great job on the install.. .thumbup:
~ Joe Z
You will not find these on US soil in a Lexus Dealership... (well maybe in 2014)
Reference this thread for the install we did with OEM Stalk:
https://www.clublexus.com/forums/gs-...eo-inside.html
Great job on the install.. .thumbup:
~ Joe Z

 09-10-13, 05:56 PM
#7
Thank you! Very nice detailed write up!
I paid the dealer $400 to install mine, I am going to make them do it right. I am miffed that the dealer in Dallas installed one to work like OEM with dash signal and all, but my dealer said he can't.
The way mine is wired, the fog lights can be turned on at any time, high beam, low beam, DRL, no other lights... just turn the switch on the stalk and they come on.
Trending Topics
09-10-13, 06:44 PM
#8

Nice write up!
For those who want a stealthier switch install location you can use the toggle switch style and mount it inside the coin pocket as shown here with double sided tape:
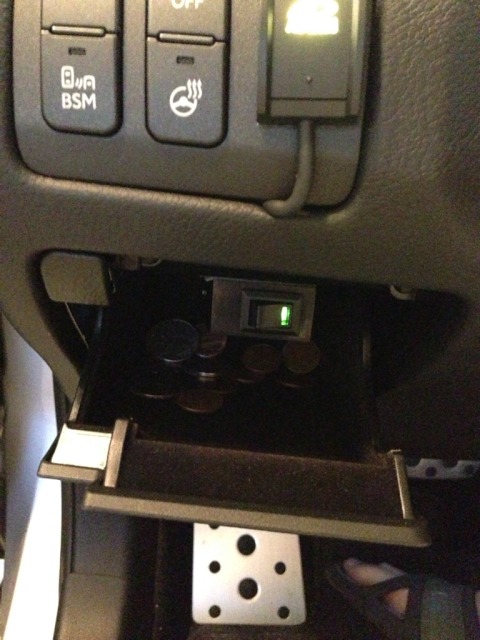
For those who want a stealthier switch install location you can use the toggle switch style and mount it inside the coin pocket as shown here with double sided tape:

The following 2 users liked this post by Allb18c:
greys0uled (09-29-22),
mtucci3 (01-17-22)

 09-14-13, 01:29 PM
#11
Thanks guys. Just giving back to a forum that's been so helpful to me with wheels and stuffs.
These are the two bulbs I'm trying out. Philips standard H9 (needs small modification to fit) and CrystalVision Ultra H11 bulbs.
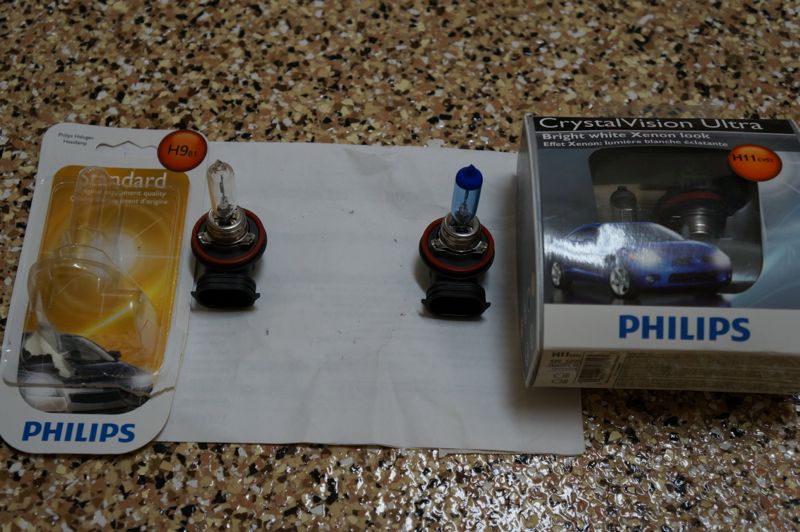
Only thing I don't like about Ultra bulb (passenger) is during the day the fog light looks blue, versus the whiter standard bulb (driver).
But at night the Ultra bulb is a perfect match to the HID headlights.

See what I mean, and much cheaper than LED bulbs.
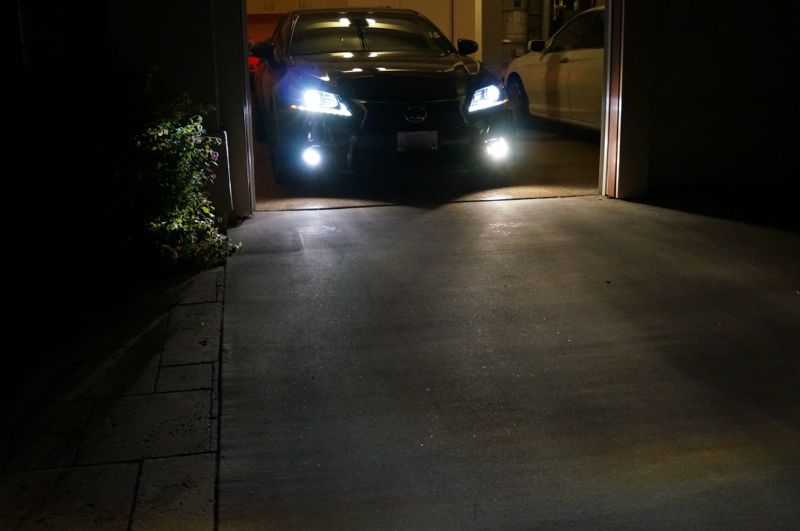
One good thing about the standard H9 bulb is that they give out more light (65W) than the H11 bulb (55W). But you do have to make a small modification to the base of the bulb to fit the H9 in the H11 socket. So if you drive in a lot of foggy conditions I would go with H9 bulbs for the most light output.
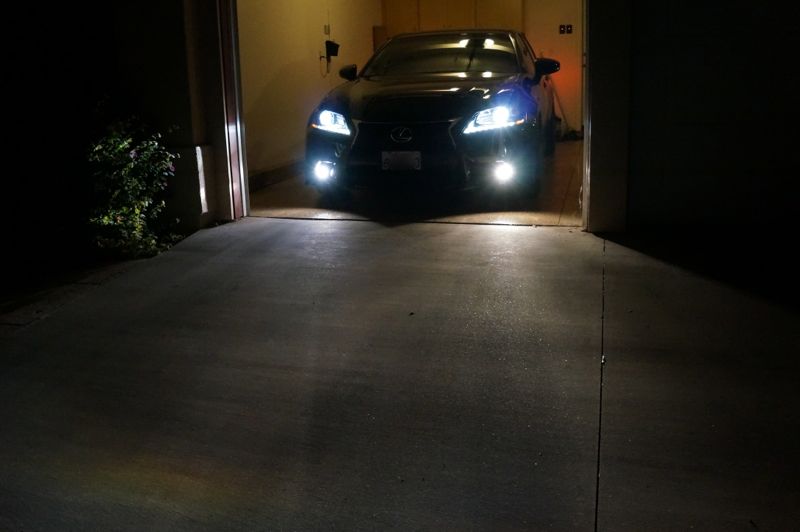
Another comment I would make is that others have tried fitting HID projectors in this housing. But that's not recommended since the heat would eventually melt the plastic housing. So for the moment, either use these bulbs or LED bulbs. Personally I would not spend over 1k for newer HID fog lights from Japan. Since I'm only using these for cosmetic reasons only.
Only thing I don't like about Ultra bulb (passenger) is during the day the fog light looks blue, versus the whiter standard bulb (driver).
But at night the Ultra bulb is a perfect match to the HID headlights.
See what I mean, and much cheaper than LED bulbs.
One good thing about the standard H9 bulb is that they give out more light (65W) than the H11 bulb (55W). But you do have to make a small modification to the base of the bulb to fit the H9 in the H11 socket. So if you drive in a lot of foggy conditions I would go with H9 bulbs for the most light output.
Another comment I would make is that others have tried fitting HID projectors in this housing. But that's not recommended since the heat would eventually melt the plastic housing. So for the moment, either use these bulbs or LED bulbs. Personally I would not spend over 1k for newer HID fog lights from Japan. Since I'm only using these for cosmetic reasons only.
Last edited by mso4; 09-14-13 at 01:34 PM.

 09-16-13, 11:49 AM
#14
Driver School Candidate
 09-16-13, 12:39 PM
#15
Driver

Join Date: Aug 2013
Location: CA
Posts: 149
Likes: 0
Received 0 Likes
on
0 Posts
Wow, no words can described how detailed the DIY. Great Job!!
I am so clueless about DIYs, so when someone can really perform DIYs on his/her own cars, I really respect them!! I wish I can inherit some of their talents.
Awesome awesome work.
I am so clueless about DIYs, so when someone can really perform DIYs on his/her own cars, I really respect them!! I wish I can inherit some of their talents.
Awesome awesome work.
