When you click on links to various merchants on this site and make a purchase, this can result in this site earning a commission. Affiliate programs and affiliations include, but are not limited to, the eBay Partner Network.
Changing Transmission Filter/Strainer ***DIY w Pics***
Good evening,
I've just crossed 150k miles and like my other vehicles, felt it was time to change the filter.
Disclaimer: Attempt at your own risk. This is the method that I found most useful and efficient – yours may differ and may not be the exact as described herein. As with any do-it-yourself project, unfamiliarity with the tools and process can be dangerous. This project should be construed as theoretical advice. I will not be held responsible for any injury due to the misuse or misunderstanding of this DIY project.
remove drain bolt to drain fluid...I drained into an empty 5qt jug. Make sure to put back drain bolt before removing pan
quarts are the markings on left. Between 2-2.5 qts came out
There are 20, 10mm bolts on tranny
Used this to remove all bolts
pic of old filter. make sure to hold pan with one arm while removing bolts with the other. Remove pan while keeping it parallel to the ground as it has fluid in it. So dont tip over.
old filter. notice it is held on by 4 10mm bolts.
pan with old fluid in it
I drained into same container which held fluid I drained initially
another .25-0.3 qts came out so ~2.75 quarts total drained from pan
clean it up with a rag....it actually wasnt too bad.
Go ahead and removed old gasket. I sprayed the entire pan with brake cleaner. actually looks pretty good. Interestingly no magnets!
view after filter removed. Note when removing filter, remove all four bolts, pry downward, but more fluid will come out of opening on filter so keep over a waste pan or you will get dooshed with fluid!
this is the top side of old filter. notice O ring - good idea to replace while you're at it
old filter wasnt too bad either
I decided to open up the rest of old filter and inspect using dremel
again, not in bad shape
New filter......add new O-ring and re-install onto transmission.....just snug the 4 10mm bolts.
i cleaned the pan with lacquer thinner (or can use acetone or ethanol) where the gasket meets the pan
First of two of the most important steps in my opinion. Use either grey or black permatex and apply a thin layer directly to pan where gasket meets the pan
do not glob it on....not a bead.....thin layer only!
like this. This serves to seal all possible gaps (especially in corners which are problem areas for leaks) and hold gasket in place while remounting to transmission.
close up
end result. now I mounted pan (see below) and let sit for two hours and let Permatex sit up before adding any fluid.
2nd important step to avoid leaks. I mounted the pan and finger tightened all bolts first (no order). Then I torqued between 65-70 in/lbs in this order (image above - basically criss-crossing). NOT ft/lbs...in/lbs! This is basically 5.5 ft lbs.....but you will need to use a 1/4" drive torque wrench.
Lastly, you can follow instructions from old thread to add fluid and do the fluid check
***As a side note, remember ~2.75 quarts came out, I added 3.5 quarts quarts total and when I removed fluid check bolt on pan, a small trickle of fluid came out for a few seconds then I was done.
Al is the man. Thanks for taking one for the team and being so detailed. Your DIY convinced me that I probably won't do this procedure or even think about it until around 200-250k miles.I will just keep changing the fluid every 75k
Al is the man. Thanks for taking one for the team and being so detailed. Your DIY convinced me that I probably won't do this procedure or even think about it until around 200-250k miles.I will just keep changing the fluid every 75k
you're welcome...and I think you are right. I was surprised how clean the old filter was. I would wait as well unless there is another reason (rusted bolt) etc the pan needs to be removed.
Thanks for the DIY.
I attempted this yesterday but snapped a pan bolt and called it quits. I'll deal with that later.
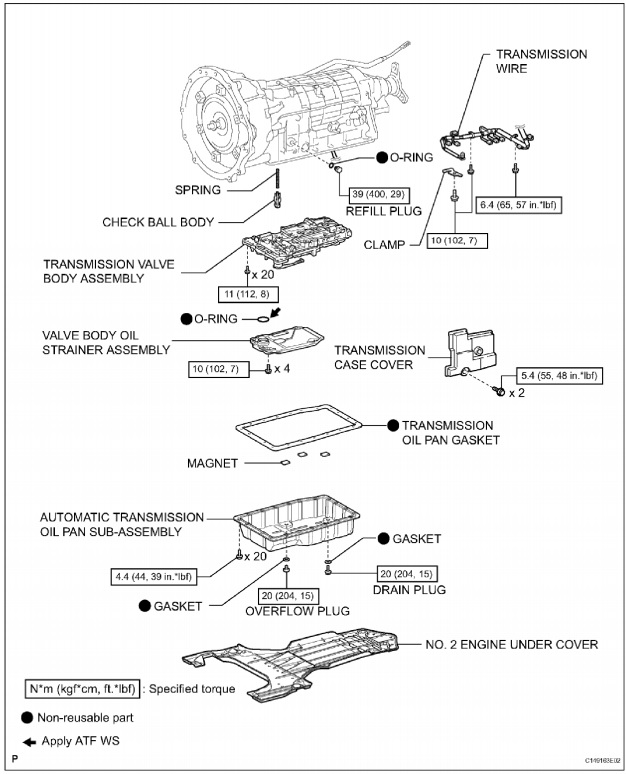
Two suggestions, according to the manual, there's supposed to be three magnets in the pan and the torque spec on the pan bolts is an amazingly low 39 in-lbs not 70!
Also, I wouldn't use permatex on the gasket, its difficult to clean off when you have to redo the gasket again, and not needed. I replaced the pan gasket and filter on my Solara and installed the gasket dry and there was no leaking.
You would have thought the filter would come with an O-ring since the manual says its an non-reuseable part.
Thanks for the DIY.
I attempted this yesterday but snapped a pan bolt and called it quits. I'll deal with that later.
Two suggestions, according to the manual, there's supposed to be three magnets in the pan and the torque spec on the pan bolts is an amazingly low 39 in-lbs not 70!
Also, I wouldn't use permatex on the gasket, its difficult to clean off when you have to redo the gasket again, and not needed. I replaced the pan gasket and filter on my Solara and installed the gasket dry and there was no leaking.
You would have thought the filter would come with an O-ring since the manual says its an non-reuseable part.
A few points...
1. I too was surprised by the lack of magnets but given how clean the pan was I was not too worried about it.
2. I saw conflicting numbers with respect to pan bolt torque. I decided to use between 60-70 in lbs at the advice of a lexus technician. And this is typically what I've used on all our other vehicles with no issues.
3. I've always used permatex with the intent that I would not have to ever drop pan again. I typically drive a car to 250k-275k, changing tranny filter at around 150k. To me, guaranteeing no leaks by using permatex is greater than the alternative result of having a leak. Removing the permatex can easily be done with dremel with wire brush attachment or similar device.
Lastly, sorry to hear about the bolt. Did that happen on removal or installation?
Thank you alchemist. I was looking at whether to replace the transmission filter in my IS250, but seeing how good your old one looked I'm not too worried now.
Great post with lots of pics! This is the only guide to replacing the transmission filter I could find.
If I do 3x drain and refill, at which point would you recommend that I change the filter? Should I do it at the first drain and fill? Or the last drain and fill?
I am leaning towards doing at the last drain and fill, which would be after I have replaced most of the fluid. Thoughts?
If I do 3x drain and refill, at which point would you recommend that I change the filter? Should I do it at the first drain and fill? Or the last drain and fill?
I am leaning towards doing at the last drain and fill, which would be after I have replaced most of the fluid. Thoughts?
I've done this on a Camry and my GS. I dropped pan and replaced filter first and then did drain & fills. Not sure how much diff it actually makes though if you do it first or last though.
For those wanting to remove more fluid per dump/refill is this; once the pan has been drained on the initial pull of the plug, keep the drain bucket under the pan and start the engine for 5 to 6 seconds. This action can get an additional 0.5 - 2.5 quarts of fluid out. Now drop the pan and filter. Continue as outlined above.
I have read that if the additional quarts are removed starting the car to not pump in all the quarts in one shot, but to do half the amount. Then start the car for a few seconds and proceed to fill up the rest....
1. I too was surprised by the lack of magnets but given how clean the pan was I was not too worried about it.
2. I saw conflicting numbers with respect to pan bolt torque. I decided to use between 60-70 in lbs at the advice of a lexus technician. And this is typically what I've used on all our other vehicles with no issues.
3. I've always used permatex with the intent that I would not have to ever drop pan again. I typically drive a car to 250k-275k, changing tranny filter at around 150k. To me, guaranteeing no leaks by using permatex is greater than the alternative result of having a leak. Removing the permatex can easily be done with dremel with wire brush attachment or similar device.
Lastly, sorry to hear about the bolt. Did that happen on removal or installation?
So last week I dropped the trans pan to replace the filter clean the pan of course after a number drain and fills the previous few weeks. Did not want to chance a flush with 130K.
Fluid was dark in the beginning but progressively got better and now after about 15 quarts put through it is a very nice color red.
Pan did have three magnets that had build up.
Here is my question, according to the drawing it shows the torque spec in 39 in lbs for the 20 trans pan bolts.
I torqued to this spec when installed and decided to check for leaks and do a re-torque one week later.
I was surprised to be able to get 1/4-1/2 turn more on each bolt. Is this due to the new gasket settling in? No leaks apparent by the way.
Now I am wondering if I should use some thread locker like blue medium strength locktite. To ensure no loosening of the bolts.
A note, that when I removed the pan initially there were some bolts that were not tight like the others.
39 pounds seems a bit high for transmission pan bolts. This is why I dont like using torque wrenches for basic stuff. But, connecting rods, head bolts etc yes.
Sounds like you stripped the bolts, thread locker will not help with damaged threads. Aluminum threads are soft, you will need to either drill them out and tap for a larger bolt, or drill them out and install helicoils that way you keep the original bolts. But helicoils take time, if you drilled for a 1 size up bolt. You can purchase speed taps, and use them on a drill.
 10-28-16, 09:56 PM