Master Cylinder - Sensor Swap?
 10-10-13, 07:29 PM
#1
Advanced
Thread Starter

The ABS/Master Cylinder went out on my '98 GS400. Got a used one from a 2003 GS300 for $700.
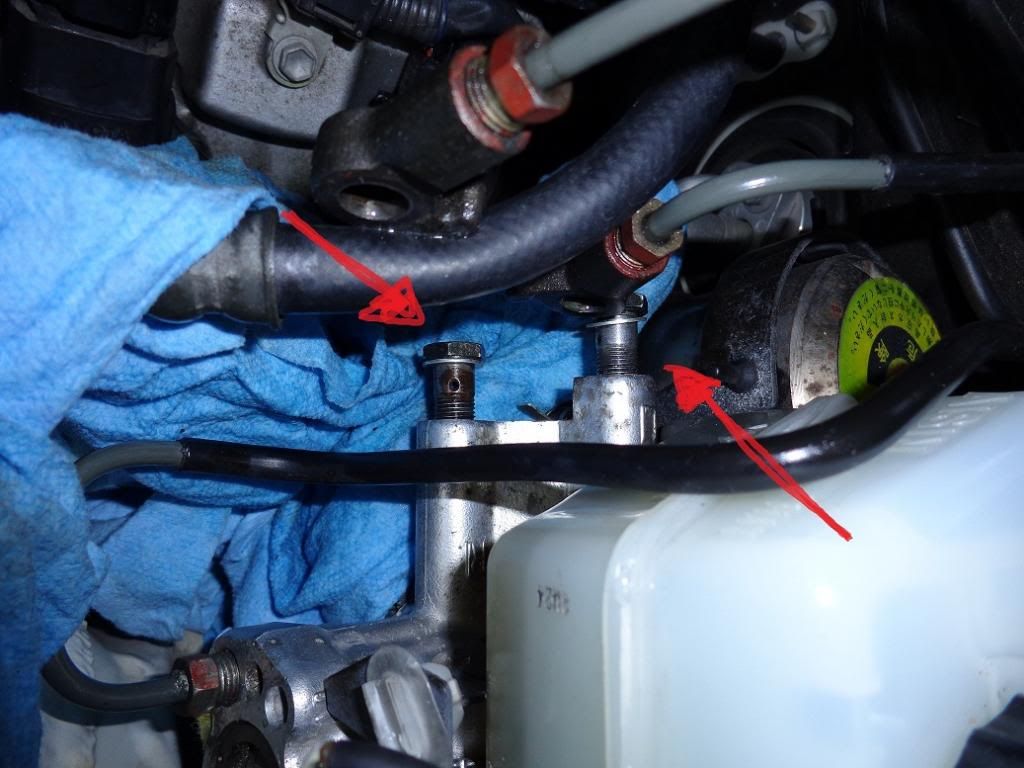
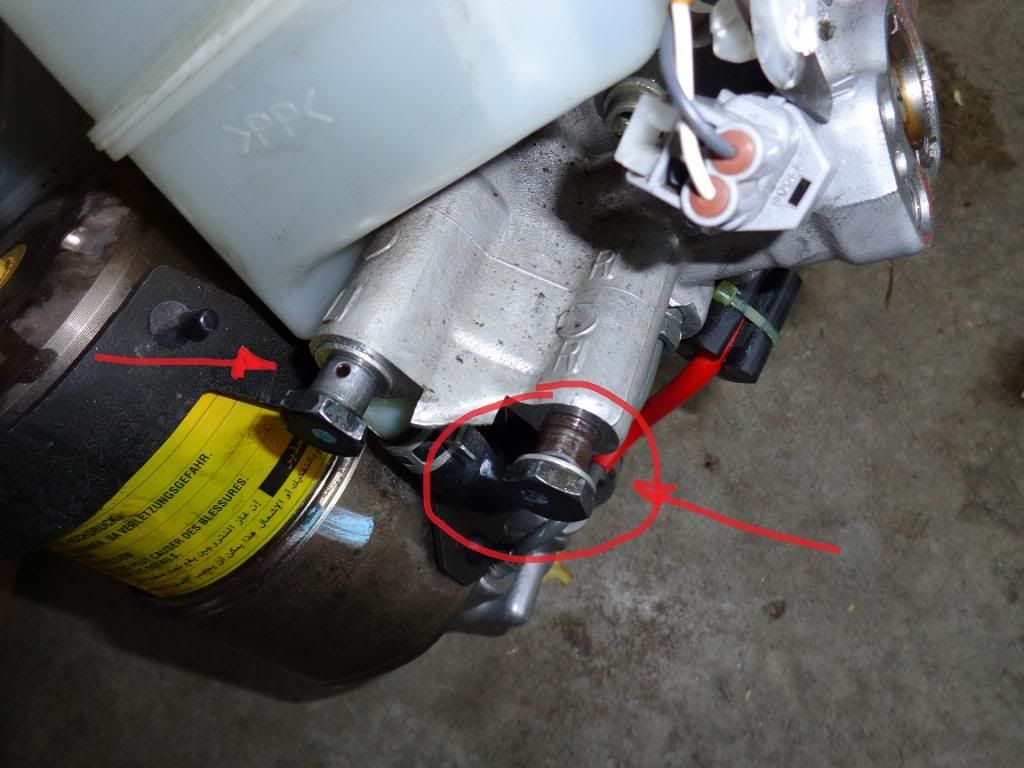
I heard that you need to swap the new sensor for the old one. Is this true?
In the pic, is this the sensor I need to replace?
Thanks
http://www.lost911.com/images/MasterCylinder.jpg
I heard that you need to swap the new sensor for the old one. Is this true?
In the pic, is this the sensor I need to replace?
Thanks
http://www.lost911.com/images/MasterCylinder.jpg

 10-14-13, 10:21 AM
#4
Driver School Candidate

Join Date: Aug 2013
Location: MD
Posts: 8
Likes: 0
Received 0 Likes
on
0 Posts
The ABS/Master Cylinder went out on my '98 GS400. Got a used one from a 2003 GS300 for $700.
I heard that you need to swap the new sensor for the old one. Is this true?
In the pic, is this the sensor I need to replace?
Thanks
http://www.lost911.com/images/MasterCylinder.jpg
I heard that you need to swap the new sensor for the old one. Is this true?
In the pic, is this the sensor I need to replace?
Thanks
http://www.lost911.com/images/MasterCylinder.jpg
I have a 98 gs 300 and will have to do the same procedure.
Also, Is there anything else I should have to do after the install?
10-14-13, 01:23 PM
#5
Driver School Candidate

Join Date: Nov 2007
Location: NJ
Posts: 16
Likes: 0
Received 0 Likes
on
0 Posts
Just get a large and deep enough socket. I just picked one up from PepBoys.
Mine were on pretty tight (both my original and the "new" sensor, that is).
Takes some muscle but it'll come off.
Nothing involved in the process is rocket science and is pretty straight forward to do.
I thought I read where some folks did the whole thing in just 20 minutes. took me just over an hour to get the old one out and the new one in. Maybe I'm just get'n old.
But the breaking improvement is night and day. Maybe I'd just gotten use to my old break's poor performance.
10-14-13, 04:54 PM
#6
Driver School Candidate
Join Date: Aug 2013
Location: MD
Posts: 8
Likes: 0
Received 0 Likes
on
0 Posts
Just get a large and deep enough socket. I just picked one up from PepBoys.
Mine were on pretty tight (both my original and the "new" sensor, that is).
Takes some muscle but it'll come off.
Nothing involved in the process is rocket science and is pretty straight forward to do.
I thought I read where some folks did the whole thing in just 20 minutes. took me just over an hour to get the old one out and the new one in. Maybe I'm just get'n old.
But the breaking improvement is night and day. Maybe I'd just gotten use to my old break's poor performance.
Mine were on pretty tight (both my original and the "new" sensor, that is).
Takes some muscle but it'll come off.
Nothing involved in the process is rocket science and is pretty straight forward to do.
I thought I read where some folks did the whole thing in just 20 minutes. took me just over an hour to get the old one out and the new one in. Maybe I'm just get'n old.
But the breaking improvement is night and day. Maybe I'd just gotten use to my old break's poor performance.
A guy said something like that in this thread >> https://www.clublexus.com/forums/sus...ster-unit.html
the poster is AMSMIKE
10-14-13, 05:04 PM
#7
You have to put the driver's seat as far back as it goes (or remove it depending on how nimble you are). Then pull the lower panel off the dash. it's a couple 10mm bolts and then some clips that unclip when you pull on it. Then with the cover off, you lay on the carpet, look up under the dash where the brake pedal connects and you can see the 4 nuts right there. If you're pulling the whole unit, you disconnect the spring to the pedal, then pull the cotter pin from the pedal pin. Then pop the pedal pin from the clevis. That'll free the pedal from the master cylinder.
Then you take the 4 nuts off. Before you do that though, it's a good idea to take off the brake lines and electrical connectors from the engine side because once the nuts are off, the unit will tend to flop. Then once you get all 4 nuts off (one's hard because there's a brace in front of it) you can go to the engine side and work the unit out.
You really want to have towels and or paper towels down under the unit because brake fluid will eat your paint.
Then re-assembly is the reverse. I haven't read how to bleed these units yet but, that's the last thing you have to do.
Trending Topics
10-15-13, 07:50 AM
#8
Driver School Candidate
Join Date: Nov 2007
Location: NJ
Posts: 16
Likes: 0
Received 0 Likes
on
0 Posts
"Nimble" is right.
Unfortunately I'd parked my car in the garage with the driver side door so close to the wall that I couldn't get in on that side. As a result, I had to do the interior work upside down. literally. head under th dash, feet hanging over the seat. Wifey was like, "...what the hell are you doing?" (lol)
Like Master Kwan said, three of the bolts are easy to get to, but the one behind the brace is a bit challenging. (I think it's more the uncomfortable body position than the bolt itself.) Just use a elbow socket to reach around that brace.
Once you get the new one in, make sure the brake arm under that dash is in the "U" bracket before you get too happy putting the four bolts back in place. I made this mistake and had to take the whole thing a loose and put it back again.
But none of this is hard. It's one of those "once you see it, you can fix it" kinda jobs.
10-15-13, 08:26 AM
#9
Having done it once, I'll bet I could have it out in under 30 minutes now. Have my flare nut wrenches handy (10 mm) my extensions and 10 and 12 mm deep well sockets and a pair of pliers to pull the cotter pin.
10-15-13, 08:58 AM
#10
Driver School Candidate
Join Date: Aug 2013
Location: MD
Posts: 8
Likes: 0
Received 0 Likes
on
0 Posts
Thanks for all of the help guys, its truly appreciated. I have never done any car work before ever besides changing tires and checking oil levels. So I am trying to gather as much info as possible to get the bmc in. The dealer wanted $2900 just for the part! I was forced to attempt this fearing the price. But I still may have to send my car to the dealership so that they can bleed the brakes. I heard that bleeding the brakes necessary after doing this job. I just found out that my 2002 GS 300 BMC will not be shipping with the bolts. So now I am in a hunt for those. Anyone have an idea where I can find the bolts that I need? A guy talks about it in a thread and he has pictures of the bolts not going all the way inside the unit. The pictures are courtesy of driver1988

10-15-13, 10:22 AM
#11
You already have them. On the old unit.
Will probably have to get it towed then. The brakes won't work at all until they're bled.
But I still may have to send my car to the dealership so that they can bleed the brakes.
10-15-13, 11:51 AM
#12
Driver School Candidate
Join Date: Nov 2007
Location: NJ
Posts: 16
Likes: 0
Received 0 Likes
on
0 Posts
Yea, I could do it in half the time now, too. Kinda like the first time driving some place new; it always seems further than it really is 
If you've never bled brakes before, then a lack of confidence is probably the thing that's most hindering you.
And I don't think I'd suggest that to be the first significant car repair to be undertaken by a nuubee
Best either to wait til you get a few good blisters under your belt or take it to a shop, as you mentioned.
10-16-13, 06:38 AM
#13
Driver School Candidate
Join Date: Aug 2013
Location: MD
Posts: 8
Likes: 0
Received 0 Likes
on
0 Posts
Thanks Guys!! I started working yesterday. I made good progress in 30 minutes. I was able to get to 3 of the 4 firewall bolts. That 4th one is very tricky. I had to stop because i was upside down working and my head started to hurt. I will be attempting to work on the 4th bolt today. I'm going to my Dad's house to see if he has a pivoting socket wrench like mcharity said. Thanks for all of the support it really helped me!!

Thread
Thread Starter
Forum
Replies
Last Post