Door Lock Acutuators DIY ???


 06-07-10, 09:42 PM
#497
Driver School Candidate

Join Date: Apr 2010
Location: ca
Posts: 21
Likes: 0
Received 0 Likes
on
0 Posts
Please check out this link, hope this will help.
http://www.youtube.com/watch?v=5VqGy...eature=related
http://www.youtube.com/watch?v=PZV4xB0806M
http://www.youtube.com/watch?v=5VqGy...eature=related
http://www.youtube.com/watch?v=PZV4xB0806M
06-07-10, 11:21 PM
#498

Please check out this link, hope this will help.
http://www.youtube.com/watch?v=5VqGy...eature=related
http://www.youtube.com/watch?v=PZV4xB0806M
http://www.youtube.com/watch?v=5VqGy...eature=related
http://www.youtube.com/watch?v=PZV4xB0806M
lol....yeah i posted those already in post # 475
here is what i posted in # 475
well said sir....also if anyone is a visual person here is a fairly good step by step video. i actually watched every second of both of them....
part 1
http://www.youtube.com/watch?v=5VqGy7_X9MM
and part 2
http://www.youtube.com/watch?v=PZV4xB0806M
i havent done something like this but if the wire loom/epoxy dont work i will be using this video
part 1
http://www.youtube.com/watch?v=5VqGy7_X9MM
and part 2
http://www.youtube.com/watch?v=PZV4xB0806M
i havent done something like this but if the wire loom/epoxy dont work i will be using this video
the guy that made those movies saved me ALOT of work.
 to him
06-16-10, 10:46 PM
to him
06-16-10, 10:46 PM
#499

Awesome DIY!
Anyone in the South bay have experience with this? I just ordered the motors and want to see if anyone would be able to help me or possibly do this install for me. I'm just really strapped for time these days. Any help would be greatly appreciated. TIA.
Anyone in the South bay have experience with this? I just ordered the motors and want to see if anyone would be able to help me or possibly do this install for me. I'm just really strapped for time these days. Any help would be greatly appreciated. TIA.
06-27-10, 05:24 PM
#500
Driver School Candidate

Join Date: Aug 2009
Location: CA
Posts: 7
Likes: 0
Received 0 Likes
on
0 Posts
Thanks to everyone who contributed to this. I was able to do my first rear door after reviewing all the info. Thought I would share a couple of tips and confirmations on the rear actuators as far as I did this.
1. Leave the window up for sure.
2. There is no need to remove or loosen the handle, in fact this looks very difficult as the far bolt would tak a special tool.
3. If you jiggle and work with the actuator, you can get is out and back in. I think it is easier to do the rear based on all I saw with the front doors.
4. I used several single edge razors and gently wedged them into the assembly casing, working around it. It actually will open quite quickly and cleanly. I agree with the guy who posted the youtube videos which are great--you don't necessarily need to glue the casing back together if you make a clean split of the housing with the razors. The two screws hold it petty snugly together.
5. Putting the actuator back in the door was easier than I thought. Once the T-screws are lined up the unit slide right into place.
6. I don't think you need to pull the cables out of the inside door handle, just unscrew the two screws on the back side of the panel and it comes out. When I tried to slide out the cable ball from the handle initially, a small piece of the holding clip (plastic) snapped off. It still holds the cable, but anymore damage and O would have to repce that assembly also.
I am posting a couple of images for the rear door, since in doing this I found none that really showed exactly where the rear actuator is and it doesn't have rods attached to it like the front doors, but more of a clip/hinge mechanism.
06-27-10, 05:34 PM
#501
Driver School Candidate
Join Date: Aug 2009
Location: CA
Posts: 7
Likes: 0
Received 0 Likes
on
0 Posts
Also I want to mention, that I could not find the gear puller in stock that was mentioned or listed, so I ordered another small one on ebay, but it was to large to work. So I went back and tried what someone else suggested earlier. Hold the old bushing in the square slot at the base of a pair of pliers, then find a small drill bit that will fit the hole and tap the spindle off. After gerrying the pliers in a vise I was able to extract the bushing in a minute. Then I used the vice to push it into place on the new motor in a few seconds. All done.
Incredible, could have never done this without all the great input here!
Incredible, could have never done this without all the great input here!
06-27-10, 05:47 PM
#502
Driver School Candidate
Join Date: Aug 2009
Location: CA
Posts: 7
Likes: 0
Received 0 Likes
on
0 Posts
Here's few rear door pics
Just showing handle latch can stay connect to cables
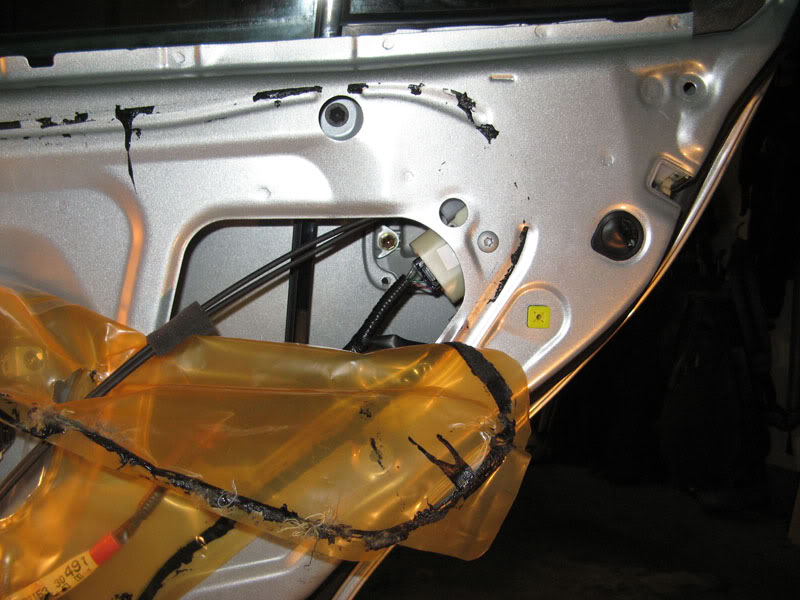
the one T-screw holds the actuator housing top right along with the 3 screws on the side of the door. Once remove you can carefully wiggle and angle the assembly out. I found that putting my fingers up behind it, you can assist getting it out by moving the actuator lever up near the handle.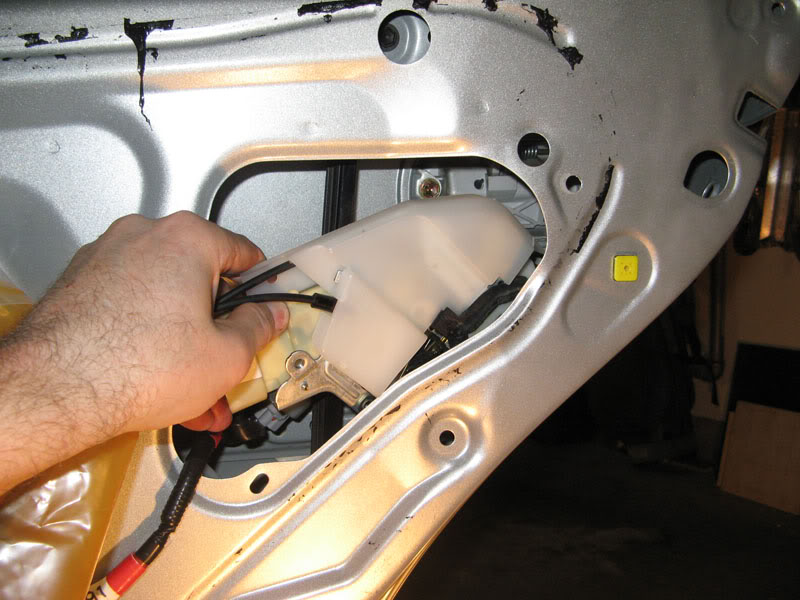
And therte it is.
Just showing handle latch can stay connect to cables
the one T-screw holds the actuator housing top right along with the 3 screws on the side of the door. Once remove you can carefully wiggle and angle the assembly out. I found that putting my fingers up behind it, you can assist getting it out by moving the actuator lever up near the handle.
And therte it is.
06-29-10, 06:54 AM
#503
looks like i'm here to join the party... the wife noticed that the driver side door wasn't locking/unlocking when using the powerlocks... i could hear it click when trying to lock/unlock, but i think it isn't enough to turn the lock... so probably dying...
just put in an order for the new motors with tag16c on ebay... will let u guys know how it works out for me...
just put in an order for the new motors with tag16c on ebay... will let u guys know how it works out for me...
06-29-10, 07:32 AM
#504
Im about to do my third actuator this week. 3 have failed so far. I failed once, and purchased a new one before we all found out that they can be replaced. This will be my second, on my car, that I will replace just the motor. $400 in savings so far. Yay.
 06-30-10, 09:29 AM
#508
Also I want to mention, that I could not find the gear puller in stock that was mentioned or listed, so I ordered another small one on ebay, but it was to large to work. So I went back and tried what someone else suggested earlier. Hold the old bushing in the square slot at the base of a pair of pliers, then find a small drill bit that will fit the hole and tap the spindle off. After gerrying the pliers in a vise I was able to extract the bushing in a minute. Then I used the vice to push it into place on the new motor in a few seconds. All done.
Incredible, could have never done this without all the great input here!
Incredible, could have never done this without all the great input here!
07-05-10, 01:48 PM
#509
Driver School Candidate

Join Date: Jul 2010
Location: CA
Posts: 4
Likes: 0
Received 0 Likes
on
0 Posts
Hello,
I am new here. I am so glad that I found you guys and post the solution for the GS door lock problem's. It has been bothering me for couple years. I have 2001 GS430 and it was a great car until the passenger side rear door weather strip got caught up at door close. See Pictures. I have to re-open and straight the weather strip and close the door again. I guess that I was doing it so often and damaged the door actuator motor and it quit to work couple years ago. The door lock still make the clicking sound but it never engage completely. I have to manually lock the rear door by hand and watch the weather strip and close the door. If the weather strip got caught again, I have to put my hand into the car from the front door, unlock the rear door and re-do the whole thing again. I am ready to use this DIY to fix this problem. My question to ask is that is this door lock problem caused by bad actuator motor? Do I need to fix my weather strip? How can I fix the weather strip? It looks just fine. Do I need to buy a new weather strip from dealer? Any other alternative choices for me? Thanks guys!
I am new here. I am so glad that I found you guys and post the solution for the GS door lock problem's. It has been bothering me for couple years. I have 2001 GS430 and it was a great car until the passenger side rear door weather strip got caught up at door close. See Pictures. I have to re-open and straight the weather strip and close the door again. I guess that I was doing it so often and damaged the door actuator motor and it quit to work couple years ago. The door lock still make the clicking sound but it never engage completely. I have to manually lock the rear door by hand and watch the weather strip and close the door. If the weather strip got caught again, I have to put my hand into the car from the front door, unlock the rear door and re-do the whole thing again.
I am ready to use this DIY to fix this problem. My question to ask is that is this door lock problem caused by bad actuator motor? Do I need to fix my weather strip? How can I fix the weather strip? It looks just fine. Do I need to buy a new weather strip from dealer? Any other alternative choices for me? Thanks guys!
07-12-10, 09:42 PM
#510
Intermediate

Does anyone know where I can get a replacement coupling? It took flight when I was removing it off of the shaft. This is for an 2001 Rx300 driver's door as pictured on the left.
Thanks...
Neil
Thanks...
Neil