When you click on links to various merchants on this site and make a purchase, this can result in this site earning a commission. Affiliate programs and affiliations include, but are not limited to, the eBay Partner Network.
MORE INSTRUCTIONAL INFO INCOMING......
Just received these goodies last night. They came assembled like this already. No assembly needed.
48 cubic in., 3,000 psi HPA (High Pressure Air) nitrogen/ compressed air tank with pressure regulated hose (Not your typical 300 psi paintball tank). It is used for you to personally refill your own paintball tanks at home. Both hose/regulator and tank are new and cost ~45$ from ebay.com .This will be used for the future recharging of my shocks. A local air compressor shop quoted me $20 to fill this tank with nitrogen. They just need for me to buy a special style of fitting that's rated at 3,000 psi in order for them to hook up their nitrogen supply tank. Considering a shock is only charged to 150 - 300psi max, and has a far smaller volume than 48cu in., this should last me a long time. Also keep in mind these type pf tanks can be used for nitrogen or compressed air, NOT CO2 (comes in liquid form. not gas)
EDIT: 7/28/15
Before reading below, there are still a few paintball shops around that still fill regular nitrogen tanks, as well as the HPA (High Pressure Air) nitrogen tanks. Please call around in your area and find a paintball shop. Let them fill the tank for you. It will only take around 5 minutes for them to prepare, setup, and fill your tank. for me it only cost $2.00 USD(not a typo mistake, yes 2 -$1 bills) for the shop to fill my tank. If you go this route, you won't have to worry about the disclaimer/ warnings typed below.
*************************THINGS NOT TO DO**********************
***DO NOT PURCHASE A SUPPLY CO2 TANK AND TRY TO REFIL WITH 3,000 PSI OF NITROGEN!!!
***CO2 SUPPLY TANKS ARE RATED FOR 1,800 PSI MAX. If you try to fill a 1,800psi CO2 tank with 3,000psi of nitrogen an explosion will occur as the CO2 tank is not rated for that pressure!!
***Also the CO2 used in recharging paintball tanks is a liquid, not a gas!! High Pressure Air (HPA) tanks are only to be filled with gas, NOT liquids!!
***Only use an HPA - high pressure air(3,000psi or even 5,000psi gaseous) tank, and high pressure equipment( same psi rating as the hpa tank) for high pressure nitrogen storage and refill.
***AND WHEN REFILLING ANY HPA TANK WITH ANY GAS (NITROGEN, ETC) DO NOT USE ANY OILS OR LUBRICANTS ON ANY INTERNAL PARTS, OR O-RINGS WHATSOEVER, AS THIS WILL IGNITE WHEN PLACED UNDER 3,000PSI OF PRESSURE....SIMILAR TO HOW A DIESEL ENGINE WORKS WITH DIESEL FUEL (FUEL [OIL-LKE SUBSTANCE] MIXED WITH HIGH PRESSURE = IGNITION/DETONATION)....SAME LOGIC.
***Every 5 years of use/shelf life, the HPA tanks need to be hydrostatic tested and re-certified that they can still handle their listed pressures and function properly.
***Do not fill these tanks with pure oxygen. The instruction sheet said NOT to do this***
close up of tank.
tank pressure dial, and 3,000 psi nitrogen inlet port.
Here is where I got the tank from. The price has gone up a little bit, the seller is still selling this combo.
This tank can be refilled at paintball shops for around $2 to $5. Just call and ask if they refill nitrogen HPA (high pressure air) tanks. a tank of this volume/size and pressure should pressure charge quite a few shock revalves.
Also keep in mind, one thing I have found is that when recharging the shock, once you have your desired amount of pressure in the shock and then close-off the tank's nitrogen output valve, I lost about 50 psi of pressure from the shock when removing the nitrogen needle from the self healing rubber-like seal. The rubber like seal takes about 1 second to reseal where the needle puncture entrance was. So when refilling my shocks with nitrogen, I added an extra 50 psi to my desired shock pressure to accommodate for this.
The shocks will be installed hopefully this week or next week, as I have just got my car back from a shoddy body shop (4 months and barely any work had been done). So I will be sanding, priming, and prepping the car for paint myself.
Sorry for the delays, and I have not forgot about making a youtube video. When it does get put up later on, please subscribe to my channel as I plan to post nothing but DIY projects from the car to the home.
Installed the shocks and I am very happy with the results! There is probably a 35% - 40% improvement over the original stock bc racing shock shim arrangement. I had the revalved shocks installed in the front only. They were installed with the 14K swift springs that were already there. I had the clicks set to +20 and +22 from the softest setting going to hard (the yellow line in the successful dyno graph).
The ride is much more supple on dips. The car goes with the dips in the road, instead of slapping down/crashing down on the freeway dips at 70mph.
Now keep in mind the original stock BC racing setup can be adjusted to be supple with the dips in the road too, but whenever I adjusted to this, it was at the exchange of losing the body roll control at the slower shock shaft speeds. So you only had 1 out of the 2 versus having a nice supple ride, with also keeping body control at the low shock shaft speeds.
Now the turn in and handling seems even more in tune with the steering input. It is like it is quite a bit more precise.
The only downfall throughout this install, is that my BC racing coil over set that was on the car was the extreme low version (short shock body), and the BC racing coilover I re-valved was the normal length shock body. So now my car in the front does not sit as low as it once did. This is not a huge issue as I plan to revalve the recently removed short shock body BC racing coilovers today, and install them on the car as well.
EDIT:
I forgot that I also have driving test video of before the install, and also after the install. I am not sure how effective it will be in conveying the "driving feel" but it was the best I could do. I will upload the video shortly.
I have received a few email and such from readers all over the world and different auto message boards(non-lexus) and I am more than happy to help. I actually enjoy helping (as long as it doesn't become overwhelming) and I believe in doing so we can all learn even more. I am no professional race team suspension expert, but I love DIY and learning by doing.
If any information in this post is not quite clear, accurate, or doesn't make sense to the reader, please ask questions (for some you must create username and become a board member) so I can better convey the point or idea. Or let me know that there is a mistake/typo so I can fix it. It is totally fine and actually would be much appreciated for I and I'm sure many others that may read this.
Just found this out from an awesome new member on here who is doing his revalve on a Mazda MX-5, that COB stands for "Compression Only Bypass". So if you are using the COB check plate and spring plate with your COB piston for a revalve, orientate the COB side so that it is working with the compression stroke. If not using the COB spring and check plate, then you can orientate it in any fashion, just be consistent on all 4 shocks.
Also for those unaware, the bilstein bleed shims are as follows:
The interesting attachment is the "Bilstein 46mm digressive build guide" pic, which among other things details bypass plate codes in the same way you have discovered:
Number of cutout holes on bleed shim.
742 = 2
743 = 4
744 = 8
Thickness of bleed shim (A1, B1, C1) C1 = .25 B1 = .20 A1 = .15
"
Within the mazdaspeed forum link this member provided, there is a Bilstein piston/shim break down for both linear and digressive pistons. This literally explains to the user how each shim controls each aspect of the shock force dyno graph, and how to adjust to obtain what you want to get.
Please view that link/thread. There is some really good info there. If anything, at least check out the Bilstein Instruction piston/shim instruction sheet. In the post he even shows how to properly orientate the "COB" piston, check plate, and spring plate.
Thank you member for your contribution to the board and clearing this up.
I think the Inside piston diameter of the bleed shims is determined by the last trailing number digit (A2, B1, C2). I could be wrong, I am not 100% sure.
A2 = 12mm Inside diameter
B1 = 8mm Inside diameter
C2 = 12mm Inside diameter
UPDATE (7/14/2015): For my second revalve, I did not use the bypass shims. Instead I used a regular shim (NO cutout holes/grooves) of the same equivalent thickness, and diameter of the bypass shim that was listed in the manual. Please see the update below.
The Bilstein valving guide info shown below is directly from "Tomas" of the Mazda speed forums in the link below. I take no credit for this info whatsoever.
For my second re-valve, I did not use the bypass shims. Instead I used a regular shim (NO cutout holes/grooves) of the same equivalent thickness, and diameter of the bypass shim that was listed in the manual. I have been driving on this for a while now, and with this setup I would feel some of the small bumps/dips in the road, but it is still different than the stock BC BR racing shock. The car wheels rolled with the road undulations just in a firm way...its as if the wheel never left the road (slow [20mph] to moderate speeds[55mph] on 0.5 inch to 2 inch bumps/dips). Yes, there was transmissibility of the bumps into the cabin, but it really was more of a firm-pleasant feeling [like you know exactly what the wheels are doing on the road]. At any speed higher than +75mph, it is a nice smooth and firm drive. At this speed you feel the road irregularities far less than in the lower speed range, due to the digressive blow-off. But yet still maintaining that quick instant steering response.
This is nothing like a dropping of the car/wheel smacking down on the pavement after passing the "crest" of a road bump[due to excessively high rebound rates -jacking down]. But at the lower speed range the car rolled with the road. Keep in mind I have 14kg/mm swift springs in the front [Natural frequency of 1.64Hz]. If I had installed my 10kg/mm [Natural Frequency of 1.38Hz] springs I feel that the same can be achieved but the transmissibility would be even more softer/pleasant (I would adjust of the BC racing BR **** if needed). I am just afraid that I may lose my steering's instant turn-in response, so I am hesitant to downgrade to lower strength springs.
I have the front set at 12 clicks from softest setting (please see the successful dyno graph of the 2nd re-valve - post #19) going towards the hard setting. I love it! I have only done the front with this digressive arrangement and it feels great! The rear of the car still has the stock BC racing BR shocks with their linear profile, but with a 6kg/mm swift spring instead of the original 8kg/mm spring. So the recoil response is slower/softer. I know it would make sense to change the rears to a digressive arrangement like the front, but I am really digging this ride to be honest. I drive this old car over the newer car every chance I get. Eventually I may change the rears after some more driving time, but I am not sure at this present moment.
Originally the rear had 12kg/mm which gave a natural frequency of ~2.2Hz. This is very high for a regular road car on poorly paved, pot hole ridden city streets. And when the BC BR shock adjustment kno_b was turned for the purpose of maximum body roll control, the rear felt planted and awesome in every turn, but I hated every road bump with a passion. Not to mention speed bumps gave the jacking down effect where rear of car instantly drops/slaps the ground after going over the "crest" of bump. After a while, I started to develop lower back pains.
1st OBSERVATION:
For my 3rd re-valve(on BC BR extreme low dampers [2 to 3 inches shorter shock body]) I decided to follow the bilstein manual and use the bleed shims just as indicated. Unfortunately, the bleed shim I needed (2 cutout holes) I did not have. I had bleed shim with 4 cutout holes, and the correct thickness/diameter. I used it anyway. To add to the frustration and to make a long story short I also got distracted for a bit of time and when I got back to working on the 2nd shock, I forgot to pressurize the shock with nitrogen (sigh..silly mistake). Either way the front end of the car was seriously under-damped overall.
So it was a bit tougher to give an exact rating on this arrangement, but with the small dips, and bumps(under 0.5 inches at 35 to 45mph) in the road they were nearly not felt. The transmissibility of road bumps/dips was drastically reduced and almost non-existent. The instant steering response turn-in/input was reduced a bit as a result of the extra shock bleed, but it was not bad or horrible. I attribute this to the 14kg/mm springs (783 lb/in) and the front being too low(not to my liking). The stock front lexus springs are around ~340lb/in. so the 14kg/mm has a higher resistance to compression. And I believe this is why the excess bleed did not affect turn-in in a huge way.
. (7/25/15 - EDIT: After some more though, I now think the turn in body lean was not horridly bad because the car may have been so low that at turn in, the frame was on the upper A-Arms / control arms. I did not like this ride height, as I set the coilover height way to low by guessing the height during installation)
.
There still was a noticeable difference enough that I still prefer no bleed shims, but it was not really bad. I cannot comment for any bump over 0.5" as one of the shocks was not really pressurized. So any bump over 0.5 in. or smaller bumps at +45mph speeds made the front end grossly oscillate up and down a few times. Like a Cadillac, or a large statesman car with blown shocks in the front. There was a serious lack of damping force.
Please learn form my mistakes and take your time when re-valving your shocks. If you have a bad memory like I do, try not to get distracted and tell those distracting you to wait. Or you will be pi$$ed after putting everything together.
2nd OBSERVATION:
A second observation I thought about, was do I really need the bleed shim? This is considering the BC racing BR shock already has an adjustable bleed by using the kno_b adjustment. For me I felt this adjustable bleed was more than adequate. Just by looking at the 2nd re-valve dyno graph, There is a more than adequate range of adjustments depending on what you are trying to achieve. Granted, if I was going to keep the adjustment bleed kno_b closed(which is like a non adjustable shock [set it to full hard]), and never use the clicker/kno_b, then I would follow the bilstein manual and add the bleed shim.
I feel by adding the bleed shim with the adjustment kno_b, it is doubling up on bleed which is not necessary in most cases. In some cases you may need extreme amounts of bleed at low shaft speeds to give you exceptionally low shock forces in this range, but yet still maintain high shock forces at moderate to high shaft speeds. If this is you and the BC BR adjustment kno_b is not enough, then you may need the extra bleed given by the bleed shim.
For my goals of a "98%-sport driven daily driver, 2%-ready for the track if needed car" I did not need this.
Also, keep in mind, I believe the bilstein valving manual was initially put together for the main focus of non-adjustable shocks. So in that case, I can see the importance of having the bleed, because you do not have an adjustable bleed kno_b like the BC racing BR shocks have. But since I have the adjustment kno_b, I am not too worried about the bleed shims.
I currently have swapped in the 2nd revalve shocks and the ride is back to how I like it. I will revalve the shocks from this 3rd revalve to match the 2nd revalve shim arrangement(no bleed) and place these on the rear sometime in the future. I have a total of 6 spare shocks off of the car and 4 shocks on the car.
3rd OBSERVATION:
With this suspension setup, the car definitely has way more traction. So much so that my traction control acts in a manner I have never seen. In the past on long, curved freeway on-ramps, when taking the car to limits of grip and traction the car would drive through as I periodically blip the throttle to maintain speed through the turn.
After the suspension mod, I can now go darn near full throttle through almost the whole the turn, but as I get right at the "cusp" of maximum grip, something funny happens now. Some weird "grumbling" / noise is coming from the back end. It seems like it is coming from the rear differential area but I am not sure. My differential is stock, so I will have to see if this is the reason. But other than that, all is well and I really enjoy the setup. Granted, I still need an alignment.
EDIT - 10/24/15: I now believe the grumbling/power loss at edge of maximum tire grip, in the hard turns, came from the rear shocks being set too soft. This allowed for excessive body roll to the point of the one tire practically lifting up and losing traction. Once this occurred the rear differential could not maintain its normal operation, because I do not have a limited slip differential or torsen LSD. And the grumbling/instant power loss was the result.
So as a rundown, the front and rear shocks are set with the same shock shim profile, and psi pressures. Keep in mind the fronts shocks are the short shock body length, and the rears are the normal "long" body length.
Softest Koni bump stop I could find. This is way more softer/pleasant the the stock BC racing bump stop. The Koni part no is 7234480000 . The Inside diameter cutout of the bump stop is 14mm. the BC racing BR coilover shaft diameter is 12mm, but it fits just fine.
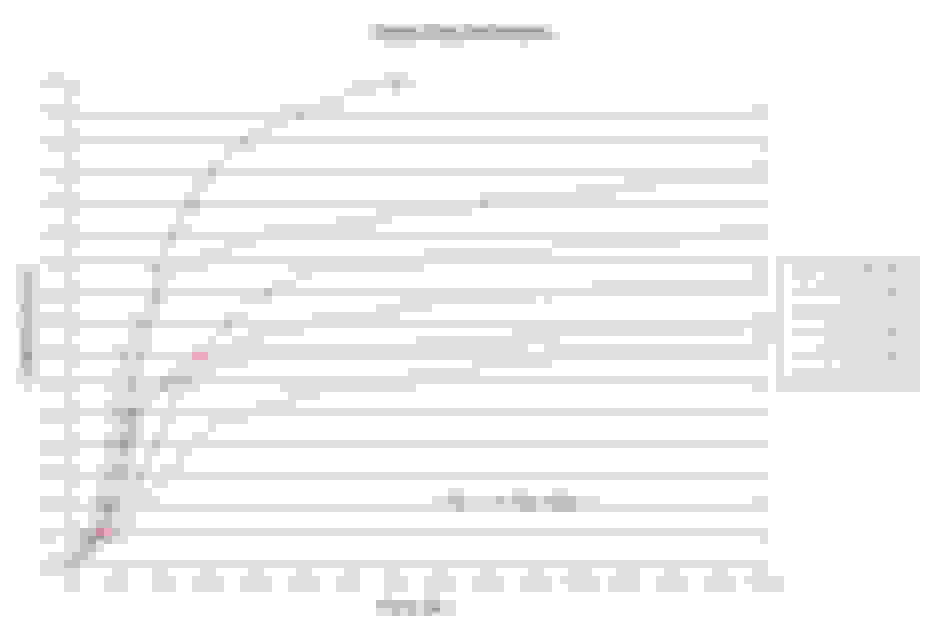
This is a picture of the koni bump stops and their respective forces vs compression (in inches) chart. The koni bump stop #7234480000 seems to absorb the most force out of all of them. Therefore, when bottoming out, the force from the road bumps is absorbed instead of transferred to the chassis/ car cabin. These bump stops cost me a little under $80 for all 4 of them shipped. Summit racing sells them online also. This image was taken from koni racing.com (http://www.koniracing.com/bumpstops.cfm)
BC Racing BR "Regular Shock" vs "Extreme Low shock" height comparison.
Koni bump stop inside of shock dust boot
Koni bump stop inside of shock dust boot. I currently have trimmed the excess off of the dust boot from the bottom so only the Koni bump stop can fit inside of it perfectly.
3rd revalve shock piston/shim stack. Metal piston band used in this re-valve. On the 2nd revalve, I used the black bilstein Teflon piston band.
3rd re-valve shock piston/shim stack. Metal piston band used in this re-valve. On the 2nd revalve, I used the black bilstein Teflon piston band.
3rd revalve shock piston/shim stack. If you look closely, you can see where the bleed shim is by looking at the cut-out part of the shim.
3rd revalve shock piston/shim stack. If you look closely, you can see where the bleed shim is by looking at the cut-out part of the shim.
Thanks Jennie. I appreciate your kind words. If more comes up I will definitely add it.
I have a few more Auto, Home, and electronic ideas, and inventions [maybe I will post the inventions ] I may post up on the clublexus as well my youtube channel/blog I'm trying to get going.
In a weird way, for me the clublexus message boards serve as an automotive journal which I can share my thoughts with the masses. It also comes with the added benefit of other enthusiasts chiming in on this "journal" to give insight from a different perspective. It is a really cool concept when you think of it this way.
As soon as the channel/blog is up I will post it here and I plan to direct the viewers to the cool posts that exist on clublexus.com .
This message board has helped me numerous times over the last 7-8 years when major car issues arose, and I had no clue where to start or which "honest" mechanic to turn to. So I am more than happy to give back and help out. I am excited to see that this post alone has helped diy auto-enthusiasts around the world.
I have been speaking with a truck shock absorber engineer and he agrees a lot less bleed is needed with bypass through the shaft, it makes sense really.
It sounds like you nailed the valving if you are happy with the ride with adjustment set near the middle.
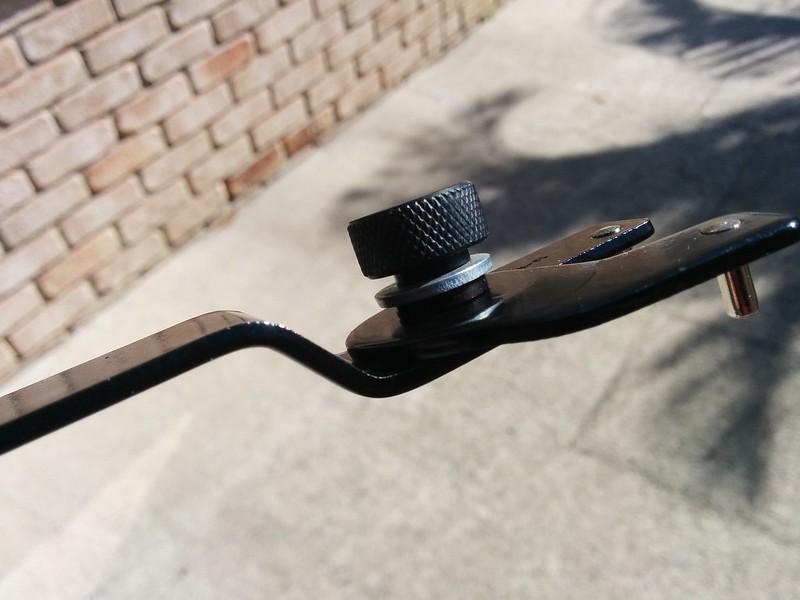
I'd like to add that it's worth buying a good quality pin wrench. I tried to use an angle grinder tool, and even with the washer added to shim it, it was too flimsy to reliably work:
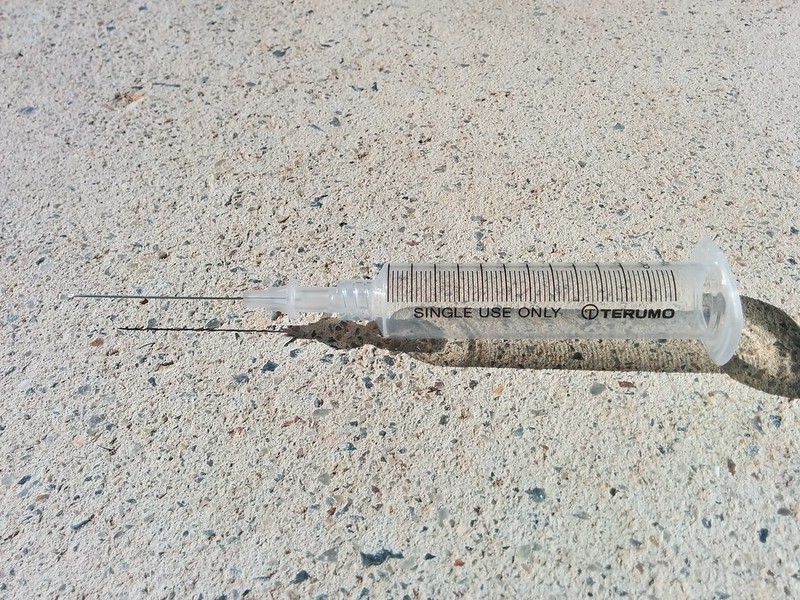
This is my budget nitrogen vent tool which comprises of a 22 gauge needle and a syringe with the piston removed:


 03-10-15, 07:57 AM


 ] I may post up on the clublexus as well my youtube channel/blog I'm trying to get going.