Instructions for front suspension installation
 04-10-07, 12:59 AM
#1
Pole Position
Thread Starter

Join Date: Feb 2007
Location: CA
Posts: 208
Likes: 0
Received 0 Likes
on
0 Posts
I changed my stock front springs and shocks last month to KYB shocks and RSR springs. Following the Lexus service manual, here are a few pictures and some notes on what I did and did NOT have to do. The final result was successful and have already put over a 1,000 miles since without issues.
1. Loosen, but do NOT remove lug nuts. Jack up the car at the front cross member and support both sides with jack stands.
Remove front wheel. Notice I used a secondary jack to support the lower control arm. I found it very helpful to carefully lower the shock/spring assembly.

2. DID NOT DO: Remove the brake caliper. The manual says to do this because when removing the upper control arm, the weight of the caliper could pull the brake line and possibly damage it.
3. Disconnect the ABS speed sensor. In reality, I just removed this part of the speed sensor so I could move the suspension without pulling it.
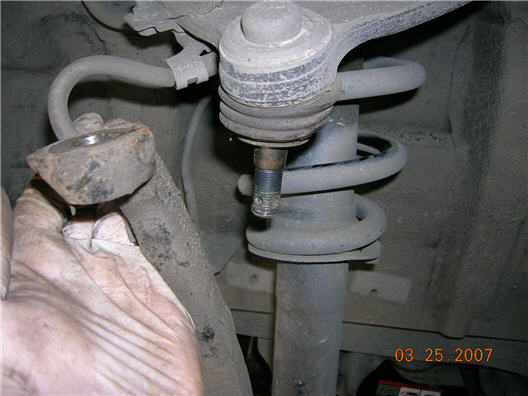
4. Disconnect upper suspension arm from steering knuckle -
Here's what I'm talking about

Pull out the castle nut clip.

Use a ratchet to remove the castle nut.
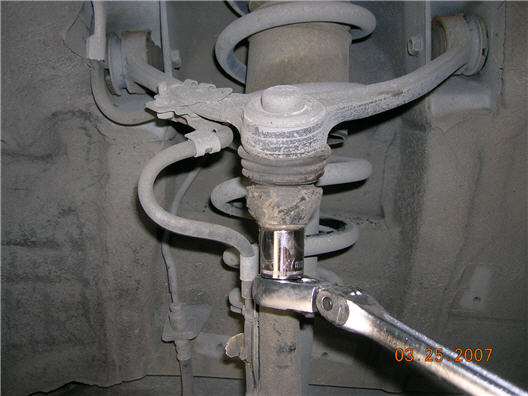
Use a Pitman Arm Puller like this (I bought from AutoZone) and tighten it until the arm pops off. This is where you have to support the suspension so that when it pops off you do not pull the brake line and possibly make it leak.

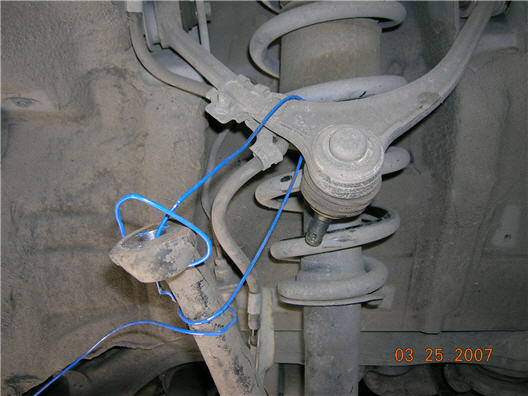
Here it is after you disconnect the arm.

Hook a coat hanger from the upper suspension arm to the steering knuckle so the lower control arm doesn't pull the brake line.
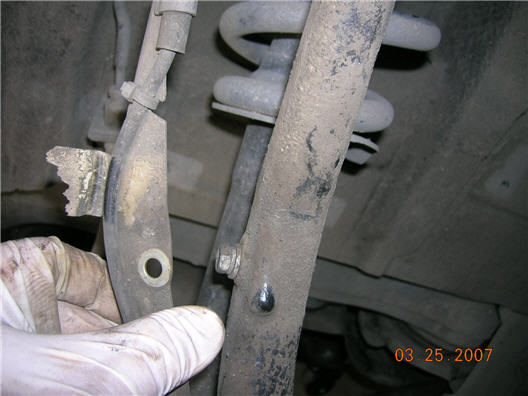
5. Disconnect Stabilizer bar from stabilizer bar link. Remove bolt and nut (although it looks like these are both bolts, one is a bolt and the other is a nut).

See next post for continuation...
1. Loosen, but do NOT remove lug nuts. Jack up the car at the front cross member and support both sides with jack stands.
Remove front wheel. Notice I used a secondary jack to support the lower control arm. I found it very helpful to carefully lower the shock/spring assembly.
2. DID NOT DO: Remove the brake caliper. The manual says to do this because when removing the upper control arm, the weight of the caliper could pull the brake line and possibly damage it.
3. Disconnect the ABS speed sensor. In reality, I just removed this part of the speed sensor so I could move the suspension without pulling it.
4. Disconnect upper suspension arm from steering knuckle -
Here's what I'm talking about
Pull out the castle nut clip.
Use a ratchet to remove the castle nut.
Use a Pitman Arm Puller like this (I bought from AutoZone) and tighten it until the arm pops off. This is where you have to support the suspension so that when it pops off you do not pull the brake line and possibly make it leak.
Here it is after you disconnect the arm.
Hook a coat hanger from the upper suspension arm to the steering knuckle so the lower control arm doesn't pull the brake line.
5. Disconnect Stabilizer bar from stabilizer bar link. Remove bolt and nut (although it looks like these are both bolts, one is a bolt and the other is a nut).
See next post for continuation...
Last edited by phollero; 04-12-07 at 10:06 PM. Reason: updated title
 04-10-07, 01:04 AM
#2
Pole Position
Thread Starter
Join Date: Feb 2007
Location: CA
Posts: 208
Likes: 0
Received 0 Likes
on
0 Posts
6. Remove the front shock absorber.
Remove the bolt and nut and disconnect the shock absorber from the lower suspension arm. This was the hardest part because that bolt is @#!$Damn tight. I ended up spraying it with penetrating oil several times and using an impact wrench.


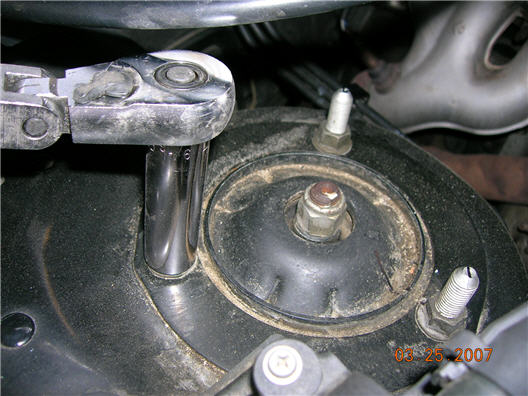
Remove the 3 nuts and shock absorber from the body.
The center nut (piston rod lock nut) should be loosened, but remove it AFTER you put the spring compressors on because it is under high tension.
I lowered the jack supporting the suspension so I could lower the arm slowly and pull the shock absorber out.


7. After you have removed the shock and spring:
Compress the spring using a spring compressor.

Unscrew the piston rod lock nut.
Remove the suspension support (aka shock mount) from the shock absorber.
Remove the insulator (boot) from the shock absorber.
Remove the rubber spring bumper from the shock absorber.
Remove the coil spring.
Remove the bolt and nut and disconnect the shock absorber from the lower suspension arm. This was the hardest part because that bolt is @#!$Damn tight. I ended up spraying it with penetrating oil several times and using an impact wrench.
Remove the 3 nuts and shock absorber from the body.
The center nut (piston rod lock nut) should be loosened, but remove it AFTER you put the spring compressors on because it is under high tension.
I lowered the jack supporting the suspension so I could lower the arm slowly and pull the shock absorber out.
7. After you have removed the shock and spring:
Compress the spring using a spring compressor.
Unscrew the piston rod lock nut.
Remove the suspension support (aka shock mount) from the shock absorber.
Remove the insulator (boot) from the shock absorber.
Remove the rubber spring bumper from the shock absorber.
Remove the coil spring.
04-10-07, 01:06 AM
#3
Pole Position
Thread Starter
Join Date: Feb 2007
Location: CA
Posts: 208
Likes: 0
Received 0 Likes
on
0 Posts
8. Reassembly:
INSTALL SPRING BUMPER TO SUSPENSION SUPPORT
INSTALL INSULATOR TO SUSPENSION SUPPORT
Make sure you match the bolt of the suspension support with the cut�out part of the insulator. Note picture from manual since I did not take a picture.

Compress the spring and INSTALL COIL SPRING TO SHOCK ABSORBER.
Fit the lower end of the coil spring into the recess of the spring
seat of the shock absorber.
INSTALL SUSPENSION SUPPORT
(a) Install the suspension support to the rod.
(b) Temporarily tighten a new lock nut.
(c) Align the suspension
lower bolt, as shown.

9. Installation: is the reverse of removal.
Left - the new spring and shock
Right - original stock spring and shock

Just note some torque specifications so you tighten correctly:
Castle nut - 64 ft lbf
Stabilizer bolt/nut - 41 ft lbf
Shock absorber lower bolt - 116 ft lbf - This mother is tight so TIGHTEN SLOWLY so you don't break the bolt!
The 3 shock mount nuts - 41 ft lbf
Piston rod lock nut - 20 ft lbf (USE THE NEW nut that comes with shock)
Some of you may wonder about how to reattach the upper control arm since you needed a pitman arm puller to pop it out: fortunately attaching it is just merely ratcheting the castle nut to the correct torque and that's all. It will lock right back in. I did end up buying new castle nuts because mine were getting stripped from overtightening. You should also buy a new clip (cotter pin) since the manual says it is should not be reused.
This is also a good time to inspect your upper ball joint for cracks in the rubber and for excessive play.

INSTALL SPRING BUMPER TO SUSPENSION SUPPORT
INSTALL INSULATOR TO SUSPENSION SUPPORT
Make sure you match the bolt of the suspension support with the cut�out part of the insulator. Note picture from manual since I did not take a picture.
Compress the spring and INSTALL COIL SPRING TO SHOCK ABSORBER.
Fit the lower end of the coil spring into the recess of the spring
seat of the shock absorber.
INSTALL SUSPENSION SUPPORT
(a) Install the suspension support to the rod.
(b) Temporarily tighten a new lock nut.
(c) Align the suspension
lower bolt, as shown.
9. Installation: is the reverse of removal.
Left - the new spring and shock
Right - original stock spring and shock
Just note some torque specifications so you tighten correctly:
Castle nut - 64 ft lbf
Stabilizer bolt/nut - 41 ft lbf
Shock absorber lower bolt - 116 ft lbf - This mother is tight so TIGHTEN SLOWLY so you don't break the bolt!
The 3 shock mount nuts - 41 ft lbf
Piston rod lock nut - 20 ft lbf (USE THE NEW nut that comes with shock)
Some of you may wonder about how to reattach the upper control arm since you needed a pitman arm puller to pop it out: fortunately attaching it is just merely ratcheting the castle nut to the correct torque and that's all. It will lock right back in. I did end up buying new castle nuts because mine were getting stripped from overtightening. You should also buy a new clip (cotter pin) since the manual says it is should not be reused.
This is also a good time to inspect your upper ball joint for cracks in the rubber and for excessive play.
04-10-07, 05:00 AM
#5
Rookie

Join Date: Nov 2003
Location: International
Posts: 70
Likes: 0
Received 0 Likes
on
0 Posts
One of the BEST write ups to removing the suspension on a GS300 i have coem accross, and i have been searching for weeks now.
phollero thank you ever so much for posting this, you dont know how much hassle it has taken out for me.
Just a question though:-
1. The center nut (piston rod lock nut)
Do you just loosen this with a ratchet as normal or do you have to use a spanner and hold the centre rod in place with something so it doesnt turn aswell?
Im sure il have one or two more questions by the time i get around to it and find not everything is going to plan!
But once again, thank you greatly for this info, much appreciated.


Trending Topics
04-10-07, 07:18 AM
#8
Pole Position
Thread Starter
Join Date: Feb 2007
Location: CA
Posts: 208
Likes: 0
Received 0 Likes
on
0 Posts
One of the BEST write ups to removing the suspension on a GS300 i have coem accross, and i have been searching for weeks now.
phollero thank you ever so much for posting this, you dont know how much hassle it has taken out for me.
Just a question though:-
1. The center nut (piston rod lock nut)
Do you just loosen this with a ratchet as normal or do you have to use a spanner and hold the centre rod in place with something so it doesnt turn aswell?
Im sure il have one or two more questions by the time i get around to it and find not everything is going to plan!
But once again, thank you greatly for this info, much appreciated.
phollero thank you ever so much for posting this, you dont know how much hassle it has taken out for me.
Just a question though:-
1. The center nut (piston rod lock nut)
Do you just loosen this with a ratchet as normal or do you have to use a spanner and hold the centre rod in place with something so it doesnt turn aswell?
Im sure il have one or two more questions by the time i get around to it and find not everything is going to plan!
But once again, thank you greatly for this info, much appreciated.
Last edited by phollero; 04-10-07 at 01:55 PM. Reason: corrected information.


 04-11-07, 10:19 AM
#12
Rookie
Join Date: Nov 2003
Location: International
Posts: 70
Likes: 0
Received 0 Likes
on
0 Posts
Come to think of it my car has just failed its MOT on the top and lower ball joints on the passenger side. DAMN IT!
Im assuming in order to get the top arm off its just a case of taking the bolts out on either side at the top, preferably when the strut assembly is out aswell?
Im assuming in order to get the top arm off its just a case of taking the bolts out on either side at the top, preferably when the strut assembly is out aswell?
04-11-07, 10:52 AM
#13
Pole Position
Thread Starter
Join Date: Feb 2007
Location: CA
Posts: 208
Likes: 0
Received 0 Likes
on
0 Posts
Come to think of it my car has just failed its MOT on the top and lower ball joints on the passenger side. DAMN IT!
Im assuming in order to get the top arm off its just a case of taking the bolts out on either side at the top, preferably when the strut assembly is out aswell?
Im assuming in order to get the top arm off its just a case of taking the bolts out on either side at the top, preferably when the strut assembly is out aswell?
04-11-07, 11:01 AM
#14
Rookie
Join Date: Nov 2003
Location: International
Posts: 70
Likes: 0
Received 0 Likes
on
0 Posts
Cheers for that bud (again)! 
Its just looking at your pics above it seems like there are 2 bushes that the 2 bolts run through, wasnt too sure what to do with them.
But like i said she failed on the ball joints on top AND bottom. But from what i can see, the bottom one is 3 nuts, pretty straight forward. Unless some one wants to tell me something different before i start?
04-11-07, 11:22 AM
#15
Pole Position
Thread Starter
Join Date: Feb 2007
Location: CA
Posts: 208
Likes: 0
Received 0 Likes
on
0 Posts
Cheers for that bud (again)!
Its just looking at your pics above it seems like there are 2 bushes that the 2 bolts run through, wasnt too sure what to do with them.
But like i said she failed on the ball joints on top AND bottom. But from what i can see, the bottom one is 3 nuts, pretty straight forward. Unless some one wants to tell me something different before i start?
The lower ball joint indeed has 3 points of attachment. 2 are plain bolts and the third is a nut connected to the tie rod. After you take out the clip and unscrew the nut connected to the tie rod, you need to use the pitman arm puller to pop the tie rod out of the ball joint. You can then remove the ball joint and its mount.