
How To: Repair your Radio Button Lights (3ES Pioneer)
 05-08-12, 06:34 PM
#1
October 19th, 2017 Update:
I created a video on how to repair the lights using Pioneer and Lexus replacement parts. Check it out.
There are really four ways to go about this.
1. Buy a repaired unit online (eBay). It can be a bit pricey, but it's lot cheaper than a new one from the dealer. Some of them even come with an integrated auxiliary support, and they're much faster to replace. You also get a working LCD, in case yours is broken, like mine.
2. Pay a repair shop to do it for you. One such shop is http://factoryradioservice.com/ The repairs can be a lot cheaper than buying a complete unit, but you do have to ship out your radio to them, which can be a real inconvenience if you need to drive the vehicle in the mean time.
3. Disassemble the radio and replace the light bulbs yourself. This is the cheapest solution, but also the most complicated one. You need to be pretty handy to get this done, and have enough spare time to pull it off. A soldering iron and some patience is required for this job.
EDIT:
4. Buy the replacement parts from Pioneer's website. This may end up being more expensive than buying a repaired radio online, but there are still a few plus sides to this method. One is that you get to keep your original radio, and two, the repair is a matter of removing a few screws and putting the new part in.
Website: http://parts.pioneerelectronics.com/
LCD Display with Backlighting: CWM4319 ($109)
Circuit Board with Lights: CWM4320 ($74.50)
Might be Temporarily Unavailable
In this tutorial, I will be going over the third option. I will not be covering the removal of the radio, since there is already a thread about it.
Prerequisite: https://www.clublexus.com/forums/es3...radio-lcd.html
In case your climate control bulbs are out as well, there is a thread for that too.
https://www.clublexus.com/forums/es3...t-problem.html
I will say this though, I found a great SST (Special Service Tool) for removing the A/C vents and the bottom trim piece. It's a Rubbermaid plastic spatula. It fits perfectly into the tight crevices and doesn't scratch the radio. Looks like this.


Now for the radio button lights, you will need to order them from http://www.mcmelectronics.com/ The part number is 25-995. Each one costs only $0.41, so I suggest that you replace all of them at once. You need 12, but I recommend buying a little more in case you mess up. I bought about 20, just to be safe.
They're not a perfect match in terms of dimensions, but they fit just fine. The original bulb is a little bit shorter. Here's a good side by side comparison. (the old is on the right).

Now for the repair.
Tools Used:

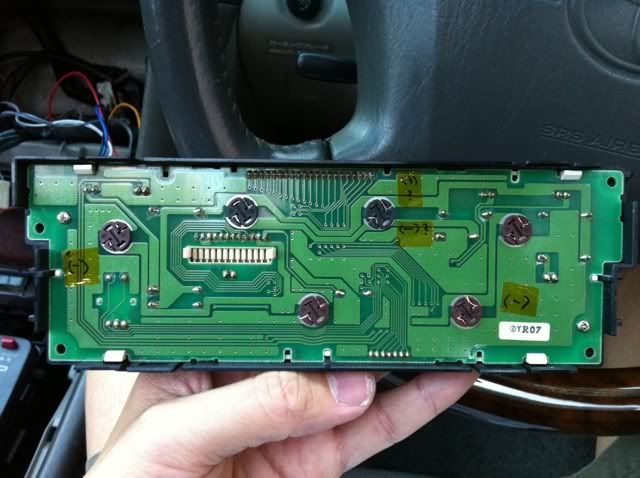
Step 1: Remove the circuit board from the radio.
Step 2: Unsolder each little light bulb with their plastic holders.
The green caps will be transferred to the new bulbs, later in the process.
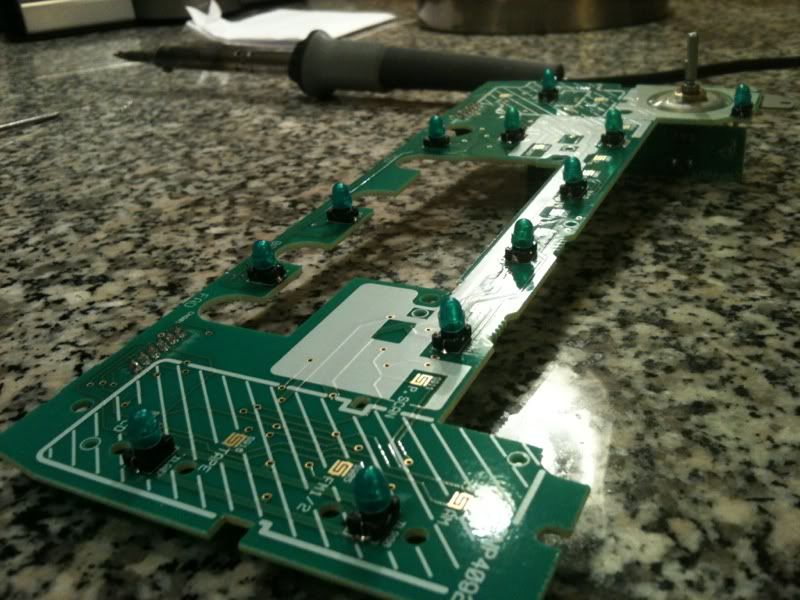
You will end up with something like this. I used some tape to hold the volume control **** from flapping around.


Old bulbs. 11 out of 12 (I did one as a test run, before doing all the other ones)

Step 3: Remove the old bulbs from the plastic holders
Step 4: Insert the new bulbs into place and bend the leads.
Don't they just look so happy?

Step 5: Trim the ends to size and bend them into place, just like the factory bulbs.
Having something sharp, like a box cutter, helps tuck the wires into place.
Bulbs are ready to go back

Step 6: Resolder the new bulbs back onto the circuit board.
Add some extra solder if you feel like the bulb is not sturdy enough.
Step 7: Replace the green caps
They won't be as flush as the original, but should still hold.
They make me think of PacMan

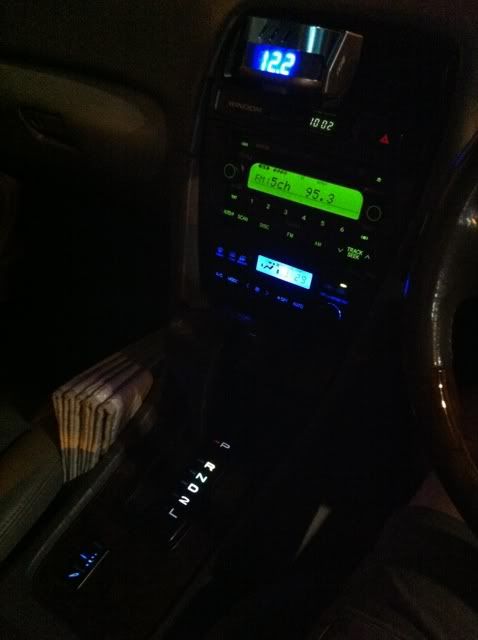
The Results:
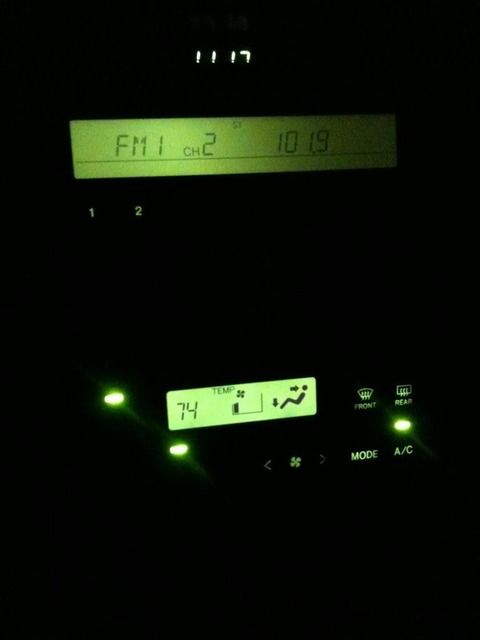
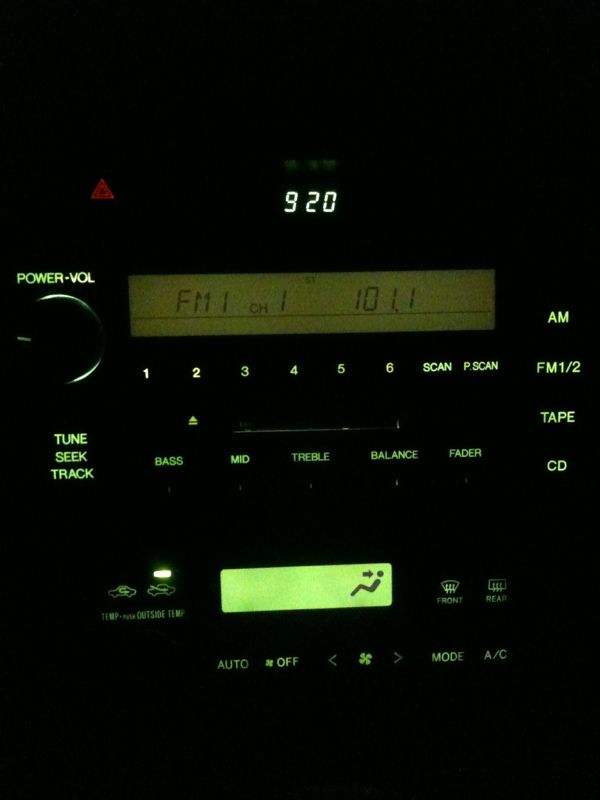
Before
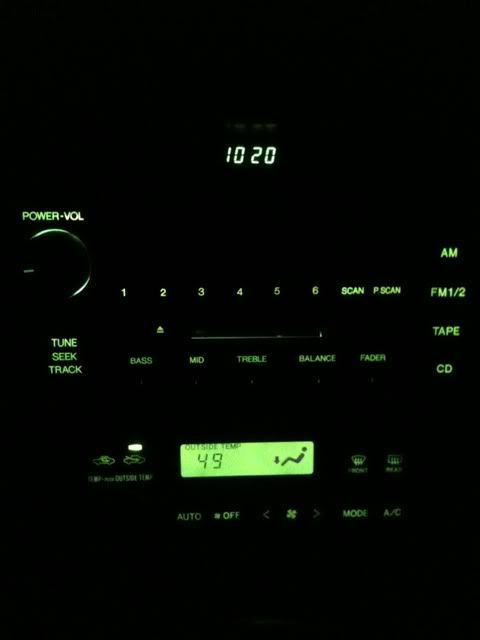
After (the LCD back light broke when I replaced the climate control bulbs)
*See post #12 for the LCD repair procedure
Hope this helps anyone in need.
Let me know if you have any questions, I will be happy to answer them.
p.s.: Thanks to sphillips for providing me with the information on where to get the replacement bulbs.
I created a video on how to repair the lights using Pioneer and Lexus replacement parts. Check it out.
There are really four ways to go about this.
1. Buy a repaired unit online (eBay). It can be a bit pricey, but it's lot cheaper than a new one from the dealer. Some of them even come with an integrated auxiliary support, and they're much faster to replace. You also get a working LCD, in case yours is broken, like mine.
2. Pay a repair shop to do it for you. One such shop is http://factoryradioservice.com/ The repairs can be a lot cheaper than buying a complete unit, but you do have to ship out your radio to them, which can be a real inconvenience if you need to drive the vehicle in the mean time.
3. Disassemble the radio and replace the light bulbs yourself. This is the cheapest solution, but also the most complicated one. You need to be pretty handy to get this done, and have enough spare time to pull it off. A soldering iron and some patience is required for this job.
EDIT:
4. Buy the replacement parts from Pioneer's website. This may end up being more expensive than buying a repaired radio online, but there are still a few plus sides to this method. One is that you get to keep your original radio, and two, the repair is a matter of removing a few screws and putting the new part in.
Website: http://parts.pioneerelectronics.com/
LCD Display with Backlighting: CWM4319 ($109)
Circuit Board with Lights: CWM4320 ($74.50)
Might be Temporarily Unavailable
In this tutorial, I will be going over the third option. I will not be covering the removal of the radio, since there is already a thread about it.
Prerequisite: https://www.clublexus.com/forums/es3...radio-lcd.html
In case your climate control bulbs are out as well, there is a thread for that too.
https://www.clublexus.com/forums/es3...t-problem.html
I will say this though, I found a great SST (Special Service Tool) for removing the A/C vents and the bottom trim piece. It's a Rubbermaid plastic spatula. It fits perfectly into the tight crevices and doesn't scratch the radio. Looks like this.
Now for the radio button lights, you will need to order them from http://www.mcmelectronics.com/ The part number is 25-995. Each one costs only $0.41, so I suggest that you replace all of them at once. You need 12, but I recommend buying a little more in case you mess up. I bought about 20, just to be safe.
They're not a perfect match in terms of dimensions, but they fit just fine. The original bulb is a little bit shorter. Here's a good side by side comparison. (the old is on the right).
Now for the repair.
Tools Used:
Step 1: Remove the circuit board from the radio.
Step 2: Unsolder each little light bulb with their plastic holders.
The green caps will be transferred to the new bulbs, later in the process.
You will end up with something like this. I used some tape to hold the volume control **** from flapping around.
Old bulbs. 11 out of 12 (I did one as a test run, before doing all the other ones)
Step 3: Remove the old bulbs from the plastic holders
Step 4: Insert the new bulbs into place and bend the leads.
Don't they just look so happy?
Step 5: Trim the ends to size and bend them into place, just like the factory bulbs.
Having something sharp, like a box cutter, helps tuck the wires into place.
Bulbs are ready to go back
Step 6: Resolder the new bulbs back onto the circuit board.
Add some extra solder if you feel like the bulb is not sturdy enough.
Step 7: Replace the green caps
They won't be as flush as the original, but should still hold.
They make me think of PacMan
The Results:
Before
After (the LCD back light broke when I replaced the climate control bulbs)
*See post #12 for the LCD repair procedure
Hope this helps anyone in need.
Let me know if you have any questions, I will be happy to answer them.
p.s.: Thanks to sphillips for providing me with the information on where to get the replacement bulbs.
Last edited by Hayk; 10-19-17 at 11:40 AM.

The following users liked this post:
wmj259 (09-07-18)
05-08-12, 06:56 PM
#2
nice write up with pics...few qs :
1) in the last picture how come the LCD is not lit up even when all the radio control lights are lit up.
2) why didnt u try a different colour. OR gone with LEDs
3) for the climate control lights do u know the size of the bulbs across @ the base..
4) so the green cap comes off? even for climate control lights?
Last edited by imherenow; 05-08-12 at 07:00 PM.
05-08-12, 07:58 PM
#3
nice write up with pics...few qs :
1) in the last picture how come the LCD is not lit up even when all the radio control lights are lit up.
2) why didnt u try a different colour. OR gone with LEDs
3) for the climate control lights do u know the size of the bulbs across @ the base..
4) so the green cap comes off? even for climate control lights?
1) in the last picture how come the LCD is not lit up even when all the radio control lights are lit up.
2) why didnt u try a different colour. OR gone with LEDs
3) for the climate control lights do u know the size of the bulbs across @ the base..
4) so the green cap comes off? even for climate control lights?
1. The Radio LCD is powered by two light bulbs. They are slightly larger than the ones for the buttons. When I was replacing the climate control bulbs, at another time, something must have happened and the LCD bulb burnt out. (It was actually just one that failed, because the other one was bad from the start).
2. My plan is to keep the car looking factory, so I stayed with the original color. I have very little experience with electronics, so dealing with LEDs was out of the question. Plus this seemed like a much simpler solution.
3. I do not know the size, but I can give you the part numbers. The climate control has 4 Brown Bulbs for the buttons and 2 Black Bulbs for the LCD, like this:

Part Numbers:
Brown Bulb 90010-03001 (MSRP $2.78)
Black Bulb 90010-03002 (MSRP $3.08)
If you need more information, visit this thread. (I referenced it in my original post)
https://www.clublexus.com/forums/es3...t-problem.html
4. The green cap can only be removed from the radio bulbs. The climate control bulbs come with the green caps from the dealer, so there is no need to transfer the old ones to the new ones.
Last edited by Hayk; 05-08-12 at 08:01 PM.


Trending Topics
05-09-12, 06:56 PM
#8
Since we are on the subject, I figured I should add that the Radio LCD screen can be bought from Pioneer for $109, which would repair the broken back lighting. I am too cheap for that, and will hold off until i can find the right bulb to solder into place.
For anyone interested, the website is http://parts.pioneerelectronics.com and the LCD part number is CWM4319 (it is currently out of stock until June 16th, 2012).
You can also purchase the whole circuit board with new light bulbs from the same website. The part number for the circuit board is CWM4320 (the website just went offline, so I can't confirm if it's available)
05-09-12, 10:32 PM
#9
Rookie
Join Date: Jan 2011
Location: Sol 3
Posts: 66
Likes: 0
Received 0 Likes
on
0 Posts
 05-10-12, 06:39 PM
#10
Driver

Join Date: Dec 2007
Location: CA
Posts: 170
Likes: 0
Received 0 Likes
on
0 Posts
I think that I might buy it, the website says it is only $74.
05-11-12, 10:16 AM
#11
Not hard at all. I consider the hardest part is getting the radio out of the car. Especially removing the vents and the bottom trim piece that's next to the ash tray. Once you unhook the electrical connectors, it's smooth sailing from then on.
09-15-12, 10:30 PM
#12
I figured out how to repair my broken radio LCD lighting.
I won't get too detailed into the procedure, since it's very similar to fixing the buttons. You have to unsolder the bulbs, pull them out of the board and replace with new ones. The green rubber hat is reusable.
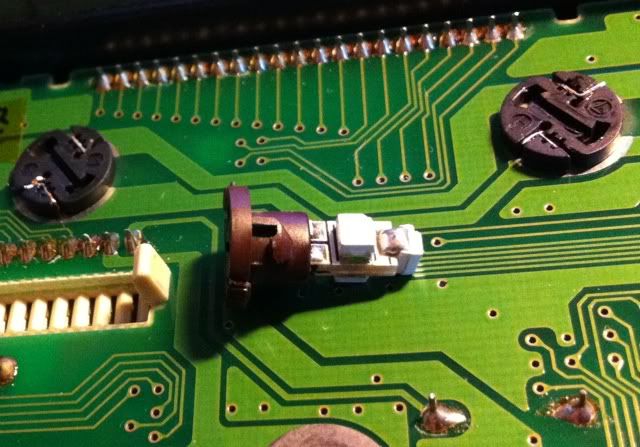
Retrofit: Black Bulb 90010-03002 (MSRP $3.08) - used for lighting the climate control LCD
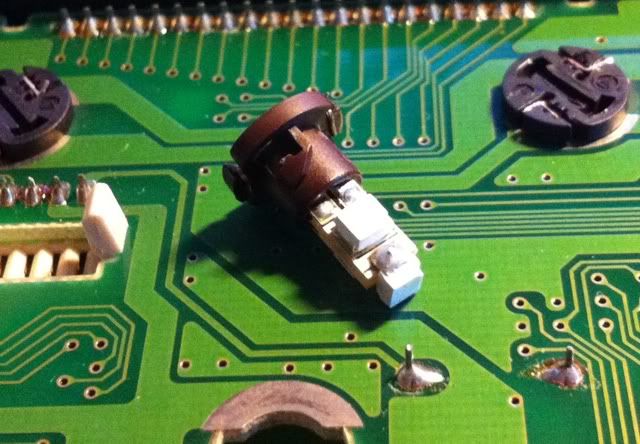
New bulb is on the left. You have to remove it from the plastic socket.

Soldered into place


Result - the light output is a little dimmer than stock. If anyone has a better solution, let me know.
Total cost: ~$10 (without tools)
I won't get too detailed into the procedure, since it's very similar to fixing the buttons. You have to unsolder the bulbs, pull them out of the board and replace with new ones. The green rubber hat is reusable.
Retrofit: Black Bulb 90010-03002 (MSRP $3.08) - used for lighting the climate control LCD
New bulb is on the left. You have to remove it from the plastic socket.
Soldered into place
Result - the light output is a little dimmer than stock. If anyone has a better solution, let me know.
Total cost: ~$10 (without tools)
11-16-12, 09:05 AM
#13
Driver School Candidate

Join Date: Nov 2012
Posts: 8
Likes: 0
Received 0 Likes
on
0 Posts
I want to change the lights to blue. I'm all set with the procedure (your post was a miracle to me thank you), but could you do me a huge favor and give me a link to the right bulbs to use that are blue? Thank you!
11-16-12, 09:20 AM
#14
Driver School Candidate
Join Date: Nov 2012
Posts: 8
Likes: 0
Received 0 Likes
on
0 Posts