ES300 P0135 O2 Oxygen Air/Fuel Ratio Sensor
 09-12-08, 09:09 AM
#16
Rookie

Join Date: Mar 2005
Location: CT
Posts: 50
Likes: 0
Received 0 Likes
on
0 Posts
hey guys i recently had a P0135 trouble code come out..so i bought a new O2 sensor (bank 1 sensor 1) from an autoshop and installed it. i had the check engine light cleared at Autozone, and all seemed fine for the first week. Then today, i turned on my engine and the check engine light turned on again. I checked the code and it was P0135 again! What do you suppose the problem could be? I'm pretty sure I installed the new O2 sensor properly. Is there a possibility that the same trouble code appeared (P0135) when the problem is coming from somewhere else?
 05-21-09, 04:41 PM
#17
Driver School Candidate

Join Date: May 2009
Location: mi
Posts: 2
Likes: 0
Received 0 Likes
on
0 Posts
hi, i have a 1994 es300 i had my engine light turn on so i had it checked out it was the o2 sensor in the front on the manifold bank1 sensor 1, so i changed it. it was the one on the manifold right when you open the hood well 2days later the engine light came back on so i got it check they said it was the p0135 o2 bank 1 sensor 1. so i called the dealer to make sure which one that is cause there is one b/w the engine and the firewall. so i asked the service guy where is bank 1 sensor 1 located he said its right on the manifold b/w the radiator and engine. so i was reading what you guys have posted and you guys said that sensor 1 is b/w the engine and the firewall. so im confused, did i change the wrong one or what.what should i do cause my engine light came back on. should i just go ahead and change the other one???
05-21-09, 04:54 PM
#18
Lead Lap

Join Date: Apr 2008
Location: tx
Posts: 745
Likes: 0
Received 0 Likes
on
0 Posts
hi, i have a 1994 es300 i had my engine light turn on so i had it checked out it was the o2 sensor in the front on the manifold bank1 sensor 1, so i changed it. it was the one on the manifold right when you open the hood well 2days later the engine light came back on so i got it check they said it was the p0135 o2 bank 1 sensor 1. so i called the dealer to make sure which one that is cause there is one b/w the engine and the firewall. so i asked the service guy where is bank 1 sensor 1 located he said its right on the manifold b/w the radiator and engine. so i was reading what you guys have posted and you guys said that sensor 1 is b/w the engine and the firewall. so im confused, did i change the wrong one or what.what should i do cause my engine light came back on. should i just go ahead and change the other one???
05-25-09, 12:48 PM
#19
Driver School Candidate

Join Date: Aug 2008
Location: Calif
Posts: 29
Likes: 0
Received 0 Likes
on
0 Posts
97 oxygen sensor
--------------------------------------------------------------------------------
I bought a new sensor, put it in the front and found out i should have changed the back one. I got a bank 1 sensor 1. So I took the original one I took out of the front and put it in the back.
I still get the check engine light. I disconected the battery, the I took out the EFI fuse. Both times the check engine light went out. It's when i went to restart it the check engine light came back on.
Do I need to buy a new sensor for the back? The old one worked on the front.
Help?????????
08-22-09, 08:29 PM
#20
the same thing just happened to me! Autozone told me wrong!! are the oxygen sensors for bank 1 and bank 2 the same? Do i need a different part? thanks guys.
BTW i got bank 1 sensor 1 code so that definitely is not the one between the engine a radiator?
BTW i got bank 1 sensor 1 code so that definitely is not the one between the engine a radiator?
08-23-09, 05:19 AM
#21
Lead Lap
Join Date: Apr 2008
Location: tx
Posts: 745
Likes: 0
Received 0 Likes
on
0 Posts
Generally bank 1 & 2 use the same sensors, since you do not give any indication of what your car is,,,,,,,
Bank 1 is always the bank where cylinder #1 is located, this is dictated by federal regulations. Bank 1 is near the firewall,
Bank 1 is always the bank where cylinder #1 is located, this is dictated by federal regulations. Bank 1 is near the firewall,
08-24-09, 01:37 PM
#22
cool sorry i forgot to put more info! i looked at them and replaced the rear. same part#. i'm glad they are the same. check engine light no longer on!
its a 94 es300 with 198k. just bought it for $1400
its a 94 es300 with 198k. just bought it for $1400
Last edited by omarg; 08-24-09 at 01:40 PM.
08-01-10, 05:45 AM
#23
Driver School Candidate

Join Date: Feb 2010
Location: VA
Posts: 24
Likes: 0
Received 0 Likes
on
0 Posts
A couple of weeks ago, the check engine light lit up on a 1997 ES300 that we own. I thought to myself, here is an opportunity to learn something new perhaps. I’ve always enjoyed working on our cars and try to do most of the maintenance and repair myself. So, I was more than eager to tackle this problem.
Getting the error code…
A couple of days later, I took the car to AutoZone and they read the error code for me free of charge. They do this as a courtesy and betting that once you know the cause you may buy any malfunctioning sensors from them. So, even though I wasn’t sure if I wanted to try to fix it myself, I figured if I knew what the problem was then I would know what to expect when I took my car to the shop.
Anyway, the error code was P0135 indicating that the heated oxygen sensor 1 on bank 1 was not functioning properly. After reading the code, the guy at AutoZone offered to show me exactly where the sensor was and I accepted his offer. So we popped up the hood and he said “That’s it! Right there!” pointing to the O2 sensor on the exhaust manifold between the radiator and the engine. (You’ll see later that the sensor he showed me was for bank 2 and not bank 1.) After we walked back into the store to print out the error code, he also looked up the price on the O2 sensor and it was around $118 for a Bosch sensor. I thought to myself, that sounds reasonable, but I wasn’t ready to buy the part yet. I thanked him for his help and drove back home to do my research.
O2 Sensor vs Air/Fuel Ratio sensor...
As far as I know only the California models use the Air/Fuel Ratio sensor. No, the O2 sensor is not the same as the Air/Fuel Ratio sensor. The O2 sensor provides a simple too lean or too rich information to the ECM. It acts like a switch it either swings the lean or the rich way and operates in a narrow range. The boundary between the lean and rich condition represents the ideal air/fuel ratio of 14.7:1. The ECM therefore constantly adjusts the air/fuel ratio by a very small amount back and forth to stay at this ideal boundary. The air/fuel ratio sensor on the other hand operates over a wider range and provides a more accurate near linear voltage representing the amount of oxygen in the exhaust. Therefore, with an Air/Fuel Ratio sensor the ECM is able to more precisely control the air/fuel ratio. Also, the Air/Fuel ratio sensors operate at a higher temperature around 1200F (650C), whereas the O2 sensors operate around 750F (400C). And, yes the Air/fuel ratio sensors do cost more, roughtly about 40% to 50% more.
Locating the O2 sensors…
After doing a little search on this site, I found out that my 1997 ES300 has three O2 sensors, sensor 1 bank 1 is located right after the exhaust manifold close to the firewall, sensor 1 bank 2 is right after the exhaust manifold by the radiator, and finally the downstream O2 sensor is located on the exhaust pipe after the catalytic converter underneath and toward the center of the car. Sensor 1 bank 1 is the hardest to find and get access to, but with a shop light and a little persistence I was able to find it. There is really no easy way to get to it though because it’s sort of sandwiched deep down below, between the firewall and the back side of the engine. But, I will tell you later how I got to it.
Buying the O2 sensors…
I know that everybody has his or her opinion on this, but I like to buy factory and OEM parts for most repairs, unless it’s an expensive part and the price differential between the OEM and the after market part is too much. Fortunately, with a little bit of online search I was able to find the O2 sensor (part number 89465-33180 superseded by 89465-06100) from an out of state Lexus dealer for about the same price (whole sale price) as what AutoZone wanted for their Bosch part. The catch was that I had to order the part online from their site to get that price. This was hard to believe! The OEM Lexus part cost the same as the Bosch part from AutoZone? My local dealer had quoted me close to twice that price on the phone. I knew that I had struck gold. At that price, I went ahead and ordered two of them. I figured at 120K miles, the other sensor is probably on its last leg out anyway. Now, when I ordered the part form Lexus, I had to specify whether I wanted the front or rear sensor. The front (upstream) sensor is the one used for sensor 1 on bank 1 and bank2. The rear sensor (89465-06020) is the downstream sensor after the catalytic converter, which I elected to not replace.
Replacing the O2 sensors…
OK, now I have the parts but will I be able to finish the job. Truthfully, before I ordered the parts, I spent about an hour locating the sensors on the engine and deciding how I could get to them. The O2 sensor on the exhaust manifold of bank 2 is by the radiator, sticks out like a sore thumb, and is pretty easy to get to. The bank 1 O2 sensor is however a totally different story. After a long few minutes of looking around with the shop light I spotted the sensor on bank 1, but I could see that there was no way I could get to it from the top of the engine without removing the intake manifold. So I put the car on ramps and got under the car to take a look. Again, I was able to see it from underneath the car but I was having trouble getting my hand through the cracks between the parts and reach it. After laying on my back under the car for a while and wondering why in the heck I am doing this, suddenly I saw a way from behind the suspension cross member that I thought I could drop a socket on the sensor. Well I thought I’m half way there, but the sensor connector was another 10 inches or so higher on the side of the engine and I could not get my hand or fingers through to reach it. There were two problems. First I had to unlatch the tab on the side of the old connector and disconnect it. Second, I had to be able to insert the connector of the new sensor into its place. After scratching my head for a while (kind of tough to do while you’re under the car on your back), I thought I could perhaps use a long flat head screw driver with a narrow blade to undo the latch with one hand and then tug on the wires with the fingers on my other hand to pull the connector out. Well, why not. I thought it would work. Now, I needed a way to be able to lift the connector of the new sensor and to guide it into the mating connector on the side of the engine. For this I needed to build an SST (Special Service Tool). While looking around the garage, I found a spiral looking wire in the trash can which had a glass butterfly on it. I think it was something that you stick in a plant pot. My wife had thrown it away and it seemed to be just what I needed for my SST. I was thinking about using a wire hanger but I could not find one around the house (all the ones we had were plastic), and this thing whatever it was seemed to be perfect for the job. So using pliers I formed the end of the wire into a three-sided square (is that possible?), leaving one side open to get the square around the neck of the connector. I made it just the right size so that I could easily get it around the lower and smaller part of the connector. Now, I could use this to lift the connector and place it in position but my SST wire would be too flimsy to push the connector in. This wasn’t too big of a deal because once the connector was in place I could then use a long screw driver to push the connector in.
The tools for the job…
Here are some pictures of the tools that I used.
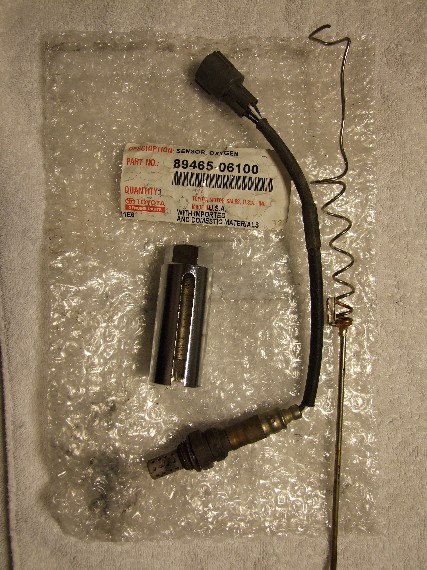
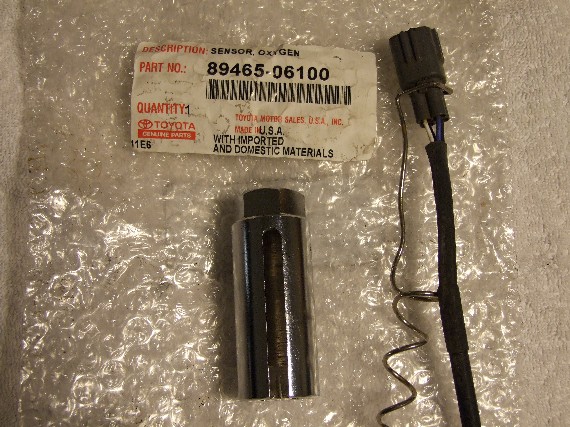
I got the O2 sensor socket from AutoZone. It’s a special deep socket with a slit (opening) on the side. The wire at the end of the sensor can be bent down gently and routed through this slit so that it doesn’t get crushed by the end of the socket. I could have bought this socket for around $11, but I got it from AutoZone on a loaner basis. I could return it when I was done for a full return of my deposit. However, I think that I am going to just keep it.
Replacing the O2 sensors…
First of all, I disconnected the negative cable from the battery and tucked it away. I’ve read that if you don’t, there is a remote possibility that the airbags could get deployed while you are working on the car. This could result in possible injuries and at the very least would cost a lot of money to fix. I replaced the sensor on bank 2 first, since it was the easier one to get to. It didn’t take much force to loosen the sensor. However, after about half a turn, the sensor would not turn any more no matter how much force I applied. It seemed as if there was some dirt or shavings in between the threads. I could see that the sensor was kind of loose but it didn’t want to turn any more. I sprayed some WD40 on it and kind of moved it back and forth with my hand without using any tools. Eventually, it started turning easily and came right out. Installing the new sensor was a breeze. The new sensors come with anti-seize compound already applied to the threads. But, I went ahead and rubbed a thin layer on just to be sure. I was careful to not use too much and not to get any on the sensors. I had bought the silver looking anti seize compound from an auto store a while back for a brake job. It’s pretty cheap and you can almost buy it from any auto store. The sensor on bank 1 turned loose easily and came right out without any problem. I was able to install the new sensor relatively easily as I described earlier using the SSTs I put together. I would say once I had the parts and the SSTs made the entire operation took around 30 minutes.
Conclusion…
I must say that I felt pretty good about the whole thing. All seems to be well and the check engine light has stayed off. What is the next project? Well…I need to do some work on the front spring/shock assembly. There is some thumping and rattling going on while driving over bumps, even little bumps, or just turning the wheels.
Until then...
Kauz
Getting the error code…
A couple of days later, I took the car to AutoZone and they read the error code for me free of charge. They do this as a courtesy and betting that once you know the cause you may buy any malfunctioning sensors from them. So, even though I wasn’t sure if I wanted to try to fix it myself, I figured if I knew what the problem was then I would know what to expect when I took my car to the shop.
Anyway, the error code was P0135 indicating that the heated oxygen sensor 1 on bank 1 was not functioning properly. After reading the code, the guy at AutoZone offered to show me exactly where the sensor was and I accepted his offer. So we popped up the hood and he said “That’s it! Right there!” pointing to the O2 sensor on the exhaust manifold between the radiator and the engine. (You’ll see later that the sensor he showed me was for bank 2 and not bank 1.) After we walked back into the store to print out the error code, he also looked up the price on the O2 sensor and it was around $118 for a Bosch sensor. I thought to myself, that sounds reasonable, but I wasn’t ready to buy the part yet. I thanked him for his help and drove back home to do my research.
O2 Sensor vs Air/Fuel Ratio sensor...
As far as I know only the California models use the Air/Fuel Ratio sensor. No, the O2 sensor is not the same as the Air/Fuel Ratio sensor. The O2 sensor provides a simple too lean or too rich information to the ECM. It acts like a switch it either swings the lean or the rich way and operates in a narrow range. The boundary between the lean and rich condition represents the ideal air/fuel ratio of 14.7:1. The ECM therefore constantly adjusts the air/fuel ratio by a very small amount back and forth to stay at this ideal boundary. The air/fuel ratio sensor on the other hand operates over a wider range and provides a more accurate near linear voltage representing the amount of oxygen in the exhaust. Therefore, with an Air/Fuel Ratio sensor the ECM is able to more precisely control the air/fuel ratio. Also, the Air/Fuel ratio sensors operate at a higher temperature around 1200F (650C), whereas the O2 sensors operate around 750F (400C). And, yes the Air/fuel ratio sensors do cost more, roughtly about 40% to 50% more.
Locating the O2 sensors…
After doing a little search on this site, I found out that my 1997 ES300 has three O2 sensors, sensor 1 bank 1 is located right after the exhaust manifold close to the firewall, sensor 1 bank 2 is right after the exhaust manifold by the radiator, and finally the downstream O2 sensor is located on the exhaust pipe after the catalytic converter underneath and toward the center of the car. Sensor 1 bank 1 is the hardest to find and get access to, but with a shop light and a little persistence I was able to find it. There is really no easy way to get to it though because it’s sort of sandwiched deep down below, between the firewall and the back side of the engine. But, I will tell you later how I got to it.
Buying the O2 sensors…
I know that everybody has his or her opinion on this, but I like to buy factory and OEM parts for most repairs, unless it’s an expensive part and the price differential between the OEM and the after market part is too much. Fortunately, with a little bit of online search I was able to find the O2 sensor (part number 89465-33180 superseded by 89465-06100) from an out of state Lexus dealer for about the same price (whole sale price) as what AutoZone wanted for their Bosch part. The catch was that I had to order the part online from their site to get that price. This was hard to believe! The OEM Lexus part cost the same as the Bosch part from AutoZone? My local dealer had quoted me close to twice that price on the phone. I knew that I had struck gold. At that price, I went ahead and ordered two of them. I figured at 120K miles, the other sensor is probably on its last leg out anyway. Now, when I ordered the part form Lexus, I had to specify whether I wanted the front or rear sensor. The front (upstream) sensor is the one used for sensor 1 on bank 1 and bank2. The rear sensor (89465-06020) is the downstream sensor after the catalytic converter, which I elected to not replace.
Replacing the O2 sensors…
OK, now I have the parts but will I be able to finish the job. Truthfully, before I ordered the parts, I spent about an hour locating the sensors on the engine and deciding how I could get to them. The O2 sensor on the exhaust manifold of bank 2 is by the radiator, sticks out like a sore thumb, and is pretty easy to get to. The bank 1 O2 sensor is however a totally different story. After a long few minutes of looking around with the shop light I spotted the sensor on bank 1, but I could see that there was no way I could get to it from the top of the engine without removing the intake manifold. So I put the car on ramps and got under the car to take a look. Again, I was able to see it from underneath the car but I was having trouble getting my hand through the cracks between the parts and reach it. After laying on my back under the car for a while and wondering why in the heck I am doing this, suddenly I saw a way from behind the suspension cross member that I thought I could drop a socket on the sensor. Well I thought I’m half way there, but the sensor connector was another 10 inches or so higher on the side of the engine and I could not get my hand or fingers through to reach it. There were two problems. First I had to unlatch the tab on the side of the old connector and disconnect it. Second, I had to be able to insert the connector of the new sensor into its place. After scratching my head for a while (kind of tough to do while you’re under the car on your back), I thought I could perhaps use a long flat head screw driver with a narrow blade to undo the latch with one hand and then tug on the wires with the fingers on my other hand to pull the connector out. Well, why not. I thought it would work. Now, I needed a way to be able to lift the connector of the new sensor and to guide it into the mating connector on the side of the engine. For this I needed to build an SST (Special Service Tool). While looking around the garage, I found a spiral looking wire in the trash can which had a glass butterfly on it. I think it was something that you stick in a plant pot. My wife had thrown it away and it seemed to be just what I needed for my SST. I was thinking about using a wire hanger but I could not find one around the house (all the ones we had were plastic), and this thing whatever it was seemed to be perfect for the job. So using pliers I formed the end of the wire into a three-sided square (is that possible?), leaving one side open to get the square around the neck of the connector. I made it just the right size so that I could easily get it around the lower and smaller part of the connector. Now, I could use this to lift the connector and place it in position but my SST wire would be too flimsy to push the connector in. This wasn’t too big of a deal because once the connector was in place I could then use a long screw driver to push the connector in.
The tools for the job…
Here are some pictures of the tools that I used.
I got the O2 sensor socket from AutoZone. It’s a special deep socket with a slit (opening) on the side. The wire at the end of the sensor can be bent down gently and routed through this slit so that it doesn’t get crushed by the end of the socket. I could have bought this socket for around $11, but I got it from AutoZone on a loaner basis. I could return it when I was done for a full return of my deposit. However, I think that I am going to just keep it.
Replacing the O2 sensors…
First of all, I disconnected the negative cable from the battery and tucked it away. I’ve read that if you don’t, there is a remote possibility that the airbags could get deployed while you are working on the car. This could result in possible injuries and at the very least would cost a lot of money to fix. I replaced the sensor on bank 2 first, since it was the easier one to get to. It didn’t take much force to loosen the sensor. However, after about half a turn, the sensor would not turn any more no matter how much force I applied. It seemed as if there was some dirt or shavings in between the threads. I could see that the sensor was kind of loose but it didn’t want to turn any more. I sprayed some WD40 on it and kind of moved it back and forth with my hand without using any tools. Eventually, it started turning easily and came right out. Installing the new sensor was a breeze. The new sensors come with anti-seize compound already applied to the threads. But, I went ahead and rubbed a thin layer on just to be sure. I was careful to not use too much and not to get any on the sensors. I had bought the silver looking anti seize compound from an auto store a while back for a brake job. It’s pretty cheap and you can almost buy it from any auto store. The sensor on bank 1 turned loose easily and came right out without any problem. I was able to install the new sensor relatively easily as I described earlier using the SSTs I put together. I would say once I had the parts and the SSTs made the entire operation took around 30 minutes.
Conclusion…
I must say that I felt pretty good about the whole thing. All seems to be well and the check engine light has stayed off. What is the next project? Well…I need to do some work on the front spring/shock assembly. There is some thumping and rattling going on while driving over bumps, even little bumps, or just turning the wheels.
Until then...
Kauz
Can Someone please help me! Im trying to order this online and I want the best price. Can I order this part from Amazon? It says something that I don't understand in the product description. It has my correct part number so I'm not sure! Can someone take a look??
http://www.amazon.com/gp/product/B00..._luc_sbs_01_01
11-30-14, 10:47 PM
#24
Driver School Candidate

Join Date: Nov 2014
Location: Texas
Posts: 1
Likes: 0
Received 0 Likes
on
0 Posts
Now I know how my friends must feel when Im "Story Painting"
 ......and secondly.....this was a very interesting story that I read completely.....and thirdly......I love to read about people who are persistent and thorough when doing a job that you just did. Congratulations!!
  12-08-14, 09:07 PM
#25

hey guys i recently had a P0135 trouble code come out..so i bought a new O2 sensor (bank 1 sensor 1) from an autoshop and installed it. i had the check engine light cleared at Autozone, and all seemed fine for the first week. Then today, i turned on my engine and the check engine light turned on again. I checked the code and it was P0135 again! What do you suppose the problem could be? I'm pretty sure I installed the new O2 sensor properly. Is there a possibility that the same trouble code appeared (P0135) when the problem is coming from somewhere else?
Also, if your car is california emissions, it needs A/F sensors? Otherwise, o2 sensors.
12-08-14, 09:10 PM
#26
LexusScorp,
The link you sent is not working. Go to denso website and you can find the correct part number for your car. Also, look under the hood to see if your car is california emissions or non-california. Different sensors for calif and non-calif.
The link you sent is not working. Go to denso website and you can find the correct part number for your car. Also, look under the hood to see if your car is california emissions or non-california. Different sensors for calif and non-calif.
12-11-14, 12:15 PM
#27
Driver School Candidate

Join Date: Feb 2008
Location: Il.
Posts: 22
Likes: 0
Received 0 Likes
on
0 Posts
I see u have a 99 rx300. I had one and as a result I still have a new denso ox sensor which I do not need. Will sell for 75.00 if someone wants it. Thanks, Zieke

Thread
Thread Starter
Forum
Replies
Last Post